Advertisement
Quick Links
Installation Guide –Genius 1021 Generator
Mains Cable – Euro
¼" Teflon Tube
Fountain Crescent
Inchinnan Business Park
Inchinnan, PA4 9RE
Scotland, UK
FITTINGS KIT
Mains Cable – UK
Mains Cable - US
x 6m
6mm Teflon Tube
T: +44 (0)141 812 8100
F: +44 (0)141 812 8200
E:
info@peakscientific.com
x 1
¼" Compression Fitting
x 1
6mm Push-fit Fitting
x 1
CD containing User Manual
x 6m
Part No.
IG-Genius1021
Rev.
00
W: www.peakscientific.com
Page
Page 1 of 8
x 1
8mm Hex Key
x 2
Silencer Fitting
x 2
x 3
x 1
x 2m
6mm Nylon Tube
Advertisement

Related Manuals for Peak Scientific Genius 1021


Summary of Contents for Peak Scientific Genius 1021
- Page 1 Installation Guide –Genius 1021 Generator FITTINGS KIT 8mm Hex Key Mains Cable – Euro Silencer Fitting ¼” Compression Fitting Mains Cable – UK 6mm Push-fit Fitting Mains Cable - US CD containing User Manual x 6m x 6m x 2m ¼”...
-
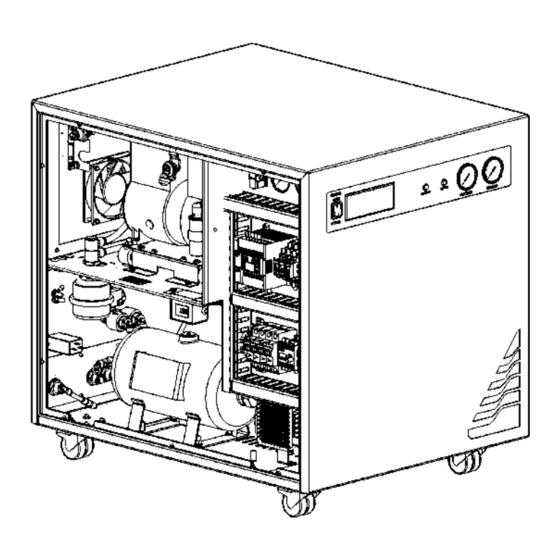
Page 2: Installation
INSTALLATION Unpack the generator from the An earth lead is connected Using the Hex-Key shipping crate and place on a flat to the inside of the panel. provided in the surface. To remove the transit This can be removed by fittings kit, turn the brackets, firstly remove the LH side pulling it off the spade... - Page 3 Remove the RH side panel as before, Repeat steps 4 and 5 to remove the RH transit taking care to remove the earth lead bracket located under the RH compressor. located on the inside of the door panel. This will pull out in the same way. **NOTE** Do not discard the transit brackets or screws as these will be needed again if the unit is to be transported from its current location.
- Page 4 If the displayed voltage is 219V or less* we would highly recommend fitting a transformer. This can be ordered directly from <= 219V Peak Scientific, Peak part number is... 06-3200 – Dual Tap Transformer 200V – 230V >= 194V Fountain Crescent T: +44 (0)141 812 8100 Part No.
- Page 5 Switch the generator power OFF at the switch Remove the mains cable completely from on the front panel. the power supply. Re-attach both the RH & LH side panels to the generator, taking care to ensure the earth Once the side panels are securely lead’s are reconnected correctly.
- Page 6 The ‘HEATING’ & ‘COOLING’ pressure gauges on the front of the generator will After 30 minutes of running, the generator gradually increase from 0 to 30psi, & 20psi can be turned off. Allow the stored gas in respectively as the pressure in the internal the internal tanks to dissipate.
- Page 7 CD supplied in the fittings kit. Please keep this for future reference. It is very important to register your generator with PEAK SCIENTIFIC. This will initiate your warranty entitlement. Please use the form on the next page to register your generator.
- Page 8 You have 1 month to register your Peak Scientific product from the date of shipment. If you wish to defer installation of your generator you must notify Peak Scientific within 1 month of the shipment date. This can be done by emailing warranty@peakscientific.com...
Need help?
Do you have a question about the Genius 1021 and is the answer not in the manual?
Questions and answers