
Related Manuals for BRONKHORST mini CORI-FLOW M12V I Series


Summary of Contents for BRONKHORST mini CORI-FLOW M12V I Series
- Page 1 Quick Start Guide for mass flow meter & controller mini CORI-FLOW™ M12, M12Vxxl, M13, M13Vxxl M14, M14Vxxl, M15 IMPORTANT! Read carefully before use. Keep for future reference.
-
Page 2: Safety First
▶ If in any doubt: scan the QR code (Service & Support) on the Notices for the user back cover to get in contact with Bronkhorst. The product requires professional experience and knowledge of installation, operational requirements of the relevant industry, and ▶... -
Page 3: Process Fluid
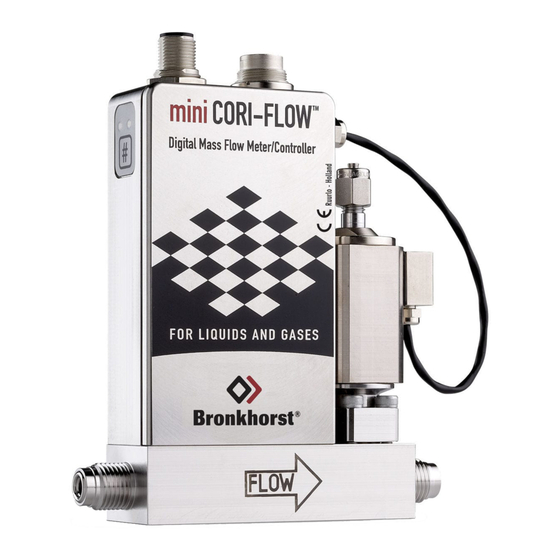
▶ If in any doubt: scan the QR code (Service & Support) on the in a non-critical process. It will guide the user in controlling and back cover to get in contact with Bronkhorst. monitoring research and pilot setups using Bronkhorst FlowSuite The user is responsible for taking the necessary safety measures software. - Page 4 FLOW mini CORI-FLOW™ M12 ... M14 1. Dampener 5. Switch/Push button 9. Purge adapter (MxxV14l) 2. Mass block 6. Status LEDs 10. Control valve 3. Fluid inlet 7. Connector (optional) 11. Fluid outlet 4. Serial number label 8. Connector 12. Wall mounting hole...
- Page 5 FLOW mini CORI-FLOW™ M15 1. Fluid inlet 5. Connector 9. Fluid outlet 2. Serial number label 6. Status LEDs 3. Transport bolt 7. Switch/Push button 4. Connector (optional) 8. Transport bolt...
-
Page 6: Before Installation
5. Custom* ▶ Scan the QR code (Service & Support) on the back cover. 6. RX-RS232/BUS ▶ Go to the Bronkhorst website and select your operating 7. +Us (15 ... 24 Vdc) system to download Bronkhorst FlowSuite. For download 8. 0 V sense information, see the back cover of this manual. -
Page 7: Mounting Location
Mounting location ▶ M15: Remove transport bolts according to the instructions supplied with the product. To ensure reliable measurements, it is important to choose a correct mounting location. Observe the following guidelines: ▶ Install the product on a flat, rigid, and clean surface [1]. ▶... - Page 8 Mounting position For gas applications: If there is a chance of condensation or if the gas stream can contain solid particles, mounting the product at the lowest point of a pipe segment [4] is therefore not advisable. ▶ Mount the product in a location where condensate or particles cannot accumulate inside the product [1,2,3,5].
-
Page 9: Electrical Connection
Fluid line connection Electrical connection For basic setup, it is recommended to use Bronkhorst® CAUTION accessories (not included) as described in this manual. Risk of personal injury due to fluid leakage! ▶ Connect the product to the PC by using a T-part 8DIN/SubD-9 Unsuitable piping material and loose connectors can cable and USB converter. -
Page 10: Adjusting Zero Point
Adding the product to Bronkhorst FlowSuite When Bronkhorst FlowSuite is started, the software will automatically search for connected instruments. All found instruments are displayed in the left pane. ▶ Use the refresh option to check for newly connected products. If the product is not found, it may not be set to serial RS-232. - Page 11 Product status in Bronkhorst FlowSuite If a connection between the product and Bronkhorst FlowSuite In Bronkhorst FlowSuite, an icon is displayed next to the product cannot be established, the switch/push button can be used to in the left pane. The icon indicates the status of the product. When...
-
Page 12: Maintenance
Maintenance Technical specifications Although no routine maintenance is required, to ensure that the Description Unit Value product works correctly and safely, a regular (visual) inspection is Maximum fluid pressure bar(g) See serial number recommended. label Check prior to each use Permissible fluid temp. -
Page 13: Service And Support
(WEEE). Bronkhorst representative. Bronkhorst will take care of proper dismantling, recycling ▶ To help you quickly, make sure you have the serial number of and/or reuse. By ensuring this product is disposed of the product at hand. -
Page 14: Declaration Of Conformity
The full text of the applicable declarations of conformity are available at the following web address: https://www.bronkhorst.com/downloads. © 2024 Bronkhorst High-Tech B.V. - All rights reserved Bronkhorst® is a registered trademark. All trademarks are the property of their respective owners. - Page 16 Bronkhorst High-Tech B.V. +31 573 45 88 00 Nijverheidsstraat 1a info@bronkhorst.com NL-7261 AK Ruurlo, The Netherlands www.bronkhorst.com Service & Support Bronkhorst FlowSuite Product Info 9.17.179B • 2024-02...
Need help?
Do you have a question about the mini CORI-FLOW M12V I Series and is the answer not in the manual?
Questions and answers