
Related Manuals for AmScope DM650AM-HDM11


Summary of Contents for AmScope DM650AM-HDM11
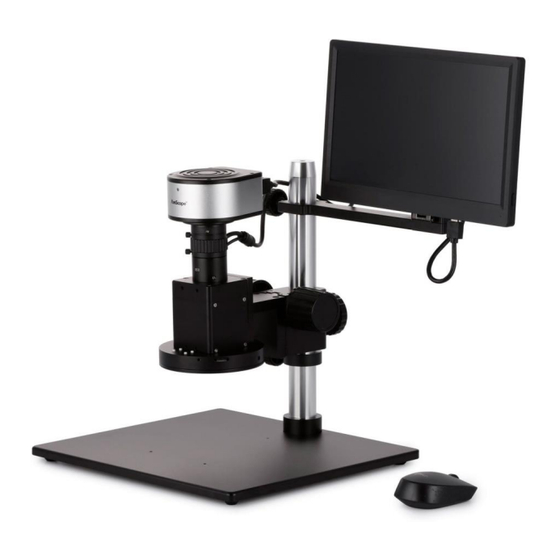
- Page 1 DM650AM-HDM11 0.6X-5X Motorized Auto Zoom Video Inspection Microscope w/11.6" HD monitor User Manual...
-
Page 2: Table Of Contents
Contents 1. Setup Guide ........................ 1 2. System function introduction..................1 2.1 Boot Screen....................1 2.2 Main Interface....................1 2.2.1 Lens focus ....................2 2.3 Auxiliary Tools....................2 2.3.1 Video switch ..................... 3 2.3.2 Take photo ....................3 2.3.4 Auto white balance (AWB) ................ 3 2.3.5 Auto exposure .................. -
Page 3: Setup Guide
1. Setup Guide Remove all components from the packaging. Most of the microscope has already been assembled, including the camera and table stand. Connect the camera and monitor with the HDMI cable. Connect the camera DC12V 1A power supply. ... -
Page 4: Lens Focus
settings - edit" (auxiliary tools cannot be edited). 2.2.1 Lens focus Adjust the on-screen zoom magnification to 5X. Move the coarse to adjust the head up and down, adjusting the working distance. Continue to adjust the working distance until the on-screen image is in focus. The working distance should be about 86mm. -
Page 5: Video Switch
2.3.1 Video switch Start preview Stop preview 2.3.2 Take Photos Click , The image will be saved to your external storage device in JPG format. Users can change the image name, storage path, and whether to save graphics or not. For storage and naming settings, refer to 2.3.6 settings –... -
Page 6: Setting
automatically adjust the exposure value in real time according to the ambient brightness change to make it conform to the optimal brightness setting. The best brightness value can be adjusted in "2.3.6 settings - Video Settings". Click again to turn off the auto exposure. 2.3.6 Settings... -
Page 7: Shooting Settings
2.3.6.1 Shooting Settings The default auto photo naming is Img_. The photo will be saved in /img/ folder of the USB drive. It is recommend users use a USB 3.0 USB drive formatted to FAT32. After the icon " " appears at the bottom, set it in “settings". -
Page 8: Zoom Rate Setting
2.3.6.3 Zoom Rate Settings Users can control the speed of auto-zoom magnification. 2.3.6.4 Measure Settings Edge: Associated with 2.4.5 measurement tool "automatic edge finding”. Turn on the automatic edge finding, the range value of the measurement point moving to the edge of the object. Line:Adjust the width and thickness of the measuring line. -
Page 9: Video Settings
2.3.6.5 Video Settings Manual Settings for the camera parameters such as light, RGB, saturation, contrast etc. Image orientation can be flipped horizontally and vertically. BW: for color image or black and white image. Lock: Click lock then enter the password to lock the parameter setting. (Default password is blank), users can modify the password. -
Page 10: Restore
2.3.6.6 Restore Restore factory settings. 2.3.6.7 Language Users can choose between 中(简) 、English、and 中(繁). 2.3.6.9 Edit (Measurement Tools & Graphics) - Page 11 The edit function allows users to change the main menu layout according to the user's needs. Measurement Tools:The left side Shows tools and the right side Hides tool. To move one to either side, select a tool and then click the center button to move it between Show and Hide.
-
Page 12: File Management
click "apply”. 2.3.7 File Management Click to open file management to browse the saved images, videos, DXF, templates, and other files. Right click any file: Users can delete, compare, copy, cut and rename any files. Right click the blank space to create a new folder. -
Page 13: Measuring Data
2.3.8 Measure Data This table shows the details of all recorded measurement data. By clicking on any data row, the corresponding elements in the video area will be highlighted in yellow. Data can be modified by double clicking the mouse. Right click on a measurement element, and that element information will move to the information bar below. -
Page 14: Measure Tools
2.4 Measure Tools 2.4.1 Measurement Operation Instructions After selecting measure tool, the mouse changes to crosshairs and enters the drawing state. Use the left mouse button to draw Right click to exit draw mode. In the process of drawing, right-click to cancel the current drawing. In the non-drawing mode, right-click the mouse to select an element (except for the key points) and change to . -
Page 15: Text
can be quickly double-clicked and right-clicked to delete. 2.4.3 Text Click icon, left click and drag the mouse at the position to be annotated on the screen. An arrow will appear, click the second time to confirm the position of the arrow and pop-up the annotation window (the color of the arrow and annotation text changes with the “settings >... -
Page 16: Delete
measurement accuracy. 2.4.6 Delete Click " " to pop-up the delete element dialog box, indicating whether to delete all element information. After clicking the "delete", all measure elements will be deleted (without any modification to the template). Lines User can add 100 horizontal and 100 vertical scale marks. Line adjustment method: Add a horizontal and vertical scale by clicking "+"... -
Page 17: Cruise Setting
the mouse will turn to then users can move the scale line position. 7. When we have added the number of scale line, if you want to add scale line again, just click the "+" to increase the number, and click "OK". Then the added scale line will be displayed in the video box. -
Page 18: Magnification Show
2.8 Magnification Visual Real time display of the optical magnification and total magnification. (Associated with 2.8 zoom magnification and 2.3.6.5 video setting > Lens settings) 2.9 Logo The logo icon can be displayed or hidden through “Settings > Edit" refer to 2.3.6.
Need help?
Do you have a question about the DM650AM-HDM11 and is the answer not in the manual?
Questions and answers