Table of Contents
Advertisement
Advertisement
Table of Contents
Troubleshooting

Related Manuals for Xerox DocuMate 3115


Summary of Contents for Xerox DocuMate 3115
- Page 1 One Touch 4.5 April 2010 05-0796-000 DocuMate 3115 User’s Guide...
- Page 2 Design © 2010 Xerox Corporation. All rights reserved. Xerox®, and the sphere of connectivity design are trademarks of Xerox Corporation in the United States and/or other countries. Content © 2010 Visioneer, Inc. All rights reserved. The Visioneer brand name and logo are registered trademarks of Visioneer, Inc.
-
Page 4: Table Of Contents
Detach the Scanner Body from the Docking Station ....... . . - Page 5 Cleaning the Scanner Body ........
- Page 6 The DocuMate 3115 Scanner Specifications ........
- Page 7 DocuMate 3115 User’s Guide...
- Page 8 • The DocuMate 3115 Scanner Congratulations on purchasing your Xerox DocuMate 3115. With this scanner you can quickly scan stacks of single-sided or double-sided pages and place their electronic images on your computer. on page x DocuMate 3115...
-
Page 9: Welcome
Before starting the software installation, please check the contents of the box to make sure that all parts are included. If any items are missing or damaged, contact the dealer where you purchased the scanner. DocuMate 3115 Scanner USB Cable USB Power Cord DocuMate 3115 User’s Guide... -
Page 10: Provided Documentation
The following documentation is provided with your scanner: • Quick Install Guide—Abbreviated installation instructions. • Scanner User’s Guide—On the Installation Disc; contains detailed installation, scanning, configuration, and maintenance information. • Readme—Contains the latest information about your scanner and software installation. -
Page 11: System Requirements
Windows 2000 (Service Pack 4), 32-bit Windows XP (Service Pack 2), 32-bit or 64-bit Windows Vista, and 32-bit or 64-bit Windows 7 The scanner is compatible with Service Pack 3 for Windows XP and Service Pack 1 for Windows Vista. -
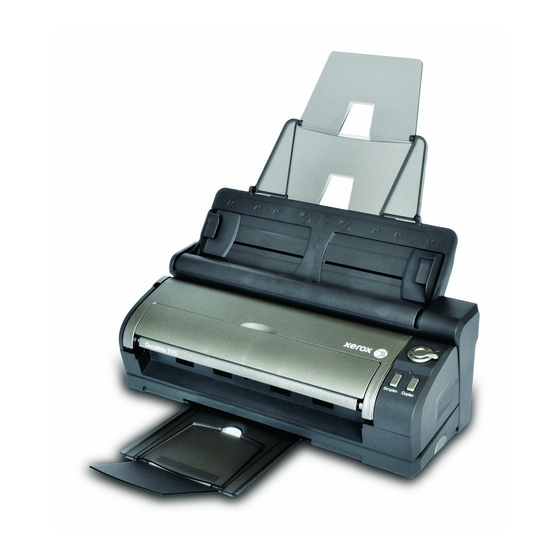
Page 12: The Documate 3115 Scanner
Output tray—Holds documents after being scanned. Control panel—One Touch scanning controls. Power Switch & Scan Settings Dial—Turn the dial to the right to turn on the scanner power. Numbers 1-6 represent the 6 One Touch scan settings. Status Light—Shows the scanner’s current status. - Page 13 Welcome DocuMate 3115 User’s Guide...
-
Page 14: Scanner Setup
Scanner Setup This chapter includes: • Unpack and Assemble the Scanner • Connect the Scanner Power Cord • Detach or Attach the DocuMate 3115 on page 2 on page 4 on page 6 DocuMate 3115 User’s Guide... -
Page 15: Unpack And Assemble The Scanner
Lift the paper guide up from the scanner body. Push the tray back until it clicks in place. If the tray isn’t fully seated in position, paper feeding from the input tray may jam in the scanner. Pull the scanner cover release to open the scanner. Remove the foam strip from the inside of the scanner. - Page 16 Place the scanner body back on the docking station. Detailed instructions for detaching and attaching the scanner are on page 6. Unfold the Input Tray and Extension from the paper guide. Pull the output tray away from the bottom of the Docking Station, then flip open the output tray extension.
-
Page 17: Connect The Scanner Power Cord
Connect the Scanner Power Cord You can power the scanner through the standard power cord to a wall outlet, or use the USB power cord to power the scanner through a USB port on the computer. Connect the Scanner Power to the Wall Plug the power supply into the power port on the scanner. -
Page 18: Connect The Scanner Power To The Computer
Only use the USB power cable included with your scanner. Connecting any other type of USB NOTE: power cable may damage your scanner, and will void its warranty. If you do not have your USB power cable, you can order a new one by contacting our Customer Service department. Please refer to the Technical Support Card, included with your scanner, for our company contact information, or visit the Parts &... -
Page 19: Detach Or Attach The Documate 3115
Detach or Attach the DocuMate 3115 The DocuMate 3115 scanner body can be removed from the Docking Station to be used as a mobile scanner. Detach the Scanner Body from the Docking Station Press and hold the release button on the side of the Docking Station. -
Page 20: Attach The Scanner Body To The Docking Station
Attach the Scanner Body to the Docking Station Place the front of the scanner body in the front of the Docking Station. Tilt the scanner body into the Docking Station and press on the back of the scanner to lock it into the Docking Station. - Page 21 DocuMate 3115 User’s Guide...
-
Page 22: Installation
10 • Install the Software and Connect the Scanner • Register Your Scanner on page 20 • Installing Additional Applications • View the User Guides on page 22 on page 11 on page 21 DocuMate 3115 User’s Guide... -
Page 23: Before You Begin
If you already have a scanner connected to your computer, it is recommended that you remove that scanner’s driver program prior to installing your Xerox scanner. You can remove these programs from the Windows Control Panel. Please refer to the user manual provided with your other scanner hardware for instructions about removing the driver and software for that unit. -
Page 24: Install The Software And Connect The Scanner
Install the Software and Connect the Scanner The installation disc contains the necessary driver, and scanning software, to use your Xerox DocuMate 3115. To install the software: Start Microsoft Windows and make sure that no other applications are running. Insert the installation disc into your computer’s DVD-ROM drive. - Page 25 On the Main Menu, select Install Products. Make sure the boxes for Scanner Driver and Visioneer One Touch are selected. The software provided with your scanner may differ slightly from the list shown in the window. NOTE: Click Install Now.
-
Page 26: Installing The Scanner Driver
The Welcome to the Xerox DocuMate 3115 Setup Wizard opens. Click Next. On the Xerox License Agreement window, read the license agreement. If you accept the terms, select I Agree then click Next. If you choose not to accept the license agreement, the installation will terminate and the scanner driver will not be installed. - Page 27 STOP when you see the “Complete the installation by connecting your hardware” window. Do NOT click OK yet. Leave the window open and proceed to the next section. If you do not see this on-screen diagram for connecting the scanner, stop and follow the NOTE: instructions below.
-
Page 28: Connect The Usb Cable And Turn On The Power
Remove any tape from the USB cable. Plug the USB cable into the USB port on the scanner then into a USB port on the computer. If the plug does not attach easily, make sure that you are plugging it in correctly. Do not force the plug into either connection. - Page 29 Turn the control dial to the right to turn on the scanner. The status light comes on and flashes indicating that the scanner is receiving power. Your computer recognizes that a scanner has been plugged into the USB port and automatically loads the appropriate software to run the scanner.
- Page 30 A Calibration window opens on-screen after Windows finishes detecting the scanner. The scanner calibrates automatically, and the window will close when calibration is complete. Depending on the version of Windows you are using, you may be prompted to click Next to proceed with calibration, and click Finish when calibration is complete.
- Page 31 Click Close on the Installation Complete window to close and exit the driver installer. DocuMate 3115 User’s Guide...
-
Page 32: Installing One Touch
Installing One Touch The One Touch software installation will start automatically after you click Close on the driver Installation Complete window. One Touch is the software needed for the buttons on the scanner to work. Click Next on the Welcome to the One Touch 4.0 Setup Wizard. -
Page 33: Register Your Scanner
Fill in the registration form, all required fields have an asterisk (*). A valid email address is required for registration. NOTE: You will be asked to enter the serial number for the scanner, it is located on the back of the scanner. The Serial Number After filling in the form, click on Submit Your Registration to complete the registration. -
Page 34: Installing Additional Applications
Installing Additional Applications Your scanner includes free, additional applications as described in the table below. Return to the disc’s Main Menu and click Install Products. Select the additional applications you want to install, then click Install Now. Follow the instructions on the screen to install each of the additional applications. -
Page 35: View The User Guides
Click on View software documentation to access the user guides for the software applications provided with the scanner. For instance, the Nuance OmniPage user guide is in this section. From either of these user guide windows, click on the User guide menu button to return to the main user guide window, then select the other documentation section to view the user guides. - Page 36 When you’re finished, click Main Menu to return to the Main Menu window and click Exit. Remove the installation disc and store it in a safe place. That’s it! Installation is finished and your Xerox DocuMate 3115 is ready to scan. DocuMate 3115...
- Page 37 DocuMate 3115 User’s Guide...
-
Page 38: Loading Documents To Scan
33 This chapter illustrates scanning with the buttons on the scanner. After loading documents in the scanner, as described below, you can also scan using the One Touch Button Panel on screen, or using a scanning application. Always remove any staples or paper clips from documents before inserting them into the NOTE: scanner. -
Page 39: Scan From The Input Tray
Adjust the paper guide for the width of paper, and make sure the input and output trays are fully extended. Load the documents into the scanner face down with the tops of the page inserted into the scanner. DocuMate 3115... - Page 40 Turn the control dial to the setting you want to use to scan, align the number to the registration mark on the scanner. For one-sided scanning press the Simplex button. For two-sided scanning press the Duplex button. Registration mark DocuMate 3115 User’s Guide...
-
Page 41: Scan From The Front Feed Tray
You can only load items into the scanner from either the Front Feed tray or the input tray at each scan time. The scanner will jam if you load paper into the input tray after an item has already been fed into the front. -
Page 42: Turn Autolaunch Off/On
If you want to scan from One Touch button panel on screen, or to be able to place a page in the scanner and wait until you are ready to initiate the scan, you can turn the AutoLaunch feature off. This option is in the Device Settings for your scanner’s hardware properties. - Page 43 Click on the scanner icon to the right of the green buttons, in the title bar of the One Touch button panel. Click on the Properties button in the hardware properties window. In the Device Settings tab, click on Turn on AutoLaunch for Front Feed Scanning to deselect this option.
-
Page 44: Scan From The One Touch Buttons
The AutoLaunch feature is now turned off. Your scanner will not start scanning until you click on the scan button on the One Touch button panel, or on the scanning interface from the application you are using. To turn AutoLaunch back on, follow the instructions in this section and click on the option in step 4 to select to enable the feature. - Page 45 For one-sided scanning press the Simplex button. For two-sided scanning press the Duplex button. DocuMate 3115 User’s Guide...
-
Page 46: Scanning Interfaces
If you selected the recommended installation options (see page 13), then you have several different options to scan with your Xerox DocuMate 3115 scanner. Each method scans equally well, so use the one with appropriate options for the item you are scanning. - Page 47 DocuMate 3115 User’s Guide...
-
Page 48: Scanning From One Touch
Based on the recommended full installation of the scanner driver and the Visioneer One Touch software, One Touch is your main scanning interface for using the scanner. The One Touch settings dial, on the scanner, shows which scan settings will be used for scanning. -
Page 49: Default One Touch Settings
Internet Explorer. A folder icon for a button means that the button is set up to archive the scanned item. The scanner sends the scanned image directly to a folder without opening the image first in a Destination Application. -
Page 50: Scan From The One Touch Button Panel
Scan from the One Touch Button Panel Scanning from the button panel on your computer’s screen works like pressing a button on the scanner. The scanner scans the item, then sends the image to the Destination Application indicated by the button’s icon. -
Page 51: Features Of The One Touch Button Panel
Features of the One Touch Button Panel The One Touch panel is your on-screen set of controls for the scanner. From the panel you can access the hardware settings for your scanner and configure the Scan button. Click on the One Touch icon to open the panel. -
Page 52: Configuring The One Touch Buttons
Place a page in the scanner. Click on the button that you made the changes for. The scanner starts scanning and sends the image to the application, with the file format and scanning configuration you specified. The next section contains detailed information on making changes to the One Touch Properties NOTE: window. -
Page 53: Selecting New Settings
If you select a word processing program such as Microsoft WordPad or Microsoft Word that can NOTE: be used for OCR (such as TXT or RTF), the text in scanned images is automatically converted to word processing text. DocuMate 3115 User’s Guide Select a file format for your scanned images. - Page 54 Edit or Delete to change or remove them. Black and White Grayscale Configure Before Scan on page 42 and Editing or Deleting Scan Selecting Document and File Format Options on page 55 for instructions on configuring on page 57. on page 52 DocuMate 3115 User’s Guide...
-
Page 55: Creating A New Scan Configuration
Scroll through the applications in the Select Destination list and click the application you want for the new scan configuration. Click the New button. If you want to start from the settings of another configuration, select the configuration, then click the Copy button. The Scan Configuration Properties dialog box opens. DocuMate 3115 User’s Guide... - Page 56 If you want to lock the configuration, click the key icon to change it from a Key to a Lock. Click OK if you are done making changes for this configuration. If the configuration is locked, click the lock to unlock it. The icon becomes a key. DocuMate 3115 User’s Guide...
- Page 57 • AutoCrop to Original—Select this option to let the scanner automatically determine the size of the item being scanned. Always use the paper guides on the scanner so the page is not skewed. Skewed pages may not crop properly. •...
- Page 58 The Simplex and Duplex buttons on the scanner take precedence over the One Touch settings. In other words, if the LED number on the scanner is configured to scan as Duplex, but you press the Simplex button, the scanner scans in Simplex, and vice versa.
- Page 59 This option is available for both Color and Grayscale scanning. Click OK to save the new configuration. It will now be in the list of Scan Configurations on the One Touch Properties window for the appropriate Destination Applications. DocuMate 3115 User’s Guide...
-
Page 60: The Device Settings Tab
Advanced—Click to see additional settings for the device. The dialog box that opens is specific to the device. For example, if the device is your printer, the dialog box is your printer’s setup settings. Click OK or Apply. DocuMate 3115 User’s Guide... - Page 61 If you want to store your archive documents in some other location, click the Browse button to specify the new location. Click OK or Apply. DocuMate 3115 User’s Guide...
-
Page 62: Editing Or Deleting Scan Configurations
Editing and deleting is normally for the configurations you create, not for your scanner’s pre-set configurations. Your scanner comes with a number of configurations pre-set at the factory. To ensure that your NOTE: scanner will always have a set of correct scan configurations, do not delete the pre-set configurations. -
Page 63: Configure Before Scan
Configure Before Scan You can set up the scanner so that, when you press a button or click it on the Button Panel, a different scanning interface opens before the scanning starts. To set up the scanner for this capability, you select Configure Before Scan from the scan configuration list. - Page 64 For instance, the Picture Type is Black & White but you want to scan your documents in color. Choose Yes to delete any scanned pages, then start over but select the correct picture type before scanning. DocuMate 3115 User’s Guide...
-
Page 65: Selecting Document And File Format Options
No—Scanning stops, but all pages scanned in this batch, up to this point, are not deleted and the TWAIN interface remains open. You can place a new page in the scanner, adjust the TWAIN settings for it, then click the Scan button in the TWAIN interface to continue scanning. -
Page 66: Image Formats
Selecting the text format option also selects OCR processing as an automatic step for scanning. Therefore, when you scan a document with the text format selected, the text portions of the document are automatically converted to editable text. DocuMate 3115 User’s Guide... - Page 67 Microsoft’s Word. Choose the file type that you want for the text format. Click OK or Apply on the One Touch Properties window. DocuMate 3115 User’s Guide on page 71. Example menu for the Text format when the selected application is Transfer to Storage.
-
Page 68: Selecting Options For One Touch
Storage and CD-R/W is for either storing scanned documents in a folder, or sending them to a CD burner to create a CD containing the scanned documents. • Fax and Print is for sending your scanned documents directly to your printer or fax software for faxing. DocuMate 3115 User’s Guide... - Page 69 One Touch button. Group by type arranges the scanned documents by the type of file, such as .rtf or .jpg. If you also want to group them by date you can choose the week and month options. DocuMate 3115 User’s Guide...
-
Page 70: Setting Destination Application Properties
These properties apply to designating the PaperPort folder to receive your scanned items. Select the folder where you want the file to be located. Click OK. Click OK or Apply on the One Touch Properties window. DocuMate 3115 User’s Guide... -
Page 71: Text Documents Properties
This could occur if you scanned a photograph with a scanner button set for text applications. Show message if text recognition failed—A message will open on the screen if the OCR reader does not detect text in the image. - Page 72 The options you select at step 4 determine the page format icons in the One Touch Properties window for that group of applications. Click the Add button. Click OK on the Link Properties window. Click Refresh on the One Touch Properties window and the new application should now be available. DocuMate 3115 User’s Guide...
-
Page 73: Image Documents Properties
Use this option to provide that compression capability to image files. To add another application to the list, click the Add Application button. See the steps on page 59 to add an application to the list. Click OK. DocuMate 3115 User’s Guide... -
Page 74: Storage Properties
5" CD (700 MB), should also be selected so you will see a message when it’s time to click the Burn to CD button. Click OK on the Link Properties window. Scan and Burn to a CD on page 66. on page 63. DocuMate 3115 User’s Guide... -
Page 75: Email Properties
Convert Bitmaps to JPEG—JPEG files can be compressed to produce smaller files sizes and, therefore, shorter transmission times when you email the file or upload it to the internet. Click OK. DocuMate 3115 User’s Guide ® will accept direct attachment of documents to a ®... -
Page 76: Scan And Burn To A Cd
Scan and Burn to a CD If you have a CD burner attached to your computer, you can scan directly from your scanner onto a CD. This feature is available only on computers running Windows version XP or later. Open the One Touch Properties window. -
Page 77: Scanning With Event Forwarding (Sti)
Select Still Image Client as the Destination Application. You cannot choose a page format for this option because the actual Destination Application is not selected until after you press the scanner button. Choose a Scan Configuration and click OK. Start scanning using the button you selected for event forwarding. -
Page 78: Creating An Html Web Page From Your Scanned Documents
Choose Save As from the Internet Explorer File menu, give the page a name, and save it in the location you use for your web page files. You can now use Microsoft Internet Explorer or other application to post the document to your web page as you would any other HTML page. Choose HTML DocuMate 3115 User’s Guide... -
Page 79: Transferring Scanned Documents To Storage
Select Transfer to Storage as the Destination Application. Choose a scan configuration and file format for your document. Click OK. Now scan the documents using the button you set up with the Destination application as Transfer to Storage. DocuMate 3115 User’s Guide... -
Page 80: Scanning To Multiple Archive Folders
Using Microsoft Windows, create the folders that you want to use for storing scanned items. Open the One Touch Properties window. Select Transfer to Storage as the Destination Application. Your scanned documents will be stored at the location you specified on the One Touch 4.0 Link Properties window. DocuMate 3115 User’s Guide... - Page 81 To help you remember which folder it is, give the new configuration a name that indicates the folder name, such as “Business Receipts.” Click the Scan Settings, Page Settings, and Advanced Settings tabs, and select the settings you want. Click the Storage Options tab. Click the Browse button. DocuMate 3115 User’s Guide...
- Page 82 11. Click OK. The new configuration is now listed as a Transfer to Storage configuration. 12. Repeat the process to create additional new configurations, such as one named “Personal Receipts.” Make sure to designate separate folders as the Storage Locations for the new configurations. DocuMate 3115 User’s Guide...
- Page 83 Scan to multiple storage folders: Insert the document you want to scan to storage. Press the Function button on the scanner to get to one of the buttons set up for scanning to storage. Press the Simplex or Duplex button to scan the documents.
-
Page 84: Scanning With Optical Character Recognition (Ocr)
The One Touch OmniPage Module or the OmniPage Pro software must be installed on your computer in order to use the OCR options with the One Touch software and your DocuMate 3115. The One Touch OmniPage Module was automatically installed when you installed your driver from the installation disc. -
Page 85: Text Formats
The specific file format is the file name extension on the text format icon. DocuMate 3115 User’s Guide This is the text format icon. - Page 86 Excel Spreadsheet—The .xls file format used by Microsoft Excel. HTML Document—The .htm file format used to create web pages. Example menu for the TEXT format when the Destination Application is a Storage location. DocuMate 3115 User’s Guide...
- Page 87 Scans with Use MRC selected may take slightly longer to complete the processing. Select Use MRC for documents with harder-to-read text or lower-quality graphics to get the best possible scan output image. The Use MRC option is available for sPDF and PDF. DocuMate 3115 User’s Guide...
-
Page 88: Selecting One Touch Omnipage Ocr Options
Selecting One Touch OmniPage OCR Options The software you installed for your scanner includes a set of advanced OCR options integrated with One Touch 4.0. The OCR options apply globally to all the One Touch Destination Applications that perform NOTE: OCR. -
Page 89: The Ocr Tab
The OCR engine does not automatically correct misspelled words that were present in the original document. When dictionaries are selected, the terms in those dictionaries are used to check the spelling. If this is option is not selected, User Dictionaries and Professional Dictionaries cannot be selected. DocuMate 3115 User’s Guide... - Page 90 Click OK or Apply. These options will now apply to the OCR processing when you select any text format as the page format. DocuMate 3115 User’s Guide...
-
Page 91: Creating Your Own Dictionaries
Now open the OCR Options window. On the OCR Options window, click the button next to the menu arrow. The User Dictionary Files window opens and shows the available dictionaries. MyDictionary is an example of a user dictionary. DocuMate 3115 User’s Guide... - Page 92 If you don’t want to use any user dictionaries for spellchecking, click [none] at the top of the list. To remove a dictionary from the list, select it and click Remove. This only removes the dictionary from the list. It does not affect the original text file you created with the list of words. DocuMate 3115 User’s Guide...
-
Page 93: Editing User Dictionaries
If a word in the list is misspelled, delete it, then re-type the word correctly in the User Word box and click Add. To import a list of words from another text file, click Import. The Import Contents of User Dictionary window opens. DocuMate 3115 User’s Guide... - Page 94 The Export User Dictionary window opens. Select the dictionary file to export and click Save. The file is exported as a formatted dictionary with the .ud filename extension so it can be opened by other programs. DocuMate 3115 User’s Guide...
-
Page 95: The Format Tab
You can later specify whether to export it in a grid or as tab-separated text columns. • Spreadsheet—Choose this option if the entire document consists of a table that you want to export to a spreadsheet program, or have treated as a table. No flowing text or graphics will be detected. DocuMate 3115 User’s Guide... - Page 96 The Spreadsheet output option is only available for documents scanned with the XLS format. Click OK or Apply. These options will now apply to the OCR processing when you select any text format as the page format. DocuMate 3115 User’s Guide...
-
Page 97: One Touch With Kofax Vrs Technology
One Touch with Kofax VRS Technology The One Touch 4.0 software you received with your Xerox scanner now includes the Kofax® Virtual ReScan® (VRS™) technology. This application has a set of features for improving and enhancing the quality of scanned documents, especially documents that would usually produce poorer quality images. -
Page 98: The Kofax Vrs Settings
Open the One Touch 4.0 Properties window. Click the New button to create a new configuration, or select one of your custom configurations you created earlier and click the Edit button. The Scan Configuration Properties window opens. Click the VRS Settings tab. DocuMate 3115 User’s Guide... - Page 99 If the page is skewed, the image will be adjusted so it is straightened. However, if the page is fed through the scanner at too great an angle, the image may not straighten correctly. In that case, re-scan the page using the paper guides to feed the paper in straight.
- Page 100 Typically, Auto Color Detect is used when you have a stack of pages to scan, some color and others not. Instead of you having to change the scan settings from Color to Black&White and back again, the scanner can choose the correct settings automatically.
-
Page 101: Changing The Hardware Settings
Changing the Hardware Settings Right-click on the One Touch icon and choose Show Hardware from the pop-up menu. The Hardware Properties dialog box opens and shows information about your DocuMate 3115. DocuMate 3115 User’s Guide... - Page 102 Paper pickup delay—If the AutoLaunch option is enabled, the Paper pickup delay option also becomes available. The Paper pickup delay is the amount of time you want the scanner to wait until it feeds the item into the scanner to start scanning.
- Page 103 DocuMate 3115 User’s Guide...
-
Page 104: Scanning From Twain
TWAIN interface for scanning. The TWAIN interface, described in this section, is the one provided with your scanner and you will see it when scanning from PaperPort or OmniPage. Other TWAIN compliant scanning applications may also access this interface. -
Page 105: Accessing The Twain Interface
TWAIN interface will open immediately. • PaperPort: On the Toolbar click on the Scanner icon to open the Scan Pane on the left side of the PaperPort desktop. Select your scanner in the Scan Pane then click on the “Scan” button in the Scan Pane. -
Page 106: Scanning With The Twain Interface
Scanning with the TWAIN Interface The TWAIN interface lists the scanning options available with your Xerox DocuMate 742 scanner. Load the documents face down with the top of the pages inserted into the Automatic Document Feeder. Adjust the settings in the TWAIN interface for the item you are scanning. -
Page 107: The Options In The Twain Interface
In that case, re-scan the page using the paper guides to feed the paper in straight. • Duplex—Scan both sides of the page. If this option is not selected, the scanner will scan the face- down side of the page only. •... - Page 108 Custom—Enter the horizontal and vertical page dimensions in the boxes. Click the name of the units, inches or mm (millimeters), to toggle between them. Click OK. The currently selected page size appears in the middle of the TWAIN interface on the left-hand side. DocuMate 3115 User’s Guide...
- Page 109 DocuMate 3115 User’s Guide...
-
Page 110: Scanning From Wia
Scanning from Microsoft’s Paint application uses the interface described in this section. Other applications may access the advanced WIA interface available with Windows Vista and Windows 7. Please refer to the Windows help for instructions on using WIA. on page 98 DocuMate 3115 User’s Guide... -
Page 111: Scan Using Wia From Microsoft Paint
On the Windows taskbar, click Start, point to Programs, point to Accessories, and then click Paint. From the File menu choose From Scanner or Camera. The scan window opens. Use this window to select scanning options and start the scan process. - Page 112 Click on the Scan button in the WIA interface. The scanner starts scanning. The scanned image will appear in Microsoft Paint (or other WIA application you’re using). DocuMate 3115 User’s Guide...
-
Page 113: Fine Tuning Your Scans
Higher dpi settings take longer to scan and produce larger files for the scanned images. Picture type—Click the menu arrow and choose the most appropriate type for the item you’re scanning. Click OK. The Custom Settings button is now set to scan with the options you selected. DocuMate 3115 User’s Guide... -
Page 114: Maintenance
Troubleshooting on page 111 • Uninstalling Your Scanner on page 114 • The DocuMate 3115 Scanner Specifications • The DocuMate 3115 Parts List This section contains information about maintenance, troubleshooting, uninstalling, scanner specifications, and spare parts. on page 107 on page 109... -
Page 115: Safety Precautions
• Only perform scanner maintenance as described in this chapter. • Keep the scanner and cleaning supplies away from any open flame or heat source as any form of alcohol is flammable. • Always read the instructions in each section carefully, the instructions are specific to the part you are installing or servicing. -
Page 116: Clearing Paper Jams
Clearing Paper Jams If your scanner stops scanning due to a paper jam in the Automatic Document Feeder, a warning dialog box opens after a few moments. Pull the ADF cover release on the top of the scanner body to open the Automatic Document Feeder cover. -
Page 117: Cleaning The Scanner
Cleaning the inside of the scanner helps to keep your scanner operating at optimum performance. You should clean the inside of the scanner at least once a week or after 5,000 pages have been scanned. If you are getting frequent paper jams, multiple pages feeding at the same time, or if you’re seeing lines in the scanned image, it is time to clean the scanner. -
Page 118: Cleaning The Docking Station
Wipe clean all of the rollers in the scanner. Be careful not to snag the cloth on the paper sensor. Rollers (located in both the body of the scanner and under the scanner lid). Close the cover when you’re finished. - Page 119 Wipe the feed roller from side to side. Rotate the roller to clean its entire surface. Wipe the ADF pad from top to bottom. Be careful not to snag the cloth on the springs on either side of the pad. Wipe clean all plastic surfaces, then close the rear cover. DocuMate 3115 User’s Guide...
-
Page 120: Replace The Adf Pad Assembly
The ADF pad will wear out and is designed to be a user-replaceable part. Problems with documents feeding into the ADF is an indication that the pad is wearing thin. You received a replacement pad in the original scanner box, and you can also order a new one. See the The DocuMate 3115 Parts List on page 117 for ordering information. - Page 121 Reverse the procedure to replace the new pad into its slots. Close the rear cover when you’re finished. DocuMate 3115 User’s Guide...
-
Page 122: Replacing The Roller Assembly
A worn roller should be replaced to avoid damage to the scanner’s internal parts. Before replacing the roller you should clean it as excessive dust on the roller will make it appear worn and smooth. You cannot properly diagnose a worn roller until you have cleaned it. - Page 123 Before installing the new roller, clean any dust that may have gotten on it during shipping. Insert the right end of the roller into its housing socket in the scanner. Align the lock tab, on the orange lock flange, with the slot in the scanner. Rotate the lock tab into the slot on the scanner.
-
Page 124: Troubleshooting
Start the PaperPort software and click the Scan icon, then make sure DocuMate 3115 is selected as the scanner. Problem: The installation will not complete successfully. If installation finishes, the scanner’s One Touch 4.0 options do not seem to work properly. - Page 125 After the restart is complete, plug the power cable back in. Problem: Paper jams when it begins scanning from the input tray. Make sure the front feed tray is closed, and that an item isn’t already in the scanner fed in from the front.
-
Page 126: Error Light Troubleshooting Codes
In all cases, you should turn off the scanner and check the scanner setup. Make sure the USB cable is plugged into the scanner and computer. Make sure the power cord is plugged into the scanner and into a wall outlet or USB port. -
Page 127: Uninstalling Your Scanner
Uninstalling Your Scanner To uninstall the Xerox DocuMate 3115 scanner, remove the scanner software and any other scanning software provided with the scanner. Uninstalling the Scanner and One Touch Software On the Windows taskbar, click Start, point to Settings, then click Control Panel. -
Page 128: The Documate 3115 Scanner Specifications
The DocuMate 3115 Scanner Specifications Optical resolution 600 dpi Bit depth 24-bit color, 8-bit grayscale, 1-bit bitonal (black & white) Maximum item size 8.5" x 38" Minimum item size 3.5" x 2" Scan method Duplex Automatic Document Feeder (Docking Station) - Page 129 - 32-bit or 64-bit Vista (with or without Service Pack 1 or 2) - 32-bit or 64-bit 7 Scanner Drivers TWAIN, WIA Bundled Software Visioneer One Touch Nuance PaperPort® Nuance OmniPage® Adobe® Reader® NewSoft Presto! BizCard® Kofax Virtual ReScan® (VRS™) Module DocuMate 3115 User’s Guide...
-
Page 130: The Documate 3115 Parts List
The DocuMate 3115 Parts List Please use the following part names and numbers when ordering replacements for your Xerox DocuMate 3115 scanner. Part Name Docking Station ADF Pad Roller Assembly USB Cable USB Power Cord AC Power Cord Power Supply... - Page 131 DocuMate 3115 User’s Guide...
-
Page 132: Appendix
125 • Product Safety Certification • Regulatory Information on page 127 • Compliance Information on page 128 • Illegal Copies on page 130 • EH&S Contact Information on page 133 on page 122 on page 126 DocuMate 3115 User’s Guide... -
Page 133: Safety Introduction
Please read the following instructions carefully before operating the machine and refer to them as needed to ensure the continued safe operation of your machine. Your Xerox product and supplies have been designed and tested to meet strict safety requirements. These include safety agency evaluation and certification, and compliance with electromagnetic regulations and established environmental standards. -
Page 134: Emc
(1) This device may not cause harmful interference, and (2) this device must accept any interference received, including interference that may cause undesired operation. Changes and modifications to this equipment not specifically approved by Xerox may void the user’s authority to operate this equipment. -
Page 135: Operational Safety Information
Your Xerox equipment and supplies have been designed and tested to meet strict safety requirements. These include safety agency examination, approval, and compliance with established environmental standards. To ensure the continued safe operation of your Xerox equipment, follow these safety guidelines at all times: Do These •... -
Page 136: Electrical Information
Plug the power cable directly into a correctly grounded electrical outlet. If you are not sure whether or not an outlet is correctly grounded, consult an electrician. Do not use an adapter to connect any Xerox equipment to an electrical outlet that lacks a ground connection terminal. -
Page 137: Emergency Power Off
Emergency Power Off If any of the following conditions occur, turn off the machine immediately and disconnect the power cable(s) from the electrical outlet(s). Contact an authorized Xerox Service Representative to correct the problem: • The equipment emits unusual odors or makes unusual noises. -
Page 138: Maintenance Information
Do not perform any maintenance procedures unless you have been trained to do them by an authorized local dealer or unless a procedure is specifically described in the user manuals. DocuMate 3115 User’s Guide... -
Page 139: Product Safety Certification
Product Safety Certification This product is certified by the following Agency using the Safety standards listed: Agency Underwriters Laboratories Inc. UL60950-1 1st (2003) First Edition (USA/ DocuMate 3115 User’s Guide Standard Canada) IEC60950-1: 2001 Second Edition... -
Page 140: Regulatory Information
Regulatory Information Certifications in Europe The CE mark applied to this product, symbolizes Xerox’s declaration of conformity with the following applicable European Union Directives, as of the dates indicated: December 12, 2006: December 31, 2004: A full declaration of conformity, defining the relevant directives and referenced standards, can be... -
Page 141: Compliance Information
Compliance Information Product Recycling & Disposal: USA & Canada If you are managing the disposal of your Xerox product, please note that the product may contain lead, mercury, Perchlorate, and other materials whose disposal may be regulated due to environmental considerations. -
Page 142: Energy Star For The Usa
Xerox ENERGY STAR equipment is preset at the factory. Your machine will be delivered with the timer for switching to Power Save Mode from the last copy/print out, set at 15 minutes. A more detailed description of this feature can be found in the Machine Setup Section of this guide. -
Page 143: Illegal Copies
Congress, Washington, D.C. 20559. Ask for Circular R21. Certificates of Citizenship or Naturalization. (Foreign Naturalization Certificates may be photographed.) Passports. (Foreign Passports may be photographed.) Immigration Papers. Draft Registration Cards. DocuMate 3115 User’s Guide National Bank Currency Federal Reserve Bank Notes Gold Certificates Treasury Notes... -
Page 144: Canada
The above list is provided for your convenience and assistance, but it is not all inclusive, and no liability is assumed for its completeness or accuracy. In case of doubt, consult your solicitor. Dependency Status Previous military service DocuMate 3115 User’s Guide... -
Page 145: Other Countries
Copyright material or trademarks without the consent of the owner Postage stamps and other negotiable instruments Note: This list is not inclusive and no liability is assumed for either its completeness or accuracy. In case of doubt, contact your legal counsel. DocuMate 3115 User’s Guide... -
Page 146: Eh&S Contact Information
EH&S Contact Information Contact Information For more information on Environment, Health, and Safety in relation to this Xerox product and supplies, please contact the following customer help lines: USA & Canada: 1-800-828-6571 Europe: +44 1707 353 434 DocuMate 3115 User’s Guide... - Page 147 DocuMate 3115 User’s Guide...
-
Page 148: Index
Event Forward (STI), 56, 64 Excel Spreadsheet, 73 Exit front-fed paper through the back, 89 Fax and Print, 55 File format, 39, 41, 50, 52 file format, 73 file storage location, 67 Fit to page, 47 DocuMate 3115 User’s Guide... - Page 149 Lock icon, 43, 49 Logical Form Recognition, 21 Maintain aspect ratio, 47 Maximize Quality, 53 Microsoft Internet Explorer, 65 DocuMate 3115 User’s Guide Microsoft Outlook, 55, 62 Microsoft Paint, 55, 60, 97 Microsoft Word, 40, 55, 58, 71 Minimize Size, 53 Missing Character, 77 Moiré...
- Page 150 TXT file format, 40, 71 uninstall, 114 Updates, 20 USB cable, 15 USB port, 15 Use enhanced folder browser, 56 Use languages and dictionaries to improve accuracy, 76 Use MRC, 74 user dictionary edit, 80 new, 78 User Guides, 22 DocuMate 3115 User’s Guide...
- Page 151 Watermark, 45, 94 Advanced settings, 100 WIA interface, 50, 97 Windows Image Acquisition, 97 Word Document, 73 xls file format, 73 DocuMate 3115 User’s Guide...
Need help?
Do you have a question about the DocuMate 3115 and is the answer not in the manual?
Questions and answers