Table of Contents
Advertisement
Quick Links
Advertisement
Table of Contents

Subscribe to Our Youtube Channel
Related Manuals for Gigaset PURE 100


Summary of Contents for Gigaset PURE 100
- Page 1 The most up-to-date user guide can be found at www.gigaset.com/manuals...
-
Page 2: Table Of Contents
Contents Contents Overview ................2 Base station without answering machine . -
Page 3: Overview
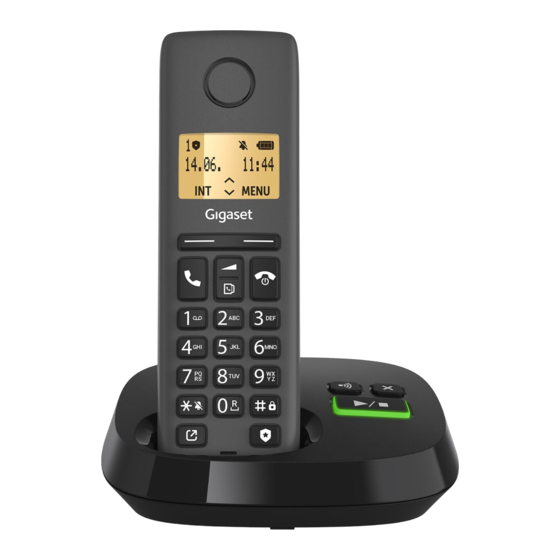
Handset Overview Handset Status bar Display keys and functions (various functions, depending on the operating situation) Talk key / Hands-free key (if hands-free function is available) End call key / On/off key (End call, go back one menu level) Control key / Menu key Star key Hash key / Lock key Recall key... -
Page 4: Base Station Without Answering Machine
Base station without answering machine Base station without answering machine Registration/paging key Base station with answering machine (if available) Registration/paging key Delete key On/Off and Playback/Stop key... -
Page 5: Symbols In The User Guide
Symbols in the user guide Symbols in the user guide Symbols Warnings, the non-adherence to which can result in damage to devices or personal injury. Important information regarding function and appropriate handling or functions that could generate costs. Prerequisite for carrying out the following action. Additional helpful information. - Page 6 Use only rechargeable batteries that correspond to the specification (see list of permitted batteries www.gigaset.com/service). Never use a conventional (non-rechargeable) battery or other battery types as this could result in significant health risks and personal injury. Rechargeable batteries, which are noticeably damaged, must be replaced.
-
Page 7: Getting Started
Connecting the base station Getting started Package contents • one base station, one plug-in power supply unit for the base station, one telephone cable • one handset, one battery cover, two batteries • one charging cradle with plug-in power supply unit (if available) •... -
Page 8: Setting Up The Handset For Use
Setting up the handset for use Connecting the base station to the power supply and phone network Device without answering machine Device with answering machine Connect the power adapter Connecting the phone jack Lay the cables in the cable ducts. The plug-in power supply must always be plugged in for operation, as the phone will not operate without a power connection. - Page 9 Setting up the handset for use Inserting the batteries Only use rechargeable batteries since otherwise major health risks and injury may result. For example, the outer casing of the batteries could be damaged beyond repair or the batteries could explode. The device could also malfunction or be damaged as a result of using batteries that are not of the recommended type.
- Page 10 Setting up the handset for use Set display language Setting the language: Press the control key until the desired language is shown on the display Set the date and time Set the date/time so that the correct date and time can be assigned to incoming calls and to enable the alarm to be used.
-
Page 11: Using The Telephone
Getting to know your telephone Using the telephone Getting to know your telephone Switching the handset on and off Switching on: When the handset is switched off, press and hold the End call key Switch off: When the handset is in idle mode, press and hold the End call key If you place a switched-off handset in the base station or charging cradle, it switches itself on automatically after 30 seconds. - Page 12 Getting to know your telephone Conversation ongoing Mute the microphone (if the left function key is assigned the mute function): Press Adjust the loudspeaker volume for earpiece and hands-free mode: Press Display keys The display keys perform a range of functions depending on the operating situation. Current display key functions Display keys...
- Page 13 Getting to know your telephone Enter text Multiple letters and digits are assigned to each key between and the key. As soon as a key is pressed, the possible characters are displayed at the bottom of the display. The selected character is highlighted. Select letters/digits: Press the key briefly several times in succession Switch between lower case, upper case...
-
Page 14: Making Calls
Making calls Making calls Calling numbers Enter the number Press the Talk key The connection is dialled via the send connection (line) set for the handset. Dialling from the directory Press the Control key briefly Select entry Press Talk key Dialling from the redial list The redial list contains the numbers last dialled with the handset. - Page 15 Making calls Accepting a call An incoming call is indicated by ringing, by a display on the screen and by the flashing Hands- free key (if available). The display shows • the caller's name if it has been stored in the directory •...
- Page 16 Making calls Enable/disable hands-free (if available) Making calls via the speaker and the microphone of the hands-free function. Enabling/disabling the hands-free function during a call: Press the Hands-free key Hands-free function is enabled: the key is illuminated Ending a call Press the End call key Making internal calls Multiple handsets have been registered to the base station.
- Page 17 Making calls Calling Line Identification During a call, the caller's number is transferred (CLI = Calling Line Identification) and can be displayed on the recipient's display (CLIP = CLI Presentation). When the caller's number is with- held, it is not shown on the called party’s display. The call is made anonymously (CLIR = CLI Restriction).
- Page 18 Making calls Create list of prefix numbers with pre-selection MENU Settings Base Preselection With Preselection Select list entry prefix numbers or initial digits of a prefix number for which the pre-selection number is to be used If necessary, select another list entry and enter another number Create list of prefix numbers without pre-selection MENU...
-
Page 19: Call And Message Lists
Editing a call list on a handset Call and message lists The phone saves information about various events in lists. The following call lists are available: Accepted calls Calls that were accepted. Missed calls Calls that were not accepted If there are missed calls that have not yet been viewed, New messages appears in the display. - Page 20 Editing a call list on a handset Edit call list Open call list Select list Select entry MENU . . . Transferring a number to a directory You can copy the phone number as a new contact in the handset's local directory or in the central directory of the base station.
-
Page 21: Directories
Contacts on the handset Directories Contacts on the handset Open the directory Directory: Briefly press the lower control key Searching contacts Scroll to the required contact Enter the first few letters of the first or last name . . . As soon as entries are found that match the input, they are displayed Select the desired contact Create new contact... - Page 22 Contacts on the handset Copy contacts from one directory to another directory Open directory Select contact MENU Send entry: Send Entry . . . The entry is sent Send another entry: End a transfer: or press the End call key Send list: Send List .
-
Page 23: Answering Machines And Announcements
Local mailbox (if available) Answering machines and announcements Local mailbox (if available) Setting up the answering machine MENU Answering Machine Select the setting you want to change Time to answer the call Ring Delay Immediately / 10 sec / 18 sec / 30 sec / Auto •... - Page 24 Local mailbox (if available) Activating/deactivating answering machine The description of how to operate the answering machine on the base station can be found in the overview. Activating the answering machine on the handset: MENU Answering Machine Answering Machine (activated If the memory is full, the display shows Memory Full! and the answering machine switches off automatically.
- Page 25 Local mailbox (if available) Actions during playback Ending playback: Press the End call key . . . and the handset returns to idle status Changing the volume: MENU Handset Volume Adjusting the volume Pausing/resuming playback: MENU Continue . . . Playback is interrupted. Resume playback: Transfer phone number to MENU...
-
Page 26: Network Answering Machine
Network answering machine Checking an answering machine The answering machine is enabled. Call the telephone connection press key 9 during the announcement . . . the announcement playback is interrupted enter the system PIN The answering machine is operated using the following keys: During playback of the info block: Skip to previous message. -
Page 27: Announcements
Announcements Assigning key 1 If you operate a local and a network answering machine, you can specify which answering machine you want to open with the key Settings for fast access are handset-specific. A different answering machine can be assigned to the key on each registered handset. -
Page 28: Additional Functions
Alarm clock Additional functions Alarm clock Date and time have been set. Turning the alarm clock on and off MENU Alarm Clock Activation = switched on) Enter the wake-up time in hours and minutes When the alarm clock is activated, the icon and the wake-up time is displayed in the idle display. - Page 29 Black lists Creating an entry MENU Settings Base Blocklist Blocked Numbers List empty: Confirm the prompt New Entry? with List not empty: MENU New Entry Blocked Num.: Enter the number Name: Enter the name Transferring calls to black list You can also transfer an incoming call or an ongoing call to the black list. The call is then termi- nated immediately.
-
Page 30: Expanding The Dect Network
Expanding the DECT network Disabling radiation completely in idle mode With the Radiation-free function, you can further reduce the radiation. Radiation is disabled completely when the base station and handsets are in idle mode. The wireless connection is only established automatically for incoming and outgoing calls. This means there is a 2 second or so delay in the connection setup. - Page 31 Talk key on the handset No action. After approx. 30 seconds, the paging call will end automatically. Repeater support A repeater increases the receiving range between the Gigaset handset and base station. Enabling Repeater mode for the base: MENU Settings...
- Page 32 Expanding the DECT network Operating the base station on a PABX The following settings are only necessary when your PABX requires them ( refer to the PABX user guide). Enter the digits slowly one after the other. Changing the dialling mode MENU The digit for the dialling mode set flashes: 0= Tone dialling (DTMF);...
-
Page 33: Handset Settings
Setting the date and time manually Handset settings Setting the date and time manually The date and time must be set so that the correct date and time can be assigned to incoming calls and the alarm clock can be used. Date and time are synchronised between the handset and base. -
Page 34: Making/Receiving Calls
Making/receiving calls Ringtones Ringtone volume Volume can be set at 5 levels or crescendo (increasing volume). MENU Handset Audio Settings Ringer Volume Select volume MENU Basestation Audio Settings Ringer Volume Select volume Ringtone melody Set different ringtones for internal and external calls and the alarm. MENU Handset Audio Settings Ringer Melody... -
Page 35: System
System System Resetting the handset Reset any individual settings and changes that you have made. MENU Settings Handset Reset Handset Confirm with . . . The handset settings are reset The following settings are not affected by a reset: • Registration of the handset to the base station •... -
Page 36: Appendix
Appendix Customer Service & Assistance Do you have any questions? As a Gigaset customer, you can find help quickly in this User Manual and in the service section of our Gigaset online portal www.gigaset.com/service. In our constantly updated online service you can find: •... - Page 37 Customer Service & Assistance Manufacturer warranty (Middle East) On the purchase of your new Gigaset product, we guarantee that this equipment is a genuine manufacturer’s product and extend the following warranty: We guarantee this product against manufacturing defects for one full year from the date of purchase, unless specified otherwise.
- Page 38 Customer Service & Assistance Service Centres (Middle East) Madina Munawara Al-Ayon Street, Customer Service Hot-line UAE Tel: 00966-4-8387931 TEL: +971 44504288 Khamis Mushyat Service Collection Point Al-Khalidiya St., https://www.blueoceanglobalsupport.com/portal Tel: 00966-7-2230772 Oman Tabuk National Telephone Services Co. LLC Main Street, P.O.
-
Page 39: Manufacturer Information
Data protection We at Gigaset take the protection of our customers’ data very seriously. It is precisely for this reason that we are ensuring all our products feature "Privacy by Design" as standard. All information we collect is used to make our products as good as possible. - Page 40 Manufacturer information Disposal Batteries should not be disposed of in general household waste. Observe the local waste disposal regulations, details of which can be obtained from your local authority. All electrical and electronic products should be disposed of separately from the municipal waste stream via designated collection facilities appointed by the government or the local authorities.
-
Page 41: Technical Specifications
Capacity: 400 - 1000 mAh Handset operating times/charging times The operating time of your Gigaset depends on the capacity of the battery, its age and the way it is used. (all times are maximums). Standby time (hours) up to 180 / 110*... - Page 42 Character set tables General technical specifications DECT standard supported GAP standard supported No. of channels 60 duplex channels Radio frequency range 1880 - 1900 MHz Duplex mode Time division multiplexing, 10 ms frame length Repetition frequency of the transmission 100 Hz pulse Duration of the transmission pulse 370 μs...
-
Page 43: Menu Overview
Menu overview Menu overview Handset Opening the main menu: Press the display key MENU Messages ............. p. - Page 44 Index Index Connecting ......6 the base station ......18 Accepted calls Consultation call .
- Page 45 Index ......6 Getting started Making calls ....... . . 15 internal .
- Page 46 Index Settings ......32 on handset ..... . . 27 Snooze mode (alarm) .
- Page 47 Issued by Gigaset Communications GmbH Frankenstraße 2, D-46395 Bocholt © Gigaset Communications GmbH 2023 Subject to availability. All rights reserved. Rights of modification reserved. www.gigaset.com...
Need help?
Do you have a question about the PURE 100 and is the answer not in the manual?
Questions and answers