Kärcher SE 3-18 Compact - Battery-powered Spray Extraction Cleaner Manual
- Manual (148 pages) ,
- Original operating instructions (12 pages) ,
- Operator's manual (56 pages)
Advertisement
General notes
Before using the device for the first time, read the original instructions that are supplied with the device, battery pack and charger. Proceed accordingly.
- Failure to follow the operating instructions can result in damage to the device and danger to the operator or other persons.
- Inform the dealer immediately in the event of any shipping damage.
- Depending on the device variant, the battery pack and charger are included in the scope of delivery.
- When unpacking, check the package contents for missing accessories or signs of damage.
You can find a QR Code® for calling up an application video in:


Intended use
Only use the device in private households.
The device is intended for use as a spray extraction cleaner for cleaning car interiors and upholstery textiles indoors in accordance with the descriptions given in these operating instructions and the safety instructions. For operation, a battery pack of the KÄRCHER Battery Power (+) platform with 18 V nominal voltage and a suitable KÄRCHER charger with 18 V nominal voltage is required, which are not included in the scope of delivery. Battery packs/chargers that are not supplied in the scope of delivery or are additionally required are available as accessories.
Accessories and spare parts
Only use original accessories and original spare parts. They ensure that the appliance will run fault-free and safely.
Information on accessories and spare parts can be found at www.kaercher.com.
Scope of delivery
The scope of delivery for the appliance is shown on the packaging. Check the contents for completeness when unpacking. If any accessories are missing or in the event of any shipping damage, please notify your dealer.
Symbols on the device
Symbols for system cleaning after use are present on the inside of the fresh water tank:

- Fill the fresh water tank with tap water.
- Insert the crevice nozzle completely into the tank opening and switch the device on. See also chapter Finishing operation
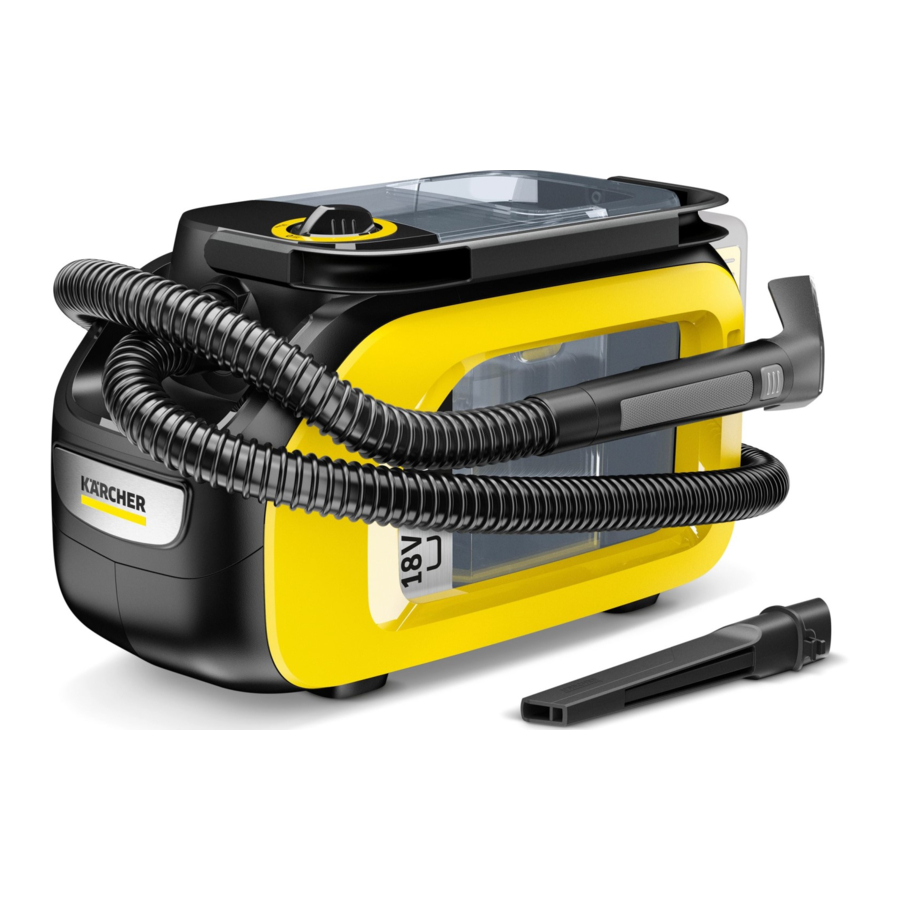
Description of the device
Depending on the model selected, there are differences in the equipment. The specific equipment is described on the device packaging.

- Spray/suction hose connection
- Power switch (1 (ON) / 0 (OFF))
- Waste water tank with lid
- Fresh water tank with lid
- Fuel cap
- Carrying handle
- Holder for accessories
- Storage for sponge, brush, detergent bag
- Battery pack mounting
- *Rechargeable battery pack
- Spray/suction hose with rotating handle
- Upholstery nozzle for spray extraction
- Crevice nozzle for spray extraction
- Detergent RM 519 (100 ml)
- *Charger
* optional
Battery pack charging
- Charging the battery pack (see operating instructions and safety instructions for the battery pack and the charger).
Initial startup
Pre-cleaning
Note
As the device does not have a dry vacuum function, if necessary remove coarse-grained dirt (e.g. crumbs) with a commercially available vacuum cleaner before cleaning the textiles.
Connecting accessories
- Press the spray/suction hose into the spray/suction hose connection on the device until it latches into place.
- For removal, press the latch and pull the spray/suction hose out.
![]()
- For removal, press the latch and pull the spray/suction hose out.
- Connect the upholstery nozzle or crevice nozzle to the handle, depending on the application case.
- To separate the upholstery nozzle and crevice nozzle, press the catch on the handle and pull the spray/ suction hose off.
![]()
![]()
- To separate the upholstery nozzle and crevice nozzle, press the catch on the handle and pull the spray/ suction hose off.


Filling the fresh water tank
 ATTENTION
Only switch on the device when the fresh water tank and waste water tank are installed.
ATTENTION
The fresh water and waste water tanks must be firmly seated in the device.
ATTENTION
The use of unsuitable detergents can damage the device and result in loss of eligibility for warranty claims.
Note
If necessary, use KÄRCHER RM 519 detergent for cleaning upholstery.
- Observe the manufacturer's dosing quantity recommendations when dosing with detergent.
- A dosage of approx. 100 ml of detergent is recommended per tank filling.
- Pour in the detergent and then fill up to "Max" with water.
- The total filling quantity is a maximum of 1.7 litres.
Note
The fresh water tank can be removed at any time for filling or be filled directly on the device.
Filling the water reservoir directly on the device
- Pull the tank cap upwards and turn sideways. Dose the detergent according to the specifications and then fill the tank with water up to the "MAX" mark.
![]()
- Close the tank cap.

Removing the water tank for filling
- Pull out the water tank vertically upwards by the recessed grip.
![]()
- Pull the tank cap upwards, turn it sideways and fill the water tank with detergent and tap water up to the "MAX" mark.
![]()
or
Unlock the tank lid, remove it and fill with detergent and tap water up to the "MAX" mark.
![]()
- Close the tank cap or fit the tank lid making sure that it is firmly seated.
- Fit the water tank down to the bottom of the device.


Fitting the battery pack
- Push the battery pack into the battery pack mount from above until the battery pack latches into place.
ATTENTION
Only use battery packs from the KÄRCHER Battery Power (+) platform with 18 V nominal voltage.

Switching on the device
- Turn the power switch to position 1 (ON).
![]()
The suction turbine and pump start.

Operation
Cleaning upholstery
Note
Warm water (maximum 50°C) increases the cleaning effect.
Note
Only use the RM 519 detergent from KÄRCHER for cleaning.
ATTENTION
Danger from cleaning solution
Risk of damage
Before using the device, check the object to be cleaned for colour fastness and water resistance in an inconspicuous place.
- Fill the fresh water tank with detergent and water, see chapter Filling the fresh water tank.
- Fit the battery pack, see chapter Fitting the battery pack.
- Switch the device on, see chapter Switching on the device.
- Press the lever on the handle to spray the cleaning solution.
![]()
- Pull the upholstery nozzle backwards over the surface to be cleaned in overlapping paths, do not push.
Note
When the wastewater container is full, a float switch closes the suction opening and the device runs at a higher speed. - Switch off the device immediately and empty the waste water tank, see chapter Emptying the waste water tank.

Cleaning methods
Light/Normal soiling
- Turn the power switch to position 1 (ON).
Illustration J
The suction turbine and pump start. - Press the lever for spraying.
The cleaning solution is sprayed on.
Illustration K - Release the lever for spraying and vacuum the residues of the cleaning solution.
- After cleaning, clean the upholstery with clean, warm water and impregnate if desired.
Heavily soiling or stains
- Turn the power switch to position 1 (ON).
Illustration J
The suction turbine and pump start. - Press the lever for spraying.
Illustration K
Cleaning solution is sprayed. - Turn the power switch to position 0 (OFF).
![]()
- Allow the cleaning solution to act for at least 5 minutes.
- Turn the power switch to position 1 (ON).
The suction turbine and pump start.
Illustration J - Suck off any residues of the cleaning solution.
- Repeat the procedure if necessary.
- After cleaning, clean the upholstery with clear, warm water and impregnate if desired.

Finishing operation
Note
To ensure that no cleaning and dirt particles remain in the lines, carry out a system cleaning (without the addition of detergents) after each application.
- Turn the power switch to position 0 (OFF).
Illustration L - Empty the waste water tank, see chapter Emptying the waste water tank.
- Fill the fresh water tank with tap water up to the "MAX" mark, see chapter Filling the fresh water tank.
- Connect the spray/suction hose to the crevice nozzle.
- Open the tank cap and insert the crevice nozzle completely into the opening.
![]()
- Turn the power switch to position 1 (ON) and simultaneously press and hold down the spray lever on the handle.
Illustration J
The rinsing process is finished as soon as the fresh water tank is completely empty. - Turn the power switch to position 0 (OFF).
Illustration L - Remove the battery pack, see chapter Removing the battery pack.
- Charge the battery pack if necessary.
- Empty the waste water tank, see chapter Emptying the waste water tank.
- Thoroughly rinse the waste water tank with clear water.
- If necessary, e.g. if the sieve in the fresh water tank is contaminated, rinse the fresh water tank with clear water, see chapter Cleaning the waste water tank cap and separator.
- Disconnect the accessories from the device.
- To remove any remaining liquid in the spray/suction hose:
- Press the catch and remove the spray/suction hose from the device.
- Press the lever on the handle and let the liquid flow out.

Note
To allow the liquid to dry completely, do not wrap the spray/suction hose around the device to dry.
Note
To avoid puddles in the living area (e.g. on carpet, parquet), let the remaining liquid run in a suitable container (e.g. sink, bucket).
- Rinse the upholstery nozzle with tap water and let the device dry with the other accessories.
- Stow the device in the "drying position" (with the two tank lids slightly open so that any remaining liquid can dry without leaving any residue).
Emptying the waste water tank
- Pull out the dirty water tank vertically upwards by the recessed grip.
![]()
- Unlock the two side ones tank caps, remove the filler cap and dispose of waste water.
![]()
- When continuing the cleaning work: Replace the filler cap, making sure that it is firmly seated. Insert the waste water tank down to the bottom of the device.
- At the end of the cleaning work: Stow the device in the "drying position" (the filler cap is slightly open and any remaining liquid can dry without leaving any residue).


Cleaning the waste water tank cap and separator
Note
2 grids are fitted to the inside of the waste water tank cover (on the separator). If the grids are wet or dirty, the float may not switch correctly or the device may switch off too early.
Therefore, ensure that the grids are clean and dry during operation.
- Remove the waste water tank from the device, see chapter Emptying the waste water tank
- Remove the tank lid from the tank and remove the separator.
- Carefully clean the tank lid and separator with a damp cloth.
- Carefully remove moisture with a dry cloth.
![]()
- Fit the tank lid and separator together, fasten on the tank and fit them back into the device.

Removing the battery pack
Note
During longer work breaks, remove the battery pack from the device and secure it against unauthorised use.
- Push the battery pack upwards and remove it from the device.
![]()

Storing the device
- Fasten the crevice nozzle to the accessory holder.
- Wrap the suction hose around the device and fasten it to the other accessory holder with the upholstery nozzle.
![]()
- Store the device in a dry and frost-free room.

Safety instructions
Hazard levels

- Indication of an imminent threat of danger that will lead to severe injuries or even death.

- Indication of a potentially dangerous situation that may lead to severe injuries or even death.

- Indication of a potentially dangerous situation that may lead to minor injuries.
ATTENTION
- Indication of a potentially dangerous situation that may lead to damage to property.
General safety instructions
- Risk of asphyxiation. Keep packaging film out of the reach of children.
- Only use the device for its proper use. Take into account the local conditions and beware of third parties, in particular children, when working with the device.
- Persons with reduced physical, sensory or mental capabilities and persons lacking experience and knowledge may only use the appliance if they are properly supervised, have been instructed on use of the appliance safely by a person responsible for their safety, and understand the resultant hazards involved.
- Only people who have been instructed on how to use the device, or have proven their ability to operate it, and have been explicitly instructed to use it, must use the device.
- Children must not operate the device.
- Children must be supervised to prevent them from playing with the appliance.
- Children may only perform cleaning work and user maintenance under supervision.
- Safety devices are provided for your own protection. Never modify or bypass safety devices.
Operation
- Operation in explosive atmospheres is prohibited.
- Risk of explosion
- Never use the device to vacuum up combustible gases, liquids or dusts.
- Never use the device to vacuum up reactive metal dusts (e.g. aluminium, magnesium, zinc).
- Never use the device to vacuum up undiluted brine or acids.
- Never use the device to vacuum up any burning or smouldering objects/matter.
These substances can corrode the materials in use on the device. - Have repair work and work on electrical components carried out only by authorized Customer Service personnel.
- Risk of injury. Do not use the nozzle and suction pipe at head height.
- In case of any foam formation or escaping liquids, switch off the device immediately and remove the mains plug or the battery pack.
- Never leave the device unsupervised while it is in operation.
- Check the device and the accessories prior to each use to make sure they are safe and working correctly. Do not use the device if it is not working properly or if it is not safe to operate.
- Do not use the device if it has been dropped beforehand, has received an impact or is visibly damaged. Have any damage repaired correctly before using the device again.
- Only use the detergents recommended by the manufacturer and observe the application, disposal and warning instructions of the detergent manufacturers.
ATTENTION
- Protect the device from extreme weather conditions, moisture and heat.
- Never vacuum substances such as plaster, cement, etc., as they can harden when in contact with water and endanger the function of the device.
Care and service
Note
- Switch off the device and remove the battery pack before performing any care and service work.
- Have repair work and work on electrical components carried out by the authorised customer service only.
- The appliance contains electrical components - do not clean the appliance under running water.
ATTENTION
- Do not use scouring agents, glass or multi-purpose cleaner for cleaning.
- Remove the battery pack from the device before a longer period of inactivity.
- Remove a used battery pack from the device and dispose if it properly.
Register your product www.kaercher.com/welcome

Documents / Resources
References
![www.kaercher.com]() Cleaning equipment and pressure washers | Kärcher International
Cleaning equipment and pressure washers | Kärcher International![www.kaercher.com]() Home and Garden Warranty Registration USA | Kärcher
Home and Garden Warranty Registration USA | Kärcher
Download manual
Here you can download full pdf version of manual, it may contain additional safety instructions, warranty information, FCC rules, etc.
Download Kärcher SE 3-18 Compact - Battery-powered Spray Extraction Cleaner Manual
Advertisement


Need help?
Do you have a question about the SE 3-18 Compact and is the answer not in the manual?
Questions and answers