Kärcher OC 6-18, OC 6-18 Premium - Mobile Outdoor Cleaner Manual
- Manual (244 pages) ,
- Original instructions manual (248 pages) ,
- Manual (24 pages)
- Also fits for
- Oc 6-18 premium
Advertisement
- 1 Safety devices
- 2 Intended use
- 3 Accessories and spare parts
- 4 Scope of delivery
- 5 Description of the device
- 6 Blink codes
- 7 Installation
-
8
Initial startup
- 8.1 Battery pack charging
- 8.2 Installing/removing the flat jet nozzle and spray lance
- 8.3 Connecting/disconnecting the medium pressure hose
- 8.4 Connecting the water supply
- 8.5 Connection to a water line
- 8.6 Water removal from water reservoir
- 8.7 Suck water from open containers
- 8.8 Installing the battery pack
- 9 Operation
- 10 Transport
- 11 Storage
- 12 Care and service
- 13 Troubleshooting guide
- 14 Technical data
- 15 Safety instructions
- 16 Documents / Resources
Safety devices
Trigger locking button
The locking button blocks the trigger and prevents the device from switching on unintentionally.
Motor circuit breaker
The motor circuit breaker switches off the device if the current consumption/temperature is too high. Wait 20 seconds or allow the device to cool down before switching it on again.
Intended use
The battery-operated pressure washer is intended for private use only.
The battery-operated pressure washer is intended for cleaning machines, vehicles, buildings, tools, façades, terraces, garden machines etc. using a water jet.
Rechargeable battery packs and chargers
Only use the device with battery packs and chargers from the KÄRCHER 18 V Battery Power (+) system.
Suitable battery packs and chargers are marked with the KÄRCHER 18 V Battery Power (+) System symbol.
Suitable battery packs bear the designation "Battery Power 18/... and Battery Power+ 18/...".
Suitable chargers bear the designation "BC 18 V...".

Accessories and spare parts
Only use original accessories and original spare parts. They ensure that the appliance will run fault-free and safely.
Information on accessories and spare parts can be found at www.kaercher.com.
Special accessories
Only use special accessories with blue plug.
Information on battery pack and charger
The following are available as special accessories:
- Battery packs/chargers that are not included in the scope of delivery or that are additionally required
- A quick charger and a battery pack with a larger capacity
Scope of delivery
The scope of delivery for the appliance is shown on the packaging. Check the contents for completeness when unpacking. If any accessories are missing or in the event of any shipping damage, please notify your dealer.
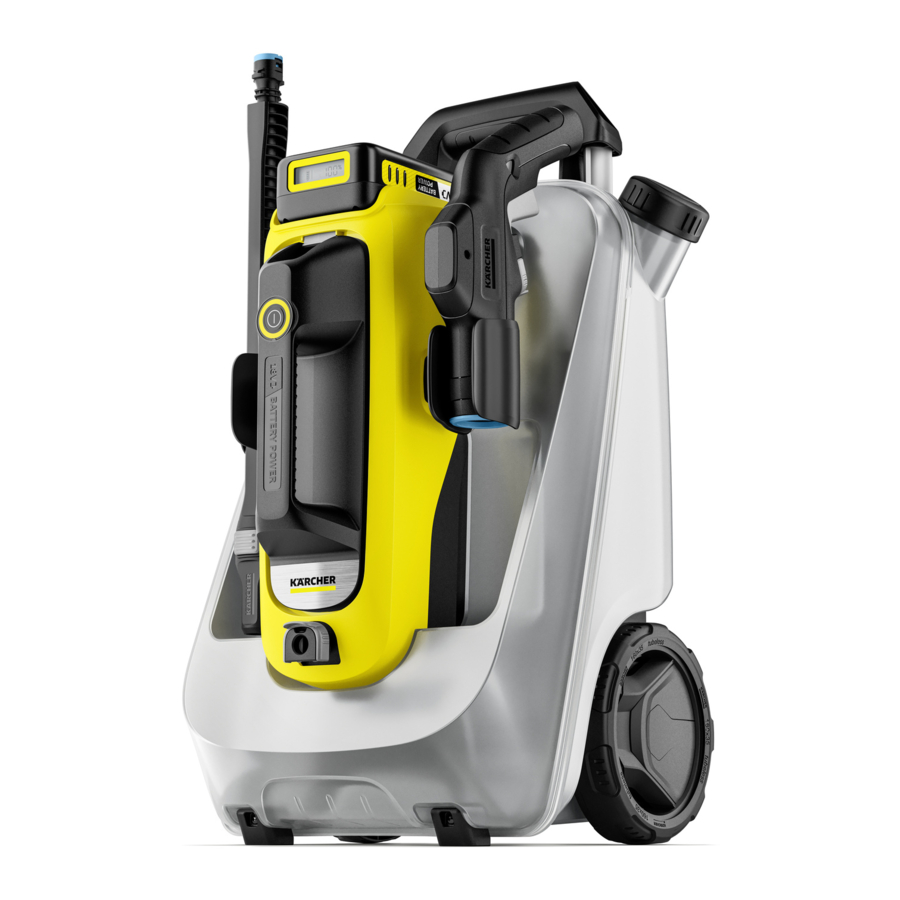
Description of the device
The maximum amount of equipment is described in these operating instructions. Depending on the model used, there are differences in the scope of delivery (see packaging).
Illustration A

- Flat jet nozzle
- Flat jet nozzle unlocking button
- Long spray lance
- Medium pressure gun
- Locking button
- Unlocking button
- Trigger
- Clip on the medium pressure gun
- Short spray lance
- Carrying handle for device
- Medium pressure hose
- *Garden hose (fabric reinforced, diameter at least 1/2 inch (13 mm), length at least 7.5 m, with commercially available quick coupling)
- Coupling
- **KÄRCHER SH 5 suction hose for water supply from open containers
- ***Battery Power 18 V plug-in charger
- ***Battery Power 18/25 battery pack
- Gun holder
- Device
- Clip on the device
- Spray lance holder
- Operating state LED
- ON/OFF button
- Battery pack unlocking button
- Battery pack holder
- Water spigot
- Type plate
- Fine filter
*Additionally required and available separately
**Optionally available
***Except for battery set: Additionally required and available separately
Illustration B
Water reservoir WT 12l
(optionally available, included in the scope of delivery for OC 6-18 Premium)

- Water reservoir
- Device mount
- Device unlocking button
- Water reservoir lid
- Pull handle
- Water reservoir carrying handle
- Hose switch
- Wheel
- Storage compartment
- Stand
- Outlet valve
Blink codes
The operating status LED indicates the operating status and faults.
 | The device is switched on. |
| The device is switched off. | |
 | Blink code 1, see The device runs dry. |
 | Blink code 2, see The device is too hot or too cold. |
 | Blink code 3, see The device draws too much current. |
Installation
Install the supplied loose parts onto the device before initial startup.
Installing the spray lance and gun holder
ATTENTION
The spray lance holder and the gun holder cannot be removed once they are engaged!
- Push the spray lance holder into the left mount on the device until it audibly locks in place.
Illustration C

- Push the gun holder into the right mount on the device until it audibly locks in place.

Initial startup
Battery pack charging
- Charge the battery pack (see operating instructions and safety instructions for the battery pack and the charger).
Installing/removing the flat jet nozzle and spray lance
Installing
- Attach the flat jet nozzle to the short or long spray lance until it audibly clicks into place.
Illustration D

- Press the short or the long spray lance into the medium pressure gun and fix it by turning it 90°.
Illustration E


Removing
- Press the spray lance into the medium pressure gun and loosen and pull it off by turning it 90°.
- Press the flat jet nozzle unlocking button and pull off the flat spray nozzle.
Connecting/disconnecting the medium pressure hose
Connecting
- Unwind the medium pressure hose and eliminate any loops and twists.
- Connect the medium pressure hose to the device:
Illustration F

- Pull the clip on the device.
- Plug in the medium pressure hose.
- Press back the clip on the device.
- Connect the medium pressure hose to the medium pressure gun:
Illustration G

- Pull the clip on the medium pressure gun.
- Plug in the medium pressure hose.
- Press back the clip on the on the medium pressure gun.
- Pull on the medium pressure hose to check that it is firmly seated in the device and in the medium pressure gun.


Releasing
Note
Before releasing the medium pressure hose, disconnect the water supply or remove the device from the water reservoir, see Water removal from water reservoir, otherwise water will leak out.
- Releasing is performed in the reverse sequence.
Connecting the water supply
ATTENTION
Risk of damage due to contaminated water and additives!
Contamination in the water and additives can damage the device and the accessories.
Operate the device only with clear fresh water without contamination or additives.
Never use contaminated water, waste water or salt water.
- Check the pressure, temperature and quantity of the supply water for compliance with the requirements, see Technical data.
Note
Observe the water distribution company regulations.
Connection to a water line
- Attach the garden hose (not included in the scope of delivery) to the coupling on the device.
Illustration H

- Connect the garden hose to the water line.
- Open the water tap fully.

Water removal from water reservoir
The device can be operated with the WT 12l water reservoir (special accessory 2.644-351.0, included the OC 6-18 Premium scope of delivery).
ATTENTION
Risk of damage!
There is a risk of damage if the water reservoir is handled improperly.
Proceed prudently: Do not drop or tip over the water reservoir, put it down carefully, do not pull or push it against hard objects, for example, Curbs or steps.
When carrying and pulling, follow all instructions in Transport.
- Push the device into the device mount on the water reservoir until it audibly latches into place.
Note: The coupling must be mounted on the water connection!
Illustration I


ATTENTION
Risk of damage!
There is a risk of damage if the device is submerged.
Do not immerse the device in liquids.
Do not fill the water reservoir by immersion or scooping.
- Fill the water reservoir:
Illustration J

- Unscrew and remove the water reservoir lid.
- Fill the water reservoir with clean, cold clear water.
- Attach the water reservoir lid and screw it shut.

Note
Water may escape when releasing the medium pressure hose from the device or medium pressure gun,.
- Operate the device, see Operating the device.
Removing the device from the water reservoir
- Switch off the device, see Switching the device on/off.
ATTENTION
Risk of damage!
There is a risk of damage if the device is removed improperly from the water reservoir.
Only grasp the carrying handle of the device to remove the device from the water reservoir.
Do not pull on the battery pack or the battery pack holder.
- Remove the device from the water reservoir:
Illustration K

- Press and hold the unlocking button on the device.
- Grasp the device by the carrying handle of the device and pull it out of the device holder.

Suck water from open containers
This pressure washer is suitable for suctioning surface water with the KÄRCHER SH5 suction hose (special accessory, order number 2.644-124.0), e.g.from water butts or ponds (for maximum suction height, see Technical data).
- Unscrew the coupling on the device.
- Fill the suction hose with water.
- Hand-tighten the union nut of the suction hose on the water connection piece and hang the suction hose in a water source (e.g. rain barrel). Lay the suction hose without kinks and do not put it under tension or pressure.
- Vent the suction hose:
- Operate the device, see Operating the device, until no more air bubbles can be seen in the suction hose.
- Release the trigger.
- Press the locking button.
Note
If the device cannot be vented, remove the spray lance from the medium pressure gun, see Installing/removing the flat jet nozzle and spray lance, reduce the suction height and repeat the venting process. If the device still does not build up pressure, install the spray lance, connect the device to a water line and operate it for approx. 1 min until it is vented. Then repeat steps 1 to 4.
Installing the battery pack

Risk of injury and damage if the battery pack is not engaged!
A battery pack that is not properly engaged can fall out and cause injury or damage.
Make sure that the battery pack engages correctly in the battery mount.
- Push the battery pack into the battery mount until it audibly clicks into place.
Illustration L


Operation
ATTENTION
Risk of damage!
Damaging the pump during dry running.
Switch off the device if it does not build up pressure within 2 minutes.
Proceed according to the instructions in chapter Troubleshooting guide.
Switching the device on/off
Switch on
- Switch off the device:
- When drawing water from a water line or open container: Place the device with its underside on a horizontal, level surface.
Illustration M

- When drawing water from the water reservoir: Place the water reservoir with the wheels and feet on a horizontal, level surface.
Illustration N

- When drawing water from a water line or open container: Place the device with its underside on a horizontal, level surface.
- Press the ON/OFF button.
Illustration O
The operating state LED lights up.
The device is ready for operation.


Switching off
- Press the ON/OFF button.
The operating state LED goes out.
The device is switched off.
Operating the device
- Switch on the device, see Switching the device on/off.
- Operate the device:
Illustration P

- Press the unlocking button.
- Pull the trigger as far as it will go and carry out the cleaning process.

Operation with detergent

Risk to life and health when handling cleaning agents!
Improper handling of detergents can lead to death and serious damage to health.
Observe the safety data sheet of the detergent manufacturer, in particular the instructions on personal protective gear.
ATTENTION
Risk of damage due to foreign substances in the water!
Foreign substances in the water will damage the device.
Do not add any foreign substances such as detergents, pesticides or other additives to the water.
ATTENTION
Risk of damage due to detergents acting too long and drying out!
Detergent can damage hot surfaces and damage surfaces if left to act for too long.
Do not apply detergent to hot surfaces and observe the maximum contact time.
Do not allow detergent to dry on the surfaces being cleaned.
- Spray the detergent sparingly on the dry surface and let it work for a while (do not let it dry).
- Rinse off the loosened dirt with the pressure jet, see Operating the device.
Interrupting operation
- Interrupt the operation:
Illustration Q

- Release the trigger.
- Press the locking button.
The trigger is locked.

Removing the battery pack
Note
During longer work breaks, remove the battery pack from the device and secure it against unauthorised use.
- Press the ON/OFF button to switch off the device, see Switching the device on/off.
- Remove the battery pack:
Illustration R

- Press the battery pack unlocking button.
- Pull the battery pack out of the battery pack mount.

Ending operation
- Release the trigger.
- Stop the water supply to the device:
- When drawing water from a water line: Close the water tap.
- When drawing water from an open container: Un-screw the suction hose from the water connection.
- When drawing water from the water reservoir: Drain the water reservoir.
- Pull the trigger for max. 1 min.
The pressure in the device is released and the residual water is pumped out of the device. - Release the trigger.
- Press the locking button. The trigger is locked.
- Press the ON/OFF button.
The operating state LED goes out.
The device is switched off. - When drawing water from a water line: Pull off the garden hose at the coupling.
- Stow the accessories, see Stowing accessories.
- Remove and charge the battery pack (see Removing the battery pack).
Stowing accessories
- Finish operation, see Ending operation.
- Release the medium pressure hose from the device and medium pressure gun, see Connecting/disconnecting the medium pressure hose.
- Drain the residual water from the accessories.
- Wind up the medium pressure hose.
- Device with water reservoir: Attach the medium pressure hose to the hose holder.
Illustration S

- Install the flat jet nozzle on the long spray lance, see Installing/removing the flat jet nozzle and spray lance.
- Engage the long spray lance on the spray lance holder.
Illustration T

- Install the short spray lance on the medium pressure gun, see Installing/removing the flat jet nozzle and spray lance.
- Engage the medium pressure gun on the gun holder.


Transport
Risk of injury or damage due to non-observance of the weight!
When transporting and storing the device, there is a risk of injury and damage due to its weight. Take into account the weight of the device for transportation and storage, see Technical data.
ATTENTION
Risk of damage!
There is a risk of damage if the water reservoir is handled improperly.
Proceed prudently: Do not drop or tip over the water reservoir, put it down carefully, do not pull or push it against hard objects such as kerbs or steps.
ATTENTION
Risk of damage due to frost!
Water can damage the device and accessories when it freezes.
Protect the device and accessories from frost during transport and storage.
- Finish operation, see Ending operation.
Carrying the device
- Carry the device:
- Device without water reservoir: Lift and carry the device by the carrying handle of the device.
ATTENTION
Risk of damage!
There is a risk of damage if carried improperly. Do not carry the device by the carrying handle of the device while there is water in the water reservoir, only use the carrying handle of the water reservoir.
- Device with water reservoir: Lift and carry the water reservoir by the water reservoir carrying handle.
Illustration U


Pulling the device with the water reservoir
- Pull the device with the water reservoir:
Illustration V

- Pull out the pull handle.
- Tip the water reservoir onto the wheels.
- Pull the water reservoir by the pull handle.

Transporting the device in a vehicle
- Device with water reservoir: Push the pull handle down until it rests against the carrying handle of the water reservoir.
- Load the device into the vehicle and secure the device against rolling away, slipping and tipping according to the respectively applicable guidelines.
Storage
Risk of injury or damage due to non-observance of the weight!
When transporting and storing the device, there is a risk of injury and damage due to its weight.
Take into account the weight of the device for transportation and storage, see Technical data.
ATTENTION
Risk of damage due to frost!
Water can damage the device and accessories when it freezes.
Protect the device and accessories from frost during transport and storage.
- Finish operation, see Ending operation.
ATTENTION
Risk of damage due to algae!
Moisture in the water reservoir can lead to algae formation during storage. Algae can damage the device and cause odours.
Empty the water completely from the water reservoir after operation.
Remove the water reservoir lid before storage to ensure sufficient ventilation
- Remove the water reservoir lid and place it in the storage compartment.
- Store the device and accessories in an indoor space protected from frost and direct sunlight
Care and service

Improper cleaning
Short-circuit
Switch off the device and remove the battery pack before performing any work on the device. Do not clean the device with a hose or high-pressure water jet.
ATTENTION
Improper cleaning
Risk of damage.
Do not use any abrasive or aggressive detergents.
The device is maintenance-free.
Cleaning the device
- Clean the device with a moist cloth.
Cleaning the water reservoir
- Clean the water reservoir with a moist cloth.
Cleaning the fine filter
Clean the fine filter regularly.
- Depressurize the device, see Ending operation.
- Devices with a water reservoir: Remove the device from the water reservoir, see Water removal from water reservoir.
ATTENTION
Risk of damage due to improper cleaning!
The fine filter is damaged by improper cleaning.
Clean the fine filter only under running water against its flow direction.
Do not use sharp or hard objects such as needles or wire brushes.
ATTENTION
Risk of damage!
The device may be damaged when operated without a fine filter.
Do not operate the device without a fine filter or with a damaged fine filter.
Check the fine filter for damage before installation and replace a damaged fine filter immediately.
- Clean the fine filter:
Illustration W

- Unscrew the coupling on the water spigot.
- Pull the fine filter out of the water connection.
- Rinse the fine filter under running water from the outside to the inside.
- Install the fine filter in the reverse order.

Cleaning the outlet valve in the water reservoir
Clean the outlet valve in the water reservoir if it is contaminated or leaking.
- Depressurize the device, see Ending operation.
- Remove the device from the water reservoir, see Water removal from water reservoir.
- Clean the outlet valve:
Illustration X

- Tilt the water reservoir forwards.
- Use a water stream to rinse the contamination out of the outlet valve.

Troubleshooting guide
Touching live parts
Electric shock
Switch off the device and remove the battery pack before performing any work on the device.
Have repair work and work on electrical components carried out by the authorised customer service only.
You can remedy minor faults using the following overview.
If in any doubt, please contact your authorised Customer Service.
| Fault | Cause | Rectification |
| The device does not start up | The battery pack is not sitting properly in the battery mount. |
|
| The charging state of the battery pack is too low. |
| |
| The device or the battery pack is too hot / too cold. |
| |
| The battery pack or charger is defective. |
| |
| Device switches off automatically | The device or the battery pack is overheated/too cold. |
|
| The device builds up no pressure, or insufficient pressure or the jet pulsates | The nozzle hole of the flat jet nozzle is dirty. |
|
| The water supply is too low. |
| |
| The water reservoir is empty. |
| |
| The water supply via the suction hose is insufficient. |
| |
| The sealing ring on the coupling is damaged. |
| |
| The fine filter is dirty. |
| |
| The device is leaking | The outlet valve in the water reservoir is dirty. |
|
| The medium pressure hose is not plugged into the device. |
| |
| The sealing ring on the nozzle of the medium pressure hose is damaged. |
| |
| The sealing ring on the coupling is damaged. |
| |
| The device leaks a small amount for technical reasons. |
| |
| The medium pressure hose is leaking | The medium pressure hose is not plugged into the medium pressure gun. |
|
| The sealing ring on the nozzle of the medium pressure hose is damaged. |
| |
| The medium pressure hose is damaged. |
| |
| The device runs dry | The fine filter is dirty. |
|
| The supplied water quantity is too low. |
| |
| The device is too hot or too cold | The motor circuit breaker has tripped, see Motor circuit breaker. |
|
| The device draws too much current | Blockage due to foreign objects in the device or accessories. |
|
| Incompatible accessories used. |
| |
| The trigger was not pulled fully. |
|
If in any doubt, please contact your authorised Customer Service.
Technical data
| Device performance data | ||
| Working voltage of the battery | V | 18 |
| Degree of protection | IPX4 | |
| Protection class | III | |
| Operating time (max.) at full battery charge with Battery Power 18/25 battery pack | min | 12 |
| Water reservoir capacity | l | 12 |
| Max. permissible pressure | MPa | 2,4 |
| Water connection Feed pressure (max.) | MPa | 1,0 |
| Input temperature (max.) | °C | 40 |
| Suction height (max.) | m | 0,5 |
| Permissible ambient temperature | °C | 5-40 |
| Dimensions and weights | ||
| Typical operating weight (device without water reservoir) | kg | 3,3 |
| Typical operating weight (device with water reservoir) | kg | 18,5 |
| Length x width x height (device without water reservoir) | mm | 384 x 241 x 204 |
| Length x width x height (device with water reservoir) | mm | 349 x 321 x 586 |
| Determined values in acc. with EN 60335-2-79 | ||
| Hand-arm vibration value | m/s2 | 0,5 |
| Uncertainty K | m/s2 | 0,5 |
| Sound pressure level LpA | dB(A) | 69 |
| Uncertainty KpA | dB(A) | 3 |
| Sound power level LWA + uncertainty KWA | dB(A) | 84 |
Safety instructions
 Read these safety instructions, these original instructions, the safety instructions provided with the battery pack and the original instructions for the battery pack/standard charger supplied before using the device for the first time. Act in accordance with them. Keep the booklets for future reference or for future owners.
In addition to the notes in the operating instructions, you also need to take into consideration the general safety regulations and accident
Hazard levels
- Indication of an imminent threat of danger that will lead to severe injuries or even death.

- Indication of a potentially dangerous situation that may lead to severe injuries or even death.
- Indication of a potentially dangerous situation that may lead to minor injuries.
ATTENTION
- Indication of a potentially dangerous situation that may lead to damage to property.
General safety instructions
- Risk of asphyxiation. Keep packaging film out of the reach of children.
- Only use the device for its proper use. Take into account the local conditions and beware of third parties, in particular children, when working with the device.
- Persons with reduced physical, sensory or mental capabilities and persons lacking experience and knowledge may only use the appliance if they are properly supervised, have been instructed on use of the appliance safely by a person responsible for their safety, and understand the resultant hazards involved.
- Children must not operate the device.
- Children must be supervised to prevent them from playing with the appliance.
- Safety devices are provided for your own protection. Never modify or bypass safety devices.
Operation
- Operation in explosive atmospheres is prohibited.
- When using the device in hazard zones (e.g. service stations), adhere to the respective safety regulations.
- Do not direct the water jet at persons, animals, live electrical equipment or loose objects.
- Do not spray any objects which contain harmful substances (e.g. asbestos).
- The appliance contains electrical components - do not clean the appliance under running water.
- Do not use the appliance if it has been dropped beforehand, is visibly damaged or if it is leaking.
- According to the applicable regulations, the appliance may never be used with the drinking water network without a system separator. Ensure that the connection to your house water system, with which the pressure cleaner is operated, is equipped with a system separator according to EN 12729 type BA.
- Water that has flowed through a system separator is no longer classified as drinkable.
- Never leave the device unsupervised while it is in operation.
- Only operate or store the device in accordance with the description or figure.
ATTENTION
- Device damage due to dry running. Switch the device on only when the water supply is ensured.
- Do not operate the device at temperatures below 0°C.
Symbols on the device
 | Do not aim the high-pressure jet may at persons, animals, live electrical equipment or the device itself. Protect the device against frost. |
 | The device may not be connected to the public drinking water network. |
 | Specification of the guaranteed sound level. |
Register your product
www.kaercher.com/welcome

Documents / Resources
References
![www.kaercher.com]() Cleaning equipment and pressure washers | Kärcher International
Cleaning equipment and pressure washers | Kärcher International![www.kaercher.com]() Home and Garden Warranty Registration USA | Kärcher
Home and Garden Warranty Registration USA | Kärcher
Download manual
Here you can download full pdf version of manual, it may contain additional safety instructions, warranty information, FCC rules, etc.
Download Kärcher OC 6-18, OC 6-18 Premium - Mobile Outdoor Cleaner Manual
Advertisement


Need help?
Do you have a question about the OC 6-18 and is the answer not in the manual?
Questions and answers