Table of Contents
Advertisement
Quick Links
Advertisement
Table of Contents

Related Manuals for Heatmiser neo Stat-HC1


Summary of Contents for Heatmiser neo Stat-HC1
- Page 1 Stat-HC1...
-
Page 2: Product Image
Model: Stat-HC1 Stat Series... -
Page 3: Table Of Contents
Table of Contents Product Image Locking/Unlocking the neoStat-HC1 Table of Contents Frost Protection Installation Procedure Holiday System Type Ventilation Mode Pairing the neoHub Feature Menu Settings Explained 23-24 Pairing the neoStat-HC1 Adjusting the Feature Menu Settings What is a Mesh Network? Feature Menu 26-27 Approach Sensor... -
Page 4: Installation Procedure
Installation Procedure Mount the thermostat at eye level. Read the instructions fully so you get the best from our product. Don’t Do not install near to a direct heat source as this will a ect functionality. Do not push hard on the LCD screen as this may cause irreparable damage. This neoStat-HC1 is designed to be ush mounted and requires a back box of 35mm (minimum depth) to be sunk into the wall prior to installation. - Page 5 Stat-HC1...
-
Page 6: System Type
System Type ‘System Type’ makes sure that the thermostat operation and switched outputs are con gured to the correct installation. Key: NO = Normally Open Switch, NC = Normally Closed Switch GND and AO = 0-10 Volt Fan Output. 01= 2 Pipe System Manual Select Heat or Cool Heat, Cool &... - Page 7 System Type cont… 04 = 4 Pipe System Heat, Cool and Auto Heat, Cool, Auto & Ventilation modes with 3 speed fan (all modes) and twin valve outputs. Heat, Cool, Auto = Auto & Manual fan. Terminal Outputs Fan: ‘GND’, ‘AO’ Vent = Manual 3 speed selectable fan.
-
Page 8: Pairing The Neohub
Pairing the neoHub • Connect the neoHub to your router with the ethernet cable provided. • Connect the neoHub power supply also provided with the hub. Download the neoApp and register your account. • Sign in to your account, select the ‘Add neoHub’ option and follow the simple step by step pairing instructions. -
Page 9: What Is A Mesh Network
• In the app, Press ADD ANOTHER for addtional zones or press FINISH to complete setup. Please note, you only have to pair the neoHub to your account once. To pair any additional Neo’s, select the + icon in the app, then ‘Add Thermostat’. What is a Mesh Network NeoStats work using a mesh network, meaning neoStats have the ability to send &... -
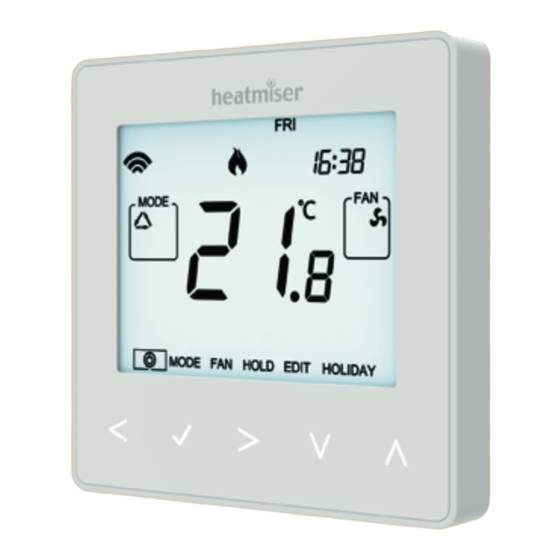
Page 10: Lcd Display
LCD Display Stat Series... - Page 11 LCD Display 1. Mesh Symbol - Displayed when connected to the neoHub. 2. Window Icon - Displays when Window/Door Switch is triggered. 3. Frost Protection/Standby – Displayed when frost protection is enabled. 4. Cool Symbol – Displayed when cooling is active. 5.
-
Page 12: Temperature Display
Temperature Display ‘Neo-HC1’ will always show the ambient room temperature. If wireless remote sensors are paired, (‘neohub’ required) the display will automatically show an average temperature between both sensors. Room Temperature Set Temperature To view the set temperature (Heat or Cool modes only): •... -
Page 13: Power On/Off
Power On/O The heating is indicated ON when the ame icon is displayed. When the ame icon is absent, there is no requirement for heating to achieve the set temperature but the neoStat remains active. To turn the neoStat-HC1 o completely, scroll to the Power Icon and hold the Tick key for approximately 3 seconds until the display goes blank .... -
Page 14: Setting The Time And Date
Setting the Time and Date To set the clock, follow these steps. • Use the Left / Right keys to scroll to ..................• Press and hold Tick to turn o the display ..................• Use the right arrow key to select CLOCK ..................•... -
Page 15: Mode Select
Mode Select ‘Neostat-HC’ can be used as a heating/cooling thermostat and a fan ventilation controller, (mode options dependent on ‘System Type’ pages 5 & 6). To select the mode: • Use the ‘Left/Right’ keys to scroll to ‘MODE’ then press Tick ...... •... -
Page 16: Setting The Comfort Levels
Setting the Comfort Levels The ‘neoStat-HC1’ o ers three program mode options; Weekday/Weekend, 7 Day and 24 Hour programming. There is also the option to use the ‘neoStat-HC1’ as a manual thermostat. The thermostat is supplied with comfort levels already factory programmed, but these can be changed easily. - Page 17 • To program the comfort levels, use the Left / Right keys to scroll to EDIT ...... • Press Tick to con rm selection ......................• Use the Left / Right keys to select day / period of week (the selection will ash)..•...
-
Page 18: Manual Temperature Control
Manual Temperature Control The ‘Up/Down’ keys allow you to adjust the current set temperature. When you press either key, you will see the word ‘SET’ and the desired temperature value. • Use the ‘Up/Down’ keys to adjust the ‘SET’ value ............•... -
Page 19: Temperature Hold
Temperature Hold The temperature hold function allows you to manually override the current operating program and set a di erent temperature for a desired period. • Use the Left / Right keys to scroll to HOLD ............... • Press Tick to con rm selection ......................•... -
Page 20: Locking/Unlocking The Neostat-Hc1
Locking the neoStat-HC1 The neoStat-HC1 has a keypad lock facility. To activate the lock follow these steps. • Use the ‘Left/Right’ keys to scroll to ‘HOLD’ & press Tick for 10 seconds ....The display will show 0000. At this point enter a four digit pin number. •... -
Page 21: Frost Protection
Frost Protection/Standby Use the Left / Right keys to scroll to the Power Icon ............The frost icon will toggle ON/OFF each time Tick is pressed ..........In this mode, the ‘neoStat-HC1’ will display the frost icon and will only turn the heating ON should the room temperature drop below the set frost temperature. -
Page 22: Holiday
Holiday The holiday function reduces the set temperature in your home to the frost protection temperature setting. The thermostat will maintain this temperature for the duration of the holiday and will then automatically return to the program mode on your return. Caution! If left in ‘COOL’... -
Page 23: Ventilation Mode
Ventilation Mode In ventilation mode there is no heat or cool output only fan control. With no timer setting this mode is completely manual and is available in all ‘System Types’ . To select ‘VENT’ mode: • Use the ‘Left/Right’ keys to scroll to ‘MODE’ then press Tick ........•... -
Page 24: Feature Menu Settings Explained
Feature Menu Settings Explained THESE FEATURES ALLOW YOU TO SET THE CORRECT PARAMETERS FOR INITIAL SETUP. Feature 01 – Pairing To neoHub: This function is used to pair the thermostat to the Hub. Feature 02 - Switching Di erential: This function allows you to increase the switching di erential of the thermostat. - Page 25 Feature 08 – Program Mode: The neoStat-HC1 o ers the following program mode options; Weekday/ Weekend - 4 comfort levels for Monday - Friday. 4 di erent comfort levels for Saturday - Sunday. 7 Day Program - Each day of the week has 4 comfort levels that can be programmed independently.
-
Page 26: Adjusting The Feature Menu Settings
Adjusting the Feature Menu Settings • Use the Left / Right keys to scroll to ..............• Press and hold the Tick button for 3 seconds ............• SETUP will be highlighted, now press the tick key once ........Feature Number Setting Value •... -
Page 27: Feature Menu
Feature Menu FEATURE DESCRIPTION SETTING Used to add zone to the neoHub Pairing 00.5 = 0.5°C Switching Di erential 01 = 1.0°C (Default) 02 = 2.0°C 03 = 3.0°C 07° - 17°C (12°C = Default) Frost Protection Temperature Output Delay 00 - 15 Minutes (00 = Default) Up/Down Temperature Limit 00°... - Page 28 Feature Menu FEATURE DESCRIPTION SETTING 00 = °C, 01 = °F (00 = Default) Temperature Format System Type 01 = 2 Pipe System, Selectable Heat or Cool only. 02 = 2 Pipe System, Cool only. 03 = 2 Pipe System Heat & Cool (fans for Cool only). 04 = 4 Pipe System Heat, Cool &...
-
Page 29: Re-Calibrating The Thermostat
Re-calibrating the Thermostat Attention! Re-calibrating this thermostat could cause it to operate incorrectly? Before you attempt to carry out this procedure please call the support line printed on the back page of this manual. If you need to re-calibrate the thermostat, follow these steps. •... -
Page 30: Diagrams
Wiring Diagram - Normally Closed Valve System Types 01 & 02 Model: neoStat-HC1 230VAC 0-10v AC230V Input AO n/a V1 V2 0-10v This product must only be installed Normally Closed Valve by a quali ed electrician and comply Connection with local installation regulations. Stat Series... - Page 31 Wiring Diagram - Normally Open Valve System Types 01 & 02 Model: neoStat-HC1 230VAC 0-10v AC230V Input AO n/a V1 V2 0-10v This product must only be installed Normally Open by a quali ed electrician and comply Valve with local installation regulations. Connection Stat-HC1...
- Page 32 Wiring Diagram - 3 Wire Valve Connection System Types 01 & 02 Model: neoStat-HC1 230VAC 0-10v AC230V Input AO n/a V1 V2 0-10v This product must only be installed 3 Wire Valve by a quali ed electrician and comply Connection with local installation regulations.
- Page 33 Wiring Diagram - Fan Coil & Wet Systems System Types 03 & 05 Model: neoStat-HC1 230VAC 0-10v AC230V Input AO n/a V1 V2 0-10v This product must only be installed by a quali ed electrician and comply No Fan Output with local installation regulations.
- Page 34 Wiring Diagram - Heat & Cool Valves System Type 04 Model: neoStat-HC1 230VAC 0-10v AC230V Input AO n/a V1 V2 0-10v This product must only be installed by a quali ed electrician and comply 2 Port Motorised with local installation regulations. Valves Stat Series...
-
Page 35: Factory Reset
Factory Reset To reset the device to factory default settings, follow these steps: • Use the Left / Right keys to scroll to ..............• Press and hold Tick to turn the display OFF ............• SETUP will be highlighted ..................•... - Page 36 Units 1-5 Hurstwood Court, Mercer Way Shadsworth Business Park, Blackburn, Lancashire, BB1 2QU, United Kingdom. Hereby, Heatmiser UK Ltd. declares that the radio equipment type (designation of type of radio equipment) is in compliance with Directive 2014/53/EU. Rev 1.4 RF Frequency: 2.4ghz 3.54dBm...
Need help?
Do you have a question about the neo Stat-HC1 and is the answer not in the manual?
Questions and answers