Table of Contents
Advertisement
Quick Links
x 44
WARNING! FOR YOUR SAFETY, FOR OUTDOOR USE ONLY
Please read these instructions carefully and ensure that your barbecue is properly installed, assembled,
maintained and serviced in accordance with these instructions.
Failure to follow these instructions may result in serious injury and/or damage to property.
Necessary
Tools
Please check the pack contents before attempting to assemble this product. A full checklist of
components is given in this leaflet. If any components are missing, please contact the retailer from
whom you bought this product.
This product takes approximately 60 MINUTES
to assemble with 2 PEOPLE. The fittings pack
contains SMALL ITEMS which should be KEPT
AWAY FROM YOUNG CHILDREN. Read this
leaflet in full before commencing assembly.
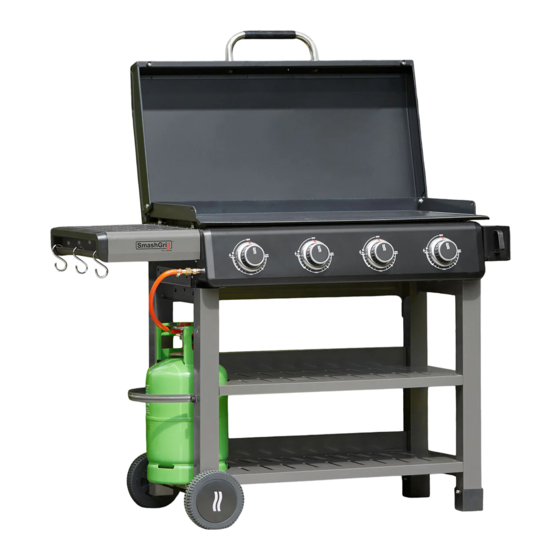
SmashGrill 4 Burner
GSM40MK
x 4
x 12
x 12
x 2
x 44
Carbon Monoxide Hazard
Using a barbecue inside can kill you,
it gives off Carbon Monoxide, which has no odour.
Never use a barbecue in enclosed spaces such as
a tent, home/building, vehicle or garage.
Advertisement
Table of Contents

Related Manuals for Grillstream SmashGrill GSM40MK


Summary of Contents for Grillstream SmashGrill GSM40MK
- Page 1 SmashGrill 4 Burner GSM40MK x 44 x 12 x 44 x 12 WARNING! FOR YOUR SAFETY, FOR OUTDOOR USE ONLY Please read these instructions carefully and ensure that your barbecue is properly installed, assembled, maintained and serviced in accordance with these instructions. Failure to follow these instructions may result in serious injury and/or damage to property.
-
Page 2: Table Of Contents
GSM40MK Contents Warning Information Page Location of your BBQ Page Connecting to the gas cylinder Page The hose and regulator assembly Page Testing for leaks Page Gas cylinder safety Page What is Propane Page Are all gas bottle gases the same Page How is it different from natural gas Page... -
Page 3: Warning Information
IMPORTANT - BBQS MUST BE INSTALLED IN ACCORDANCE WITH THE MANUFACTURER’S INSTALLATION INSTRUCTIONS, LOCAL GAS FITTING REGULATIONS AND MUNICIPAL BUILDING CODES. GRILLSTREAM BARBECUES, Think carefully when deciding on a location where you are to use your LEISUREGROW PRODUCTS LTD. 8504-23 2531-23 BBQ. -
Page 4: Testing For Leaks
GSM40MK SECURING THE HOSE AND REGULATOR ASSEMBLY GAS CYLINDER SAFETY Quick release connection (Fig. 4) - Always change over a gas cylinder away from any possible source - The BBQ’s manifold connection is a quick release connector of ignition in a well ventilated area - Gently pull back the movable section on the hose, slide over - Do not smoke whilst handling gas cylinders the connection on the manifold, and release. -
Page 5: Lighting Your Bbq
GSM40MK LIGHTING YOUR BBQ FIRST TIME USE OF BBQ - Before using the BBQ for the first time, it should be first wiped with PIEZO IGNITION SYSTEM a mild soap and water solution to remove any dust Upon turning any burner control knob you will hear an audible - Make sure your BBQ is on a solid level surface “click”. -
Page 6: Maintenance Of Your Bbq
GSM40MK CARE AND MAINTENANCE BURNER & FIREBOX MAINTENANCE Although your SmashGrill’s firebox is fully protected from grease STORING YOUR SMASHGRILL and other build-up that can accumulate during cooking, regular checks of the burners and ignition are still required to ensure proper - If possible, always store in a cool, dry location. -
Page 7: Troubleshooting
Re-install burners over orifices and test again WARRANTY All of our Grillstream BBQs and accessories are built to last. Our materials are carefully considered with longevity and safety in mind, the technology used in our products is second to none, and all of this is backed up with our friendly customer care team who are on hand for advice and assistance. -
Page 8: Exploded Diagram
GSM40MK Page 8... -
Page 9: Parts List
GSM40MK Description Code Flatplate Hose and Regulator Cooking Frame Side Shelf Burner Towel Holder Crossfire Assembly Side Handle Heat Shield Trolley Side - Left Upper Back Panel Trolley Side - Right Fat Cup Bracket Trolley Shelf Fat Cup Match Holder Hood Gas Bottle Support Hood Handle... -
Page 10: Fittings List
GSM40MK FITTINGS x 44 Part Part Part Part x 12 x 12 x 44 x 12 x 12 Gas Bottle 1/4”x13 Bolt No.10x10 Bolt Wheel Spacer Support Bolt Part Part Part Part 1/4” x 18 Bolt 8 Washer Split Pin Assembly Handle Washer Part... - Page 11 GSM40MK STEP 1 Attach Trolley Shelf (DC) to Trolley Side - Left (DA) using 5 x Bolt (1). Repeat for second Trolley Shelf. Part 1/4”x13 Bolt Page 11...
- Page 12 GSM40MK STEP 2 Attach Trolley Shelf (DC) to Trolley Side - Right (DB) using 7 x Bolt (1). Repeat for second Trolley Shelf. Part 1/4”x13 Bolt Page 12...
- Page 13 GSM40MK STEP 3 Slide 1 x Wheel (EB) and Wheel Spacer (4) onto Wheel Axle (EA). Now slide Wheel Axle through both legs of Trolley Side - Left (DA). Now slide second Wheel Spacer (4), Wheel (EB) and Washer (5) onto Wheel Axle, securing in place using 1 x Split Pin (6). Now carefully affix 2 x Wheel Cap (EC) onto both wheels.
- Page 14 GSM40MK STEP 4 Attach Heat Shield (AF) to Trolley Side - Left (DA) using 2 x Bolt (1). Part 1/4”x13 Bolt Page 14...
- Page 15 GSM40MK STEP 5 Carefully lower Cooking Frame (AB) onto Trolley Side - Left and Right (DA & DB) and secure in place using 6 x Bolt (1). Part 1/4”x13 Bolt Page 15...
- Page 16 GSM40MK STEP 6 Attach Side Handle (CC) to Trolley Side - Right (DB) from inside of Cooking Frame using 2 x Bolt Assembly (7) and 2 x Handle Washer (8). Part Part 1/4” x 18 Bolt Assembly Handle Washer Page 16...
- Page 17 GSM40MK STEP 7 Connect Quick Release Hose (BF) to terminal on side of Control Panel by pushing firmly. To disconnect, pull back the movable section on hose and pull apart. Please ensure you perform a gas leak check on this connection as instructed at the end of this manual. Page 17...
- Page 18 GSM40MK STEP 8 Connect Upper Back Panel (AG) to reverse of Cooking Frame (AB) and Trolley Side - Left and Right (DA & DB) using 6 x Bolt (1). Part 1/4”x13 Bolt Page 18...
- Page 19 GSM40MK STEP 9 Part unscrew bolts on side of Cooking Frame as indicated and hook Side Shelf (CA) in place. It will be secured in the next step. Page 19...
- Page 20 GSM40MK STEP 10 Secure Side Shelf (CA) in place using 2 x Bolt (2) at the front and 2 x Bolt (1) at the base. Leave all bolts loose until they are all installed. Now tighten all bolts in this and the previous step. Part Part 1/4”x13 Bolt...
- Page 21 GSM40MK STEP 11 Attach Fat Cup Bracket (AH) to Cooking Frame (AB) using 2 x Self-tapping Screw (9). Now slot Fat Cup (AI) into Fat Cup Bracket as shown. Part Self-tapping Screw Page 21...
- Page 22 GSM40MK STEP 12 Carefully lower Flatplate (AA) onto Cooking Frame (AB) with the adjustable legs passing through the holes as indicated. Note: The bolts on the adjustable legs are for adjustment only. The flatplate does not attach to the Cooking Frame as it is necessary to remove it for maintenance purposes. Higher Lower Page 22...
- Page 23 GSM40MK STEP 13 Attach one end of the Gas Bottle Support (DF) to rear leg of Trolley Side - Left (DA) using 1 x Gas Bottle Support Bolt (3). Hook the other end over the Clamping Knob pre-installed on front leg of Trolley Side - Left.
- Page 24 GSM40MK STEP 14 Hook Tool Hooks (BD) in place on Side Shelf (CA) as shown. Page 24...
- Page 25 GSM40MK STEP 15 Attach Hood Handle (AK) onto Hood (AJ) using 2 x Bolt Assembly (7). Part 1/4” x 18 Bolt Assembly Page 25...
- Page 26 GSM40MK STEP 16 Attach Hood to rear of Flatplate (AA) using 2 x Hood Bolt (12), 2 x Washer (10) and 2 x Nut (11). Part Part Part 7 Washer 1/4” Nut Hood Bolt Page 26...
- Page 27 GSM40MK STEP 17 Smaller Gas Bottles (not supplied) can be stored on the left-hand side of the Trolley. Loosen the Clamping Bolt and fold the Gas Bottle Support out of the way. Slot the Gas Bottle in place and reattach the Gas Bottle Support in place using the Clamping Bolt. Larger bottles, that will not fit on the Trolley, can be safely located on the floor beside it.
-
Page 28: Leak Test
GSM40MK TESTING YOUR BBQ TESTING FOR LEAKS - DO THIS BEFORE USING YOUR BBQ. Note - Do not test for gas leaks with an open flame. If you smell gas, turn off at the source. Before first use, at the beginning of each new season, or whenever a gas cylinder is changed, you must check for gas leaks. - Page 30 PLEASE KEEP THESE INSTRUCTIONS FOR FUTURE REFERENCE Grillstream Barbecues Part of the LeisureGrow Group Dewmead Farm, New Inn Road, Hinxworth, Hertfordshire SG7 5HG, United Kingdom. Tel: +44 (0)1462 744500 E-mail:consumer@leisuregrow.com...
Need help?
Do you have a question about the SmashGrill GSM40MK and is the answer not in the manual?
Questions and answers