Advertisement
Quick Links
Model No.: R668
PO #:
Serial #:
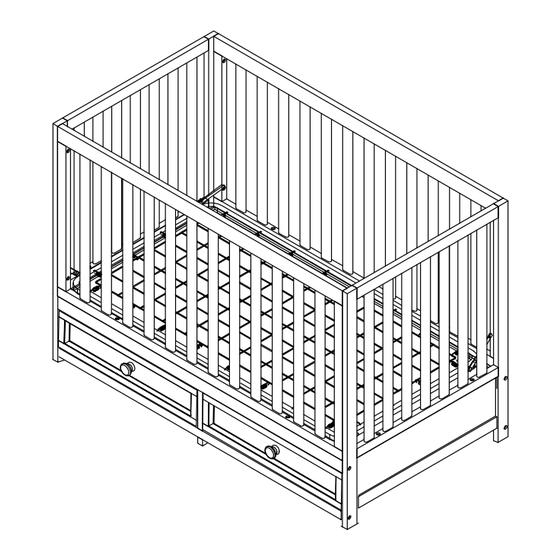
3-in-1 Convertible Crib (R668)
THIS PRODUCT IS NOT INTENDED FOR INSTITUTIONAL OR COMMERCIAL USE.
If you have any questions or missing parts, contact us. DO NOT return product parts
to the store from where it was purchased before contacting AFG Customer Service.
AFG Customer Service:
E-mail: service@afgbabyfurniture.com
Tel: (323) 722-6268
Advertisement

Related Manuals for AFG R668


Summary of Contents for AFG R668
- Page 1 THIS PRODUCT IS NOT INTENDED FOR INSTITUTIONAL OR COMMERCIAL USE. If you have any questions or missing parts, contact us. DO NOT return product parts to the store from where it was purchased before contacting AFG Customer Service. AFG Customer Service: E-mail: service@afgbabyfurniture.com...
- Page 2 To help prevent strangulation, tighten all fasteners. A child can trap parts of the body or clothing on loose • fasteners. DO NOT place crib near windows where cords from blinds or drapes may strangle a child. • 2018 AFG Baby Furniture R668 Assembly Sheet ©...
-
Page 3: Fall Hazard
Securely tighten loose bolts and other fasteners.DO NOT use crib if any parts are missing, damaged or broken. Contact (AFG International Products Inc) for replacement parts and instructional literature if needed. DO NOT substitute parts. - Page 4 R668 Parts Identi cation Sheet DO NOT assemble crib if parts are defective or miss ing. Contact AFG for exchange or keep the original box f or return authorization. ~ Crib Assembly Parts B. Right Panel C. Left Panel A. Stationary Side Panel...
- Page 5 R668 Hardware Identi cation Sheet DO NOT assemble crib if parts are defective or miss ing. Contact AFG for exchange or keep the original box f or return authorization. ~ Crib Assembly Hardware t t i (12 pcs) 1. Bolt M6 * 60mm 2.
- Page 6 R668 Crib Diagram Sheet Stationary Side Panels (2 pcs) Right Panel (1pc) Left Panel (1 pc) Top Rail (1pc) Bottom Rail (1 pc) Middle Frame (1 pc) Mattress Support (1 pc) Back Bottom Panel (1 pc) ©...
- Page 7 R668 Drawer Diagram Sheet Drawer Front Panel (2 pcs) Drawer Back Panel (2 pcs) Drawer Bottom (2 pcs) Drawer Left Panel (2 pcs) Drawer Right Panel (2 pcs) Knob (2 pcs) ©...
- Page 8 R668 Drawer Assembly Sheet STEP 1: Attach Drawer Left Panel (L) and Drawer Right Panel (M) to Drawer Front Panel (I) by using four wood screws(#6). Tighten firmly with Phillips screwdriver. STEP 2: Slide Drawer Bottom Panel (K) into the groove.
- Page 9 R668 Drawer Assembly Sheet STEP 3: Attach Drawer Back Panel (J) to the side panels with four wood screws (#6). Make sure all screws are tightly secured. STEP 4: Attach knob (#7) to the drawer using knob bolt (#8). Complete.
- Page 10 R668 Crib Assembly Sheet STEP 1 1. Attach Back Bottom Panel(N) to back of the Middle Frame (F) by securing with 2 Bolts(#3). 2. Attach Bottom Rail(E) to front bottom of the Middle Frame (F) by securing with 1 Bolt(#3).
- Page 11 R668 Crib Assembly Sheet STEP 2: 1. Attach Right Panel (B) and Left Panel (C) to the right and left side of Back Bottom Panel(N) by using 4 Barrel Nuts(#9) and tighten with 4 Bolts (#1). 2. Insert 2 Wood dowels(#5) to Top Rail(D), attach Right Panel (B) and Left Panel (C) to the right and left side of Top Rail(D) by using 2 Barrel Nuts(#9) and tighten with 2 Bolts (#1).
- Page 12 R668 Crib Assembly Sheet STEP 3: Place Mattress Support (G) into the crib. Adjust the Mattress Support to the desired height. Then use four Bolts (#4) to secure the mattress support in place. Face Up Warning Envelope WARNING: Make sure that the warning envelope on the Mattress Support Frame is facing up.
- Page 13 R668 Crib Assembly Sheet STEP 4: 1. Slide in two Stationary Side Panel (A). Then use 4 Bolts (#1) to secure the panel in place. 2. Screw 4 Bolts (#2)into both the right and left side holes that connects Back Stationary Side Panel (A) to Right Panel (B) and Left Panel (C).
- Page 14 R668 Crib Assembly Sheet STEP 5: Slide the two drawers into the bottom compartment. Complete. ©...
- Page 15 R668 Toddler Bed Assembly STEP 1: Unscrew the four bolts (#2) and two bolts(#1)from Stationary Side Panel (A). Remove the Stationary Side Panel. STEP 2: 1. Attach Guard Rail(H) to Top Rail(D), installing two bolts (#2) and tighten the guard rail to the Left side panel(C) .
- Page 16 R668 Day Bed Assembly STEP 1: Unscrew the 2 bolts (#2) and 2 bolts (#1) ,Remove the Guard Rail. Day Bed Complete. ©...
- Page 17 Product Assistance Procedures AFG International Products strives to ensure that our customers are receiving a quality piece of furniture. We want our customers to be satisfied with using our products for years to come. In the event that you need assistance or have any inquiries regarding our products, please feel free to contact us with the information below.
-
Page 18: Care And Maintenance
DO NOT return products to the store once a product is used, it cannot be resold and the materials and energy invested in the product would go to waste. In the event that AFG determines that a defect that may result from customer abuse or misuse, we will contact you with information about services and methods to prevent occurrences.
Need help?
Do you have a question about the R668 and is the answer not in the manual?
Questions and answers