
Related Manuals for Sleipner MIDI 203


Summary of Contents for Sleipner MIDI 203
- Page 1 Installation Guide For DC Electric Windlass Models MIDI 203 DOCUMENT ID: SLEIPNER MOTOR AS 7092 REVISION: P.O. Box 519 DATE: N-1612 Fredrikstad 2023 Norway LANGUAGE: www.sleipnergroup.com...
-
Page 2: Table Of Contents
Anchor Line Stop Ring Installation ..............................17 Pre-delivery Checklist ..................................18 Service and Support................................... 19 Product Spare Parts and Additional Resources ..........................19 Warranty Statement .................................... 19 Patents........................................19 Sleipner Motor AS P.O. Box 519, Arne Svendsensgt. 6-8 N-1612 Fredrikstad, Norway MC_0451 MIDI 203 7092... -
Page 3: Responsibility Of The Installer
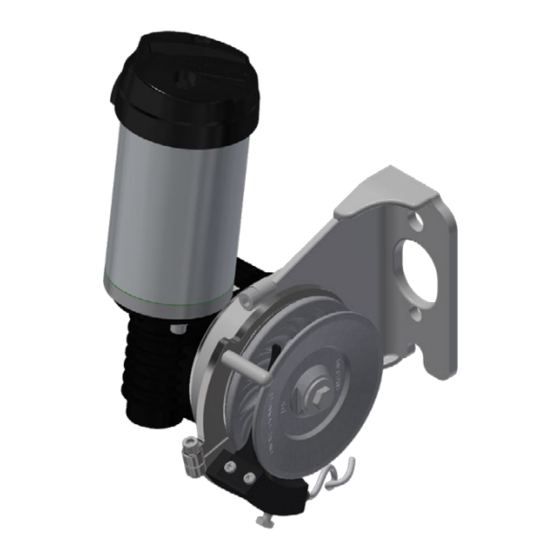
For MIDI windlass systems MC_0318 Sleipner MIDI is designed for boats up to approximately 7 meters. These windlasses are true free-fall windlasses and are developed with an electrical control unit. This unit is ready for connecting Sleipner remote control and switch panel. -
Page 4: Product Measurements
Motor bracket attachment measurements Motor bracket attachment measurements Motor bracket attachment diameter Motor bracket attachment measurements Motor bracket attachment measurements Motor bracket attachment measurements 65.4 Motor bracket attachment measurements Motor bracket attachment measurements (k) (l) MG_0527 MIDI 203 7092 2023... -
Page 5: Product Specifications
Product Specifi cations MC_0466 Equipment: - Anchor (Multiple types) Description MIDI 203 - Anchor bracket (Multiple types) Maximum Operating Voltage - Lead line (MIDI) - Thru-Hull conduit for rope anchor line No-Load current (V) <0.1A with 12v - Remote control... -
Page 6: Installation Preparation
Platform roller or hinged platform roller If the windlass is fi tted low in relation to the anchor roller, so the angle between the anchor roller and hull conduit is small, use an Sleipner hinged platform roller or a pivoting platform roller with spring «62-30000» to ensure that the free-fall will work. Ensure the anchor line is wound up in-line with the hull conduit. -
Page 7: Anchor Line Clearance
**Rope Clearance Area for rope to collect Rope bin Attach the end of the rope to the boat ** A low rope clearance will cause rope jamming and spinning when reeling in the anchor line. MG_0349 MIDI 203 7092 2023... -
Page 8: Windlass Mounting Installation
Adjust the windlass anchor line guide and stop sensor in a corresponding manner by loosening the screw fastening it to the gear leg. Rotate the bracket so the anchor line is guided down and away from bulkheads and components that prevent the anchor line from coiling correctly below the windlass. (NB: Max. tightening torque 17 Nm.) Anchor Pull direction MG_0528 MIDI 203 7092 2023... -
Page 9: Windlass Electrical Installation
Connecting switch panel 86-08950 or 86-08955 • 4-way Sleipner cable come in various lengths. • 4-way Sleipner cable are easy attached to contacts on control box unit (150810). • The cable must be attached to 150810 contact unit. • See wiring diagram or control panel manuals for more details. - Page 10 Leave breaker/fuse disconnected until the installation is completed. See control unit (150800) manual for confi guring programming and more installation information. fig.1 150800 Spring washer Washer Cable lug A1-A2 Link Spacer see SM-111517 for illustration MG_0353 MIDI 203 7092 2023...
-
Page 11: Visual Wiring Diagram
Config Opt. Sleipner 150810 remote receiver Main circuit 4-lead breaker/ fuse control cable Battery IMPORTANT Position for easy access. Motor Ensure it is turned OFF when not in use. Auto stop sensor Midi MG_0351 MIDI 203 7092 2023... -
Page 12: Configuring Windlass Type
“Fault” LED is lit: The last fault condition detected by the controller is indicated by the “Mode” LEDs, visible when the terminal cover is removed. Some faults will inhibit operation, while others allow continued use. See Troubleshooting table. MIDI 203 7092 2023... -
Page 13: Windlass Circuit Breaker
To switch OFF, press red the button. WARNING Improper use or incorrect connection of such high currents components will generate a lot of heat which in worst case can cause fi re. OFF button ON button (move/press pin switch upwards) MG_0354 MIDI 203 7092 2023... -
Page 14: Insert Anchor Line Into The Windlass Line Wheel
When pulling in the anchor line for the fi rst time, you must keep the anchor line tight, so the anchor line run correctly. Be careful to avoid injuring fi ngers. Secure the end of the anchor line to an appropriate point after threading it through the windlass. MG_0529 MIDI 203 7092 2023... -
Page 15: Anchor Line Around The Line Wheel
180 Max. 90˚ degrees counter-clockwise The anchor line is always pulled into the windlass from the right. This is because of the direction of rotation for the windlass gypsy wheel. Anchor line Bin MG_0348 MIDI 203 7092 2023... -
Page 16: Anchor Line Stop Rings For Auto Stop
Mark the anchor line once more by the detector and fasten the stop rings by the marks. These stop rings will be exposed to wear by the line wheel, especially during heavy loads, and must therefore be inspected regularly. Replace damaged stop rings if needed. MG_0538 MIDI 203 7092 2023... -
Page 17: Anchor Line Stop Ring Installation
Stop ring fi tted and fastened tightly to the anchor line. Fasten the other stop ring in the same manner. Recommended tools: Keeper ring pliers Pliers Stop Rings for Auto Stop Auto stop rings Pliers Water pump pliers Anchor line MG_0350 MIDI 203 7092 2023... -
Page 18: Pre-Delivery Checklist
Date of delivery:......................................The compartment for the product has been isolated from general bilge water and has no obvious or suspected risks for fl ooding: .................................................................................................................................. Other comments by installer: .................................................................................................................................................................... MIDI 203 7092 2023... -
Page 19: Service And Support
11. This warranty gives you specific legal rights, and you may also have other rights which vary from country to country. Patents MC_0024 At Sleipner we continually reinvest to develop and offer the latest technology in marine advancements. To see the many unique designs we have patented visit our website www.sleipnergroup.com/patents MIDI 203... - Page 20 © Sleipner Group, All rights reserved The information given in the document was right at the time it was published. However, Sleipner Group cannot accept liability for any inaccuracies or omissions it may contain. Continuous product improvement may change the product specifi...
Need help?
Do you have a question about the MIDI 203 and is the answer not in the manual?
Questions and answers