Table of Contents
Advertisement
Available languages
Available languages
Quick Links
PROJECT SOURCE® and logo design
are trademarks or registered trademarks
of LF, LLC. All Rights Reserved.
Serial Number
Questions, problems, missing parts? Before returning to your retailer, call our
customer service department at 866-389-8827, 8 a.m. - 8 p.m., EST, Monday - Sunday.
You could also contact us at partsplus@lowes.com.
AS22530
Purchase Date
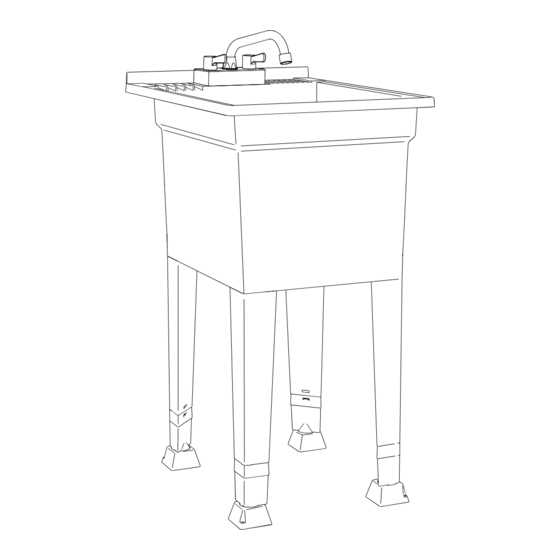
LAUNDRY TUB
with FAUCET KIT
MODEL #999-LUT18WHT
ITEM #5286851
Français p.
10
Español p.
19
Advertisement
Chapters
Table of Contents

Related Manuals for Project Source 999-LUT18WHT


Summary of Contents for Project Source 999-LUT18WHT
- Page 1 ITEM #5286851 LAUNDRY TUB with FAUCET KIT MODEL #999-LUT18WHT PROJECT SOURCE® and logo design are trademarks or registered trademarks of LF, LLC. All Rights Reserved. Français p. Español p. Serial Number Purchase Date Questions, problems, missing parts? Before returning to your retailer, call our customer service department at 866-389-8827, 8 a.m.
-
Page 2: Table Of Contents
TABLE OF CONTENTS Package Contents..........................2 Safety Information..........................4 Assembly Instructions........................5 Care and Maintenance........................9 Warranty............................9 PACKAGE CONTENTS SINK QUANTITY PART DESCRIPTION Sink basin Upper legs Lower legs Sink feet... - Page 3 PACKAGE CONTENTS HOT + COLD FAUCET DRAIN PART DESCRIPTION QUANTITY PART DESCRIPTION QUANTITY Faucet body Drain tube Base plate Trap loop with depth tag Gasket Threaded adapter Locknut 1.25” Reducer gasket (optional) Supply line 1.25” Washer (optional) Sink stopper...
-
Page 4: Safety Information
SAFETY INFORMATION Please read and understand this entire manual before attempting to assemble, operate or install this product. Failure to do so may result in personal injury and/or damage. WARNING • Understand that the warnings and cautions discussed in this guide cannot cover every possible situation that may occur. -
Page 5: Assembly Instructions
ASSEMBLY INSTRUCTIONS SINK Lay the sink basin (A) upside down on the floor or a sturdy table top. Note: The back “lip” should hang off of the flat surface to prevent bending or breaking. Insert 4 upper legs (B) into the corners of the sink basin. - Page 6 ASSEMBLY INSTRUCTIONS FAUCET AND DRAIN KIT Begin the faucet assembly process with the sink unit in its upside down position. With a pair of scissors, trim the cuff off one end of the drain tube (K). Only trim in the valley of the hose as shown by the dashed line.
- Page 7 ASSEMBLY INSTRUCTIONS FAUCET AND DRAIN KIT Slide the faucet body (E) and base plate (F) into the faucet sink holes and position the gaskets (G) in place. Slide the locknuts (H) up to the gaskets and tighten by hand until snug. Use a wrench to ensure locknuts are fully tightened.
- Page 8 ASSEMBLY INSTRUCTIONS FAUCET AND DRAIN KIT Measure the drain tube so that it makes a trap and cut to length. Affix the second threaded adapter to the trimmed end of the drain tube. Use the threaded adapter to connect the drain tube to the drain line, tightening by hand until snug.
-
Page 9: Care And Maintenance
CARE AND MAINTENANCE This utility sink has been manufactured with the highest grade plastic and will provide many years of usage with the proper care and maintenance. • Always rinse the sink with fresh water to dilute and remove any deposits that may have been left behind after usage. - Page 10 ARTICLE #5286851 ENSEMBLE CUVE DE LESSIVE ET ROBINET MODÈLE #999-LUT18WHT PROJECT SOURCE® et le logo sont des marques de commerce ou des marques de commerce déposées de LF, LLC. Tous Français p. droits réservés. Español p. Numéro de série Date d’achat Des questions, des problèmes, des pièces manquantes? Avant de retourner l’article...
-
Page 11: Contenu De L'emballage
TABLE DES MATIÈRES Contenu de l’emballage.........................11 Consignes de sécurité........................13 Instructions pour l’assemblage.....................14 Entretien............................18 Garantie............................18 CONTENU DE L’EMBALLAGE ÉVIER QUANTITÉ PIÈCE DESCRIPTION Évier Montants supérieurs Montants inférieurs Pieds de l’évier... - Page 12 CONTENU DE L’EMBALLAGE CHAUD + FROID ROBINET DRAIN QUANTITÉ PIÈCE DESCRIPTION QUANTITÉ PIÈCE DESCRIPTION Corps du robinet Tuyau d’évacuation Plaque de base Boucle pour siphon avec jauge de profondeur Joint Adaptateur fileté Contre-écrou Conduite d’alimentation Joint réducteur de 1,25 po (facultatif) Bouchon d’évier Rondelle de 1,25 po...
-
Page 13: Consignes De Sécurité
CONSIGNES DE SÉCURITÉ Assurez-vous de lire et de comprendre l’intégralité de ce manuel avant de tenter d’assembler, d’installer ou d’utiliser l’article. Le non-respect de cette consigne peut entraîner des blessures ou des dommages matériels. AVERTISSEMENT • Veuillez noter que les mises en garde et les avertissements indiqués dans ce manuel ne couvrent pas toutes les conditions et situations qui pourraient survenir. -
Page 14: Instructions Pour L'assemblage
INSTRUCTIONS POUR L’ASSEMBLAGE ÉVIER Posez l’évier (A) à l’envers sur le sol ou sur un plateau solide. Remarque: Le rebord arrière doit dépasser la surface plane afin d’éviter qu’il ne se brise ou se plie. Insérez les 4 montants supérieurs (B) dans les coins de l’évier. - Page 15 INSTRUCTIONS POUR L’ASSEMBLAGE ENSEMBLE ROBINET ET DRAIN Retournez l’évier à l’envers afin de commencer le processus d’assemblage du robinet. À l’aide d’une paire de ciseaux, coupez le collier à une extrémité du tuyau d’évacuation (K). Coupez seulement dans le sillon du tuyau comme l’illustre la ligne pointillée.
- Page 16 INSTRUCTIONS POUR L’ASSEMBLAGE ENSEMBLE ROBINET ET DRAIN Faites glisser le corps du robinet (E) et la plaque de base (F) dans les trous appropriés du robinet et mettez les joints (G) en place. Faites glisser les contre-écrous (H) jusqu’aux joints, puis serrez-les fermement à la main. Utilisez une clé...
- Page 17 INSTRUCTIONS POUR L’ASSEMBLAGE ENSEMBLE ROBINET ET DRAIN Mesurez le tuyau d’évacuation de manière à ce qu’il crée un siphon et coupez-le à la longueur désirée. Fixez le deuxième adaptateur fileté à l’extrémité coupée du tuyau d’évacuation. Utilisez un adaptateur fileté afin de raccorder le tuyau d’évacuation à...
-
Page 18: Entretien
ENTRETIEN Cet évier à usage général a été fabriqué à partir de plastique de la plus haute qualité. Il offrira de nombreuses années d’utilisation s’il est entretenu de façon appropriée. • Rincez toujours l’évier avec de l’eau douce pour diluer et éliminer les dépôts qui pourraient avoir été... - Page 19 ARTÍCULO n.° 5286851 RECIPIENTE PARA LAVAR ROPA con KIT DE GRIFO PROJECT SOURCE® y el diseño del logotipo son marcas comerciales o marcas registradas de LF, LLC. MODELO n.° 999-LUT18WHT Todos los derechos reservados. Français p. Español p. Número de serie Fecha de compra ¿Preguntas, problemas, piezas faltantes? Antes de volver a la tienda, llame a nuestro...
-
Page 20: Contenido Del Paquete
ÍNDICE Contenido del paquete........................20 Información de seguridad......................22 Instrucciones de ensamblaje......................23 Cuidado y mantenimiento......................27 Garantía............................27 CONTENIDO DEL PAQUETE LAVABO CANTIDAD PIEZA DESCRIPCIÓN Lavabo del fregadero Patas superiores Patas inferiores Pies del fregadero... - Page 21 CONTENIDO DEL PAQUETE CALIENTE + FRÍA DRENAJE GRIFO CANTIDAD PIEZA DESCRIPCIÓN CANTIDAD PIEZA DESCRIPCIÓN Tubo de desagüe Cuerpo del grifo Sifón con etiqueta de Placa de base profundidad Empaque Contratuerca Adaptador roscado Línea de entrada Empaque reductor de 3,17 cm (opcional) Tope del fregadero Arandela de 3,17 cm...
-
Page 22: Información De Seguridad
INFORMACIÓN DE SEGURIDAD Lea y comprenda este manual por completo antes de intentar ensamblar, usar o instalar este producto. De lo contrario, podría ocasionar lesiones o daños. ADVERTENCIA • Debe tener en cuenta que las advertencias y precauciones mencionadas en esta guía no cubren todas las situaciones que podrían ocurrir. -
Page 23: Instrucciones De Ensamblaje
INSTRUCCIONES DE ENSAMBLAJE LAVABO Coloque el fregadero (A) en posición invertida sobre el piso o sobre una superficie de mesa resistente. Nota: el reborde posterior debe colgar de la superficie plana a fin de evitar que se doble o se rompa. Inserte las 4 patas superiores (B) en las esquinas del fregadero. - Page 24 INSTRUCCIONES DE ENSAMBLAJE GRIFO Y KIT DE DESAGÜE Comience el proceso de ensamblaje del grifo con el fregadero ubicado en posición invertida. Con un par de tijeras afiladas, recorte el puño de un extremo del tubo del desagüe (K). Solo recorte en la depresión de la manguera, como se muestra, en la línea punteada.
- Page 25 INSTRUCCIONES DE ENSAMBLAJE GRIFO Y KIT DE DESAGÜE Deslice el cuerpo del grifo (E) y la placa de base (F) hacia los orificios del fregadero del grifo y coloque los empaques (G) en su lugar. Deslice la contratuerca (H) hasta el empaque y ajuste la contratuerca a mano hasta que quede bien firme.
- Page 26 INSTRUCCIONES DE ENSAMBLAJE GRIFO Y KIT DE DESAGÜE Mida el tubo de desagüe para formar una trampa y córtelo a la medida. Fije el segundo adaptador roscado al extremo recortado del tubo de desagüe. Utilice el adaptador roscado para conectar el tubo de desagüe a la línea de desagüe.
-
Page 27: Cuidado Y Mantenimiento
CUIDADO Y MANTENIMIENTO Este fregadero de uso general está fabricado con acero inoxidable de la máxima calidad y podrá disfrutarlo durante muchos años con el cuidado y el mantenimiento adecuados. • Siempre enjuague el fregadero con agua dulce para diluir y eliminar cualquier depósito que pudiera haber quedado después del uso.
Need help?
Do you have a question about the 999-LUT18WHT and is the answer not in the manual?
Questions and answers