Table of Contents
Advertisement
Quick Links
Advertisement
Table of Contents

Related Manuals for Safety Vision LED7B-TS


Summary of Contents for Safety Vision LED7B-TS
- Page 1 U S E R G U I D E...
- Page 2 Safety Vision reserves the right to amend the information in this document at any time without prior notice. This material is confidential and the property of Safety Vision. It is shared with your company for the sole purpose of helping you with the operation of the described equipment.
-
Page 3: Table Of Contents
LED7B-TS / LED10B-TS USER GUIDE TABLE OF CONTENTS WHAT’S IN THE BOX? Monitor IR Remote Control INSTALLATION Before You Start Fan-Shaped Bracket U-Shaped Bracket IR Remote Control Battery WIRING WIRE OPERATION Powering On the Monitor Using the Touchscreen Switching between Camera Feeds... - Page 4 LED7B-TS / LED10B-TS USER GUIDE Settings Power Camera Parking Line Language Trigger Auto Scan Power On Standard System MAINTENANCE Operation Cleaning Disclaimer APPENDIX A: SPECIFICATIONS CLIENT SUPPORT TECH SUPPORT FCC COMPLIANCE STATEMENT...
-
Page 5: What's In The Box
LED7B-TS / LED10B-TS USER GUIDE WHAT’S IN THE BOX? Monitor • Wiring harness • Fan-shaped mounting bracket • U-shaped mounting bracket • Mounting bracket angle adjustment screws • HDMI adapter • Sun shield • Infrared remote control • (IR) (CR2025 battery not included) -
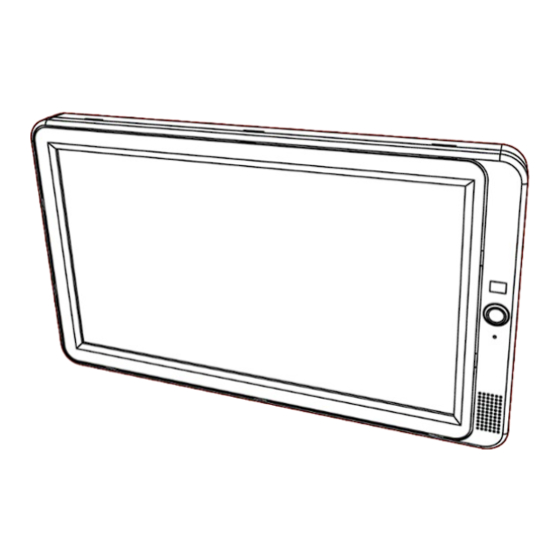
Page 6: Monitor
LED7B-TS / LED10B-TS USER GUIDE Monitor HD touchscreen Speaker Infrared sensor HDMI adapter Power button AV input Light level sensor... -
Page 7: Ir Remote Control
LED7B-TS / LED10B-TS USER GUIDE IR Remote Control MUTE Mutes and unmutes speaker POWER Power on or put monitor in standby mode Moves cursor up DOWN Moves cursor down LEFT Decreases volume / moves cursor left RIGHT Increases volume/moves cursor right... -
Page 8: Installation
LED7B-TS / LED10B-TS USER GUIDE INSTALLATION Before You Start To reduce the risk of electric shock, disconnect the vehicle battery • before installing the monitor. Do not install the monitor where it may interfere with safe vehicle • operation or prevent air bag deployment. -
Page 9: Fan-Shaped Bracket
LED7B-TS / LED10B-TS USER GUIDE Fan-Shaped Bracket Select a safe position within the observer’s line of sight (for example, on the to install the monitor. dashboard) Secure the monitor bracket to the mounting surface with the supplied screws, the pre-applied high-bond adhesive, or both. - Page 10 LED7B-TS / LED10B-TS USER GUIDE (Fan-Shaped Bracket cont.) Slide the monitor onto the mounting bracket to the desired height and tighten the locknut to secure the monitor to the mounting bracket. Adjust the monitor horizontally and vertically, then tighten the handle...
-
Page 11: U-Shaped Bracket
LED7B-TS / LED10B-TS USER GUIDE U-Shaped Bracket Select a safe position within the observer’s line of sight (for example, on the to install the monitor. dashboard) Secure the monitor U-shaped bracket to the mounting surface with the supplied screws. Slide the monitor into the U-shaped bracket and thread the 4 angle adjustment screws through the bracket and into the mounting holes on either side of the monitor. -
Page 12: Ir Remote Control Battery
LED7B-TS / LED10B-TS USER GUIDE IR Remote Control Battery The IR remote control requires a CR2025 battery included). To install new (not battery: Press the clip on the side of the battery tray and slide the tray out. Insert the CR2025 battery, positive side up, into the tray. -
Page 13: Wiring
LED7B-TS / LED10B-TS USER GUIDE WIRING Connect the 22-pin DIN connector on the wiring harness to the 22-pin DIN connector on the monitor cable. Connect camera 1 to the Cam1 input on the wiring harness. Repeat the previous step for cameras 2 through 4 as needed. -
Page 14: Wire
LED7B-TS / LED10B-TS USER GUIDE (Wiring cont.) Connect the individual wires on the wiring harness as follows: WIRE DESCRIPTION Ignition power 10-32V DC Ground Reverse (typically connected to vehicle’s backup lights). TRIG 1 When activated, the monitor receives input from •... -
Page 15: Operation
LED7B-TS / LED10B-TS USER GUIDE OPERATION Powering On the Monitor Upon turning the vehicle ignition, the monitor will automatically power on. Using the Touchscreen Upon powering on the monitor, camera 1 will display by default. (Cam1) (see the Power On section). -
Page 16: Entering/Exiting Standby Mode
LED7B-TS / LED10B-TS USER GUIDE (Operation cont.) Entering / Exiting Standby Mode To enter Standby Mode, swipe your finger down from the top of • the screen. To exit Standby Mode, swipe your finger up from the bottom of •... -
Page 17: Opening/Closing The Main Menu
LED7B-TS / LED10B-TS USER GUIDE (Operation cont.) Opening / Closing the Main Menu To open the Main Menu, tap the screen anywhere in the bottom fourth • of the screen, as demonstrated in the red box below. To exit the... -
Page 18: Navigating The Main Menu
LED7B-TS / LED10B-TS USER GUIDE NAVIGATING THE MAIN MENU Tap an icon Display, Input, Settings, or Power) to enter (Volume, corresponding submenus. Volume Tap the Volume icon to adjust audio levels. The following window will appear: To adjust the volume, drag the volume slider bar to the left •... -
Page 19: Display
LED7B-TS / LED10B-TS USER GUIDE Display Tap the Display icon to change camera views. The following window will appear: Each numbered icon correlates to its respective camera. To switch • camera views, tap a numbered icon. To exit, tap away from the Display window. -
Page 20: Settings
LED7B-TS / LED10B-TS USER GUIDE Settings Tap the Settings icon. The following menu will appear: The following pages detail the options within each icon listed above. Power To enter Standby Mode, tap the Power icon in the Main Menu or press the... -
Page 21: Camera
LED7B-TS / LED10B-TS USER GUIDE Camera Tap the Camera icon to display the following menu: To toggle between cameras, tap Cam1, Cam2, Cam3, or Cam4. • To change the camera name, tap Setup and rename the camera using • up to 8 characters. -
Page 22: Parking Line
LED7B-TS / LED10B-TS USER GUIDE Parking Line Tap the Parking Line icon to display the following menu: To display parking lines while reversing the vehicle, toggle the desired • camera to On. To calibrate where and • how the parking lines... -
Page 23: Language
LED7B-TS / LED10B-TS USER GUIDE Language Tap the Language icon to display the following menu: To change the display language, tap the desired language icon. • To exit, tap the icon. -
Page 24: Trigger
LED7B-TS / LED10B-TS USER GUIDE Trigger Tap the Trigger icon to display the following menu: Triggers prompt a (actions such as closing a vehicle door or reversing the vehicle) camera feed to display on the monitor. NOTE: Triggers override Auto Scan rotation (see the Auto Scan section). -
Page 25: Auto Scan
LED7B-TS / LED10B-TS USER GUIDE Auto Scan Tap the Auto Scan icon to display the following menu: Auto Scan determines how long a camera feed displays in a continuous rotation. To enable or disable Auto Scan, toggle Scan / Off. -
Page 26: Power On
LED7B-TS / LED10B-TS USER GUIDE Power On Tap the Power On icon to display the following menu Tap a camera icon to enable the following: • (Cam1, Cam2, Cam3, Cam4) ◦ The highlighted camera will display first upon powering on the monitor. -
Page 27: Standard
Tap the Standard icon to display the following menu Standard determines the resolution and video format type for each camera. IMPORTANT: Safety Vision recommends keeping Automatic toggled On (default). To manually set up camera resolution and video format type (not recommended),... -
Page 28: System
LED7B-TS / LED10B-TS USER GUIDE System Tap the System icon to display the following menu Dimmer: Low, Medium, High, or Auto screen brightness • Menu: • ◦ To enable touch control, toggle Menu Lock On, or press the physical power button on the monitor for 3 seconds. -
Page 29: Maintenance
Disclaimer Any modifications to the equipment not expressly approved in this manual could void the warranty and necessitate expensive repairs. Safety Vision is not responsible for damage due to improper installation, operation, cleaning, or maintenance. Call Safety Vision Tech Support for assistance. -
Page 30: Appendix A: Specifications
LED7B-TS / LED10B-TS USER GUIDE APPENDIX A: SPECIFICATIONS SCREEN SIZE DIMMER 7B-TS: 7” Manual / Automatic (selectable) 10B-TS: 10" POWER REQUIREMENT ASPECT RATIO 12/32V DC 16:9 POWER CONSUMPTION RESOLUTION 7B-TS: ~8W 1024 × 3(RGB) × 600 10B-TS: ≤ 25W DOT PITCH ANTI-VIBRATION 7B-TS: 0.15(H) ×... -
Page 31: Client Support
LED7B-TS / LED10B-TS USER GUIDE CLIENT SUPPORT The Client Support team serves as the voice of Safety Vision; ensuring an optimal experience through the entire client relationship. They interact with every department in the company to accommodate your needs and deliver on every inquiry or request. Whether you want to place an order, would like more information on a product, or anything in between;... - Page 32 6100 W. SAM HOUSTON PKWY. N. HOUSTON, TX 77041-5113 MAIN: 713.896.6600 TOLL FREE: 800.880.8855 SAFETYVISION.COM Copyright © 2023 Safety Vision, LLC All Rights Reserved.
Need help?
Do you have a question about the LED7B-TS and is the answer not in the manual?
Questions and answers