Table of Contents
Advertisement
Quick Links
Advertisement
Table of Contents

Related Manuals for Winmate EAC Mini EACIEK20


Summary of Contents for Winmate EAC Mini EACIEK20
- Page 1 IoT Gateway Intel® Elkhart Lake Celeron® N6211, 1.2 GHz Processor EAC Mini EACIEK20 User Manual Document Version 1.0 Document Part Number: 91521110111N Please read these instructions carefully before using this product, and save this manual for future use.
-
Page 3: Table Of Contents
Contents Contents Preface ............................3 About This User Manual ........................ 6 Chapter 1: Introduction ......................... 7 1.1 Overview ......................... 8 1.2 Product Features ......................8 1.3 Hardware Specifications ....................9 1.4 Package Contents ......................10 1.5 Description of Parts ....................... 12 1.6 LED Indicators ....................... - Page 4 EAC Mini EACIEK20 IoT Gateway User Manual 4.2.5 Boot Menu ......................43 4.2.6 Exit Menu ......................44 4.3 Using Recovery Wizard to Restore Computer ............... 45 4.4 How to Enable Watchdog ....................46 Chapter 5: Driver Installation ...................... 47 5.1 Chipset Driver Installation ..................... 48 5.2 Graphic Driver Installation .....................
-
Page 5: Preface
Preface Preface Copyright Notice No part of this document may be reproduced, copied, translated, or transmitted in any form or by any means, electronic or mechanical, for any purpose, without the prior written permission of the original manufacturer. Trademark Acknowledgement Brand and product names are trademarks or registered trademarks of their respective owners. - Page 6 EAC Mini EACIEK20 IoT Gateway User Manual Advisory Conventions Four types of advisories are used throughout the user manual to provide helpful information or to alert you to the potential for hardware damage or personal injury. These are Notes, Important, Cautions, and Warnings.
- Page 7 Preface • Do not leave this equipment in an uncontrolled environment where the storage temperature is below -20°C (-4°F) or above 60°C (140°F). It may damage the equipment. Caution Use the recommended mounting apparatus to avoid risk of injury. Caution Do not cover the openings! Warning! Only use the connection cords that come with the product.
-
Page 8: About This User Manual
The documentation set for the Winmate® EAC Mini EACIEK20 IoT Gateway provides information for specific user needs, and includes: • EAC Mini EACIEK20 Quick Start Guide - describes how to get the box computer up and running. • EAC Mini EACIEK20 User Manual – contains detailed description on how to use the display, its components and features. -
Page 9: Chapter 1: Introduction
Chapter 1: Introduction Chapter 1: Introduction This chapter provides the EAC Mini EACIEK20 IoT Gateway product overview, describes its features and hardware specifications. -
Page 10: Overview
Congratulations on purchasing Winmate® EAC Mini EACIEK20 IoT Gateway The EAC Mini EACIEK20 is a compact industrial IoT Gateway with low power consuming Intel® Elkhart Lake processor. The EAC Mini provides great expansion including one M.2 2242 Key B slot for SSD or Wi-Fi / Bluetooth. -
Page 11: Hardware Specifications
Chapter 1: Introduction 1.3 Hardware Specifications Model Name EACIEK20 Intel® Celeron® N6211 (1.5M Cache, up to 3.0GHz) Intel® Celeron® N6210 (1.5M Cache, up to 2.6GHz) (Optional) Graphics Engine Intel® UHD Graphics System Specification BIOS Insyde UEFI Watchdog Timer Programmable 256 levels, timer interval 1 to 255 sec. 1 x 3200MT/s 4GB LPDDR4 Memory 1 x 3200MT/s 8GB LPDDR4 (Optional) -
Page 12: Package Contents
AWS lot Greengrass Certified 1.4 Package Contents Carefully remove the box and unpack EAC Mini EACIEK20 IoT Gateway. Please check if all the items listed below are inside your package. If any of these items are missing or damaged contact us immediately. - Page 13 Chapter 1: Introduction Optional Accessories: WLAN External WWAN External AC Adapter • • • • VESA Mounting Kit Antenna Antenna 12V/ 36W P/N:98K000A0009A P/N: 397SM000000S P/N: 397SM000000Q P/N: 922D036W12V6 DIN Rail Mounting • P/N: 98K000A00099...
-
Page 14: Description Of Parts
EAC Mini EACIEK20 IoT Gateway User Manual 1.5 Description of Parts This section includes front and rear side I/O ports location of the EAC Mini EACIEK20 IoT Gateway. Front Side Rear Side 1.6 LED Indicators The EAC Mini IoT Gateway provides one HDD and one Power LED indicators located on the front for status monitoring. -
Page 15: Mechanical Dimensions
Chapter 1: Introduction 1.7 Mechanical Dimensions All dimensions are shown in mm (millimeters). Unit without mounting bracket Standard With Expansion Module Unit with mounting bracket... -
Page 16: Chapter 2: Hardware Installation
Chapter 2: Hardware Installation Chapter 2: Hardware Installation This chapter provides information on how to use external I/O and the installation of EAC Mini EACIEK20 IoT Gateway hardware. -
Page 17: Connectors
The following sections give you information about EAC Mini standard connectors and pin assignments. 2.1.1 HDMI Connector Plug HDMI signal cable to the HDMI connector of the EAC Mini EACIEK20, and plug the other end to the monitor. Pin assignment and signal names of HDMI connector Pin №... -
Page 18: Usb Connector
Chapter 2: Hardware Installation 2.1.3 USB Connector The EAC Mini EACIEK20 provides two USB3.2 Gen2x1 Type-A connectors. Use USB3.2 Gen2x1 Type-A connector to connect external devices such as mouse or keyboard to the box computer. Pin assignment and signal names of USB connector Pin №... -
Page 19: External Antenna Installation
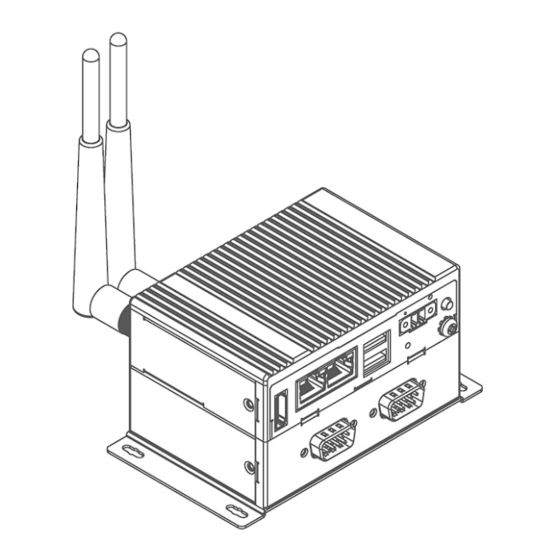
EAC Mini EACIEK20 IoT Gateway User Manual 2.2.2 External Antenna Installation Notice that external antenna is an optional feature of the EAC Mini EACIEK20. To install external SMA antenna: 1. Remove the rubber cap on the SMA connector before installing the antenna. -
Page 20: Expansion Module Installation
Chapter 2: Hardware Installation 2.2.3 Expansion Module Installation Notice that expansion module is an optional feature of the EAC Mini EACIEK20. To install expansion module: Unscrew the three screws, and remove the Attach the 2 layer module bracket and ❶... -
Page 21: Usb Wire Loop Installation
EAC Mini EACIEK20 IoT Gateway User Manual 2.2.4 USB Wire Loop Installation To install USB Wire Loop: ❶ Insert USB to the USB slot. ❷ Install copper pillar, USB wire loop, and fasten one screw to secure the USB to the EAC Mini EACIEK20. -
Page 22: Connecting The Power
Chapter 2: Hardware Installation 2.3 Connecting the Power The DC power supply connector of the EAC Mini IoT Gateway is on the front panel. The DC power input for the EAC Mini allows a voltage input range from 9 V DC to 36 V DC. Warning! Ensure voltage and polarity is compliant with the DC input. -
Page 23: Chassis Grounding
EAC Mini EACIEK20 IoT Gateway User Manual 2.3.2 Chassis Grounding EAC Mini provides EMI protection and a stable grounding base. Use chassis grounding point located on the front. -
Page 24: Chapter 3: Mounting
Chapter 3: Mounting Chapter 3: Mounting The EAC Mini supports five types of mounting: wall and desk mounting by default, and optional VESA, DIN-rail mounting solutions. You can purchase mounting kit from Winmate as an optional accessory. -
Page 25: Wall/ Desk Mount
EAC Mini EACIEK20 IoT Gateway User Manual 3.1 Wall/ Desk Mount L-shape mounting brackets for wall/ desk mounting are supplied with the EAC Mini. Before mounting the unit to the wall, attach L-shape mounting brackets to the EAC Mini (supplied by Winmate). -
Page 26: Din-Rail Mount
Chapter 3: Mounting 3.2 DIN-Rail Mount You can purchase DIN-Rail mounting kit from Winmate as an optional accessory. DIN-Rail Mounting Kit: Part Number: 821118551400 Mounting Instruction: ❶ Fasten screws to secure DIN-rail mounting ❷ Place the EAC Mini with the DIN-Rail bracket to the EAC Mini. -
Page 27: Vesa Mount
EAC Mini EACIEK20 IoT Gateway User Manual 3.3 VESA Mount You can purchase VESA mounting kit from Winmate as an optional accessory. VESA Mounting Kit Part Number: 821118561001 Mounting Instruction: ❶ Mark the location of the screw holes on the ❷... -
Page 28: Chapter 4: Insyde Uefi Bios Setup
Chapter 4: INSYDE UEFI BIOS Setup Chapter 4: Insyde UEFI BIOS Setup BIOS Setup Utility is a program for configuration basic Input / Output system settings of the computer for optimum use. This chapter provides information on how to use BIOS setup, its functions and menu. -
Page 29: How And When To Use Bios Setup
EAC Mini EACIEK20 IoT Gateway User Manual 4.1 How and When to Use BIOS Setup To enter the BIOS setup, you need to connect an external USB keyboard, external monitor and press Del key when the prompt appears on the screen during start up. The prompt screen shows only few seconds so need press Del key quickly. -
Page 30: Bios Functions
Chapter 4: INSYDE UEFI BIOS Setup 4.2 BIOS Functions 4.2.1 Main Menu The Main menu displays the basic information about yoursystem including BIOS version, processor RC version, system language, time, and date. When you enter BIOS setup, the first menu that appears on the screen is the main menu.It contains the system information including BIOS version, processor RC version, system language, time, and date. -
Page 31: Advanced Settings
EAC Mini EACIEK20 IoT Gateway User Manual 4.2.2 Advanced Settings Select the Advanced Tab from the setup menu to enter the advanced BIOS setup screen. You can select any of the items on the left frame of the screen to go to the sub menu for the item, such as CPU Configuration. - Page 32 Chapter 4: INSYDE UEFI BIOS Setup 4.2.2.1 CPU Configuration BIOS Setting Description Setting Option Effect When enabled, a VMM Intel (VMX) Enable or disable Intel can utilize the additional Virtualization Virtualization Enable/Disable hardware capabilities Technology Technology. provided by Vander pool Technology.
- Page 33 EAC Mini EACIEK20 IoT Gateway User Manual 4.2.2.2 CPU Power Management Configuration BIOS Setting Description Setting Option Effect -Max non-turbo Select the performance Boot Configure Boot performance state that the BIOS will Performance Performance Mode -Max battery set starting from reset...
- Page 34 Chapter 4: INSYDE UEFI BIOS Setup states when it is not 100% utilized Custom P-state Configure Custom P- Enter Enters sub-menu Table state Table parameters Set the number of -Number of P- Select the number of [Number] custom P-states. At least states custom P-states.
- Page 35 EAC Mini EACIEK20 IoT Gateway User Manual 4.2.2.3 System Agent Configuration BIOS Setting Description Setting Option Effect Intel® Virtualization Enabled Vt-d Technology for Vt-d capability Disabled Directed I/O...
- Page 36 Chapter 4: INSYDE UEFI BIOS Setup 4.2.2.4 PCH-IO Configuration...
- Page 37 EAC Mini EACIEK20 IoT Gateway User Manual BIOS Setting Description Setting Option Effect PCI Express clock PCI Express gating enable/disable Enter Opens sub-menu Configuration for each root port. SATA And RST Enable/ Disable SATA Enter Opens sub-menu Configuration device Selectively enable/...
- Page 38 Chapter 4: INSYDE UEFI BIOS Setup...
- Page 39 EAC Mini EACIEK20 IoT Gateway User Manual...
- Page 40 Chapter 4: INSYDE UEFI BIOS Setup 4.2.2.4.2 SATA And RST Configuration 4.2.2.4.3 USB Configuration...
- Page 41 EAC Mini EACIEK20 IoT Gateway User Manual 4.2.2.5 ME Firmware Configuration 4.2.2.6 F81804 Configuration...
- Page 42 Chapter 4: INSYDE UEFI BIOS Setup 4.2.2.7 Hardware Monitor...
-
Page 43: Security Menu
EAC Mini EACIEK20 IoT Gateway User Manual 4.2.3 Security Menu This section allows to configure and improve system, and set up some system features according to your preferences. BIOS Setting Description Setting Option Effect TrEE Protocol Choose TrEE Protocol TrEE Protovol... -
Page 44: Power Menu
Chapter 4: INSYDE UEFI BIOS Setup 4.2.4 Power Menu BIOS Setting Description Setting Option Effect Enable/ Disable Disabled ACPI S3 ACPI S3 configuration ACPI S1/S3 Sleep Enabled state Disabled Auto Wake on S5, Auto Wake on S5 By Every Day by Day or Month or Auto Wake on S5 configuration... -
Page 45: Boot Menu
EAC Mini EACIEK20 IoT Gateway User Manual 4.2.5 Boot Menu BIOS Setting Description Setting Option Effect Select boot type to Dual UEFI Boot Boot Type Boot Type configuration type, Legacy type or Type UEFI type Allows InsydeH20 to skip certain tests while Enabled booting. -
Page 46: Exit Menu
Chapter 4: INSYDE UEFI BIOS Setup 4.2.5.1 Boot Type Order 4.2.6 Exit Menu... -
Page 47: Using Recovery Wizard To Restore Computer
EAC Mini EACIEK20 IoT Gateway User Manual 4.3 Using Recovery Wizard to Restore Computer Note: Before starting the recovery process, make sure to backup all user data. The data will be lost after the recovery process. Important: Before starting the recovery process, remove the PCI/ PCIe card and CFast card. -
Page 48: How To Enable Watchdog
Chapter 4: INSYDE UEFI BIOS Setup 4.4 How to Enable Watchdog To enable Watchdog, you need to download Winmate Watchdog utility. Find more information on Watchdog in “Watchdog Guide” that you can download from Winmate Download Center. To enable watchdog in Watchdog AP follow the instructions below: triangle button to show hidden 1. -
Page 49: Chapter 5: Driver Installation
Chapter 5: Driver Installation Chapter 5: Driver Installation This chapter provides instructions on how to install drivers on the EAC Mini IoT Gateway. You will quickly complete the installation. 5.1 Chipset Driver Installation 5.2 Graphic Driver Installation 5.3 Management Engine (ME) 5.4 Serial IO Driver Installation 5.5 Ethernet Driver Installation 5.6 Watchdog Driver Installation... -
Page 50: Chipset Driver Installation
EAC Mini EACIEK20 IoT Gateway User Manual 5.1 Chipset Driver Installation Follow instructions below to install Chipset driver. 1. Open the Driver CD (included in the package) and select Chipset driver. 2. Installation window will pop up, select Next. - Page 51 Chapter 5: Driver Installation 3. Select Accept to agree with the terms of license agreement. 4. Check the ReadMe file information, select Install to continue.
-
Page 52: Graphic Driver Installation
EAC Mini EACIEK20 IoT Gateway User Manual 5. Wait for the driver to be installed. When installation completed, select Restart Now to restart your computer. 5.2 Graphic Driver Installation Follow instructions below to install Graphic driver. 1. Open the driver CD and double-click on Graphic driver. - Page 53 Chapter 5: Driver Installation 2. The system opens installation window, click Next to continue. 3. Click Yes to agree to the license terms.
- Page 54 EAC Mini EACIEK20 IoT Gateway User Manual 4. Check installation details and click Next. 5. Check installation details and click Next.
-
Page 55: Management Engine (Me)
Chapter 5: Driver Installation 6. After installation is completed, select “Yes, I want to restart this computer now”, and click Finish. 5.3 Management Engine (ME) Follow instructions below to install Management Engine (ME) . 1. Open the Driver CD (included in the package) and select ME driver. - Page 56 EAC Mini EACIEK20 IoT Gateway User Manual 2. Select Next to start the installation. 3. Click Next to agree to the license terms.
- Page 57 Chapter 5: Driver Installation 4. Check installation details and click Next. 5. When installation completed, select Finish complete installation.
-
Page 58: Serial Io Driver Installation
EAC Mini EACIEK20 IoT Gateway User Manual 5.4 Serial IO Driver Installation Follow instructions below to install Serial IO driver. Step 1 Open the Driver CD (included in the package) and select Serial IO driver. Step 2 Right click on " iaLPSS2_GPIO2_EHL "... -
Page 59: Ethernet Driver Installation
Chapter 5: Driver Installation 5.5 Ethernet Driver Installation Follow instructions below to install LAN driver. 1. Open the Driver CD (included in the package) and select LAN driver. 2. When compression is complete, select Next. - Page 60 EAC Mini EACIEK20 IoT Gateway User Manual 3. Read the license agreement, and then select Next. 4. System displays the installed packages, select Next.
- Page 61 Chapter 5: Driver Installation 5. Confirm the installation, select Install to start the installation. 6. When installation is completed, select Finish to close the window.
-
Page 62: Watchdog Driver
EAC Mini EACIEK20 IoT Gateway User Manual 5.6 Watchdog Driver For more details about Winmate Watchdog, please download Watchdog Guide from Winmate Downloads Center: Follow instructions below to install Watchdog driver. 1. Type “cmd” in the run box then the cmd.exe will appear in programs. - Page 63 Chapter 5: Driver Installation 4. Wait for installation to complete. When installation is complete, press any key to close. 5. Open the Driver CD (included in the package) and select Watchdog AP.
- Page 64 EAC Mini EACIEK20 IoT Gateway User Manual 6. Select Next. 7. The installed storage location is displayed, select Next to continue.
- Page 65 Chapter 5: Driver Installation 8. Select Next to start the installation. 9. When installation is completed, select Finish to close the window.
-
Page 66: Thermal Control Ap
EAC Mini EACIEK20 IoT Gateway User Manual 5.7 Thermal Control AP Follow instructions below to install Thermal Control AP. 1. Click Driver. - Page 67 Chapter 5: Driver Installation 2. Click WMMIO_64bit.
- Page 68 EAC Mini EACIEK20 IoT Gateway User Manual...
- Page 69 Chapter 5: Driver Installation...
- Page 70 EAC Mini EACIEK20 IoT Gateway User Manual 3. Click AP.
- Page 71 Chapter 5: Driver Installation...
- Page 72 EAC Mini EACIEK20 IoT Gateway User Manual...
-
Page 73: Chapter 6: Technical Support
Chapter 6: Technical Support Chapter 6: Technical Support This chapter includes pathway for technical support and Software Development Kit (SDK). Free technical support is available from our engineers every business day. We are always ready to give advice on application requirements or specific information on the installation and operation of any of our products. -
Page 74: Software Developer Support
EAC Mini EACIEK20 IoT Gateway User Manual 6.1 Software Developer Support You can download SDK, derivers and other document from Winmate Download Center Winmate File Share. Winmate Download Center http://www.winmate.com/ > Support > Download Center > Embedded Computing > EAC Mini EACIEK20 6.2 Problem Report Form... -
Page 75: Appendix
Appendix Appendix This chapter provides additional information about EAC Mini EACIEK20 IoT Gateway. -
Page 76: Appendix A: Order Information
EAC Mini EACIEK20 IoT Gateway User Manual Appendix A: Order Information EAC Mini EACIEK20 IoT Gateway available in the following configurations: Model Name Configuration EACIEK20-100-A432 Intel N6211, 4G RAM, 32GB eMMC, 2 x USB3.2 Gen2x1, 2 x LAN, 1 x HDMI EACIEK20-101-A432 Intel N6211, 4G RAM, 32GB eMMC, 2 x USB3.2 Gen2x1,... -
Page 77: Appendix B: Expansion Module
Appendix Appendix B: Expansion Module 16-Channel Digital I/O with isolation EACWLST-232 To install EACWLST-232 module: 1. Follow the procedure described in Chapter 2, “Expansion Module Installation” to install EACWLST-232 module. 2. Connect two USB cables. One end to EACWLST-232 board and another end to EAC Mini motherboard. - Page 78 EAC Mini EACIEK20 IoT Gateway User Manual 2- Port CANBus with isolation EACWLST-233 To install EACWLST-233 module: 4. Follow the procedure described in Chapter 2, “Expansion Module Installation” to install EACWLST-233 module. 5. Connect two USB cables. One end to EACWLST-233 board and another end to EAC Mini motherboard.
- Page 79 Appendix 2-port Giga-LAN EACWLST-236 To install EACWSLT-236 module: 1. Follow the procedure described in Chapter 2, “Expansion Module Installation” to install EACWSLT-236 module. 2. Connect two USB cables. One end to EACWSLT-236 board and another end to EAC Mini motherboard. 3.
- Page 80 EAC Mini EACIEK20 IoT Gateway User Manual 2-Port RS232/422/485 with isolation EACWLST-235 & EACWLST-231 To install EACWLST-235 module: 1. Follow the procedure described in Chapter 2, “Expansion Module Installation” to install EACWLST-235 module. 2. Connect one end of the USB cable to the EACWLST-235 board and another end to the EAC Mini motherboard.
- Page 81 NOTE...
- Page 82 NOTE...
- Page 83 NOTE...
- Page 84 Winmate Inc. 9F, No.111-6, Shing-De Rd., San-Chung District, New Taipei City 24158, Taiwan, R.O.C www.winmate.com Copyright © 2023 Winmate Inc. All rights reserved.
Need help?
Do you have a question about the EAC Mini EACIEK20 and is the answer not in the manual?
Questions and answers