
Subscribe to Our Youtube Channel
Related Manuals for GGM gastro SMB60ES


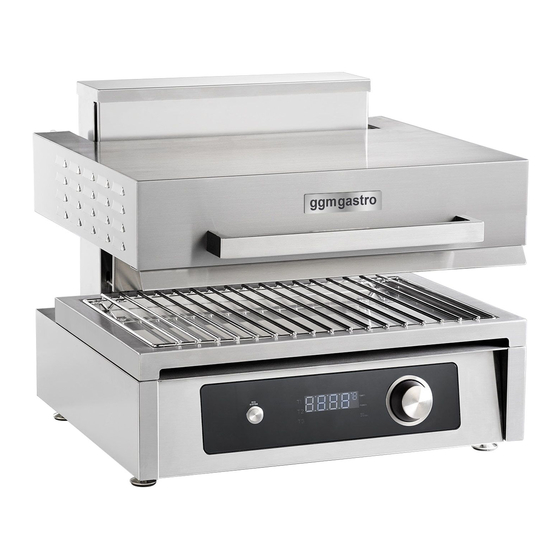
Summary of Contents for GGM gastro SMB60ES
- Page 1 SALAMANDRE - SALAMANDERS SMB60ES SMB75ES ISTRUZIONI ORIGINALI ORIGINAL INSTRUCTIONS...
- Page 2 INDICE - INDEX GUIDA RAPIDA - QUICK GUIDE ________________ 3 INSTALLAZIONE - INSTALLATION _______________ 23 UTILIZZO E MANUTENZIONE - USE AND MAINTENANCE __ 53...
- Page 3 GUIDA RAPIDA - QUICK GUIDE SALAMANDRE / SALAMANDERS SMB60ES SMB75ES ISTRUZIONI ORIGINALI ORIGINAL INSTRUCTIONS...
-
Page 4: Table Of Contents
ITALIANO Sicurezza ___________________________ 5 Installazione _________________________ 13 Uso ______________________________ 16 Pulizia _____________________________ 20 ENGLISH Safety _____________________________ 9 Installation __________________________ 13 Use ______________________________ 16 Cleaning the unit ______________________ 20 Il Fabbricante declina ogni responsabilità per le possibili inesattezze contenute nel presente opuscolo imputabili ad errori di trascrizione o stampa si riserva inoltre il diritto di apportare al prodotto quelle modifiche che ritiene utili o necessarie, senza pregiudicarne le caratteristiche essenziali. -
Page 5: Sicurezza
SICUREZZA AVVERTENZE PER L’INSTALLAZIONE A CHI È RIVOLTO QUESTO MANUALE SPIEGAZIONE DEL SIGNIFICATO DEI Queste istruzioni sono indirizzate principalmente all’installatore, che le deve PITTOGRAMMI leggere attentamente prima dell’installazione dell’apparecchiatura. È fatto assoluto divieto Per rendere più chiara e gradevole la lettura, all’installatore di effettuare le operazioni diverse all’interno di questo manuale sono stati da quanto previsto in queste istruzioni. - Page 6 in posizione visibile che NON può essere Se l’apparecchiatura non funziona o si utilizzata. notano alterazioni funzionali o strutturali, Prima di operare sulla macchina accertarsi disconnetterla dall’alimentazione elettricae che eventuali parti calde della macchina si contattare un centro di assistenza autorizzato siano riportate a temperatura ambiente.
-
Page 7: Pulizia
istruzioni. analoghe caratteristiche con cavo di messa a terra di colore giallo verde. Lo stato di macchina ferma, rilevato per mezzo di un’ispezione visiva della stessa, AVVERTENZE PER L’UTILIZZO non garantisce con sicurezza che E LA MANUTENZIONE l’apparecchiatura sia spenta. Al fine di tutelare la propria incolumità, l’operatore deve verificare A CHI È... - Page 8 indicati dal Fabbricante. notano alterazioni funzionali o strutturali, disconnetterla dall’alimentazione elettrica e Durante i primi utilizzi delle apparecchiature si contattare un centro di assistenza autorizzato potrebbe avvertire un odore acre o di bruciato. dal Fabbricante senza tentarla di ripararla da se. Il fenomeno scompare completamente dopo i Si raccomanda l’impiego di ricambi originali.
-
Page 9: Safety
SAFETY INSTALLATION WARNINGS WHO THIS MANUAL IS MEANT FOR These instructions are meant for the installer MEANING OF PICTOGRAMS who should carefully read them before installing the unit. It is forbidden to perform To make the reading clearer and easier for operations that are not given in these the reader, some symbols have been used instructions. - Page 10 with the regulations in force in the country protection devices. where the unit will be used and the data Don’t overturn the unit or lay it on its side indicated on the serial number plate; in order to carry out maintenance Check that all the safety regulations and operations.
-
Page 11: Installation
WARNING FOR THE WIRING CONNECTION are not given in these instructions. Hereinafter the word “UNIT” will mean the Before starting the wiring connection, “SALAMANDER” machine. always compare the system data with those shown on the serial number plate. General warnings The electrical risks have been solved by designing the electrical systems according The inobservance of the following rules could... - Page 12 The areas marked by this sticker protect maintenance, please call the Technical Support the access to live parts. Center. The areas marked by this sticker (i.e. hot The Manufacturer does not guarantee any surface hazard), both during cooking and damage resulting from the lack of for a certain time after switching off (because maintenance or improper cleaning (i.e.
-
Page 13: Installazione
INSTALLAZIONE - INSTALLATION Max 35°C Min 5°C +3 mm Max 75%... - Page 14 Numero di serie / Serial number Dati del Fabbricante / Manufacturer’s details NAME: MANUFACTURER’S ADDRESS: Modello apparecchiatura / Unit model MOD: Serial: Alimentazione [kW] / Power [kW] Alimentazione [V] / Power supply [V] Frequenza [Hz] / Frequency [Hz] Hz : 50/60 Grado di protezione Ingress protection code Marcatura CE / EC mark...
- Page 15 YES!
-
Page 16: Uso
USO - USE ALCUNE NOZIONI IMPORTANTI | A FEW IMPORTANT NOTES Questa apparecchiatura è stata progettata e riscaldare, tostare, gratinare, cuocere realizzata per prodotti alimentari. può venire alzata e abbassata La testa mobile manualmente fino a trovare la giusta distanza dai prodotti da trattare, in base alla loro tipologia e grandezza. - Page 17 TIMER Impostazione della durata di cottura (modalità TIMER) | POWER Setting the cooking duration (TIMER mode) SYSTEM Accensione | Switching on the unit TIMER Alimentare l’apparecchiatura mettendo in “ON” POWER l’interruttore generale del quadro elettrico al quale è SYSTEM collegata. Tenendo premuta la manopola “A” per almeno 3 secondi l’apparecchiatura si accende.
- Page 18 Funzione ECO SYSTEM (riduzione dell’energia) | ECO SYSTEM Variazione delle durate dei programmi “T1”, “T2”,“T3” | Change FUNCTION (power reduction) of the duration of T1”, “T2”,“T3” programs YES! TIMER POWER Attenzione ! Il piatto o il vassoio devono spingere la barra D SYSTEM Attention! The plate or the tray must touch the bar D TIMER...
-
Page 19: Cleaning The Unit
PULIZIA - CLEANING THE UNIT SUPERFICI IN ACCIAIO | STEEL SURFACES Le superfici in acciaio, la griglia di appoggio e la panno morbido bacinella vanno pulite con un detersivo per piatti o sapone neutro acqua diluito in molto calda. Dopo la pulizia, sciacquare accuratamente con acqua pulita e asciugare con cura utilizzando un panno. - Page 20 SMALTIMENTO A FINE VITA DISPOSAL OF THE UNIT INFORMAZIONI SULLO SMALTIMENTO DI INFORMATION RELEVANT TO THE DISPOSAL OF APPARECCHIATURE PROFESSIONALI PROFESSIONAL EQUIPMENT Ai sensi dell’art. 24 del Decreto Legislativo 14 marzo 2014, Pursuant to Article 24 of Legislative Decree No. 49 of 14 n.
- Page 22 MANUALE DI INSTALLAZIONE - INSTALLATION MANUAL SALAMANDRE / SALAMANDERS SMB60ES SMB75ES ISTRUZIONI ORIGINALI ORIGINAL INSTRUCTIONS...
- Page 23 GENTILE INSTALLATORE questo libretto contiene tutte le informazioni necessarie per una corretta installazione dell’apparecchiatura. Le consigliamo pertanto di leggerlo attentamente prima del montaggio e di conservarlo con cura per consultazioni future. Se qualche passaggio non fosse ben compreso, il Fabbricante rimane a disposizione per fornire qualsiasi informazione.
- Page 24 SICUREZZA ____________________________ SPIEGAZIONE DEL SIGNIFICATO DEI PITTOGRAMMI ______________________ 25 DATI TECNICI ___________________________ 31 DISPOSIZIONI DI LEGGE REGOLE TECNICHE E DIRETTIVE __________________ 31 DATI TECNICI SMB60ES _______________________________________ 32 DATI TECNICI SMB75ES ________________________________________ 33 INSTALLAZIONE _________________________ AVVERTENZE DI SICUREZZA ________________________________________ 34 OPERAZIONI PRELIMINARI _________________________________________ 34...
-
Page 25: Sicurezza
SICUREZZA SPIEGAZIONE DEL SIGNIFICATO DEI AVVERTENZE PER PITTOGRAMMI L’INSTALLAZIONE A CHI È RIVOLTO QUESTO MANUALE Per rendere più chiara e gradevole la lettura, all’interno di questo manuale sono stati Queste istruzioni sono indirizzate utilizzati dei simboli atti a trasmettere al lettore principalmente all’installatore, che le deve il significato o l’importanza delle informazioni leggere attentamente prima dell’installazione... - Page 26 in atmosfere a rischio di esplosione; Non trasportare, installare ed effettuare • manutenzione sull’apparecchiatura senza all’esterno, in luoghi esposti direttamente • essere provvisti dei dispositivi di protezione all’aria di mare carica di sale o alla luce individuale prescritti all’interno di questo solare diretta e alle intemperie (pioggia, manuale (vedere cap.
- Page 27 prescrizioni locali. dell’apparecchiatura. Tale interruttore deve avere una separazione dei contatti onnipolare L’apparecchiatura deve essere sottoposta a così da garantire la disconnessione completa controlli periodici da parte di un centro di sotto la categoria di sovratensione III. È assistenza autorizzato. Per assicurare le migliori obbligatorio un corretto collegamento a terra condizioni di utilizzo e di sicurezza, effettuarlo utilizzando un cavo unico, senza giunzioni,...
-
Page 28: Safety
SAFETY MEANING OF PICTOGRAMS INSTALLATION WARNINGS WHO THIS MANUAL IS MEANT FOR To make the reading clearer and easier for the reader, some symbols have been used These instructions are meant for the operator in this manual to convey the meaning or the who should carefully read them before using importance of a piece of information next to a and servicing the unit. - Page 29 ones, renovations, etc.) doesn’t prevent the unit Position the unit in a place where there is enough space to safely carry out the from being moved. maintenance operations that must be If the unit does not work or if you notice performed periodically.
- Page 30 parts that are not specific for the unit authorized technician. The cable can only be model; replaced with one of similar characteristics with a yellow-green earth cable. partial or complete inobservance of these • instructions. PERSONAL PROTECTION EQUIPMENT (PPE): WHAT IT IS Please understand that, when the unit is stopped, it does not mean the unit is AND WHY IT MUST BE USED...
-
Page 31: Dati Tecnici
Salamandra elettrica con corpo riscaldante regolabile in altezza. Robusta struttura completamente in acciaio inox. Resistenza corazzata o ad infrarosso ad SMB60ES 600x530x525 alta efficienza protetta da vetro ceramico per una facile e veloce pulizia. Nei modelli B-Flex il comando elettronico dà la possibilità di scegliere... -
Page 32: Dati Tecnici Smb60Es
DATI TECNICI SMB60ES 650 min. [ mm ] mA Morsettiera arrivo linea Morsettiera di derivazione BC Teleruttore B4 Regolatore energia 380-415 V3N~ B5 Encoder B6 Pulsante B7 Microinterruttore BP Base di potenza 220-240 V3~ DS Display T3 Termocontatto Resistenza 220-240 V~... -
Page 33: Dati Tecnici Smb75Es
DATI TECNICI SMB75ES 650 min. [ mm ] mA Morsettiera arrivo linea Morsettiera di derivazione BC Teleruttore B4 Regolatore energia B5 Encoder B6 Pulsante 380-415 V3N~ B7 Microinterruttore BP Base di potenza DS Display 220-240 V3~ T3 Termocontatto Resistenza Elettroventola di raffreddamento... -
Page 34: Installazione
INSTALLAZIONE Le immagini si riferiscono alla salamandra modello SMB60ES ma, salvo quando diversamente specificato, le istruzioni valgono per qualsiasi modello. AVVERTENZE DI SICUREZZA L’installazione, la messa in funzione e la manutenzione straordinaria dell’apparecchio devono essere eseguite da personale qualificato. Tutti i lavori necessari all’installazione devono essere eseguiti in conformità... -
Page 35: Posizionamento
locale stesso. Le prese d’aria devono avere dimensioni adeguate, devono essere protette da griglie e collocate in modo da non poter essere ostruite. rispondere alle normative vigenti in termini di sicurezza • sul lavoro e sugli impianti; non contenere materiali o sostanze potenzialmente •... - Page 36 Apparecchiatura appesa ad una staffa 70 e i 120 cm, accertandosi della sua Fissare a parete la staffa fornita dal Fabbricante ad un’altezza compresa tra i perfetta planarità. Assicurarsi che la parete di fissaggio sia ignifuga, non sensibile al calore sia in grado di sostenere il peso dell’apparecchiatura;...
- Page 37 YES!
-
Page 38: Allacciamenti
• all’apparecchiatura: - Modelli SMB60ES, SMB75ES : la morsettiera si trova smontando il cruscotto. ricollegare il nuovo cavo come indicato negli schemi • elettrici all’inizio del manuale. Il cavo di allacciamento prescelto deve avere caratteristiche non inferiori al tipo H07RN-F con temperatura di utilizzo almeno 80 °C ed... -
Page 39: Collaudo Apparecchiatura
COLLAUDO APPARECCHIATURA Prima della messa in servizio deve essere eseguito il collaudo dell’impianto al fine di valutare le condizioni operative di ogni singolo componente ed individuare le eventuali anomalie. In questa fase è importante che tutte le condizioni di sicurezza e di igiene siano rigorosamente rispettate. Per effettuare il collaudo eseguire le seguenti verifiche: verificare che la tensione di rete sia conforme a quella dell’apparecchiatura;... -
Page 40: Technical Data
Stainless steel sturdy frame. Highly efficient armored or infrared resistances protected by glass 600x530x525 SMB60ES ceramics, easy and quick to clean. The B-Flex models come with an electronic control that gives the possibility of setting the operating time or three preset programs;... -
Page 41: Smb60Es Techincal Data
TECHNICAL DATA SMB60ES 650 min. [ mm ] mA Input terminal board Junction terminal board 380-415 V3N~ BC Contactor B4 Power regulator B5 Encoder 220-240 V3~ B6 Button B7 Micro-switch BP Power base DS Display 220-240 V~ T3 Thermal contact... -
Page 42: Smb75Es Techincal Data
TECHNICAL DATA SMB75ES 650 min. [ mm ] mA Input terminal board Junction terminal board BC Contactor B4 Power regulator B5 Encoder 380-415 V3N~ B6 Button B7 Micro-switch BP Power base DS Display 220-240 V3~ T3 Thermal contact Resistance M1 Electric cooling fan... -
Page 43: Installation
INSTALLATION The images refer to the SMB60ES model salamander but, if it is not given differently, the instructions are the same for any model. SAFETY WARNINGS The installation, start-up and extraordinary maintenance must be carried out by qualified personnel. All work necessary to install the unit must meet the regulations in force. -
Page 44: Positioning The Unit
can’t be covered; the room must meet the current safety regulations • relevant to the workplace; the room must not contain potentially explosive • materials or substances; the room must be dedicated exclusively to the • preparation of food; the temperature must range between 5° C and 35°C; •... - Page 45 Machine hooked to a bracket 70 and 120 cm, making sure that it is Fix the bracket supplied by the Manufacturer to the wall at a height between perfectly aligned. fire-retardant material, is not sensitive to heat can bear the weight Make sure that the fixing wall is made of a of the machine.
- Page 46 YES!
-
Page 47: Connections
Unplug the cable from the terminal board of the • machine: - SMB60ES, SMB75ES Model: dismount the dashboard to find the terminal board. Connect the new cable as given in the electrical • diagrams shown at the beginning of the manual. The... -
Page 48: Testing The Unit
TESTING THE UNIT Before using the machine for the first time, test it to check all the operating conditions and identify possible anomalies. It is important that all safety and hygiene conditions are met in this phase. To test the machine, check for the following: check that the system voltage complies with the unit’s voltage;... - Page 50 MANUALE DI UTILIZZO E MANUTENZIONE - USE AND MAINTENANCE MANUAL SALAMANDRE / SALAMANDERS SMB60ES SMB75ES ISTRUZIONI ORIGINALI ORIGINAL INSTRUCTIONS...
- Page 51 GENTILE INSTALLATORE questo libretto contiene tutte le informazioni necessarie per una corretta installazione dell’apparecchiatura. Le consigliamo pertanto di leggerlo attentamente prima del montaggio e di conservarlo con cura per consultazioni future. Se qualche passaggio non fosse ben compreso, il Fabbricante rimane a disposizione per fornire qualsiasi informazione.
- Page 52 SICUREZZA ____________________________ SPIEGAZIONE DEL SIGNIFICATO DEI PITTOGRAMMI ______________________ 53 UTILIZZO _____________________________ QUALCHE IMPORTANTE NOZIONE ____________________________________ 59 UTILIZZO_______________________________________________________ 60 MODELLI ____________________________________ 63 MODELLI SA/E60S-BF • SA75S-BF _______________________________ 64 MANUTENZIONE ORDINARIA __________________ PULIZIA DELL’APPARECCHIO _______________________________________ 65 PULIZIA SUPERFICI IN ACCIAIO __________________________________ 66 PULIZIA RESISTENZE AD INFRAROSSO _____________________________ 66 PULIZIA VASCHETTA RACCOGLI BRICIOLE __________________________ 66 PULIZIA GRIGLIA INOX _________________________________________ 66...
-
Page 53: Sicurezza
SICUREZZA SPIEGAZIONE DEL SIGNIFICATO DEI AVVERTENZE PER L’UTILIZZO PITTOGRAMMI E LA MANUTENZIONE A CHI È RIVOLTO QUESTO MANUALE Per rendere più chiara e gradevole la lettura, all’interno di questo manuale sono stati Queste istruzioni sono indirizzate utilizzati dei simboli atti a trasmettere al lettore principalmente all’operatore, che le deve il significato o l’importanza delle informazioni leggere attentamente prima dell’uso e della... - Page 54 testa dell’apparecchiatura. Utilizzare gli apparecchi solo sotto sorveglianza e non lasciarli mai funzionare Non infilare oggetti (es. presine, coltelli, a vuoto. Spie luminose indicano lo stato di ecc...) sotto all’apparecchiatura. accensione o spegnimento di tutte le Questa apparecchiatura è considerata attrezzature.
- Page 55 Per la pulizia di qualsiasi componente o accessorio NON utilizzare detergenti abrasivi o in polvere, aggressivi o corrosivi (es. acido cloridrico/muriatico o solforico, soda caustica, ecc...), utensili abrasivi o appuntiti (es. spugne abrasive, raschietti, spazzole in acciaio, ecc...), getti d’acqua a vapore o a pressione. Attenzione! Non usare tali utensili e sostanze nemmeno per pulire il mobile sotto l’apparecchiatura.
-
Page 56: Meaning Of Pictograms
SAFETY MEANING OF PICTOGRAMS USE AND MAINTENANCE WARNINGS To make the reading clearer and easier for the reader, some symbols have been used WHO THIS MANUAL IS MEANT FOR in this manual to convey the meaning or the importance of a piece of information next to a These instructions are meant for the operator symbol. - Page 57 should completely disappear after the next two in this regard, we recommend that you sign a or three operations.. maintenance agreement. Please handle cooked food while wearing It is forbidden to tamper with or remove the proper personal protection devices the safety devices (such as hazard stickers, (please see the chapter “Personal Protection etc.).
- Page 58 PERSONAL PROTECTION EQUIPMENT (PPE): WHAT IT IS AND WHY IT MUST BE USED In order to prevent any risks deriving from the installation of the machine, the operators must wear suitable personal protection equipment (PPE) such as: Well fitted clothing (nothing too loose) without parts that might get entangled;...
-
Page 59: Utilizzo
UTILIZZO QUALCHE IMPORTANTE NOZIONE Le immagini si riferiscono alla salamandra modello SMB60ES ma, salvo quando diversamente specificato, le istruzioni valgono per qualsiasi modello. Questa apparecchiatura è stata progettata e realizzata riscaldare, tostare, gratinare, cuocere prodotti alimentari. Il calore è ottenuto mediante delle potenti resistenze ad infrarosso o resistenze corazzate che si trovano nella parte superiore della testa mobile. -
Page 60: Utilizzo
UTILIZZO 2 zone indipendenti di Questi modelli sono dotati di riscaldamento comandate ciascuna da un regolatore di energia (manopole A). Accensione Alimentare l’apparecchiatura mettendo in “ON” l’interruttore generale del quadro elettrico al quale è collegata. L’accensione di una zona di riscaldamento avviene ruotando la corrispondente manopola “A”... - Page 61 Accensione Alimentare l’apparecchiatura mettendo in “ON” l’interruttore generale del quadro elettrico al quale è collegata. Sul display scorrono alcune scritte per classificare l’attrezzatura (type) e il firmware (Uer), successivamente compare la scritta OFF. Tenendo premuta la manopola “A” per almeno 3 secondi l’apparecchiatura si accende.
- Page 62 Impostazione della potenza (modalità POWER) TIMER Dopo aver impostato la durata di cottura, il led POWER “POWER” lampeggia ad indicare che è necessario SYSTEM scegliere la potenza di riscaldamento desiderata e il display visualizza “P3”: questa sigla indica che l’apparecchiatura lavorerà...
-
Page 63: Modelli
Funzione ECO SYSTEM (riduzione dell’energia) Questi modelli sono dotati della funzione “ECO SYSTEM”: YES! se è attiva, le resistenze si accendono solo quando viene rilevato un piatto o un vassoio e si spengono quando viene rimosso, in modo da risparmiare energia. Posizionare il piatto o il vassoio sopra la griglia. -
Page 64: Modelli Sa/E60S-Bf • Sa75S-Bf
Variazione delle durate dei programmi “T1”, “T2”,“T3” I programmi “T1”, “T2”,“T3” hanno delle durate già preimpostate: - T1 15 minuti - T2 10 minuti - T3 5 minuti TIMER Esse, se necessario, si possono modificare in modo POWER permanente nel seguente modo: SYSTEM ruotare la manopola “A”... -
Page 65: Manutenzione Ordinaria
MANUTENZIONE ORDINARIA PULIZIA DELL’APPARECCHIO AVVERTENZE Prima della pulizia spegnere e lasciare raffreddare l’apparecchiatura. Nel caso di apparecchiature ad alimentazione elettrica agire sull’interruttore sezionatore per disattivare l’alimentazione elettrica. Per la pulizia di qualsiasi componente o accessorio NON utilizzare detergenti abrasivi o in polvere, aggressivi o corrosivi (es. -
Page 66: Pulizia Superfici In Acciaio
PULIZIA SUPERFICI IN ACCIAIO panno morbido Le superfici in acciaio vanno pulite con un detersivo per piatti o sapone neutro acqua diluito in molto calda. Dopo la pulizia, sciacquare accuratamente con acqua pulita e asciugare con cura utilizzando un panno. Per lo sporco più... -
Page 67: Comportamento In Caso Di Guasto
COMPORTAMENTO IN CASO DI GUASTO In caso di guasto scollegare immediatamente l’apparecchio dalla rete elettrica e chiamare il Servizio Assistenza. SMALTIMENTO A FINE VITA INFORMAZIONI SULLO SMALTIMENTO DI APPARECCHIATURE PROFESSIONALI Ai sensi dell’art. 24 del Decreto Legislativo 14 marzo 2014, n. 49 “Attuazione della Direttiva 2012/19/UE sui rifiuti di apparecchiature elettriche ed elettroniche (RAEE)”. -
Page 69: Safety
A FEW IMPORTANT NOTES The images refer to the SMB60ES salamander machine but, if it is not given differently, these instructions suit every model. heating, toasting, This unit was designed and made for cooking au grating and cooking food. Heat is produced by powerful infrared resistances or armored resistances that are in the upper part of the moveable top part of the machine. -
Page 70: Smaltimento A Fine Vita
2 independent These models are equipped with heating areas, each one of them controlled by a power regulator (knob A). Switching on the unit Switch the unit on by positioning the main switch of the electrical switchboard, to which the unit is connected, to ON. - Page 71 Switching on the unit Feed the unit by turning on the main switch of the switchboard to which the unit is connected. A few words are shown on the display to classify the machine, then the word OFF appears. Keep knob “A” pressed for at least 3 seconds to switch on the unit.
- Page 72 Setting power (POWER mode) TIMER After setting the cooking duration, the “POWER” LED POWER light flashes to indicate that you need to select the SYSTEM heating power and the display shows “P3”: this word means that the machine will work with all active resistances at their maximum power.
-
Page 73: Sa/E60 | Sa/E60-E Models
ECO SYSTEM function (power reduction) YES! These models are equipped with the “ECO SYSTEM” function: if it is active, the resistances will switch on only when a dish or a tray is detected and switch off when it is removed to save power. Position the dish or the tray on the grid. -
Page 74: Sa/E60S-Bf • Sa75S-Bf Models
Attention! The plate or the tray must touch the bar D The “T1”, “T2”,“T3” programs have durations that are already set: - T1 15 minutes - T2 10 minutes - T3 5 minutes TIMER If it is necessary, they can be permanently changed as POWER follows: SYSTEM... -
Page 75: Ordinary Maintenance
ORDINARY MAINTENANCE CLEANING THE UNIT WARNINGS Before cleaning the machine, switch it off and let the machine cool down. In the event that the machine is electrically powered, use the switch disconnector to cut off the power supply. To clean any component or accessory, DO NOT use abrasive or powder detergents that are aggressive or corrosive (i.e. -
Page 76: Cleaning Steel Surfaces
CLEANING STEEL SURFACES The steel surfaces, the grid and the tray must be cleaned soft rag dish detergent or neutral soap with a and a every hot water. After cleaning, rinse properly diluted in with clean water and dry carefully with a rag. For more resistant dirt, use ethylic alcohol, acetone or another non-halogenated solvent. -
Page 77: What To Do In The Event Of A Failure
WHAT TO DO IN THE EVENT OF A FAILURE In the event of a failure, disconnect the unit immediately from the power supply and call Technical Support. DISPOSAL OF THE UNIT INFORMATION RELEVANT TO THE DISPOSAL OF PROFESSIONAL EQUIPMENT Pursuant to Article 24 of Legislative Decree No. 49 of 14 March 2014 “Implementation of Directive 2012/19/EC on Waste Electrical and Electronic Equipment (WEEE)”.
Need help?
Do you have a question about the SMB60ES and is the answer not in the manual?
Questions and answers