Table of Contents
Advertisement
Quick Links
Technical Support and E-Warranty Certificate www.vevor.com/support
TRANSMISSION JACK
USER'S MANUAL
MODEL:
We continue to be committed to provide you tools with competitive price.
"Save Half", "Half Price" or any other similar expressions used by us only represents an
estimate of savings you might benefit from buying certain tools with us compared to the major
top brands and doses not necessarily mean to cover all categories of tools offered by us. You
are kindly reminded to verify carefully when you are placing an order with us if you are
actually saving half in comparison with the top major brands.
Advertisement
Table of Contents

Related Manuals for VEVOR SD0601


Summary of Contents for VEVOR SD0601
- Page 1 Technical Support and E-Warranty Certificate www.vevor.com/support TRANSMISSION JACK USER'S MANUAL MODEL: We continue to be committed to provide you tools with competitive price. "Save Half", "Half Price" or any other similar expressions used by us only represents an estimate of savings you might benefit from buying certain tools with us compared to the major top brands and doses not necessarily mean to cover all categories of tools offered by us.
- Page 2 CustomerService@vevor.com This is the original instruction, please read all manual instructions carefully before operating. VEVOR reserves a clear interpretation of our user manual. The appearance of the product shall be subject to the product you received. Please forgive us that we won't inform you again if there are any technology or software updates on our product.
-
Page 3: Technical Parameters
1. Technical parameters Brand VEVOR Model Max Load(kg) Product size Product weight kg 2. Safety precautions WARNING: Read this manual before using this product. Failure to do so can result in serious injury. SAVE THIS MANUAL 1) Position the Jack Position the jack to only lift on the areas of the vehicle as specified by the vehicle manufacturer. - Page 4 - Chock the wheel opposite the end being lifted. - When you block a load, you secure and support a load that is being lifted. The block(s) or stabilizer(s) should have a weight capacity that is greater than the weight of the load which is being lifted. 6) Center Load on Jack Saddle Off-center loads and loads lifted when the jack is not level can cause loss of load or damage to the jack.
-
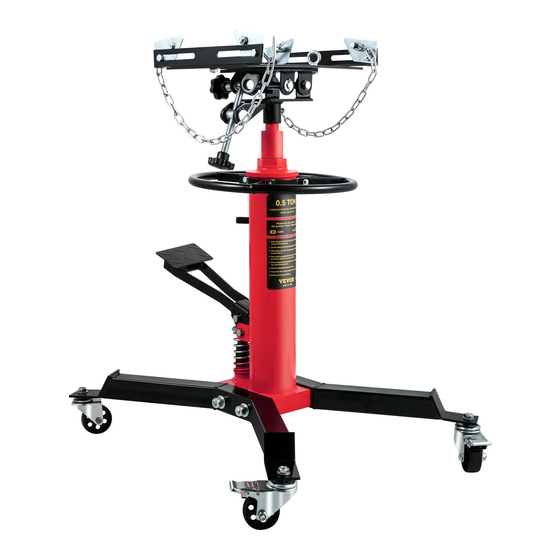
Page 5: Product Structure Diagram
3. Product structure diagram... -
Page 6: Instructions Of Use
Part name Part name Cylinder Screw M10*16 Foot Pump Pedal Screw M8*40 Release Handle Base Handle Oil Screw Chain Washer 12 Saddle Spring Washer 12 Bent Bolt Nut M12 Bolt Column Caster Wheels Nut M8 Spring Washer 16 Nut M10 Washer 16 Angle Iron Screw M16*70... - Page 7 Step 2: Install the base on the side of the cylinder base (4 M16 * 70 bolts, 4 16 spring pads, 4 16 flat pads, using a 24mm open wrench or 24mm socket wrench)
- Page 8 Step 3: Install the pedal above the pump body (using external pliers) External Pliers Step 4: Trap the handle over the cylinder...
- Page 9 Step 5: Install handle ring screws (3 M8 * 40 bolts, 3 M8 nuts, need a 14mm open wrench or a 14mm socket wrench) Step 6: Install the tray (saddle) on the oil cylinder For more detailed installation steps, please refer to the video on the website.
- Page 10 5. Instructions of use 1) RAISING THE JACK 1. Before use, ensure the transmission weight and size does not exceed the capacity of the jack. 2. Ensure the vehicle from which the gearbox be removed is correctly positioned. 3. Check handbrake is applied and raised to allow the transmission jack to be positioned correctly.
-
Page 11: Maintenance Instructions
attempting to lift, lower, or transport transmission. 2. Transport the load over level and solid ground, preferably concrete, and ensure the floor is swept clean before transporting load. 3. Be diligent in continually monitoring the load in transit.Keep all other persons at a safe distance. -
Page 12: Scope Of Application
Test the equipment by lifting without a load. If the binding continues contact Customer Service. 3) Lubrication This equipment will not operate safely without proper lubrication. Using the equipment without proper lubrication will result in poor performance and damage to the equipment. Some parts in this equipment are not self-lubricating;... -
Page 13: Common Fault Analysis
7. Common fault analysis fault failure cause solution phenomenon In use, the actual load The actual load weight The ladder weight does not exceed exceeds the maximum the maximum product deformation product load load Address: Baoshanqu Shuangchenglu 803long 11hao 1602A- 1609shi Shanghai Imported to AUS: SIHAO PTY LTD, 1 ROKEVA STREETEASTWOOD NSW 2122 Australia... - Page 14 TechnicalSupport and E-Warranty Certificate www.vevor.com/support...
Need help?
Do you have a question about the SD0601 and is the answer not in the manual?
Questions and answers