Table of Contents
Advertisement
Advertisement
Table of Contents

Related Manuals for Cambridge Audio CXN100


Summary of Contents for Cambridge Audio CXN100
- Page 1 CXN100 Manual Generated: 01/02/2024 - 13:46...
-
Page 2: Table Of Contents
Table of Contents CXN100 ............................................Introduction ..........................................What's included with the CXN100? ..................................Front panel controls ........................................Display ............................................Rear panel connections ......................................Remote Control ........................................Getting connected ........................................Connecting to WiFi ........................................StreamMagic app - Setup ....................................... Google Home / Chromecast built-in .................................. -
Page 3: Cxn100
CXN100 Last updated: February 1, 2024 01:32. Revision #11526 Users Manual... -
Page 4: Introduction
This guide is designed to make installing and using this product as easy as possible. Information in this document has been carefully checked for accuracy at the time of publishing; however, Cambridge Audio’s policy is one of continuous improvement, therefore design and specifications are subject to change without prior notice. -
Page 5: What's Included With The Cxn100
What's included with the CXN100? Last updated: February 1, 2024 01:32. Revision #11527 Inside the box of your CXN100 you will receive: 1. CXN100 Network Player 2. Safety Guide 3. Quick Start Guide 4. Control Bus Cable 5. 2x Wi-Fi/Bluetooth Antennas... -
Page 6: Front Panel Controls
6. Infrared sensor IR sensor that receives IR commands from the compatible CX series 2 remote control. Note: The CXN100 does not have its own remote control and does not come with one included. 7. Source Selector Scroll through sources enabled in the StreamMagic app. -
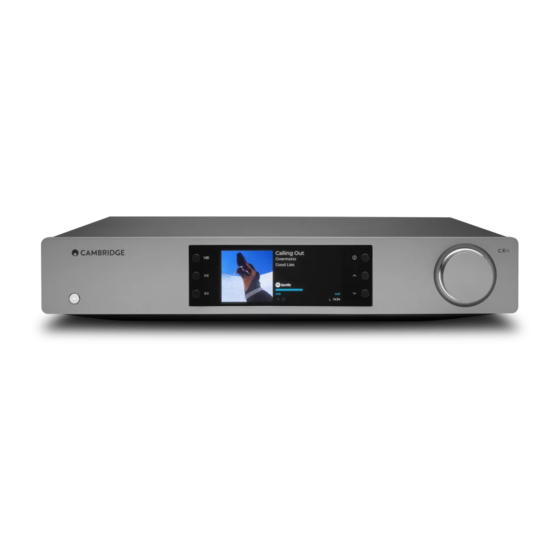
Page 7: Display
Display Last updated: January 18, 2024 09:46. Revision #11478 1. Album/Source artwork Displays the album artwork. Alternatively, if no artwork is available this will display the source input icon. 2. Track title, artist and album For Internet Radio, this will display the radio station name and the current playback. 3. - Page 8 9. Speaker output Displays the currently selected speaker output on relevant network streamers. 10. Mute volume Displays when the network streamer is muted. 11. Firmware update This indicates when new firmware is available. Press the 'Info' button on the front panel or use the StreamMagic app to update the network streamer's firmware.
-
Page 9: Rear Panel Connections
A USB B type socket to enable connection to PC and Mac computers. Note: For Class 2 USB audio, Windows-based PCs require a Cambridge Audio USB driver to be installed before connection. You can find the latest USB driver here. - Page 10 Position 2 – Main unit audio ground is connected directly to chassis ground. For some setups, this can reduce hum or noise when certain TVs, Turntables, and other equipment are connected to the CXN100 unit. 10. Digital Inputs (Coax and Optical) TOSLINK and S/P DIF coaxial digital inputs.
-
Page 11: Remote Control
Last updated: February 1, 2024 01:33. Revision #11530 Note: The CXN100 does not have its own remote control and does not come with one included. The device can be controlled via the StreamMagic app. If you wish to use a remote control with your device, the CX series 2 remote control is compatible with the CXN100. -
Page 12: Getting Connected
Last updated: February 1, 2024 01:33. Revision #11531 Basic Analogue Connections Important Note: Switch the power off before making any connections. There are two analogue connection options for the CXN100. 1. Line Output Connection (RCA) 2. Balanced Audio Connection (XLR) The balanced connection is the higher quality option and can reject noise and interference in the cable when used with other equipment that supports this function. - Page 13 There are two digital connection options for the CXN100. Note: If using either of the digital outputs of the CXN100, the digital signal will bypass the DAC in CXN100 and will instead be processed by the unit connected to the digital output, E.g., CXA81 1.
- Page 14 CXN100 with CXA (via StreamMagic app) When using the app to turn the CXN100 on/off, this will also turn the CXA on/off. The app can also be used to control the volume of the CXA. Connect the CXN100 Control Bus Out to CXA Control Bus In.
- Page 15 When turning the CXN on/off, this will turn the CXA and CXC on/off. With all three CX devices, connect the CXN100 Control Bus out to CXA Control Bus in. Then connect the CXA Control Bus out to CXC Control Bus in.
-
Page 16: Connecting To Wifi
Failure to maintain your device with regular firmware updates as provided by Cambridge Audio will void the product warranty and is likely to cause major issues to the unit in time. - Page 17 Android: Connect both of the supplied Wi-Fi antennas to the rear of the unit, and ensure that it's in range of your wireless router. Then power on your unit. Note: If you are setting up your device for the first time or after a factory reset, you will first need to follow the on screen instructions to select your preferred language after powering on your unit.
-
Page 18: Streammagic App - Setup
Failure to maintain your device with regular firmware updates as provided by Cambridge Audio will void the product warranty and is likely to cause major issues to the unit in time. Please ensure that your unit is updated to the most current firmware version. Information on the latest firmware version for your player can be found here. -
Page 19: Google Home / Chromecast Built-In
Google Home / Chromecast built-in Last updated: January 18, 2024 02:13. Revision #11491 Your player is network connected, not only can you listen to devices connected to the inputs on the product but you can also stream music from many different sources both on your home network and from the internet. Your player features Chromecast built-in and can be incorporated in to your Google Home. -
Page 20: Internet Radio
Internet radio Last updated: October 24, 2023 04:24. Revision #11490 You can assign up to 99 of your favourite Internet Radio stations as presets on your player, which can then be recalled using the StreamMagic app. A limited amount of presets can be recalled via the remote control if your player includes one. You can search and assign a preset via the StreamMagic app: Within the StreamMagic app navigate to the Radio tab. -
Page 21: Bluetooth
Bluetooth Last updated: October 26, 2023 12:56. Revision #11489 The Bluetooth source allows your player to receive wireless Bluetooth audio from most phones, tablets and laptops. Pairing To begin streaming high-quality music from your chosen media source it will first need to be paired with your player. Within the StreamMagic App navigate to the Home tab. -
Page 22: Airplay
AirPlay Last updated: October 24, 2023 04:30. Revision #11488 AirPlay is an Apple technology designed to control home audio systems and speakers in any room — with a tap or by just asking Siri — right from iPhone, iPad, HomePod, or Apple TV. Play a song in the living room and kitchen at the same time or adjust the volume in any room, all in sync. After installing your player, add it to the Apple Home app with a few simple steps using your iPhone or iPad How to use AirPlay from iPhone or iPad 1. -
Page 23: Built-In Streaming Services
1. Open the Spotify app and choose the playlist, album, song, etc. that you wish to stream to player. 2. Select the devices icon within Spotify and select your Cambridge Audio network player from the list of ‘Listening On’ devices. - Page 24 Qobuz (via StreamMagic) 1. Open the StreamMagic app and navigate to the Library tab, and then select Qobuz. Note: Please ensure that you sign into your Qobuz account when prompted to do so. This will only be required on the first instance of use to link the account to the StreamMagic app.
-
Page 25: Usb Audio
This can be done using the source selector on the front of the device, or by going to the Home tab and then selecting USB Audio within the Sources section of the StreamMagic app. 3. Navigate to the CA Control Panel which should now be installed in your Windows taskbar. This will show any connected Cambridge Audio USB Audio device and current sample rate. - Page 26 4. On your PC, navigate to Settings > System > Sound. Select your Network Player as your output device from the drop-down menu. 5. Within this same window under Related Settings on the right-hand side, select Sound Control Panel. Alternatively, scroll down and select More Sound Settings.
- Page 27 7. Within Speaker Properties, navigate to the Advanced tab. Select the desired bit depth and sample rate preference. (This step is optional.) Note: Not all Windows versions support playback at sample rates greater than 384kHz. If you experience issues please set the default Windows playback format to 384kHz or lower, then restart your Network Player.
- Page 28 2. Select the USB Audio source. This can be done using the source selector on the front of the device, or by going to the Home tab and then selecting USB Audio within the Sources section of the StreamMagic app. 3.
-
Page 29: Usb Media
USB Media Last updated: February 1, 2024 01:34. Revision #11534 You may connect a USB SSD, USB HDD or flash drive to your player via the USB Media input located on the rear of the unit for playback. Once connected, the following formats are supported: ALAC, WAV, FLAC, AIFF, DSD (x512), WMA, MP3, AAC, HE AAC, AAC+, OGG Vorbis Note: your player will read large capacity hard drives connected to the USB input. -
Page 30: Streaming Your Local Digital Music Collection
To stream local content, you will need the following hardware and software running in your network: 1. Your Cambridge Audio Network Player. 2. A mobile device such as a smartphone or tablet on which you can run the StreamMagic app, or by accessing your collection via the front panel controls. -
Page 31: Mqa (Master Quality Authenticated)
MQA (Master Quality Authenticated) Last updated: July 26, 2023 03:28. Revision #11483 Your player includes MQA technology, which enables you to play back MQA audio files and streams, delivering the sound of the original master recording. The front panel will display MQA green or blue to indicate that the unit is decoding and playing an MQA stream or file, and denotes provenance to ensure that the sound is identical to that of the source material. -
Page 32: Settings
Control Bus If your device is connected to a Cambridge Audio amplifier using a control bus connector, volume commands can be sent directly to the amplifier. For more information, please refer to the Getting Connected section of this manual under ‘Control Bus’ here. - Page 33 Firmware This will check for and apply any new firmware available for your player. You can also check for new updates on the info screen and manually update the unit’s firmware by following the steps below: Hold down the ‘i’ (Info) button on the front panel As instructed on the display, press the ‘play/pause’...
-
Page 34: Info Screen
Info screen Last updated: February 1, 2024 01:38. Revision #11523 The info screen shows useful information about your player, it also allows you to carry out some actions to help resolve problems with your player. To access the info screen hold the button on the front panel for 2 seconds. -
Page 35: Technical Specifications
Technical specifications Last updated: February 1, 2024 01:38. Revision #11522 D/A CONVERTERS ESS ES9028Q2M THD @ 1kHz 0dBFs < 0.0005 % THD @ 20kHz 0dBFs < 0.0005 % FREQUENCY RESPONSE 20Hz-20kHz +/- 0.1dB * SIGNAL TO NOISE RATIO (REF 1W) >... - Page 36 ECO Mode: <0.5W Network Standby Mode: >2W MAX POWER CONSUMPTION DIMENSIONS 80 x 430 x 325mm (3.1 x 16.9 x 12.8") WEIGHT 3.55kg (7.8Ibs)
-
Page 37: Source Quality Matrix
Source quality matrix Last updated: February 1, 2024 01:37. Revision #11521 SOURCE DELIVERY METHOD MAXIMUM RESOLUTION Spotify Connect Mobile/Desktop App 320kbps Spotify AirPlay Mobile/Desktop App 320kbps Spotify Chromecast Mobile/Desktop App 320kbps Spotify Bluetooth Mobile/Desktop App aptX HD TIDAL Connect Mobile/Desktop App 24bit / 192 kHz TIDAL (via StreamMagic app) StreamMagic App... -
Page 38: Troubleshooting
Ensure your chosen UPnP server software can serve the file type you are trying to access. Some servers do not serve FLAC for instance. This Network Player can only play non-DRM files. Files that have DRM controls cannot be played by the CXN100. - Page 39 WAV, ALAC, AIFF can currently be played. This Network Player can only play non-DRM files. Files that have DRM controls cannot be played by the CXN100. Check that your device does not require more than 1A if it is powered from the USB socket itself.
-
Page 40: Frequently Asked Questions
Does the CXN100 come with a remote control? No, the CXN100 does not have its own remote control and does not come with one included. The unit can be fully controlled and the settings can be adjusted via the StreamMagic app. - Page 41 What USB HDs will the CXN100 support? The primary function of the CXN100 is as a network music player and the USB port is intended for convenient connection of USB HDDs and SSDs. As such, we can not guarantee compatibility with all USB HDDs and SSDs.
Need help?
Do you have a question about the CXN100 and is the answer not in the manual?
Questions and answers