Table of Contents
Advertisement
Quick Links
Download this manual
See also:
User Manual
Advertisement
Table of Contents

Related Manuals for Unitech PA966


Summary of Contents for Unitech PA966
- Page 1 PA966 PA966 Product Reference Guide Unitech is a member of Oracle Embedded Software Licensing Program P/N 400489 REV.B...
-
Page 2: Table Of Contents
Tour of the Unitech PA966 ... 7 PA966 Front and Left Side ... 7 PA966 Back ... 7 First Steps with the Unitech PA966 ... 8 Installing the Battery Pack ... 8 Supplying Power to the PA966 ... 9 Charging the Main and Backup Batteries for the First Time ... 9 Using the Stylus ... - Page 3 Product Reference Guide Checking Main and Backup Battery Status ... 20 How to Save Battery Power ... 21 Warm Boot / Cold Boot ... 22 Charging Considerations ... 23 Storage and Safety Precautions ... 23 Chapter 4. Communication..24 Introduction...
-
Page 4: Chapter 1. Introduction
Introduction Thank you for purchasing PA966. Your PA966 is a rugged, compact and lightweight palm-size computer. It utilizes the Windows CE operating system, and incorporates two optional scanning laser device, laser & imager, color LCD with touch screen, keypad, and wireless communication capability. - Page 5 In the above situation, plug the PA966 to the RS232 or USB cable with DC in port or put the unit into the Unitech PA96x Cradle (with 12V/2A AC-DC adapter), and recharge the unit for 16 hours in order to fully charge its backup battery.
-
Page 6: Unitech Pa966 & Accessories
Product Reference Guide Unitech PA966 & Accessories After opening the box, please make sure the following accessories for the PA966 are present: PA966 Main Body PA966 CD Battery pack Quick Reference Guide CF slot drawer for PA966 Stylus Pulling-tags RF Card Cushion... -
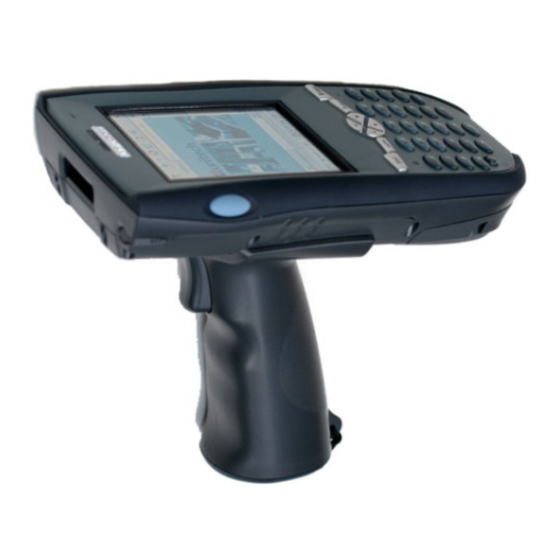
Page 7: Tour Of The Unitech Pa966
Product Reference Guide Tour of the Unitech PA962 Stylus This stylus is designed for tapping screen . Touch Screen RS232/USB/ Charging Port PA966 Back IrDA port Reset Hole Push enclosed button for system warm-start CF slot compartment Please remove the battery door to access CF slot. -
Page 8: First Steps With The Unitech Pa966
First Steps with the Unitech PA966 Rechargeable Lithium-Ion battery pack RS232/Charging cable or USB/Charging cable Docking Station NOTE: Data you entered may not be properly stored until the built-in backup battery has been adequately charged. Please remember to turn on the back up battery before you charge the terminal. -
Page 9: Supplying Power To The Pa966
It may take up to 16 hours to fully charge the empty backup battery. The first time charge should be at least 16 hours to ensure a proper charge. CAUTION: Operating the PA966 for the first time without the AC adapter, and without fully charging the backup battery may result in loss of data stored in RAM memory. -
Page 10: Using The Stylus
Your CF card Protective Screen Film The PA966 screen ships with a protective plastic film. You may remove this if desired by peeling from one corner. The screen will be more susceptible to scratching without the film, but will be more readable. -
Page 11: First Operation Of The Unitech Pa966
This screen can also be accessed at any time by pressing the hot key [FUNC] and the [ESC] key. The PA966 will prompt you to calibrate the unit by tapping a sequence of screen locations. Tap gently but firmly. When you have completed the series of taps, press the [ENT] key to confirm it or press the [ESC] key to cancel it. -
Page 12: Setting The Time Zone First
Setting the Time Zone first Follow the steps below to set up your time zone. Tap the location arrow to see a list of cities. Choose your location (or nearest listed one). Select the Daylight Savings Time check box, if necessary. Tap the APPLY button. -
Page 13: Flash Memory
Flash Memory is a re-writable location for programs and data files. The benefit of this feature is that files and programs saved in Flash Memory are unaffected by the PA966’s power status. To access the contents of Flash Memory, simply select “My Computer”... -
Page 14: Chapter 2. Using The Keypad And Scanner
Chapter 2. Keypad The PA966 series keypad contains 36 keys, including Cursor key, Numeric Key, Alpha key, ON/OFF, Function, Escape, Backspace, and Enter key. Please refer to the picture below. Hot Key TO Get System information Power Status Scanner Setting... -
Page 15: Alpha Key
Product Reference Guide Keypad Input Method When the PA966 boots, the default condition is Numeric Mode on. When you toggle to Alpha Mode, the default condition is CAPS mode off. Key Pos. Alpha Off (Default) FUNC Up Backspace Backspace Enter... -
Page 16: Software Keyboard (Windows Ce Keyboard)
Software Keyboard (Windows CE Keyboard) The Windows CE provides software keypad which allows users to input more characters. Opening the Windows CE Keyboard: The Windows CE keyboard can be opened by tapping the “keyboard” icon on the task bar. (Refer to picture). Keying-in Characters: After tapping the “keyboard”... -
Page 17: Using The Laser Scanner
Trigger keys are located on the left and right sides of the unit. Press either one. The PA966 also has a built-in Scanner Setting.exe program that allows the user to test the barcode scan function for 1D & 2D also for image capturing. Scanner Setting.exe is... -
Page 18: Chapter 3. Power System
Charging the Main and Backup Battery for the First Time Note: Before using the PA966 for the first time, charge the unit for 16 hours to fully charge the empty backup battery. Operating the PA966 for the first time without the AC adapter, and without fully charging the backup battery may result in loss of data stored in RAM memory. -
Page 19: Power Status Indication
Stopping the operation and charging the PA966 immediately is highly recommended. No icon: When displayed means there is no external power supply to the PA966 but its battery power status is good. “Backup Battery Low” icon: When displayed indicates the backup battery is low and needs to be charged. -
Page 20: Checking Main And Backup Battery Status
“GOOD”. It is necessary to charge the battery when “Low” or “Very Low” are displayed in bold characters. If “Low” or “Very Low” are still displayed after charging, please contact Unitech Technical Support. -
Page 21: How To Save Battery Power
Automatic shut-down of the PA966 The PA966 will enter idle mode when there is no task, or all tasks are waiting for input. In default setting, the PA966 will automatically turn itself off if it remains idle for 3 minutes and when there is no external charging power applied. -
Page 22: Warm Boot / Cold Boot
Warm Boot / Cold Boot Warm Boot To perform a warm boot while the PA966 is operating, insert a pin (paper clip works well) into the reset hole on the back of the terminal, right below the PCMCIA cover. Under the Windows folder of your terminal, locate the file BootMode.exe, execute the program, and confirm the warning message. -
Page 23: Charging Considerations
Product Reference Guide Charging Considerations It is important to consider the environment temperature whenever you are charging the Lithium-Ion battery pack. The process is most efficient at normal room temperature or slightly cooler. It is essential that you charge batteries within the stated range of 18°C to 25°C. -
Page 24: Chapter 4. Communication
Chapter 4. Introduction The Unitech PA966 allows users to link to a host computer via RS-232,USB, IrDA, or RF connection for data communication. This chapter provides an overview of the communication of the PA966. The following subchapters cover these topics: ”Microsoft ActiveSync”... -
Page 25: Activesync
Because you will be restarting your computer during installation, save your work and quit all programs before you begin. To set up your communication settings, a PA966 serial cable is required to connect the PA966 to your host computer. If you run the Windows NT operating system with a service pack, you will be informed ®... - Page 26 Product Reference Guide Download the executable program “msasync. exe” from the Microsoft web site at: http://www.microsoft.com/mobile/pocketpc/ downloads/activesync35.asp. Execute this program. Select the folder into which Microsoft ActiveSync will be installed. If you choose not to download into the displayed default folder, click the Change button.
- Page 27 Product Reference Guide Using the RS232 cable or USB, plug the PA966 into a communication port on your desktop computer. Turn the PA966 on. Click the Next button. Microsoft ActiveSync should recognize your PA966 and configure your communication port. If a message appears indicating that it is unable to detect a connection, click the Cancel button and manually configure the communication settings.
- Page 28 Synchronization will be initialized and will take place if you’ve chosen to synchronize periodically or upon connection. Note: Your desktop computer can create a partnership with multiple PA966. Also, a PA966 can create a partnership with up to two desktop computers.
-
Page 29: Using The Mobile Devices Window
Open the Explorer window by double- clicking your device icon in the Mobile Devices window. Use this window, which is the root window to the PA966, to copy and move files between the PA966 and your desktop computer, as described in the “Synchronization” section. -
Page 30: Changing Communications Settings
Microsoft ActiveSync uses the specified communication ports to connect to the PA966. Make sure these resources are available for Microsoft ActiveSync to connect to the PA966. Other programs cannot use them while the PA966 and your desktop computer are connected. -
Page 31: Synchronization
Synchronization takes place according to the options you chose during Microsoft ActiveSync setup. If you accept the default (On Connect) synchronization option in the Microsoft ActiveSync Setup Wizard, you’ll be able to simply connect your PA966 to your desktop computer, and synchronization will take place. -
Page 32: What Gets Synchronized
For details on synchronizing specific items, see Microsoft ActiveSync Help. Files All files you create on the PA966 are stored in a My Document/PA966 My Documents folder (if the assigned Device Name is PA966). View those files by double-clicking the short-cut PA966 My Documents icon on your desktop computer. -
Page 33: Changing Synchronization Options
Option button is available for that service. Installing and Removing Software Any program created for your PA966 can be installed as long as there is sufficient memory or storage space. First install the software on your desktop computer and then connect the PA966 to your desktop computer. -
Page 34: Inbox
InBox Following is an overview of InBox. Step-by-Step information on how to use this program can be found in the Help function on the PA966. To view Help, tap Start, and then Help. Sending and Receiving E-Mail with InBox Use InBox to send and receive e-mail messages using any of these methods: Send and receive messages using a dial-up connection to a service provider or your corporate network. -
Page 35: Setting Up Remote Mail
ISP must use a POP3 mail server and an SMTP mail gateway. For dial-up connections, you’ll require an internal PCMCIA type modem card or external modem for the PA966. You’ll also need to set up the remote connection on the PA966 using the Connections program. -
Page 36: Receiving Messages
ActiveSync Options. Select Message and then click Options. (For the Options button to be available, you must have previously enabled message synchronization.) To change InBox delivery options for remote mail: In InBox on your PA966, tap Service and then tap the service name. Then tap Service again and tap Properties. -
Page 37: Sending Messages
RF Communication Windows CE can support TCP/IP protocol, so the user can easily connect to the Internet by Modem or RF. The following chapter is an introduction on how to connect the PA966 to a network via TCP/IP. There are several PCMCIA RF cards available on the market. These cards provide the PA966 with wireless communications. -
Page 38: Installing The Wireless Local Area Network (Wlan) Card
Remove the protective backing from the sticky side of the RF Card Cushion and install the cushion along the inside upper edge of the PCMCIA Cover as shown. The RF Card Cushion prevents damage to the RF card antenna in case the PA966 is accidentally dropped. - Page 39 Product Reference Guide Setting up RF Card pre-loaded in CF Slot of PA966 The PA966 has optional RF model which is pre-loaded with RF Card in CF slot. The PA966 RF model will automatically display the following screen when terminal...
-
Page 40: Appendix A
64MB Microsoft Windows CE 5.0 Professional Plus Microsoft Embedded Visual Tool for VB and VC programming Unitech PA966 Software Developmenet Kit Touch screen, stylus, keypad,software keyboard, bar code laser scanner and imager scanner. 36 physical keys with backlight including cursor key, numeric... -
Page 41: Laser Scan Engine
Product Reference Guide Laser Scan Engine Light Source: Visible Laser Dicode(VLD) 650nm. Scan Rate: 39+Scan/Sec Scan angle: +53° from normal Min. print contrast: 25% absolute dark/light reflectanceat 650nm Power Consumption: 65mA typicle@5V Laser Typical Depth of Field Decode Zone N e a r 5 m i l 2 . - Page 42 Barcode/Symbology Symbology Imager Scan Engine Performance Focal Point: 7 inches (17.8cm) from lens plate (nominal) 8 mil Working Linear Range (.020cm) 3.5 in. Near: (8.9cm) 7.6 in. Far: (19.3cm) Product Reference Guide Codabar Code 11 Code 32 Code 39 Code 39 Full ASCII Code 93 Code 128 Delta Code...
- Page 43 Product Reference Guide Viewing Angle: +40º Ambient Light: 535 to 100,000 lux (full sunlight) Aiming Illumination LEDs Green Aiming LEDs Red Aiming LEDs Laser Aiming Barcode/Symbology PDF 417 MicroPDF417 MixiCode Data Matrix QR Code Postal Postnet Planet Code British Post Linear Codabar Code 39...
- Page 44 Power Power Options Power Consumption Battery Charge Backup Battery Power Management Interface Port RS232/USB/Charging Port IrDA PCMCIA & CF Product Reference Guide Lithium-Ion @7.4V, 1850mAH Main Battery Pack (Battery pack can be recharged 500 cycles or more) External AC/DC adapter @12VDC/2A with regulator Using Maing Battery at At 8V 25 Active mode: 117mA (Laser Engine power on, Backlight power on)
- Page 45 Opration: Depends on product configuration Laser with Laser with BT only BT & RF -20~50℃ 0~50℃ Note: RF stands for pre-loaded WiFi CF card in PA966 or PA967. Pin Assignment of Charge and Communication Port Assignment Description Receive Data Send Data Data Transmit Ready...
-
Page 46: Docking Station
Accessories List Accessories Desktop Cradle Car Kit Modem Cradle 4 Slot Multi-bay Battery Pack Universal Power Supply Power Cord (US) Power Cord (EU) Power Cord (UK) 2 Slot Battery Charger 4 Slot Battery Charger USB Cable w/ DC in port RS232 Cable w/DC in port USB Cable (Cradle to PC) RS232 Cable (Cradle to PC) -
Page 47: Appendix B
Product Reference Guide Appendix B Update and Upgrade OS Update OS via Compact Flash or USB You may choose update OS via CF or USB, select the Bootmode in PA966 Utilities. Insert CompactFlash chip into PC Card Adapter After the OS is successfully... -
Page 48: Appendix C
Appendix C Troubleshooting Guide P roblem Term inal does not power on. Term inal shuts its elf down. B attery life is s hort "Low B ack up B attery" m es sage S creen is blank Term inal either do not res pond, or res ponds inac curately to touch s c reen input. -
Page 49: Fcc Statement
Laser Information The Unitech PA960 series is certified in the U.S. to conform to the requirements of DHHS/ CDRH 21CFR Subchapter J and to the requirements of IEC 825-1. Class II and Class 2 products are not considered to be hazardous. The PA960 series contains internally a Visible Laser Diode (VLD) whose emissions do not exceed the maximum limits as set forth in the above regulations. - Page 50 Unitech Customer Support http://www.ute.com America http://latin.unitech-adc.com http://www.unitech-adc.com China http://www.ute.com.cn http://www.unitech-europe.com EMEA Japan http://www.unitech-japan.co.jp Taiwan http://adc-utt.unitech.com.tw Head Office http://www.unitech-adc.com Product Reference Guide e-mail: inquiry@ute.com e-mail: info@latin.unitech-adc.com e-mail: aidcsales@adc.unitech.com e-mail: unitech@ute.com.cn e-mail: sales@unitech-europ e-mail: sales@unitech-japan.co.jp e-mail: barcode@unitech.com.tw e-mail: marketing@adc.unitech.com.tw e.nl...
Need help?
Do you have a question about the PA966 and is the answer not in the manual?
Questions and answers