Unitech PT630 Operation Manual
Portable terminal
Hide thumbs
Also See for PT630:
- Programming reference manual (73 pages) ,
- Set up and user instructions (28 pages) ,
- Connection manual (5 pages)

Subscribe to Our Youtube Channel
Related Manuals for Unitech PT630


Summary of Contents for Unitech PT630
- Page 1 PT630 Operation Guide Page 1 of 41 ______________________________________________________ PT630 Portable Terminal Operation Guide V1.0...
-
Page 2: Table Of Contents
Downloading a Jobgen Pro application from Host to PT630 ...34 5.2.2 Uploading Jobgen Pro files from PT630 to HOST...34 5.2.3 Downloading a file from Host to PT630 using the Kermit Server...35 5.2.4 Uploading files from PT630 to HOST using the Kermit Server ...36 CHAPTER 6. -
Page 3: Chapter 1. Introduction
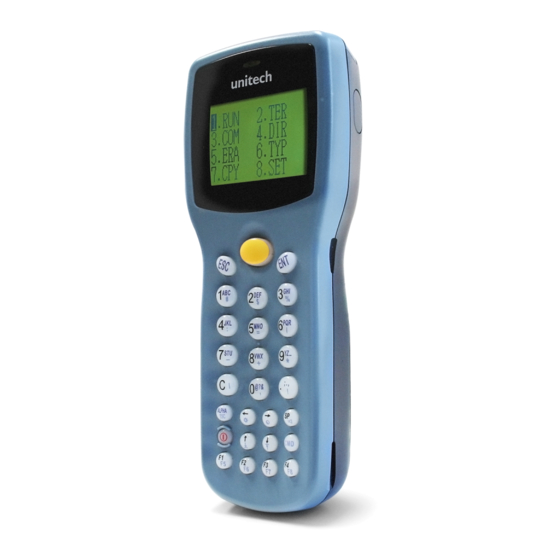
RAM memory is powered by the main Li-ion battery and a back-up lithium battery, which retains the data stored in RAM and real time clock when the main battery is drained. The PT630 has a 128x64 pixel backlit graphic LCD display, an integral 27-key keypad, a built-in bar code laser scanner/CCD module and an RS-232 serial port for data communication with a host PC. -
Page 4: Subsystems
& 1.2.2 Display Subsystem The PT630 display subsystem supports a character oriented 8-line by 20-character or 4-line by 16- character LCD display. The origin (0,0) is always at the top-left hand corner. This subsystem provides the program interface functions to display characters, set cursor position, get cursor position and clear screen display. -
Page 5: Serial Port Subsystem
This subsystem allows users to set and obtain system date and time from the Real Time Clock Integrated Circuit (IC) in the PT630. 1.2.5 Bar Code Input Port The PT630 has a built-in barcode decoder. The terminal reads bar code labels through an integrated laser scanner module, pen type module. 1.3 Diagnostics and Power-On-Test The system diagnostic routines exercise the ROM validity check, test the RAM, system parameters, the keypad, the real time clock, the RS-232 port, LCD and scanner port. -
Page 6: Chapter 2. System Software Organization
______________________________________________________ Chapter 2. System Software Organization The PT630 system software is organized into two modules: the kernel module and the application module (see diagram below). ┌──────────────────────────────────────────────────────────────────┐ │ ┌───────────┐ │ APPLIC ATION │Terminal │ MODULE │module │ └───────────┘ │ ┌───────────┐ │... -
Page 7: Operation Flow
Backup battery test "WARNING LITHIUM BATTERY LOW" When the main battery is low, a warning message will be displayed on the LCD when PT630 is power on. For PT630, it can automatically detect battery status, a warning sign will be display on battery icon on the upper side of LCD. - Page 8 A program downloaded to the PT630 may be automatically executed each time the portable terminal is turned on. In order for the program to be auto-ran, it must be downloaded to PT630 with the name AUTOEXEC.EXE. When the PT630 is turned on, the system will scan the file directory and execute the program, otherwise it will enter a mode of operation called the READY mode.
-
Page 9: Chapter 3. Operating Modes
3.1 Keyboard Modes --- Using PT630’s keyboard The keypad of PT630 consists of 27 rubber keys, the ⊙ key is used to switch on/off the unit and other 26 keys are used to control the unit and key in data. The use of keyboard is categorized to three modes: normal mode, command mode, and alpha(betic) mode. -
Page 10: Normal Mode
NORMAL mode 3.1.1 Keyboard of the PT630 is initialized to normal mode after powered on. In normal mode, the cursor is a block sign and the keyboard is mainly used to input numeric data and use F1-F4 four function-keys. The keypad layout of available keys in normal mode is shown on right picture. -
Page 11: Pt630 Modes Of Operation
Supervisor Mode 3.2.1 Ready Mode The Ready mode is the default resident operating mode. In the Ready mode the PT630 is configured as a portable programmable device, and is capable of receiving files (Download) from or transmitting files (Upload) to a Host PC. Data files or recorded information collected from the PT630 are uploaded to the host whenever the host program is ready to receive the collected data. - Page 12 The TER command puts the PT630 in either Terminal Emulation operation or FormCaching operation. User will need to choose when the TER was selected and the PT630 execute the operation. Terminal Emulation Operation. When EXEC transfers control to this EPROM-resident application program, the PT630 operates as a dumb ASCII terminal while exchanging data with a Host computer.
- Page 13 Block mode applications perform similar functions to character mode, except that the input characters will not be sent to the host one character at a time. Instead the PT630 holds the data in its internal buffer until a termination character is received. Specifying parameter linepage, lineterm, and pageterm in the terminal control table programs the termination character.
- Page 14 [ ] or [ ] key to select an existence file then pressing [ENT]. The screen will display 160 (20 character x 8 line) characters at a time. Press any key to show the next page or press [CMD] then [Alpha], to warm start the PT630 and return to the Ready Mode. 3.2.2.7 The CPY command allows the user to make a copy of data from a source and transfer the information to destination.
- Page 15 DATE & TIME Set System Clock/Calendar By selecting “1.DATE & TIME” in the SET menu, you can set the PT630 date and time. The date and time can be used as the time stamp to be appended to an input data record by an application program.
- Page 16 ______________________________________________________ 3.2.2.8.3 DISPLAY Enable/Disable whether to show the Power-on LOGO. Power-on LOGO enabled is the default setting. 3.2.2.8.4 KEYPAD: Setup up-case and low-case Alpha character input User can define upper-case or lower-case input on Alpha mode.
-
Page 17: Supervisor Mode
PT630 to the Supervisor mode of operation do the following: 1. Turn off the PT630. 2. Press and hold down the [CMD] and [ ] keys simultaneously, then switch on the PT630 by pressing the [ ] key. The PT630 LCD first shows the ‘START MENU” where the user has ⊙... - Page 18 Configuration menu, the LCD will display the BARCODE Setup as shown below. << BARCODE SETUP>> CODE 39 Press [ ] or [ ] to toggle between settings. Press [ENT] to set. Setup decoding of PT630 supported bar code symbologies Symbology Setup Category (default) Code 39...
- Page 19 PASSWORD: 3.COLD START When the TERM SETUP menu (shown below) appears on the PT630 LCD, proceed to set up the portable terminal communication parameters. When finished go to the User Mode menu and press 2 (2.TERM) to make the PT630 operate as a dumb ASCII terminal.
- Page 20 REMOTE The PT630 will output data gathered from the bar code port or keypad to its RS-232 port. LOCAL The PT630 does not transmit gathered data to its RS232 port. Echo Use the [ ] key to toggle between ON and OFF, then hit [ENT] to make the selection.
- Page 21 Enable the FormCaching application by selecting 4 (4.FORM) in the Supervisor mode menu. When FormCaching is enabled, the PT630 will first ask the user to specify data fields in four categories including field prompt, data length, and data type and device type. After defining all data fields, the user must [CMD] then [Alpha] key to end the setup of the data field.
- Page 22 When FormCaching is enabled, a data file named FORM.DAT will be created in the PT630. FORM.DAT stores the data as entered by the user after FormCaching is invoked. The PT630 will not allow the user to redefine the data fields in FormCaching once the FORM.DAT has been created.
- Page 23 RESUME ON (enable Recovery) and RESUME OFF (disable recovery) Press [ENT] to complete the setting 2.AUTO OFF Use the [ ] key to set auto-off timeout from 1 to 9 minutes. The PT630 will turn itself off automatically after being idle for the time period specified in the setting.
- Page 24 INT 22H STAND ♦Active ♦Stand by ♦Shut Down In Shutdown mode, the main power is cut off from the PT630 NOTE: To conserve battery power, keep the PT630 in waiting for input. 3.2.3.6 Password Definition This function is used to create a password. The password is used to prevent an unauthorized user from entering the Supervisor mode and accidentally change the PT630 configuration parameters.
- Page 25 3.2.3.7 Initialization The user can command the PT630 to execute a Cold Start that will clear all data stored in the RAM Disk and configure the terminal to default values. Make sure your data has been backed up to a Host/PC before performing this function.
- Page 26 PT630 to your Host/PC. 3.2.3.8 Diagnostics 1. The PT630 has a built-in diagnostics program to test the terminal's hardware. The test routines are data destructive. Therefore, before running the diagnostic program, make sure you back up the data in the PT630.
- Page 27 6. SCANNER 7. RAM BACKUP 8. EXIT Connect a bar code scanner to test bar code input by scanning bar code labels. Press any key to return to the diagnostics menu. Follow the instruction displayed on the LCD to press the [PWR] key to turn the power off and on to verify the memory backup.
-
Page 28: Chapter 4 4.1 Introduction
Chapter 4. HARDWARE OVERVIEW 4.1 INTRODUCTION The PT630 is a handheld data terminal that has an integrated laser-scanning module or clip-on pen module for bar code reading. A rechargeable Li-ion battery pack power the PT630. A lithium backup battery preserves data stored in the RAM when the power main battery is used up or during the replacement of the main battery. -
Page 29: Features
There are one scanner-trigger switches above the keypad. The scanning window of the integrated unit sits flush with the top surface of the portable terminal; with the PT630 standing in a right side up position, the scanning beam, fires off upward. -
Page 30: Pt630 Charging/Communication Cradle
An optional charging/communication cradle (dock station), model PT063, gives users a convenient environment for daily use of the PT630. The cradle has provisions for a quick charge circuit to fully charge the Li-ion battery pack installed in the unit in about 2~3 hours. The cradle also allows users to link the PT630 to host computer either through RS-232 point-to-point (PT063-1), RS-485 multi-point (PT063-2) connection or modem (PT063-3) for data communication. -
Page 31: Chapter 5 5.1 Installation
Chapter 5. COMMUNICATION 5.1 INSTALLATION The RS-232 port of PT630 can communicate with the serial port of a host computer. There are two ways to carry out communication sessions: (1) LOCAL : Directly connect to the serial port of your computer system. - Page 32 Once your PT630 has been connected with a modem to a telephone line, you can dial from the PT630 to a remote host computer. The computer needs to be attached to a modem through the telephone line. After the line is connected, the data communication process can start between PT630 and PC/Host as if the two were linked locally.
-
Page 33: Downloading And Uploading
Multi-point Please refer to the PT630 Programming Reference Manual for detailed description of ESC commands. Before you download or upload a file from the PC to the PT630, connect your PT630 and HOST using the LOCAL method. Protocol supported OFF, or MULTI... -
Page 34: Downloading A Jobgen Pro Application From Host To Pt630
5.2.1 Downloading a Jobgen Pro application from Host to PT630 This function downloads an existent JobGen Plus application from host to the PT630. On PT630: Connect the RS-232 port of PT630 to the COM port of your PC by a null modem cable. • Press [ key to power up the PT630. -
Page 35: Downloading A File From Host To Pt630 Using The Kermit Server
5.2.3 Downloading a file from Host to PT630 using the Kermit Server This function downloads a file from host to the PT630. On PT630: Connect the RS-232 port of PT630 to the COM port of your PC by a null modem cable. • Press [ key to power up the PT630. -
Page 36: Uploading Files From Pt630 To Host Using The Kermit Server
Having collected the data into the PT630, the user can upload one or more collected data forms to your PC. On PT630: Connect the RS-232 port of PT630 to the COM port of your PC with a null modem cable. • Press [ key to power up the PT630. -
Page 37: Chapter 6. Troubleshooting
7. If keypad does not work properly, Verify operation steps with user's manual, or • Power off and on your PT630, then press some keys to check if an audible beep is • generated for each key pressed. If not, call for service. - Page 38 Page 38 of 41 8. If encounter any other abnormal symptoms, Caution : The following process will clear all data in PT630 RAM disk memory) Reset (cold start) the PT630, press [CMD], [ ] and [ ⊙] simultaneously, press [3] in “Start Menu” press ENTER. See if symptoms went away. If not, call...
-
Page 39: Chapter 7. Power Sources
3 hours. The PT630 checks the power level of the main battery when the portable terminal is in use; however, the backup battery is only checked during power-on-test. Both low battery conditions will be signal to the user by a warning message on the LCD. -
Page 40: Main/Backup Battery Replacement And Installation
7.1 MAIN/BACKUP BATTERY REPLACEMENT AND INSTALLATION Main Battery 1. Make sure the unit is turned off. 2. Turn over the unit. Slide tab from right to left (see illustrations in next page). 3. Slide the main battery pack from battery compartment. 4. -
Page 41: Main Power Battery Charging With Ac/Dc Adaptor (Regular/Normal Charge)
7.2 MAIN POWER BATTERY CHARGING WITH AC/DC ADAPTOR (Regular/Normal Charge) When the PDT shows “Main battery low” message or icon , the battery pack in PT630 needs to be recharged. Plug one end of an AC-9VDC/1A power adapter into the DC-jack of RS232 cable and the other end into a wall outlet. -
Page 42: Main Battery Storage & Safety Precautions
PT630 Operation Guide Page 42 of 41 7.4 MAIN BATTERY STORAGE & SAFETY PRECAUTIONS Charging Considerations It is important to consider the surrounding temperature whenever you are charging the Li-ion battery pack. The process is most efficient at normal room temperature or slightly cooler. It is essential that you charge batteries within the stated range of 32°F to 113°F (0°C to 45°C).
Need help?
Do you have a question about the PT630 and is the answer not in the manual?
Questions and answers