Unitech PA600 Getting Started
Rugged, compact and lightweight handheld computer
Hide thumbs
Also See for PA600:
- User manual (76 pages) ,
- Quick reference manual (42 pages) ,
- Programming manual (41 pages)
Table of Contents
Advertisement
Quick Links
Chapter 1
Getting Started
Introducing the PA600
The PA600 Phone Edition (PE) is designed for users who need a
compact and durable PDA for data collection in real time transac-
tions.
The PA600 is a rugged, compact and lightweight handheld com-
puter with a Windows Mobile 6.1 operating system, an integrated
laser bar code scanner, cell phone functionality, color LCD touch-
screen, keypad and wireless communication capability. It provides
a standard Windows based environment for customization and
operation.
To reduce total cost of ownership, the PA600 is sealed to meet IP64
standards and has undergone multiple drop tests to prevent down-
time.
Thanks for choosing the PA600 PE.
1
Advertisement
Table of Contents

Related Manuals for Unitech PA600


Summary of Contents for Unitech PA600
-
Page 1: Getting Started
It provides a standard Windows based environment for customization and operation. To reduce total cost of ownership, the PA600 is sealed to meet IP64 standards and has undergone multiple drop tests to prevent down- time. -
Page 2: Chapter 1 Getting Started
Siemens MC75 Radio Module, quad-band GSM 850/900/ 1800/1900 Mhz. – EDGE Multislot Class 10. – GPRS Multislot Class 12. – GSM Release 99. Copyright 2008 unitech Electronics Co., Ltd. All rights reserved. unitech is a registered trademark of unitech Electronics Co., Ltd. -
Page 3: Package Contents
Battery Pack Stylus Quick Reference USB Charging Cables CD-ROM Guide Please contact a local Unitech representative if anything appears damaged or miss- ing. A Tour of the PA600 The main components and features of the PA600 are described through the following:... -
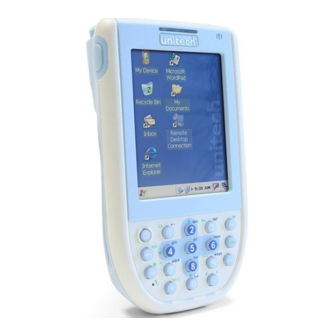
Page 4: Front View
Displays applications and data on the PA600. It is touch- screen. sensitive and responds to the Stylus or finger. Speaker. Enables audio from the PA600. Copyright 2008 unitech Electronics Co., Ltd. All rights reserved. unitech is a registered trademark of unitech Electronics Co., Ltd. -
Page 5: Back View
2200 mAH Battery Pack. Battery Compartment Opens the Battery Compartment. Release Latch. Reset Button. Press the Stylus into the PA600’s Reset Button to Clean Boot the device. Handstrap. Enables users to securely hold the PA600. Speaker. Enables audio from the PA600. -
Page 6: Installing The Battery
Plastic Battery Tab Battery Hook NOTE: Do not remove the Plastic Battery Tab, it is useful for removing the Bat- tery. Copyright 2008 unitech Electronics Co., Ltd. All rights reserved. unitech is a registered trademark of unitech Electronics Co., Ltd. - Page 7 Chapter 1 Getting Started 2. Locate the Backup Battery Switch in the Battery Compartment, and use a Sty- lus to move it to the left in the ON position. Backup Battery Switch 3. Position the Battery so the Battery Contacts align with the Battery Compartment Contacts.
-
Page 8: Charging The Battery
2. Plug the AC Adapter Cable into the USB Charging Cable’s power jack (2). 3. Plug the other end of the AC Adapter Cable into an electrical outlet (3). Copyright 2008 unitech Electronics Co., Ltd. All rights reserved. unitech is a registered trademark of unitech Electronics Co., Ltd. - Page 9 Microsoft ActiveSync operation to backup data, and recharge the PA600 as soon as possible. If the battery level reaches low status, the device will enter a sleep mode and cannot power up until the battery is charged, or until the PA600 connects to an external power source.
- Page 10 AC Adapter Cable into the USB Charging Cable’s power jack (2). 3. Plug the other end of the AC Adapter into an electrical outlet (3). Copyright 2008 unitech Electronics Co., Ltd. All rights reserved. unitech is a registered trademark of unitech Electronics Co., Ltd.
- Page 11 Getting Started Turning the PA600 on for the First Time Charge the PA600 for at least 16 hours prior to initial use. Start the PA600, calibrate the display, learn some basic Stylus usage, and setup the date and time through the...
- Page 12 3. Lightly tap the tip of the Stylus to make a menu choice. 4. Use the Stylus to print letters or numbers into a field or on a form. Copyright 2008 unitech Electronics Co., Ltd. All rights reserved. unitech is a registered trademark of unitech Electronics Co., Ltd.
- Page 13 Getting Started Calibrating the PA600 Screen The calibration screen automatically appears when the PA600 powers on for the first time or after the system is reset. 1. Calibrate the screen at any time through the following: Tap Start → Settings, and select the System tab.
- Page 14 Clock & Alarms screen. Tap Getting Started on the PA600’s main menu to acquire helpful links about sys- tem settings. Copyright 2008 unitech Electronics Co., Ltd. All rights reserved. unitech is a registered trademark of unitech Electronics Co., Ltd.
-
Page 15: Keypads And Function Buttons
Using the Hardware Chapter 2 Using the Hardware Keypads and Function Buttons With the keypad, users can enter information and interact with the PA600’s operating system. Use the function key to access and operate secondary functions. Function Activated Icon Press... - Page 16 Alphanumeric 9, w, x, y and z. Increases screen brightness. Asterisk. Illuminates keypad. Number 0 and space. — Period. Pound. Enter key. Copyright 2008 unitech Electronics Co., Ltd. All rights reserved. unitech is a registered trademark of unitech Electronics Co., Ltd.
-
Page 17: Adjusting The Screen Brightness
Brightness Using the SD/MMC memory card The PA600’s expansion slot is compatible with a range of SD and MMC storage cards, which are primarily used to backup or transfer files and data. The expansion slot also supports SDIO cards for additional connectivity options. -
Page 18: Using The Laser Scanner
Press either one of the Scan Buttons to activate the laser scanner. Scan Button Test the PA600’s Laser Bar Code Scanner through the following: Copyright 2008 unitech Electronics Co., Ltd. All rights reserved. unitech is a registered trademark of unitech Electronics Co., Ltd. - Page 19 Chapter 2 Using the Hardware 1. Tap Start → Settings and select the Sys- tem tab. Tab the Scanner icon. 2. The Scanner Control Panel opens. In the Scanner Control Panel screen, it is possible to configure bar code scan- ner parameters such as enabling or disabling bar code symbologies, set data transmission options, configure magnetic and proximity reading options and set power management options.
-
Page 20: Using The Sim Card
2. Push the SIM Card inside the slot until it clicks into place. Use a Stylus to push the SIM Card Slot Lock to the right, as shown below: Copyright 2008 unitech Electronics Co., Ltd. All rights reserved. unitech is a registered trademark of unitech Electronics Co., Ltd. -
Page 21: Using The Phone
Chapter 2 Using the Hardware Using the Phone The PA600 has an integrated phone keypad, which allows users to make, receive, and send messages via the built-in module. NOTE: Ensure that the SIM Card is properly inserted. Open the Phone screen through one of the following: 1. -
Page 22: Using The Contact List
4. Tap and hold on a contact, a menu appears. It is possible to send e-mail/text messages to the contact and etc. Copyright 2008 unitech Electronics Co., Ltd. All rights reserved. unitech is a registered trademark of unitech Electronics Co., Ltd. -
Page 23: Customizing The Phone Settings
Using the Speed Dial 1. Tap Speed Dial on the Phone keypad. 2. Tap Menu, and select New. 3. Select a contact in the contact list by tap- ping the desired contact. 4. Assign an available location for the new speed dial entry. -
Page 24: Establishing Device-Pc Connection
2. Download the Microsoft ActiveSync software from the Microsoft ActiveSync Down- load page at: http://www.microsoft.com/windowsmobile/downloads/activesync42.mspx 3. Follow the onscreen instructions to install Microsoft ActivSync. Copyright 2008 unitech Electronics Co., Ltd. All rights reserved. unitech is a registered trademark of unitech Electronics Co., Ltd. - Page 25 Chapter 3 Getting Connected 4. Click Next. The End User License Agreement (EULA) appears. 5. Accept the license agreement terms and click Next. Fill out the information fields. 6. Type the user name and organization and click Next. Select the folder destination.
- Page 26 ActiveSync and prompts users to begin the installation. 8. Click Install. The program begins the installation. After the program finishes installing, the following screen appears. Copyright 2008 unitech Electronics Co., Ltd. All rights reserved. unitech is a registered trademark of unitech Electronics Co., Ltd.
-
Page 27: Connecting The Device To The Computer
Sync window appears once the configuration process is complete. 7. Synchronization will initiate, and it will synchronize periodically or upon connec- tion. NOTE: A PC can partner with multiple PA600’s. But, a PA600 can only partner with up to two computers. -
Page 28: Synchronizing With The Computer
Bluetooth adapter or access point. Bluetooth wireless technology communicates with the computer whenever it is within range. Setup a Bluetooth connection through the following: Copyright 2008 unitech Electronics Co., Ltd. All rights reserved. unitech is a registered trademark of unitech Electronics Co., Ltd. - Page 29 Chapter 3 Getting Connected 1. Tap Start → Settings → Connections → Bluetooth → Mode and check Turn on Bluetooth. 2. Tap Devices → Add new device..3. Select a device from the list. Tap Next.
- Page 30 9. Tap Menu at the bottom right corner of the screen. Select Connect via Blue- tooth. The terminal connects to the host via Bluetooth Microsoft ActiveSync. Copyright 2008 unitech Electronics Co., Ltd. All rights reserved. unitech is a registered trademark of unitech Electronics Co., Ltd.
- Page 31 Chapter 3 Getting Connected GPRS Connection The PA600 comes with a built-in GPRS module, which enables users to connect to the internet. Access the internet through the following: NOTE: Insert the SIM card properly. See Using the SIM Card on page 20.
- Page 32 Before following these instructions, check to make sure if any authentication information is needed. 1. If the Wi-Fi icon appears on the device, dou- ble-tap the icon and tap enable wireless. Copyright 2008 unitech Electronics Co., Ltd. All rights reserved. unitech is a registered trademark of unitech Electronics Co., Ltd.
- Page 33 Chapter 3 Getting Connected 2. Tap the Wireless Manager icon. 3. Tap Menu at the bottom right corner of the Wireless Manager window. Select Wi-Fi Set- tings. 4. If there are available networks detected, tap and hold the network name, and then select Connect.
- Page 34 Add a new wireless network through the following: 1. Tap Add New. The Configure Wireless Net- work screen appears. 2. Enter a name for the network. Tap Next. Copyright 2008 unitech Electronics Co., Ltd. All rights reserved. unitech is a registered trademark of unitech Electronics Co., Ltd.
- Page 35 Chapter 3 Getting Connected 3. Enter the network key. Tap Next. 4. Tap Finish. The Configure Wireless Network screen appears again, and the new wireless network becomes available in the list. Disable the wireless network through one of the following: 1.
-
Page 36: Synchronizing Information
Sync, so that they can be viewed and edited on the PA600 and vice versa. To copy files: 1. Connect the PA600 to a computer. 2. In Microsoft ActiveSync on the computer, click Explore. Copyright 2008 unitech Electronics Co., Ltd. All rights reserved. unitech is a registered trademark of unitech Electronics Co., Ltd. - Page 37 3. Locate the desired file to copy on the PA600 or computer. 4. Do one of the following: – To copy the file to the PA600, right-click the file and click Copy. Place the cur- sor in the desired folder for the device, right-click, then click Paste.
-
Page 38: Scanner Setting
(active/focused) text edi- tor such as MS Mobile Word or a text box applicaton. Copyright 2008 unitech Electronics Co., Ltd. All rights reserved. unitech is a registered trademark of unitech Electronics Co., Ltd. -
Page 39: Bar Code Symbologies
Bar Code Symbologies Check Char/ Transmit Max/ Transmit Bar Code Enable/ Digit Check Leading Other Symbology Disable verification Char/digit Length Char/digit Bookland Codabar Transmit Start & Stop Bits, CLSI Format, *Data Length Code 11 *Check Digits, *Data Length Code 128 *Data Length Code 32 Transmit Tailing Digit... -
Page 40: Adjusting Settings
In addition, assign button functions, configure menus, enter owner information and setup connections. Copyright 2008 unitech Electronics Co., Ltd. All rights reserved. unitech is a registered trademark of unitech Electronics Co., Ltd. -
Page 41: Checking The Main And Backup Battery Status
Chapter 5 Advanced Settings Checking the Main and Backup Battery Status View the power level for both the main and backup battery through the following: NOTE: Minimize power consumption by defining the auto-off function and the processor’s speed. 1. Access the Power properties screen through either of the following: –... -
Page 42: Extending Battery Life
Minimize backlight use. Changing the Automatic Power Settings The PA600 enters idle mode when there is no task, or all tasks are waiting for input. In the default setting, the PA600 automatically turns off when it remains idle for three minutes without an external power source. -
Page 43: Adjusting Backlight Setting
Chapter 5 Advanced Settings Adjusting Backlight Setting The PA600’s LCD backlight consumes a large amount of battery power, only use this function if it is necessary. Change backlight settings through the following: 1. Tap Start → Settings → System. 2. Tap Backlight. -
Page 44: Viewing Flash Memory Files
4. Drag the file from the PA600’s flash storage folder to the computer’s folder, or drag the file from the computer’s folder to the PA600’s flash storage folder. Copyright 2008 unitech Electronics Co., Ltd. All rights reserved. unitech is a registered trademark of unitech Electronics Co., Ltd. -
Page 45: Performing A Hardware Reset
Perform a reset if the PA600 freezes (i.e., no longer responds). A soft reset allows the PA600 to get a fresh start, similar to rebooting a computer. This restarts the PA600 and adjusts memory allocation. All records and entries are retained after a soft reset. -
Page 46: Performing A Cold Boot
The system returns to the default settings. All registry settings and all files (including hidden files) return to their original factory defaults. Copyright 2008 unitech Electronics Co., Ltd. All rights reserved. unitech is a registered trademark of unitech Electronics Co., Ltd. -
Page 47: Performing A Clean Boot
Performing a Clean Boot A clean boot, similar to cold boot, cuts off power from the PA600, erasing all records and entries, deleting all added programs, cleaning storage memory and restoring the PA600 to default factory settings. Data and time settings do not retain during a clean boot, while formats, preferences and other settings restore to their default factory settings. -
Page 48: System Specifications
Microsoft Visual Studio 2005 Microsoft Windows Mobile 5.0 SDK for Pocket PC Unitech PA600 SDK Oracle Database Life Wavelink Avalanche MCL Development Suite Copyright 2008 unitech Electronics Co., Ltd. All rights reserved. unitech is a registered trademark of unitech Electronics Co., Ltd. -
Page 49: Worldwide Support
Chapter 5 Worldwide Support Appendix Worldwide Support Region Web site Global Operation Center www.unitech-adc.com Unitech Taiwan adc-utt.unitech.com.tw Unitech Asia Pacific & Middle www.unitech-utp.com.tw Unitech China www.ute.com.cn Unitech Japan www.unitech-japan.co.jp Unitech America www.ute.com Unitech Latin America latin.ute.com Unitech Europe www.unitech-europe.nl...
Need help?
Do you have a question about the PA600 and is the answer not in the manual?
Questions and answers