
Related Manuals for Total Gym XL7


Summary of Contents for Total Gym XL7
- Page 1 Owner’s Manual For maximum effectiveness and safety, please read this owner’s manual and view the video before using your Total Gym Total Gym XL7. XL7. XL7. ® ® ® ®...
-
Page 2: Table Of Contents
TOTAL GYM XL7 OWNER’S MANUAL ® Table of Contents EQUIPMENT WARNING / CAUTION LABELS ................... 3 SAFETY INSTRUCTIONS......................... 3 PRODUCT SPECIFICATIONS ........................4 SET UP ..............................5-6 ACCESSORIES: HOW TO’S .......................7-10 Wing Attachments..............................7-8 Press-Up Bars ................................8 Dip Bars ..................................8 AbCrunch Accessory .............................. - Page 3 It’s easy - all you have to do is spend 15 to 20 minutes a day, 3 to 4 days per week on your Total Gym to start realizing the benefits.
-
Page 4: Equipment Warning / Caution Labels
KEEP HAIR, FINGERS, LOOSE CLOTHING, PETS, AND CHILDREN AWAY FROM HINGES AND OTHER MOVING PARTS TO AVOID SERIOUS REMOVE WING REMOVE INJURY. ALSO, BE SURE TO HAVE ALL PINS LOCKED IN PLACE BEFORE GETTING ON YOUR TOTAL GYM ® TO AVOID SEVERE INJURY. -
Page 5: Product Specifications
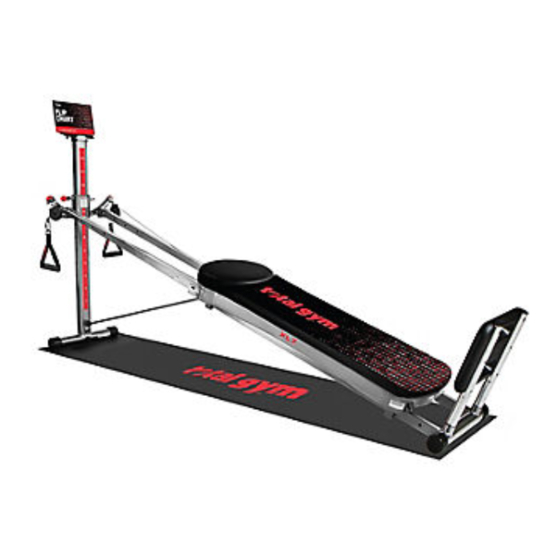
Product Speci cations TOTAL GYM XL7 OWNER’S MANUAL | PRODUCT SPECIFICATIONS ® LABEL LOCATIONS AND PARTS IDENTIFIER Total Gym XL7 includes 2 Workout DVDs ® WARNING Arm Cable/Pulley Assembly LABEL 1 Height Adjustment Tube Spring Loaded Pin (Black Knob) Squat Stand... - Page 6 TOTAL GYM XL7 OWNER’S MANUAL | SET UP ® Set Up Your product comes with: 1. Pull the product out of the shipping box. Remove all packaging • Spring Loaded Pin (Black Knob) One pin located within materials, including tape and cardboard inserts, from your unit.
- Page 7 TOTAL GYM XL7 OWNER’S MANUAL | SET UP ® 5A. Next remove plastic packing ties from the top and bottom of the 6. Remove packaging from Safety Hitch C Pin at the bottom of the vertical column. Pull out the black Spring Loaded Pin located at the vertical coloumn.
- Page 8 TOTAL GYM XL7 OWNER’S MANUAL | ATTACHMENTS: HOW TO’S ® How to Attach the Wing Attachments The Wing Attachments provided with your unit has been uniquely designed to serve several purposes. It can be placed at the top or bottom of the exerciser and angled toward you or away from you depending upon what is comfortable for you.
- Page 9 TOTAL GYM XL7 OWNER’S MANUAL | ATTACHMENTS: HOW TO’S ® How to Attach the Press-Up Bars 1. Locate the holes at the sides of the bottom rails. 2. Line up the brackets on the attachments with the holes at the bottom rails.
- Page 10 INSTALLATION Short Hitch Pin Attachment Bracket How to Install the AbCrunch Accessory to your Total Gym ® 1. Locate the 3 holes along the sides of the top rails (see Fig. 4. Repeat for other AbCrunch attachment on opposite rail.
- Page 11 ATTACHMENTS: HOW TO’S ® How to Attach the Leg Pull Accessory NOTE: Be sure you have atleast 2’-3’ open space around the exerciser so that performing on the Total Gym , as well as getting on and ® off, is convenient and safe. Please note that the rails cannot be raised to the highest level when the Leg Pulley Bracket is attached to the vertical column.
-
Page 12: Starting Out
Begin using the product at a low incline. As your fitness level progresses, increase the incline to increase the intensity and improve your muscle strength. Don’t be in a hurry to exercise at a high intensity level; start out easily and build gradually. The Total Gym is as easy as ®... -
Page 13: Inspection, Maintenance & Storage
ROUTINE MAINTENANCE 5. Holding the vertical column with one hand, release Spring Loaded Pin (Black Knob) with your opposite hand. This will • Wipe down your Total Gym on a regular basis using a clean ® release the column for folding. Fold Vertical Column down cloth and alcohol or alcohol-based products like Windex ®... - Page 14 TOTAL GYM XL7 OWNER’S MANUAL | INSPECTION, MAINTENANCE & STORAGE ® 7. With caution, to avoid pinched fingers or hands, grab the top 2. Next, tilt up the glideboard and slide it off the frame of the of the glideboard and slowly pull the unit up allowing the tube exerciser.
-
Page 15: Parts Overview & List
TOTAL GYM XL7 OWNER’S MANUAL | PARTS OVERVIEW & LIST ® Total Gym XL7 Parts List and Visual Overview ® ITEM # PART# DESCRIPTION ITEM # PART# DESCRIPTION RGBXL7 Glideboard RPULL Pulley and Rope RP102W Wheel R100230 D-Ring R3032BF Bottom Fender... - Page 16 Save your sales receipt. You may wish to staple into this manual. TOTAL GYM FITNESS, LLC LIMITED WARRANTY For a period of 12 months from date of receipt, Total Gym Fitness, LLC In the event of failure of this product...
Need help?
Do you have a question about the XL7 and is the answer not in the manual?
Questions and answers