
Related Manuals for Amila FT3100


Summary of Contents for Amila FT3100
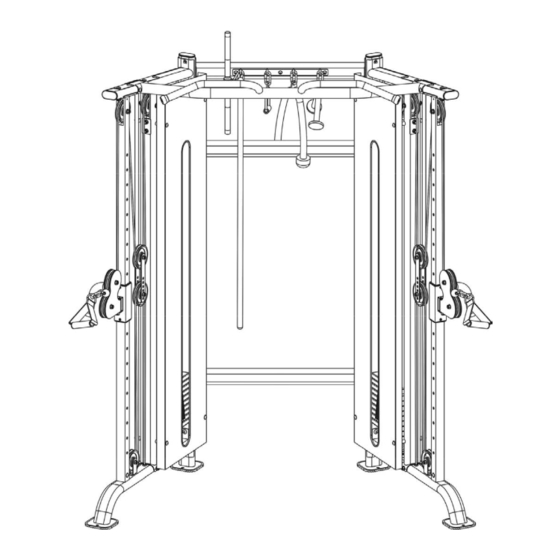
- Page 1 FT3100 unctional rainer (Code: 91640) Assembly instructions IN ORDER FOR THE WARRANTY TO BE VALID, PLEASE, BEFORE YOU BEGIN ASSEMBLING AND USING THE MACHINE, READ THIS INSTRUCTIONS.
-
Page 2: Parts List
BOLTS, WASHERS AND NUTS # Pcs DescriPtion Drawing M10x25mm M10x16mm 44 20 Allen bolt Allen bolt 37 32 M10x60mm M8x55mm Allen Carriage bolt bolt M10x90mm Ø8mm Washer Allen bolt M10x100mm Μ8 Aircraft nut Allen bolt M10x65mm 48 104 Ø10mm Washer Allen bolt M10x50mm 49 54 Μ10 Aircraft nut... - Page 3 # Pcs DescriPtion Drawing Guide Rod Hook Frame Holder Lower Upper Connecting Connecting Frame Frame Base Frame Upper Frame Left Inside Weight Stack Cover Left Outside Weight Stack Cover Right Inside Weight Stack Cover Right Outside Weight Stack Cover Right Sliding L- Shaped Cable Frame Protector...
- Page 4 # Pcs DescriPtion Drawing Rubber Bumper Shock Spring 40xØ20x15 Ø33xØ21xØ6 Weight Stem Ø10×80 Magnet Guide Sleeve 29 18 5kg Selector 4kg Selector Stem 90×320 Stem 90×270 Selector Rod 15 Joints Chain 34 16 Pulley Ø114 M18×1.5×Ø12 T- Shaped Pin Upper Cable Adjustment Cable 66 12 C-Shaped Lock...
- Page 5 ASSEmBLy It is strongly recommended to assemble the equipment by two or more people, otherwise it may cause serious injury. Step 1 • Attach 2 x Base Frame (2) and 2 x Flat Bracket (21) to 2 x Rear Post (1) respectively using 2 x M10×60mm Carriage Bolts (37), 2 x φ10mm Washers (48) and 2 x M10 Aircraft Nuts (49).
- Page 6 Step 2 • Attach 2 x Middle Support Frame (4) to 2 x Base Frame (2) respectively using 2 x M10×100mm Allen Bolts (39), 2 x Ø10mm Washers (48) and 2 x M10 Aircraft Nuts (49). — 6 —...
- Page 7 Step 3 Right Left Right Left • Put 2 x Front Support Frame (5) through the L & R Sliding Frames (12, 13) and respectively screw 1 x M18×1.5×Ø12 T-shaped Pin (35) in the bolts of the L & R Sliding Frame (12, 13), then secure the M18×1.5×Ø12 T-shaped Pin (35) to facilitate the L &...
- Page 8 Step 4 • Attach 2 x Upper Frames (6) and 2 x Flat Brackets (21) to 2 x Middle Support Frame (4) and Front Support Frame (5) respectively using 4 x M10×60mm Carriage Bolts (37), 4 x Ø10mm Washers (48) and 4 x M10 Aircraft Nuts (49).
- Page 9 Step 5 Orientation of the weight stack inserting holes • Fix 2 x Guide Rods (8) to the right Base Frame (2) using 2 x M10×25mm Allen Bolts (43). • Put the Guide Rod (8) through 1 x Rubber Bumper (28), 1 x Shock Spring (27) and 1 x Rubber Bumper (28) sequentially.
- Page 10 Step 6 Orientation of the weight stack inserting holes • Repeat Step 5 to assemble the left weight stack. — 10 —...
- Page 11 Step 7 • Put left and right Guide Rod (8) through 2 x Guide Rod Holder (9). • Fix the 2 x Guide Rod Holder (9) to the middle between the L & R Middle Support Frame (4) and the Rear Post (1) using 4 x M10×60mm Carriage Bolts (37), 4 x Ø10mm Washers (48), 4 x M10 Aircraft Nuts (49) and 2 x Bracket (25).
- Page 12 Step 8 • Fix the left and right Guide Rod Holder (9) to the Guide Rod (8) respectively using 2 x M10×25mm Allen Bolts (43) and 1 x Ø10mm Washer (48). — 12 —...
- Page 13 Step 9 • Attach the Hook Frame (11) to the Upper Connecting Frame (7) using 3 x M8×55mm Allen Bolts (45), 6 x Ø8mm Washers (46) and 3 x M8 Aircraft Nuts (47). — 13 —...
- Page 14 Step 10 • Attach the Chin up bar Frame (10) to the middle of the 2 x Upper Frame (6) using 8 x Ø10mm Wash- ers (48), 4 x M10 Aircraft Nut (49), 4 x M10×100mm Allen Bolts (39) and 2 x Arc Bracket (26). •...
- Page 15 Step 11 • Find out the end with threaded head of the Upper Cable (52) as shown in the diagram, thread the end in sequence through the long notch on the right side of the Front Support Frame (5), Middle Support Frame (4) and Guide Rod Holder (9), and finally screw it into the Selector Rod (22).
- Page 16 Step 12 • Repeat the step 11 to assemble the left Upper Cable (52). — 16 —...
- Page 17 Step 13 • Put the End a of the Adjustment Cable (53) through the sleeve on the right side of the Right Sliding Frame (12) as shown in the diagram, then screw the End D in the nut on the Base Frame (2).
- Page 18 Step 14 • Repeat step 13 to assemble the left Adjustment Cable (53). • By using the different holes of the Dou- ble Pulley Bracket (15), you may make bigger adjustments of the cable’s ten- sion, simply by placing the bottom pul- ley on a lower or highter hole.
- Page 19 Step 15 • Respectively attach 8 x Ø16×M10×65 Axle (23) to the inside of the 2 x Rear Post (1) and 2 x Middle Support Frame (4). • Respectively attach 8 x Ø16×M10×35 Axle (24) to the outside of the 2 x Rear Post (1) and 2 x Middle Support Frame (4).
- Page 20 Step 16 • Fix the Right Inside Weight Stack Cover (18) to 4 x Ø16×M10×65 Axle (23) using 4 x M10×16mm Allen Bolts (44) and 4 x Ø10mm Washers (48). • Fix the Right Outside Weight Stack Cover (16) to 4 x Ø16×M10×35 Axle (243) using 4 x M10×16mm Allen Bolts (44) and 4 x Ø10mm Washers (48).
- Page 21 Step 17 • Fix the Left Inside Weight Stack Cover (16) to 4 x Ø16×M10×65 Axle (23) using 4 x M10×16mm Allen Bolts (44) and 4 x Ø10mm Washers (48). • Fix the Left Outside Weight Stack Cover (17) to 4 x Ø16×M10×35 Axle (24) using 4 x M10×16mm Allen Bolts (44) and 4 x Ø10mm Washers (48).
-
Page 22: Warm Up Exercises
WARm-Up EXERCiSES A proper workout consists of warm-up, aerobic exercise and relaxation. Repeat the program 2 or, preferably, 3 times a week, relaxing one day in between. After a few months you will be able to increase the frequency of your workouts to 4 or 5 times per week. Warming up should be a key part of your exercise, something not to be missed.
Need help?
Do you have a question about the FT3100 and is the answer not in the manual?
Questions and answers