
Related Manuals for Amila POWER TOWER PT550


Summary of Contents for Amila POWER TOWER PT550
- Page 1 PT550 OWER OWER (code: 91600) Assembly instructions IN ORDER FOR THE WARRANTY TO BE VALID, PLEASE, BEFORE YOU BEGIN ASSEMBLING AND USING THE MACHINE, READ THIS INSTRUCTIONS.
-
Page 2: Safety Instructions
PoWer toWer Pt550 safety instructions 1. Read all instructions and warm-up before using this machine. 2. Check all parts before assembly/use and make sure they all are in perfect condition and ready for use. 3. This machine should be placed on an perfectly flat surface and, since such is not usually the case, the use of a mat or carpet is recommended. -
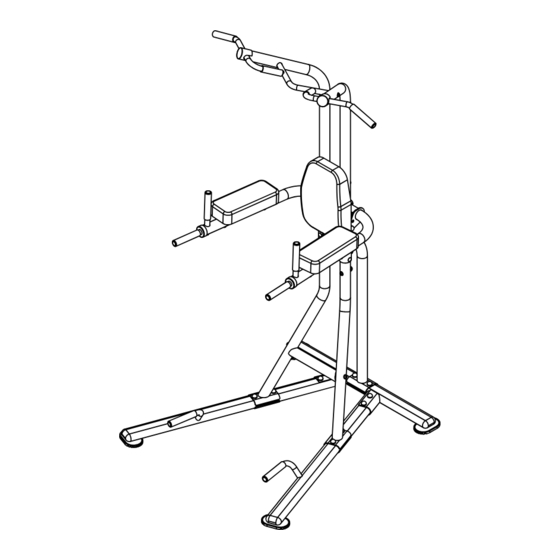
Page 3: Exploded Diagram
eXPloDeD DiaGram 19 39 41 36 43 20 23 — 3 —... -
Page 4: Parts List
Parts list Drawing Description Rear base Left base Right base Left upright Right upright Rear support Left upper frame Right upper frame Left arm support Right arm support Pull-up bar Dip grip — 4 —... - Page 5 Drawing Description Connector Curved bracket Bracket Back pad Arm pad End cap Μ12 nut cover 23 Μ10 nut cover bolts, WasHers anD nuts #28, Μ10x65mm allen bolt, #25, Μ10x75mm bolt, #26, M10x65mm bolt, #27, M12x90mm hex bolt, 2pcs 8pcs 10pcs 2pcs #29, M10x50mm allen bolt, #31, M8x70mm allen bolt,...
- Page 6 assembly instructions Step 1 1) Connect the left and right bases (2 & 3) to the rear base (1) using bolts (26), washers (33), spplit washers (43) and nuts (36). DOT NOT tighten the nuts. Step 2 1) Place the uprights (4 & 5) on the left and right bases (2 & 3) and secure them using brackets (15), bolts (26), washers (33), split washers (43) and nuts (36).
- Page 7 Step 3 1) Connect the pull-up bar (11) to the up- per frame (7 & 8) by inserting the the ends of the pull-up bar (11) in the holes on the upper part of the upper frame (7 & 8), se- curing them with bolts (30), washers (33) split-washers (43).
- Page 8 Step 5 1) Place the set of upper frame (7 & 8) and pull-up bar (11) (see Step 3) on the set of upper uprights (4 & 5) and rear support (6) (see Step 4). 2) Place curved brackets (14) on the outter side of the join, so that the side of the brackets with the holes closer to each other being towards the front of the machine.
- Page 9 Step 7 35 40 27 32 1) ATTENTION: Make sure you will use the holes as indicated in the diagram above. Place the arm supports’ set (9 & 10) from the previous step and secure them on the back side of the machine in- serting on both outter sides bolts (27) and washers (32), and on the inner sides washers (32), split washers (42) and nuts (35).
- Page 10 Step 8 1) You may now secure the pack pad (16) using bolts (31), washers (34) and split washers (44). Also se- cure the arm pads (17) using bolts (46), washers (34) and split washers (44). Step 9 1) Finally, place covers (41) to all the nuts of the machine.
-
Page 11: Warm Up Exercises
Warm-uP eXercises A proper workout consists of warm-up, aerobic exercise and relaxation. Repeat the program 2 or, preferably, 3 times a week, relaxing one day in between. After a few months you will be able to increase the frequency of your workouts to 4 or 5 times per week. Warming up should be a key part of your exercise, something not to be missed.
Need help?
Do you have a question about the POWER TOWER PT550 and is the answer not in the manual?
Questions and answers