Advertisement
Quick Links
©2023 FarmTek
®
All Rights Reserved. Reproduction
is prohibited without permission.
Revision date: 02.17.23
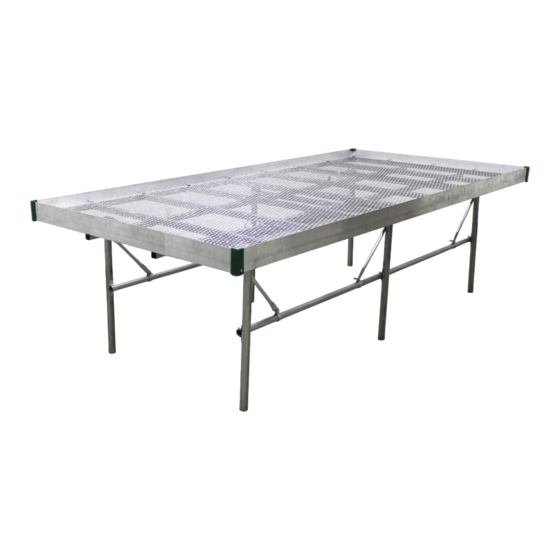
2' Wide Premium Greenhouse Benches
Premium Greenhouse Bench with Stationary Top
STK#
DIMENSIONS
112412S2X08
2' W x 3' H x 8' L
112412S2X10
2' W x 3' H x 10' L
112412S2X12
2' W x 3' H x 12' L
*
Actual bench may differ from example shown.
1
Advertisement

Related Manuals for FarmTek Growers supply 112412S2X08


Summary of Contents for FarmTek Growers supply 112412S2X08
- Page 1 2' Wide Premium Greenhouse Benches Premium Greenhouse Bench with Stationary Top STK# DIMENSIONS 112412S2X08 2' W x 3' H x 8' L ©2023 FarmTek ® 112412S2X10 2' W x 3' H x 10' L All Rights Reserved. Reproduction 112412S2X12 2' W x 3' H x 12' L is prohibited without permission.
- Page 2 Important Information READ THIS DOCUMENT BEFORE YOU BEGIN Thank you for purchasing this premium greenhouse bench. When properly assembled and maintained, this product will provide years of reliable service. These instructions include helpful hints and important information needed to safely assemble and properly maintain the bench. Please read these instructions before you begin.
- Page 3 Important Information PICTORIAL GUIDE The following graphics and photos will help identify the different parts of your bench. (Some parts may not be shown.) 102921B FALB10B FAG102B FA4482B 108553 Wafer QH1070 Pipe Neo-Bonded 1/4" Nut 1/4" x 3/4" Bolt Tek Screw Head Screw Strap Washer...
- Page 4 Assembly Instructions ASSEMBLE BENCH TOP SUPPORTS Use the photos and information that follows to construct the bench top frame supports. The 12' bench has four (4) support assemblies. The 8' and 10' benches each have three (3) supports. Gather the parts required to complete one (1) support assembly: •...
- Page 5 Assembly Instructions 6. Tighten 1/4" bolts. 7. Check square tube position. 8. Install one FA4482B Tek screw in center. 9. Check assembly for square. 10. Secure bracket in place using two (2) 11. Flip assembly over and repeat Steps 8-10 more Tek screws.
- Page 6 Assembly Instructions ATTACH PIPE STRAPS Use the photos and information that follows to attach the QH1070 straps. Attach two QH1070 straps to each bench top support assembly. QH1070 1. Measure 15-3/4" from the bottom of each leg 2. Have an assistant hold the assembly and 3.
- Page 7 Assembly Instructions ASSEMBLE SUPPORT FRAME FOR BENCH TOP For best results, assemble the support frame on a flat, level surface. Gather the parts for the support frame: • (6) ST01500D706G19 struts; eight (8) for the 12' bench. • (2) 1.315" diameter round pipes. (See Quick Start diagrams for pipe length/ID.) •...
- Page 8 Assembly Instructions ASSEMBLE SUPPORT FRAME FOR BENCH TOP—continued 7. Tighten the pipe strap mounting bolts of 8. Check that six (6) band clamps are in position 9. Take one strut and attach it to one band clamp. the mid support. Tighten until snug. Do not on the horizontal pipes–eight (8) for the 12' overtighten.
- Page 9 Assembly Instructions ASSEMBLE SUPPORT FRAME FOR BENCH TOP—continued 13. Move to the lower strut connection and 14. Using a level, verify that the support leg is 15. Repeat to attach the remaining strut for the reposition band clamp as needed. plumb/vertical.
- Page 10 Assembly Instructions • (2) 1.25" x 1.25" square tubes (See Quick Start section for ID.) INSTALL LONG BENCH TOP SUPPORT TUBES • 112431 aluminum angle clips (Bench length determines quantity.) Actual length may differ. Measure and adjust as needed. 1. Set one long 1.25" x 1.25" square tube on the 2.
- Page 11 Assembly Instructions ATTENTION: Frame shown may differ from INSTALL LONG BENCH TOP SUPPORT TUBES—CONTINUED actual frame. Assembly steps are the same. 8. Remove the clamp and move to the opposite 9. Next, move to the mid support assembly and 7. Take another Tek screw and secure the clip to the long support tube.
- Page 12 Assembly Instructions ATTENTION: Top shown may differ from ASSEMBLE BENCH TOP actual top. Assembly steps are similar. For best results, assemble the bench top frame with an assistant on a flat, level surface. Gather the parts for the support frame: •...
- Page 13 Assembly Instructions ASSEMBLE BENCH TOP—continued 7. Move to the end rails and attach side rails as 8. With assistance, gently tap the rails to seat 9. Using a carpenter's square, square all corners. shown. Position the channel edges of the side the ends at the corner.
- Page 14 Assembly Instructions 102921B FA4482B ASSEMBLE BENCH TOP—continued Neo-Bonded Tek Screw Washer ATTENTION: Actual bench may differ from what is shown. Consult the Quick Start Guide for your bench details. 12. With assistance, carefully lift the expanded 13. Lower the expanded metal top into the frame. NOTE: Use a block of wood or small hammer metal top and carry it to the assembled frame.
- Page 15 Assembly Instructions 102921B FA4482B ASSEMBLE BENCH TOP—continued Neo-Bonded Tek Screw Washer 17. Continue to install Tek screws and washers NOTE: Install screws in a position that best Photo shows a Tek screw and washer installed along the side rail at each support tube. secures both the expanded metal top and the through the side rail and into the support tube.
- Page 16 Assembly Instructions ATTENTION: Actual bench may differ from what is shown. SECURE TOP TO THE MAIN SUPPORT FRAME Consult the Quick Start Guide for your bench details. 1. Square the bench top on the support frame. 2. Move to a bench top support closest to the 3.
- Page 17 Quick Start Guide 2' x 8' Premium Bench – Stationary Top 112412S2X08 2' x 10' Premium Bench – Stationary Top 112412S2X10 2' x 12' Premium Bench – Stationary Top 112412S2X12 WARNING: Evenly distribute weight when using bench. Never stand on bench top or allow anyone to stand on bench.
- Page 18 2' x 8' (112412S2X08) Premium Bench – Stationary Top See next page for 2' x 8' bench top parts. FALB10B FAG102B Bolt 112391 Bolt Clamp S125P096G14 FA4482B Tek Screw S125P018 QH1070 Pipe Strap 112431 Angle Clip S125P096G14 112391 Bolt Clamp 131P072 S125P03175 QH1070...
- Page 19 2' x 8' (112412S2X08) Bench Top – Exploded View FA4482B 108553 Wafer 102921B Tek Screw Head Screw Neo-Bonded Washer 2' x 8' Bench Top 112412S2X08 S125P024 Support Tube FA4482B Tek Screw and 102921B Neo- Bonded Washer 112815 Poly Bench Corner 108553 Waferhead Screw...
- Page 20 2' x 8' (112412S2X08) Bench Top – Installation 112431 Angle Clips Secure the bench top to the support tubes of the main frame using Tek screws and 112431 angle clips. See Procedure 6. Install one 112431 clip at each corner of the bench top. ST01500D706G19 ATTENTION: Install the 112675 finishing plugs before you secure the bench top to...
- Page 21 PAGE RESERVED FOR CUSTOMER NOTES AND RECORDS Revision date: 02.17.23...
- Page 22 2' x 10' (112412S2X10) Premium Bench – Stationary Top See next page for 2' x 10' bench top parts. FALB10B FAG102B Bolt 112391 Bolt S125P120G14 Clamp S125P018 FA4482B Tek Screw QH1070 Pipe Strap 112431 Angle Clip 131P096 S125P120G14 112391 Bolt Clamp S125P03175 QH1070 Pipe Strap...
- Page 23 2' x 10' (112412S2X10) Bench Top – Exploded View FA4482B 108553 Wafer 102921B Tek Screw Head Screw Neo-Bonded Washer 2' x 10' Bench Top 112412S2X10 FA4482B Tek Screw and 102921B Neo-Bonded Washer S125P024 Support Tube 112815 Poly Bench Corner 108553 Waferhead 112815 Poly Screw...
- Page 24 2' x 10' (112412S2X10) Bench Top – Installation 112431 Angle Clips ST01500D706G19 Secure the bench top to the support tubes of the main frame using Tek screws and 112431 angle clips. See Procedure 6. Install one 112431 clip at each corner of the bench top.
- Page 25 PAGE RESERVED FOR CUSTOMER NOTES AND RECORDS Revision date: 02.17.23...
- Page 26 2' x 12' (112412S2X12) Premium Bench – Stationary Top See next page for 2' x 12' bench top parts. FALB10B FAG102B Bolt 112391 Bolt S125P144 Clamp S125P018 FA4482B Tek Screw QH1070 Pipe Strap 131P120G17 S125P144 112431 Angle Clip 112391 Bolt Clamp S125P03175 QH1070 Diagram above shows the 112431 clip connection.
- Page 27 2' x 12' (112412S2X12) Bench Top – Exploded View FA4482B 108553 Wafer 102921B Tek Screw Head Screw Neo-Bonded Washer 2' x 12' Bench Top 112412S2X12 FA4482B Tek Screw and 102921B Neo-Bonded Washer S125P024 Support Tube 112815 Poly Bench Corner 108553 Waferhead ATTENTION: Evenly space the S125P024 Screw...
- Page 28 2' x 12' (112412S2X12) Bench Top – Installation 112431 Angle Clips ST01500D706G19 Secure the bench top to the support tubes of the main frame using Tek screws and 112431 angle clips. See Procedure 6. Install one 112431 clip at each corner of the bench top.
- Page 29 PAGE RESERVED FOR CUSTOMER NOTES AND RECORDS Revision date: 02.17.23...
Need help?
Do you have a question about the Growers supply 112412S2X08 and is the answer not in the manual?
Questions and answers