Advertisement
Quick Links
3
Hanging the TV onto the Wall Plate
Wall
Pull
0°
Wall
-10°
Maintenance
Please check that the wall mount is secure and safe to use at regular intervals. If you have any
questions regarding any of the instructions or warnings, please contact your local distributor (OR)
contact QualGear technical support via email at support@qualgear.com.
11
HEAVY!
Use an assistant
for this step.
Prior to hanging the display on
the wall plate, first loosen the
two screws of adapter brackets
using a Philips screwdriver.
Then using an assistant, hang
the display on the wall plate
carefully.
Tighten the two screws of
adapter brackets using a
Philips screwdriver to secure
the adapter brackets to the
wall plate.
www.qualgear.com
Version June 2020
Version June 2020
QG-TM-T-015
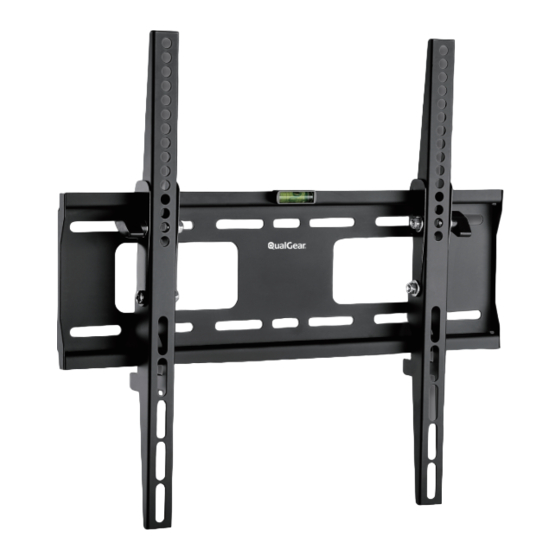
For Most 32" to 55" Flat Screen TVs
55"
and Monitors
MAX
CAUTION!
Do not exceed the maximum rated weight
specified. Otherwise, serious injury or
property damage may occur.
VESA
200x200 | 300x300 | 400x200 | 400x400
Advertisement

Related Manuals for QualGear QG-TM-T-015


Summary of Contents for QualGear QG-TM-T-015
- Page 1 Please check that the wall mount is secure and safe to use at regular intervals. If you have any VESA questions regarding any of the instructions or warnings, please contact your local distributor (OR) www.qualgear.com 200x200 | 300x300 | 400x200 | 400x400 contact QualGear technical support via email at support@qualgear.com. Version June 2020 Version June 2020...
-
Page 2: Parts Checklist
If any parts are missing or damaged, contact your local distributor or WARNING support@qualgear.com for replacement parts and do not start assembly and installation until you receive all the parts. Do not begin to install your QualGear product Tighten screws firmly, but do not over tighten. - Page 3 Mounting to a Wooden Stud Wall NOTE Do NOT use power drill and do NOT over tighten the lag bolts. For concrete wall NOTE mounting, follow Step 1b. Stud Finder Wall Plate Using an edge-to-edge stud finder, find the Using a level, mark the centerline of the stud. edges of the stud.
- Page 4 Mounting to a Concrete Wall NOTE Do NOT use power drill and do NOT over tighten the lag bolts. Marking Template Wall Plate Q G -TM-T -015 Hold the marking template (D) provided against the wall where you want to install your TV, mark four holes for drilling.
- Page 5 Installing to a Flat Back Panel of a TV Flat Back M-A/ M-B Panel Adapter Bracket Adapter Bracket 5.5mm 8.5mm M-C/ M-D Choose the appropriate screws and washers according to the type of your TV, and attach adapter brackets (B & C) to the back of the TV using a Phillips screwdriver.
- Page 6 Installing to a Curved or Recessed Back Panel of a TV Choose the appropriate screws, washers, and spacers (if necessary) according to the type of your T V and attach adapter brackets (B) to the back of the TV using a Phillips screwdriver. 8.5mm M-D/ M-E/ M-F IMPORTANT!
Need help?
Do you have a question about the QG-TM-T-015 and is the answer not in the manual?
Questions and answers