Table of Contents
Advertisement
Advertisement
Table of Contents

Related Manuals for Zeiss VISUSCOUT 100


Summary of Contents for Zeiss VISUSCOUT 100
- Page 1 VISUSCOUT 100 Mobile Retinal Camera User Manual...
- Page 2 VISUSCOUT 100-GA-GB-031219...
-
Page 3: Table Of Contents
Resetting the device ...................... 24 Installation ....................30 Notes on installation and use ..................30 Unpacking and installing the device ................31 Daily use ....................32 Usage environment requirements ............33 Maintenance and care ................34 Cleaning instructions ....................35 VISUSCOUT 100-GA-GB-031219... - Page 4 Fault remedy ......................... 37 Optional accessories ................38 Technical description of VISUSCOUT 100 ........39 Camera .......................... 39 Optics ..........................39 Charging Station ......................40 Power supply ......................... 40 Battery ........................... 40 USB cable ........................40 Environmental Conditions for Use, Storage, Transportation ..41 Warranty ....................
-
Page 5: Notes On The User Manual
Correct operation of the system is imperative for its safe and successful functioning. You should therefore ensure that you are thoroughly familiar with this user manual before setting up and using the VISUSCOUT 100 the first time. The user manuals and other documentation enclosed with the VISUSCOUT 100 should be kept accessible to users at all times to ensure that the information required for use of the VISUSCOUT 100 is readily available. -
Page 6: Explanation Of The Symbols Used
CAUTION –PROPERTY DAMAGE Indicates possible device damage if the appropriate safety precautions are not heeded. Information, hints and advice for better understanding of the instructions to be observed in the operation of the device. VISUSCOUT 100-GA-GB-031219... - Page 7 Manual. Failure to follow these instructions could place the patient or operator at risk. Type BF applied parts. Applied part is a part of the VISUSCOUT 100 that in normal use necessarily comes into physical contact with the patient. Charger polarity symbol, voltage and power 9V, 1.1 A...
-
Page 8: Package Check List
Package check list The VISUSCOUT 100 basic device is supplied with the parts shown below. Carl Zeiss VISUSCOUT 100 retinal camera and accessories: In addition, the sales case includes: Batteries (2 pcs) Spare Eye cup Cleaning cloth User manual USB memory stick (includes VISUSCOUT 100 Client, VISUSCOUT 100 SYNC Software and User Manual) Fig. -
Page 9: Country-Specific Information And Labels
44 and following. UMDNS No.: 10551 This declaration shall be rendered invalid if changes are made to the product without the manufacturer’s authorization. VISUSCOUT 100 supports Toshiba FlashAir W04 WIFI card with 32 GB Flash. For more information: www.Toshiba-memory.com. VISUSCOUT 100-GA-GB-031219... -
Page 10: Intended Use
Intended use The ZEISS VISUSCOUT 100 is a medical digital camera that is used to take digital images and video of the fundus of the human eye. The ZEISS VISUSCOUT 100 is designed to be used in medical environment. - Page 11 WARNING – ELECTRICAL HAZARD Place PC and cradle outside the patient environment (at least 1.5 meters distance from the patient). Use only accessories and battery provided by ZEISS with this product. Connection between camera and workstation is via USB and/or WIFI.
-
Page 12: Disposal Of The Product
Please read the latest internet information provided by the manufacturer. Where the product or its components are resold, the seller must inform the buyer that the product is to be disposed of in accordance with the currently applicable national regulations. VISUSCOUT 100-GA-GB-031219... -
Page 13: External Labels
External labels Fig. 2 Warning and information labels on the device Fig. 3 Warning and information labels on the cradle Note, that labels on device may differ from the labels specified here due to date of manufacture. VISUSCOUT 100-GA-GB-031219... - Page 14 Charger polarity symbol, voltage and power Serial number (year of manufacture from digits 3 and 4) Global trade item number GS1 Unique Device Identification Identification label (inside battery case) Serial number as bar code and numeric Serial number VISUSCOUT 100-GA-GB-031219...
-
Page 15: Performance Specifications
Pictures can also be taken using infrared light for both aiming and capturing. The ZEISS VISUSCOUT 100 has 9 internal fixation targets for the patient to fixate at while imaging. Below section will guide how to control the fixation lights. -
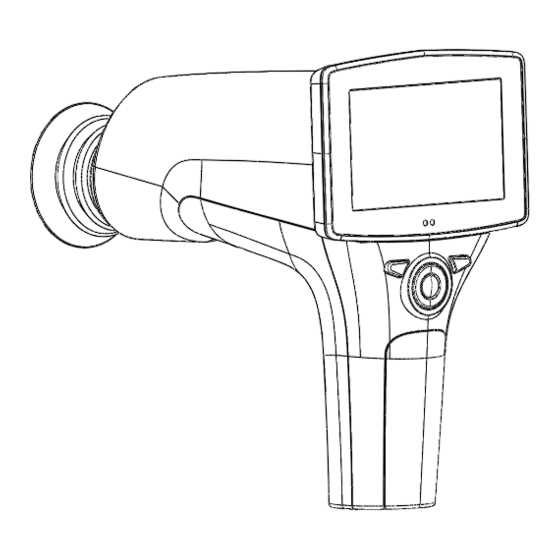
Page 16: Description Of The Device
Description of the device 1. Power LED 2. Connection LED 3. Left Soft Key 4. Right Soft Key 5. Navigation Key (Arrow Keys Left/Right/Up/Down) 6. Dual action shutter button 7. System Connector Fig. 4 Description of Device VISUSCOUT 100-GA-GB-031219... -
Page 17: User Interface
Left LED- Active when device is powered on, blinking indicator Green when charging in cradle. Right LED- Active when device is placed to the cradle and indicator Blue connected to a PC. Graphical indicators: Fig. 5 User Interface VISUSCOUT 100-GA-GB-031219... -
Page 18: Quick Start Guide
Quick start guide WHAT TO DO BEFORE THE FIRST USE: 1. Remove ZEISS VISUSCOUT 100 from the sales package and check that all parts are undamaged. 2. Install Battery as instructed in the Appendix B. 3. Place Cradle on a desk next to the PC (Personal Computer). -
Page 19: Operation
VISUSCOUT 100 is both charged and connected to PC (Personal Computer) using the provided cradle. When VISUSCOUT 100 is not used, it may be stored in the cradle. Storing device in the cradle is not harmful for the battery, because battery is charged only when charge is dropped below certain limit. -
Page 20: Basic Use - Starting Up, Shutting Down And Taking An Image
To transfer images to a PC via USB connection, place device to the cradle. The image transfer and charging are indicated with green and blue LED-lights, and text on LCD-screen (for 15 seconds). When VISUSCOUT 100 Client is open, images are transferred to the PC automatically via USB or WIFI connection if the automatic image transfer is enabled from Client settings. -
Page 21: Image Quality Analysis
The letter S represents sharpness. If the image is sharp, the sharpness indicator is green. The indicator is yellow, if the image is not sharp enough. For un-sharp image, the indicator light is red. VISUSCOUT 100-GA-GB-031219... -
Page 22: Device Menu
Navigation key changes values in the menu. Active value is indicated with blue color. Changed values are saved by using left soft key (“Ok”) and cancelled by pressing right soft key (“Cancel”). Some values are confirmed by pressing the Middle key. Fig. 6 Device Menu VISUSCOUT 100-GA-GB-031219... - Page 23 Show camera SW Browse version information with left and version version right arrow key Start query Era./Fol./None Choose the startup query between memory erase, new patient folder or no query at all. Wireless On/Off Enable or disable wireless connection VISUSCOUT 100-GA-GB-031219...
- Page 24 USB write protection is on by default. When protection is on this feature will prevent any virus from entering the camera from a PC when connected to the cradle. When transferring images automatically from the camera to the PC via WIFI or USB, the USB write protection must be set off. VISUSCOUT 100-GA-GB-031219...
- Page 25 If no query is selected, then the camera will go directly to live view upon start-up. Wireless By default, wireless connection is on. User can enable or disable wireless connection. When wireless connection is enabled, the wireless symbol is shown on display next to the battery level indicator. VISUSCOUT 100-GA-GB-031219...
-
Page 26: Adjusting Focus And Automatic Focus
When focus mode is set to manual a diopter scale is visible on the screen. Resetting the device If the device behavior is abnormal, device can be reset by pressing the left soft key for long time (approximately 13 seconds). VISUSCOUT 100-GA-GB-031219... - Page 27 2-3 meters behind the operator (patient’s eye targets to infinity and stays still). Pupil is approached until the reflection from the eye fundus can be seen. VISUSCOUT 100-GA-GB-031219...
- Page 28 11. If multiple patients are examined during one session, new file folder is created for each patient by pressing middle key for over 3 seconds. 12. Transfer images to a PC after capturing images. When VISUSCOUT 100 Client is open, images are transferred via USB connection to the PC...
- Page 29 Autofocus range is from -15 to +10 diopters Right soft key and manual focus range is -20 to +20 diopters. Long Open Menu Enter camera menu by pressing Right soft key for longer than 1s. VISUSCOUT 100-GA-GB-031219...
- Page 30 Wh/Wh aiming and capture light source. Target On / Off Fixation target light can be set to constant if blinking needed. Image quality On / Off Enable or disable the image quality analysis analysis after image capture. VISUSCOUT 100-GA-GB-031219...
- Page 31 Capture mode Both still images and video can be taken with the VISUSCOUT 100 camera. When taking a video, the shutter button must be held down while taking the video. The video recording will stop once the shutter button is released.
-
Page 32: Installation
CANADA only: For single-phase power systems with 120 V AC, NEMA 5- 15P power plugs must be used. CAUTION –PROPERTY DAMAGE Do not store or use this device in damp rooms. Do not expose the device to water splashes, dripping water or sprayed water. VISUSCOUT 100-GA-GB-031219... -
Page 33: Unpacking And Installing The Device
Only connect the device to an electricity supply which corresponds to the supply voltage of the device. WARNING - DANGER FROM FALLING PARTS The cables for the accessories should be laid to prevent any risk of the examiner tripping over them or their presenting any danger to the patient. VISUSCOUT 100-GA-GB-031219... -
Page 34: Daily Use
• Use the power cable supplied with the device. • The power plug must be inserted into a power outlet that has an intact protective ground connection. • All cables and plugs may be used only if they are in perfect working condition. VISUSCOUT 100-GA-GB-031219... -
Page 35: Usage Environment Requirements
VISUSCOUT 100 is not suitable for use in the presence of flammable anesthetics. VISUSCOUT 100 is intended to be used inside in a normal room temperature and normal humidity. Do not use VISUSCOUT 100 in an environment where there is possibility that water condenses to or inside the device. -
Page 36: Maintenance And Care
The device may only be opened, put into operation, modified and repaired by the manufacturer’s customer service technicians or specialists expressly authorized in writing by Carl Zeiss Meditec. If in doubt, insist on seeing the written authorization or contact Carl Zeiss Meditec directly. -
Page 37: Cleaning Instructions
Cleaning instructions The ZEISS VISUSCOUT 100 is a precision optics instrument that should be handled with care. Please note following cleaning instructions: • Shut down device before cleaning it • Remove cradle from mains before cleaning it • Disinfect housing with soft cloth moistened with alcohol (e.g. 70% ethanol). - Page 38 There are no other maintenance procedures that can be carried out by the user. All servicing and repairs other than replacing the battery must be carried out by Carl Zeiss or Carl Zeiss certified service facilities and service personnel. Carl Zeiss will make available work instructions to repair those parts of medical electrical equipment that Carl Zeiss has designated as repairable by service personnel.
-
Page 39: Fault Remedy
Fault remedy The ZEISS VISUSCOUT 100 will display error messages about the limitations of the usage. Error message is always displayed with explanatory message providing information about possible actions. List of the all possible error messages: Error message: What to do: Memory full Memory is full and you must empty memory card. -
Page 40: Optional Accessories
If the instrument is modified, appropriate inspection and testing must be conducted to ensure continued safe use of this instrument. Only use accessories and spare parts approved by Carl Zeiss Meditec. • Spare battery • Spare eye cup • Spare charging station •... -
Page 41: Technical Description Of Visuscout 100
Technical description of VISUSCOUT 100 Model: ZEISS VISUSCOUT 100 Intended use: Intended to capture digital images and video of the fundus of the human eye. Camera Image sensor: CMOS, 5.0 Megapixels Image memory type: WIFI SDHC card Display: 4'', TFT-LCD, 800x480 pixels, 16.7 M colors... -
Page 42: Charging Station
It is only allowed to attach the Battery and the Power source provided in the sales package into the Cradle. If you need replacement to the Battery or Power source, please contact Carl Zeiss or your local dealer. VISUSCOUT 100-GA-GB-031219... -
Page 43: Environmental Conditions For Use, Storage, Transportation
15004-1 FOR STORAGE. DO NOT STORE THIS INSTRUMENT IN CONDITIONS WHERE THE TEMPERATURE MAY RISE ABOVE +35C OR FALL BELOW -20C. CAUTION Do not leave the eye cup in direct sunlight as it may warm up and burn patient’s face when taking image. VISUSCOUT 100-GA-GB-031219... - Page 44 EXPECTED USAGE LIFE OF THE VISUSCOUT 100: There are no strict limitations on expected usage life of the VISUSCOUT 100. Usage life is approximately five years. Normal battery lifetime is expected to be 1-2 years. INTELLECTUAL PROPERTY RIGHT INFORMATION: Windows 7®, Windows 8.1®, Windows 10® are trademarks of Microsoft Corporation.
-
Page 45: Warranty
Warranty Carl Zeiss provides a 1-year warranty for the parts and labor. Warranty for battery is 6 months. Submitting claim: Any claim under this warranty must be submitted in writing before the end of warranty period to Carl Zeiss or your local dealer. The claim must include a written description of the failure that the device has. -
Page 46: Electromagnetic Compatibility
WARNING - HAZARD DUE TO ELECTROMAGNETIC INTERFERENCE RADIATION The VISUSCOUT 100 may not be placed next to or stacked together with other equipment, except in the device configurations described in this user manual. If operation close to or with other devices is necessary, the VISUSCOUT 100 must be closely observed to monitor its proper functioning in this configuration. -
Page 47: Appendix A - Electromagnetic Compatibility
Portable RF communications equipment (including peripherals such as antenna cables and external antennas) should be used no closer than 30 cm (12 inches) to any part of the VISUSCOUT 100, including cables specified by the manufacturer. Otherwise, degradation of the performance of this equipment could result. - Page 48 0 % 1 cycle; 0 % 1 cycle; variations on environment. If the user of power supply the VISUSCOUT 100 70 % UT for 25 70 % UT for 25 input lines requires continued cycles; cycles;...
- Page 49 RF transmitters, an electromagnetic site survey should be considered. If the measured field strength in the location in which the VISUSCOUT 100 is used exceeds the applicable RF compliance level above, VISUSCOUT 100 should be observed to verify normal operation. If abnormal...
- Page 50 VISUSCOUT 100 maintains basic safety and performance when used in an electromagnetic environment in which radiated RF disturbances are controlled. The customer or the user of VISUSCOUT 100 can help prevent electromagnetic interference by maintaining a minimum distance between portable and mobile RF communications equipment (transmitters) and VISUSCOUT 100 as recommended below, according to the maximum output power of the communications equipment.
-
Page 51: Appendix B - Replacing The Battery
Appendix B - Replacing the battery Battery pack is specially designed and manufactured for this device. Carl Zeiss customer service or your local dealer provide suitable battery packs. Label in the battery display following information: Li-Ion battery 3.6V-2350 mAh Procedure for replacing the battery is: 1. -
Page 52: Appendix C - Wifi Functionality
In case you need to uninstall VISUSCOUT 100 Client software, it can be uninstalled from Windows Control Panel by opening Programs and Features, selecting Uninstall for the application and following the uninstaller instructions. - Page 53 Connect the camera to the PC with USB cable provided with the device. The camera must be placed on the cradle to enable USB connection. After the connection is enabled via WLAN or USB, open VISUSCOUT 100 Client. The camera in the network is shown on the list. Select the camera that you want to connect and press ‘Connect device’...
- Page 54 (figure below). Select images which you want to download from the list on left and press “Download files”. To preview images that you have downloaded, go to Local contents (figure below). Select an image for preview from the list on the left. VISUSCOUT 100-GA-GB-031219...
- Page 55 To disconnect the selected camera from VISUSCOUT 100 Client, press ‘Disconnect’ VISUSCOUT 100-GA-GB-031219...
-
Page 56: Wifi Sd Card Firmware Update
13. When the camera USB drive is reconnected to PC, answer OK to UpdateTool query about inserting the card. 14. Repeat from step 6. (normally will repeat 3 times) 15. When UpdateTool reports ‘Updated Successfully’, remove Camera from cradle and it will power off automatically. 16. Update completed. VISUSCOUT 100-GA-GB-031219... - Page 57 VISUSCOUT 100-GA-GB-031219...
-
Page 58: Index
Installation ......................30 Installing ......................31 Intended user profile .................... 8 Maintenance ...................... 34 Manufacturer’s declaration .................. 7 Package check list ....................6 Performance specifications ................13 Service life ......................13 Side effects ......................8 Symbols ....................... 4 Unpacking......................31 VISUSCOUT 100-GA-GB-031219... - Page 60 ZEISS VISUSCOUT 100 is manufactured by Optomed Plc. Optomed Plc. Yrttipellontie 1 FI-90230 Oulu Finland Manual version: 2019 12 03 Rev 14 SW 3.2 0598 Carl Zeiss Meditec AG Goeschwitzer-Str. 51-52 07745 Jena Germany Phone: +49 3641 220 333 Fax:...
Need help?
Do you have a question about the VISUSCOUT 100 and is the answer not in the manual?
Questions and answers