Table of Contents
Advertisement
Quick Links
Advertisement
Table of Contents

Related Manuals for Garmin eTrex Summit


Summary of Contents for Garmin eTrex Summit
- Page 1 Summit personal navigator owner’s manual reference guide UA-1005.001...
- Page 2 GARMIN products. Website address: www.garmin.com GARMIN is a registered trademark and eTrex is a trademark of GARMIN Corpora- tion and may not be used without the express permission of GARMIN Corporation.
-
Page 3: Registration
Product Registration link on the home page. Thanks for choosing the GARMIN eTrex Summit. If you have any questions or comments regarding the use of the eTrex Summit you can visit our website or contact our Customer Service Department M-F, 8:00-5:00 CST (except holidays) at 1-800-800-1020. -
Page 4: Table Of Contents
Introduction Introduction Registration ................ 1 Table of Warnings and Cautions ............3 Contents FCC Statement ..............4 Features ................5 Buttons ................6 Description ................. 7 Installing the Batteries ............8 Getting Started Calibrating the Electronic Compass ....10 Satellite Page Basics ..........11 Map Page Basics .......... -
Page 5: Warnings And Cautions
Cautions vehicle, it is the sole responsibility of the owner/operator of the eTrex Summit to secure the GPS unit so that it will not cause damage or personal injury in the event of an accident. Do not mount the eTrex Summit over airbag panels or in a place where the driver or passengers are likely to have an impact with it in an accident or collision. -
Page 6: Fcc Statement
Introduction FCC Compliance The eTrex Summit complies with Part 15 of the FCC Statement limits for Class B digital devices. This equipment generates, uses, and can radiate radio frequency energy and, if not installed or used in accordance with the instructions may cause harmful interference to radio communications. -
Page 7: Features
Introduction Features The eTrex Summit is a six ounce, 12 channel, hand held GPS receiver. It has a built-in GPS antenna and only five user-buttons. All buttons are located on either side of the unit, allowing for simple, one-handed operation that won’t obstruct your view of the display. -
Page 8: Buttons
Introduction eTrex Summit Buttons The UP/DOWN Button: • Select options on pages and menus • Adjust Display Contrast on Satellite Page • Zoom in and out on Map Page • Cycle through trip computer data • Cycle through elevation computer data The ENTER Button: •... -
Page 9: Description
Introduction Internal eTrex Summit GPS Antenna Description PAGE Button Button DOWN Button POWER Button ENTER Button LCD Display Compass (with backlight) Sighting Marks Waterproof Case External Power Data Connector Pressure Sensor Vent Battery Compartment UA-1005.009... -
Page 10: Installing The Batteries
Battery Installing the Batteries Installation The eTrex Summit operates on 2 AA batteries (not included), which are installed at the back of the unit. To install the batteries, remove the battery cover by turning the D-ring at the back of the unit 1/4 turn counter- clockwise. -
Page 11: Getting Started
Started Here We Go. . . The Getting Started Section introduces you to the basic op- eration of the eTrex Summit. The Reference Section shows you how to use all of eTrex Summit’s remaining features. The First Step The eTrex Summit’ s GPS operates using information gathered from satellites. -
Page 12: Calibrating The Electronic Compass
Calibrating the Calibrating the Electronic Compass Compass The eTrex Summit’ s Electronic Compass needs to be calibrated outdoors after the batteries have been changed before using the unit for navigation. Failure to calibrate the Electronic Compass can result in gross inaccuracy of the compass feature. -
Page 13: Satellite Page Basics
At the top of the page the unit displays a message letting you know the status of the receiver. The eTrex Summit displays the message ‘Ready to Navigate’ when the receiver has gathered information from at least three satellites. -
Page 14: Map Page Basics
Getting Started Page Basics Map Page Basics Destination Orientaion Waypoint “You”; your location Path to Destination On the Map Page, the UP “Trail” and DOWN Buttons are Map Scale (track log) used to adjust the map scale from 200 feet to 800 miles. -
Page 15: Pointer Page Basics
The ‘Compass Ring reflects either your compass or GPS heading (direction of movement) based on your speed. The eTrex Summit will automatically select the correct sensor for you. By pressing the UP or DOWN Buttons, you can... -
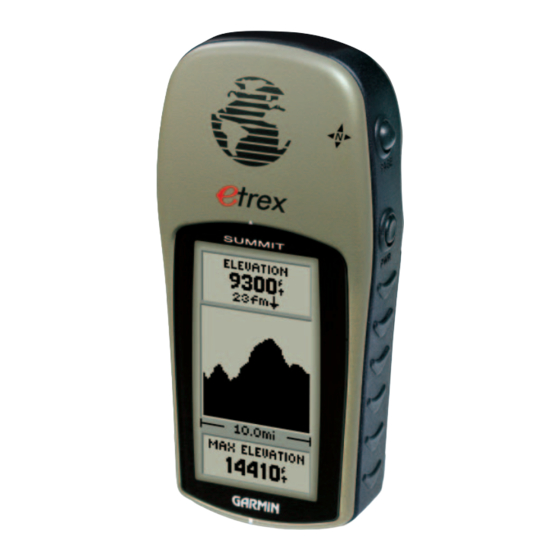
Page 16: Elevation Page Basics
Getting Started Page Basics Elevation Page Basics Rate of Current Elevation Ascent/Descent Elevation Profile Scale On the Elevation Page, the UP and DOWN Buttons are used to cycle through a variety of user-selectable Selectable data. Data The Elevation Page will provide the user with the current elevation, rate of ascent/descent, and a profile of elevation changes over distance or time. -
Page 17: Menu Page Basics
Battery Indicator Strength You can select your The Menu Page gives you access to eTrex Summit’ s particular time zone on the TIME page. more advanced features. With the Menu Page you can create and view waypoints, create a route, save and view track logs, calibrate the electronic compass and altimeter or access the system setup features. -
Page 18: Creating A Waypoint
In this brief exercise, you’ll mark your current location (your home for example), travel a short distance away, and then have the eTrex Summit guide you back to where you started (to get the most out of this exercise, make sure to walk for at least the time noted for each step). - Page 19 Getting Started Edit Waypoints As mentioned earlier the eTrex Summit will assign a numeric name at the time a waypoint is created. The assigned name can be easily changed to something more meaningful to help in identifying the waypoint. To change the waypoint name:...
-
Page 20: Heading In The Right Direction
Follow the Guidance by GARMIN Pointer It is time to let the eTrex Summit guide you back to the waypoint we named ‘HOME’ using the GOTO function. The GOTO function provides you with a straight line navigation path to your selected destination. -
Page 21: Cancelling A Goto
You’ve now gone through the basic operation of eTrex Summit and you’re ready to get out there and have some fun! To turn eTrex Summit off, press and hold the POWER Button. When you clear the Track Log you also clear the Elevation Profile. -
Page 22: Map Page Options
“?” means the eTrex figure icon is replaced by a ‘direction’ triangle. Summit has lost satellite reception (weak signals). You should relocate the eTrex Summit or move to a place that has a clear view of the sky. UA-1005.022... -
Page 23: Pointer Page Options
1. Press ENTER to activate the options list. 2. Using the UP or DOWN button, highlight ‘Sight ’N Go’ and press ENTER. 3. Holding the eTrex Summit level, line up the sighting When using the ‘Sight ‘N Go’ or marks on the case with a distant landmark. - Page 24 2. Using the UP or DOWN button, highlight ‘Sight ’N Go’ and press ENTER. 3. Holding the eTrex Summit level, line up the sighting marks on the case with a distant landmark. 4. Press ENTER to lock the magnetic bearing.
- Page 25 ODOMETER’ tells you how far you’ve gone since the last trip reset. To change a data field: 1. On the Pointer Page, press the UP or DOWN button and scroll through the available options, stopping on the data you want the eTrex Summit to display. User-Selectable Data Field UA-1005.025...
-
Page 26: Elevation Page
Reference Elevation Page Elevation Page Options Options In addition to the Elevation Page basics explained on page 14, there are several options that allow the user to customize the elevation profile display. ‘PLOT OVER TIME’ sets the elevation profile to display changes over a set period of time. - Page 27 Reference Reference Elevation Page With the elevation profile set to ‘PLOT OVER Options DISTANCE’ you can set the distance using the ‘ZOOM DISTANCE” option. You can set the profile to display data over .2 miles, .5 miles, 1 miles, 5 miles, 10 miles, 15 miles or 25 miles.
- Page 28 Reference The ‘VIEW POINTS’ options allows you to scroll Elevation Page through the stored elevation profile and view a single Options point along the profile. When the pointer is stopped at a location along the profile the elevation, time of day and date the point was created are displayed.
- Page 29 Reference Elevation Page You can also change the data field along the bottom of Data Fields the Elevation Page to display different data. Total Ascent—Total distance ascended Total Descent—Total distance descended Average Ascent—Average distance of ascents Average Descent—Average distance of descents Maximum Ascent Rate—Maximum Ascent Rate in feet per minute.
- Page 30 Menu Page selections. Mark Waypoint Page The ‘MARK WAYPOINT’ page allows you to create a waypoint at the eTrex Summit’ s current location or at a location you enter in the position field. You can also change the symbol, name and elevation.
-
Page 31: Mark Waypoint Page
Reference To change the elevation: Mark Waypoint Page 1. Press the PAGE Button and switch to the ‘MENU’ Page. Press the UP or DOWN button and highlight ‘MARK’. Press ENTER. The ‘MARK WAYPOINT’ Page appears. 2. Press the UP or DOWN button and highlight the ‘ELEV’... -
Page 32: Waypoint Page
Reference Waypoint Waypoints Page Page The Waypoints Page organizes all of your waypoints in alphabetical order for easy selection. It also allows you to select nine of the ‘NEAREST WAYPOINTS’, and if you want, delete all waypoints. To select a waypoint: 1. -
Page 33: Review Waypoint Page
Reference Review Review Waypoint Page Waypoint Page The ‘Review Waypoint’ Page allows you to change the waypoint symbol, name, and location (covered previ- ously). You can also delete the waypoint, display the waypoint on the Map Page, start a GOTO or project a new waypoint using the selected waypoint as a reference. - Page 34 Reference Review Using the Project feature, the eTrex Summit can create Waypoint Page a waypoint at a specified distance and bearing using an existing waypoint as a reference. You can change the name, symbol and elevation on this page. Projecting a Waypoint : 1.
-
Page 35: Routes
18. This section discusses the route method. The third method, TracBack, is discussed on page 33. In the eTrex Summit, a route is at least two waypoints that describe the path you are going to travel. The route feature is very convenient because it allows the... - Page 36 In either case, you can navigate to a destination using ‘ROUTE’ if a route has more than two waypoints. The eTrex Summit will not allow the ‘FOLLOW’ button to be highlighted if there is only one waypoint in the route.
- Page 37 Reference To activate a route: Routes 1. Press the PAGE button and switch to the ‘MENU’ Page. Press the UP or DOWN Button and highlight ‘ROUTE’. Press ENTER. The ‘ROUTE’ Page appears. 2. Press the UP or DOWN button and highlight ‘FOLLOW’...
-
Page 38: Tracks
Summit will take you back by following the ‘Track Log’ that you left behind. You can save a total of ten tracks in the eTrex Summit. The track log starts recording as soon as the eTrex Summit gets a location fix. - Page 39 Reference Track Logs Saving the Current ‘Tracklog’: 1. With the “MENU’ page displayed, highlight ‘TRACKS’ and press ENTER. The Track Log Page will appear. 2. Press the UP or DOWN Button and highlight ‘SAVE’ and press ENTER. The ‘SAVE BACK THROUGH’ window appears giving you a time frame for saving a track or ‘ENTIRE LOG’.
- Page 40 Reference To delete all tracks: Track Logs 1. On the Track Log Page, Press the UP or DOWN button and highlight ‘DELETE ALL’. Press ENTER. The verification window appears. 2. If you really want to delete all saved tracks, press the UP or DOWN button and highlight ‘YES’.
-
Page 41: Calibration
Reference Calibration The ‘ELEVATION’ option displays the elevation profile for the entire track log graphically. Elevation: 1. With the ‘TRACK LOG’ page displayed highlight a ‘SAVED TRACK’ and press ENTER. 2. Using the UP or DOWN button select ‘ELEVATION’ and press ENTER. The elevation profile for the ‘SAVED TRACK’... - Page 42 Reference Calibration The eTrex Summit will calibrate the altimeter automati- cally using GPS altitude. If you know the exact current elevation or barometric pressure, you can calibrate the altimeter manually. Calibrating the Altimeter Manually: 1. With the ‘MENU’ Page displayed highlight ‘CALI- BRATE’...
- Page 43 Daylight Savings Time. When you select 12 hour time formatting, the clock will read like a standard clock with 12 hour AM and 12 hour PM cycles. The 24 hour option sets the eTrex Summit to display a 24 hour cycle (Military Time). To change the time format: 1.
-
Page 44: Setup Page
‘DAYLIGHT SAVINGS’ field and press ENTER. 4. Press the UP or DOWN Button, select ‘AUTO’, ‘YES’, or ‘NO’ and press ENTER. Press PAGE to get back to the page of your choice. The eTrex Summit can automatically select the Daylight Savings Time mode. UA-1005.044... -
Page 45: Display Page
ENTER. Press PAGE to get back to the ‘SETUP’ page. Units Page Using your eTrex Summit with a paper map increases the navigation power of both. If you are going to use a map in conjunction with the eTrex Summit, you must select the position format (grid), map datum, map units, and north reference to match the map’... - Page 46 Position Format The default position format (and the one most commonly used) for the eTrex Summit is latitude and longitude in de- grees and minutes (hdddº mm.mmm’). You may also choose from 17 other position formats. There is also a “User” posi- tion format which allows you to approximate custom-de- signed grids.
- Page 47 Press ENTER. Press PAGE to select the page of your choice. Elevation/VSPD (vertical speed) The eTrex Summit lets you select either feet or meters for all elevation and vertical speed readings. To Change the Elevation/VSPD Units: 1. With the ‘MENU’ Page displayed using the UP or DOWN button highlight ‘SETUP’...
- Page 48 The Interface Page allows you to connect and use devices such as computers and differential GPS (DGPS) The interface options will beacon receivers to the eTrex Summit. Below is a allow you to use a PC to description of the available formats.
-
Page 49: Heading Page
The eTrex Summit needs to be held level for the Electronic Compass to provide an accurate heading. When mounting the eTrex Summit in a car or on a bicycle, the unit will need to be tilted in order to see the display, making the compass less accurate. - Page 50 Using the UP or DOWN button select the correct number then press ENTER. When all numbers are entered correctly, highlight ‘OK’ and press ENTER. The eTrex Summit can be set Setting the Switch Back Period: to disable the Electronic Compass above a user 1.
- Page 51 True North for travelling on land. If necessary, you can correct for the difference between Grid North and True North manually. The eTrex Summit will reflect the North Reference setting when using the GPS or Electronic Compass for a bearing.
- Page 52 Turning the GPS Receiver ‘Off’ Turning the GPS receiver ‘OFF’ will conserve battery power if you want to use the eTrex Summit as a compass or develop a ‘Pressure Trend’ on the Elevation Page. When the unit is in ‘DEMO’...
- Page 53 4. Using the UP or DOWN button highlight the desired mode and press ENTER. Compass The eTrex Summit will allow you to turn the Electronic Compass on and off. Turning the compass off when not needed will help conserve power.
- Page 54 Reference System Page Software Button The Software Page shows the eTrex Summit’ s current software version. To update the eTrex Summit’ s software, visit the GARMIN web site www.garmin.com. Defaults Button The ‘DEFAULTS’ button resets all of the ‘SYSTEM’ setting to the factory defaults.
-
Page 55: Appendicies
Subject to proper user calibration. The temperature rating for the eTrex Summit may exceed the usable range of some batteries. Alkaline batteries can rupture at high temperatures. External power can only be applied using the GARMIN Auto Power Adapter (P/N 010-10203-00) or PC Interface Cable with Auto Power Adapter (P/N 010-10268-00- this cable contains a voltage regulator). -
Page 56: Appendix B What Is Gps
Appendicies Appendices Appendix B GPS - the Global Positioning System - is a navigation revolution. It’ s a technology that pinpoints a What is GPS? user’ s location anywhere in the world, 24 hours a day, regardless of the weather. Designed by the United States’... -
Page 57: Appendix C - Reciption Tips
YOU INDOORS NOW?’ will appear. Press the UP or DOWN Button and highlight ‘YES’. Press ENTER. The message will disappear. 2. Go outside. The eTrex Summit will keep tracking. B. You are not indoors and you have not moved hundreds of miles/km since you last... -
Page 58: Appendix D - Time Chart
Appendicies Appendix D Time Offset Chart The table below gives approximate UTC time offset for various longitudinal zones. If you are in daylight savings time, add one hour to the offset. s f f s f f º 0 º 5 °... -
Page 59: Appendix E Accessories
PC Interface Cable with Auto MapSource® Map Data CD-ROMs Power Adapter An excellent tool for creating waypoints and routes on your PC using a background map and downloading them to your eTrex. See your GARMIN dealer for MapSource details. UA-1005.059... -
Page 60: Appendix F Wiring Diagram
Diagram receivers, marine autopilots and/or a second GPS receiver. The NMEA 0183 version 2.0 interface format is supported by the eTrex Summit and enables the unit to drive up to three NMEA devices. NMEA 0183 Version 2.0 Approved Sentences: GPGGA, GPGLL, GPGSA, GPGSV, GPRMB,... -
Page 61: Appendix G Troubleshooting
2. See “Satellite Reception Tips” on page 55. eTrex Summit coordinates do not match the location on your map: 1. Check to make sure the eTrex Summit is configured to use the same datum as your map. See page 32. The Electronic Compass heading is incorrect: 1. - Page 62 Yes. How accurate is a GARMIN GPS? The eTrex Summit is accurate to within 100 meters under the DoD- imposed Selective Availability (S/A). Without S/A, the eTrex Summit is accurate to within 15 meters. Using differential techniques, the eTrex Summit can be as accurate as 1-5 meters.
-
Page 63: Appendix Hfaq's
No. You can clear the track log, but it is always activated. Remember that if you clear the track log you are also clearing the elevtation profile. What does the message "NO DGPS POSITION" mean? eTrex Summit had a differential fix and lost it. UA-1005.063... -
Page 64: Appendix I - Index
Appendicies Appendices Appendix I Accessories ................57 Index Activate a Route ..............35 Activate the Compass ............51 Altimeter ................51 Auto Zoom On/Off .............. 20 Autolocate ................55 Average Ascent ..............27 Average Descent ..............27 Average Speed ..............23 Batteries ................ - Page 65 Appendicies Appendix I Electronic Compass ............. 47 Index Elevation ................ 23,29 Elevation Computer .............. 5 Elevation Page ..............14 Elevation Page Options ............25 Elevation Profile ..............39 Elevation/VSPD ..............45 FAQ’ s ................... 60 Features ................. 5 Global Positioning System ............ 54 GOTO ................
- Page 66 Appendicies Appendices Appendix I Nearest Waypoints Pag ............30 Index NMEA .................. 46 Normal Mode ..............50 North Reference .............. 48,49 Orient Map ................. 20 Plot Over Distance ............... 24 Plot Over Time ..............24 Pointer Page ................. 13 Points .................. 26 Position Format ..............
- Page 67 Appendicies Time Format ..............41,42 Appendix I Time Offset Chart ..............56 Time Scale ................24 Index Time Zone ............... 15,42 Total Ascent ................. 27 Total Descent ..............27 TracBack ................33 TracBack Navigation ............38 Tracks ..................5 Trip Computer ............... 5 Trip Odometer ..............
- Page 68 A copy of the original sales receipt is required as the proof of purchase for warranty repairs. GARMIN retains the exclusive right to repair or replace the unit or software or offer a full refund of the purchase price at its sole discretion. SUCH REMEDY SHALL BE YOUR SOLE AND EXCLUSIVE REMEDY FOR ANY BREACH OF WARRANTY.
- Page 69 UA-1005.069...
- Page 70 © 2000 GARMIN Corporation GARMIN International, Inc. 1200 East 151 Street, Olathe, Kansas 66062, U.S.A. GARMIN (Europe) Ltd. Unit 5, The Quadrangle, Abbey Park Industrial Estate, Romsey, SO51 9AQ, U.K. GARMIN (Asia) Corporation No. 68, Jangshu 2 Road., Shijr, Taipei County, Taiwan www.garmin.com...
Need help?
Do you have a question about the eTrex Summit and is the answer not in the manual?
Questions and answers