
Related Manuals for HOMCOM 370-225V00


Summary of Contents for HOMCOM 370-225V00
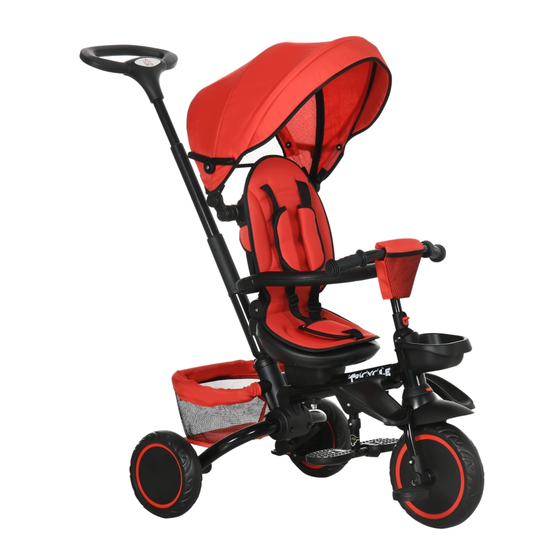
- Page 1 IN221200391V01_UK 370-225V00 12-50 months * The maximum load is 25kg. IMPORTANT, RETAIN FOR FUTURE REFERENCE: READ CAREFULLY ASSEMBLY INSTRUCTION...
-
Page 2: Maintenance
Note: Tricycle structure and appearance are subject to change without notice. Pictures are for reference only. Maintenance: Regularly check the trike, ensuring all screws and components are properly secured. 1. Clean the tricycle with a slightly damp cloth instead of water, so the structure does not get damaged. - Page 4 1. Unfolding the U-shaped tube Unfold the U-shaped tube backwards, following the arrow from picture 1, ensuring the tube is completely fixed. 2. Installing front/back wheels As shown in 'PICTURE 2', put the brake pedal 5 into the transverse tube of the rear wheel frame, then insert the rear wheel 6 into the corresponding hole on brake pedal 5, completing the installation of the rear wheel.
-
Page 5: Direction For Use
Direction for use 1. Unfolding the footrest pedal There is a footrest pedal under frame 1 (PICTURE 7). You can unfold the footrest, so children can rest their feet as the trike gets pushed. 2. Moving the seat forward and backward There is a switch under the seat, on the left –... -
Page 6: Istruzioni Di Assemblaggio
IN221200391V01_IT 370-225V00 12-50 mesi TRICICLO PER BAMBINI *Carico massimo 25kg. IMPORTANTE! CONSERVARE IL PRESENTE MANUALE PER FUTURO RIFERIMENTO E LEGGERLO ATTENTAMENTE. ISTRUZIONI DI ASSEMBLAGGIO... -
Page 7: Manutenzione
Nota: La struttura e l'aspetto del triciclo sono soggetti a modifiche senza preavviso. Le figure riportate sono solo di riferimento. Manutenzione: Controllare regolarmente il triciclo, assicurarsi che tutte le viti e le parti siano fissate correttamente in posizione. 1. Pulire il triciclo passando un panno leggermente umido invece dell'acqua, in modo da non danneggiare la struttura. - Page 8 LISTA PARTI Tettuccio Telaio Asta di spinta Cestello anteriore Cestello posteriore Poggiapiedi Pedale Ruota posteriore poggiapiedi Ruota Manopola anteriore Pedale freno poggiapiedi 4.Pedale freno×2 1.Telaio×1 2.Ruota anteriore×1 3.Poggiapiedi×1 6.Asta di spinta×1 5.Ruota 7. Tettuccio×1 8.Cestello posteriore×2 anteriore×1...
- Page 9 STEP DI MONTAGGIO Manopola poggiapiedi FIGURA 3 FIGURA 1 FIGURA 2 Cestello posteriore FIGURA 4 FIGURA 5 FIGURA 6 1. Estendere il tubo a U Estendere il tubo a U all'indietro, seguendo la freccia in figura 1, assicurandosi che il tubo sia completamente fissato in posizione.
-
Page 10: Istruzioni Per L'uso
Istruzioni per l'uso Interruttore di Pulsante di regolazione in rotazione dle avanti e indietro sedile del sedile FIGURA 7 FIGURA 8 1. Estendere il pedale del poggiapiedi Il pedale del poggiapiedi è situato sotto il telaio 1 (FIGURA 7). È possibile aprire il poggiapiedi in modo che i bambini possano riposare i piedi mentre il triciclo viene spinto da un adulto. - Page 11 If you have any questions, please contact our customer care center. Our contact details are below: 0044-800-240-4004 enquiries@mhstar.co.uk IMPORTER ADDRESS: MH STAR UK LTD Unit 27, Perivale Park, Horsenden lane South Perivale, UB6 7RH MADE IN CHINA In caso di dubbio, si prega di contattare il nostro centro assistenza clienti. I nostri dettagli di contatto sono di seguito: 0039-0249471447 clienti@aosom.it...
Need help?
Do you have a question about the 370-225V00 and is the answer not in the manual?
Questions and answers