Table of Contents
Advertisement
Quick Links
NuMaker-Server-NUC980
NuMicro
®
Family
ARM926EJ-S™-based 32-bit Microprocessor
NuMaker-Server-NUC980
User Manual
Evaluation Board for NuMicro
®
NUC980 Series
The information described in this document is the exclusive intellectual property of
Nuvoton Technology Corporation and shall not be reproduced without permission from Nuvoton.
Nuvoton is providing this document only for reference purposes of NuMicro microcontroller and
microprocessor based system design. Nuvoton assumes no responsibility for errors or omissions.
All data and specifications are subject to change without notice.
For additional information or questions, please contact: Nuvoton Technology Corporation.
www.nuvoton.com
Jul 31, 2023
Page 1 of 48
Rev 1.21
Advertisement
Table of Contents

Related Manuals for Nuvoton NuMaker-Server-NUC980


Summary of Contents for Nuvoton NuMaker-Server-NUC980
- Page 1 The information described in this document is the exclusive intellectual property of Nuvoton Technology Corporation and shall not be reproduced without permission from Nuvoton. Nuvoton is providing this document only for reference purposes of NuMicro microcontroller and microprocessor based system design. Nuvoton assumes no responsibility for errors or omissions.
-
Page 2: Table Of Contents
Hardware Configuration ..............7 Front View ..................7 Rear View ..................15 Quick Start ................16 Nuvoton CDC Driver Installation ............16 Nuvoton Virtual COM Driver Installation ..........17 BSP Firmware Download ..............21 Hardware Setup ................21 NuWriter Tool .................23 Executing Sample Code ..............27 Make your own Embedded Linux ............31... - Page 3 Figure 1-1 NuMaker-Server Development Board ................5 Figure 3-1 Front View of NuMaker-Server ..................7 Figure 3-2 Rear View of NuMaker-Server ..................15 Figure 4-1 Nuvoton USB Driver Installation Setup................. 16 Figure 4-2 CDC Driver Installation ....................17 Figure 4-3 VCOM Driver Installation Setup ..................17 Figure 4-4 VCOM Driver Installation ....................
- Page 4 NuMaker-Server-NUC980 List of Tables Table 4-1 Power On Setting ......................23 Jul 31, 2023 Page 4 of 48 Rev 1.21...
-
Page 5: Overview
NuMaker-Server-NUC980 OVERVIEW NuMaker-Server can gather information from up to 8 UART sensors and transfer to cloud server over two on board Ethernet port. It can also transfer information from cloud server by Ethernet to UART devices in opposite direction by applications. This serial server is a very popular IIoT device used in industrial control, which can easily transfer an onsite industrial machine control into a remote cloud factory control. -
Page 6: Features
NuMaker-Server-NUC980 FEATURES Target Chip NUC980DK63YC (V2.0) or NUC980DK61Y (V1.2/1.0): LQFP128 pin MCP package with DDR2 (64 MB), which can run up to 300MHz operating speed SPI Flash: Quad mode system booting or data storage SD0/eMMC0: User SD/eMMC memory card for system booting, data storage or SDIO (Wi- Fi) device ... -
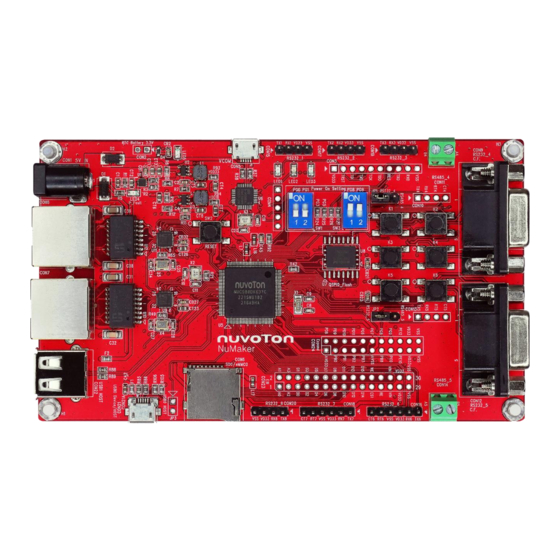
Page 7: Hardware Configuration
NuMaker-Server-NUC980 HARDWARE CONFIGURATION Front View User indication LEDs (LED1~3) JTAG (CON3) Virtual COM UART1 UART3 UART2 RTC battery System (CON5, U6) (CON15) (CON19) (CON17) Power-on setting (CON2) Reset (SW1, SW2) (SW2) 5V IN (CON1) UART4 selection (CON9, CON11, JP1) Ethernet1_PE... - Page 8 NuMaker-Server-NUC980 Power indication LEDs (LED4, LED5): Color Descriptions The system power will be terminated and LED4 LED4 lighting when the input voltage is over 5.7V or the current is over 1.7A. LED5 Green Power normal state. RTC Battery (CON2): External Battery supply for RTC 3.3V powered CON2.1: Positive (+)
- Page 9 NuMaker-Server-NUC980 UART3 pin header (CON19). Connector GPIO pin of NUC980 Function CON19.1 GPC3 UART3_TXD CON19.2 GPC4 UART3_RXD CON19.3 VDD33 CON19.4 JTAG interface and UART0 (CON3) Connector GPIO pin of NUC980 Function CON3.1 VDD33 CON3.2 GPG15 nTRST CON3.3 GPG14 CON3.4...
- Page 10 NuMaker-Server-NUC980 User Key Matrix SWs (K1~K6) Function GPIO pin of NUC980 Row0 GPC13 Column0 GPC1 Row0 GPC13 Column1 GPC2 Row1 GPC14 Column0 GPC1 Row1 GPC14 Column1 GPC2 Row2 GPC15 Column0 GPC1 Row2 GPC15 Column1 GPC2 UART5 selection (CON12, CON14, JP2): ...
- Page 11 NuMaker-Server-NUC980 Expand port for user use (CON24) Connector GPIO pin of NUN980 Function CON24.1 ADC VSS CON24.2 GPD8 SPI0_SS0 CON24.3 GPB0 ADC_AIN[0] CON24.4 GPD9 SPI0_CLK CON24.5 GPB1 ADC_AIN[1] CON24.6 GPD10 SPI0_DO CON24.7 GPB2 ADC_AIN[2] CON24.8 GPD11 SPI0_DI CON24.9 GPB3 ADC_AIN[3] CON24.10...
- Page 12 NuMaker-Server-NUC980 EBI port for user use (CON23) Connector GPIO pin of NUN980 Function CON23.1 GPG0 EBI_ADDR0 CON23.2 GPG1 EBI_ADDR1 CON23.3 GPB2 EBI_ADDR2 CON23.4 GPG3 EBI_ADDR3 CON23.5 GPC0 EBI_DATA0 CON23.6 GPC1 EBI_DATA1 CON23.7 GPC2 EBI_DATA2 CON23.8 GPC3 EBI_DATA3 CON23.9 GPC4 EBI_DATA4 CON23.10...
- Page 13 NuMaker-Server-NUC980 UART8 pin header (CON20) Connector GPIO pin of NUC980 Function CON20.1 GPA12 UART8_TXD CON20.2 GPA11 UART8_RXD CON20.3 VDD33 CON20.4 SD0/eMMC0 (CON6): Use Micro SD/eMMC memory card for system booting, data storage or SDIO (Wi-Fi) device Power on setting (SW1, SW2)
- Page 14 NuMaker-Server-NUC980 SPI-NOR Flash boot SW2.2/SW2.1 OFF/ON GPG9/GPG8 with 4-bit mode SPI-NOR Flash boot SW2.2/SW2.1 OFF/OFF GPG9/GPG8 with 1-bit mode USB0 Device/HOST (CON21, JP3): USB0 Device/HOST Micro-B connector, By JP3 status or defined by the ID pin of the USB cable ...
-
Page 15: Rear View
NuMaker-Server-NUC980 Rear View Figure 3-2 shows the main components from the rear view of NuMaker-Server Development Board RS232-4/5 transceivers with SN75C3232E (U13 and U15) RS485-4/5 transceivers with SN65HVD10 (U14 and U16) RS485-4/5 transceivers (U14, U16) RS232-4/5 transceivers (U13, U15) -
Page 16: Quick Start
Nuvoton CDC Driver Installation The USB serial port function is used to print some messages on PC API, such as SecureCRT, through the standard UART protocol to help user to debug program. Download and install the latest Nuvoton CDC driver: https://www.nuvoton.com/resource-download.jsp?tp_GUID=SW1020160914071736 The installation is presented in Figure 4-1 and Figure 4-3. -
Page 17: Nuvoton Virtual Com Driver Installation
Nuvoton Virtual COM Driver Installation The firmware programming tool NuWriter requires a NuWriter driver to be installed on PC first. Please follow the steps below to install the driver. Download and install the latest Nuvoton Virtual COM driver: https://github.com/OpenNuvoton/NUC980_NuWriter/tree/master/Driver The installation is presented in Figure 4-3 and Figure 4-4. - Page 18 NuMaker-Server-NUC980 Jul 31, 2023 Page 18 of 48 Rev 1.21...
- Page 19 NuMaker-Server-NUC980 Jul 31, 2023 Page 19 of 48 Rev 1.21...
-
Page 20: Figure 4-4 Vcom Driver Installation
NuMaker-Server-NUC980 Figure 4-4 VCOM Driver Installation Jul 31, 2023 Page 20 of 48 Rev 1.21... -
Page 21: Bsp Firmware Download
NuMaker-Server-NUC980 BSP Firmware Download NUC980 Linux BSP provides cross compilation tools based on Linux. This BSP has been tested in different x86 Linux distributions, including Ubuntu, CentOS, and Debian, etc. Since there are many distributions out there with different system configuration, sometimes it is necessary to change system setting or manually install some missing components for cross compilation. -
Page 22: Figure 4-5 Hardware Setting
(CON21) (SW1) Figure 4-5 Hardware Setting Plug in the USB0 cable (CON21) If the installation is successful, a virtual COM port named “WinUSB driver (Nuvoton VCOM)” can be found in the “Device Manager”. Figure 4-6 Nuvoton VCOM Jul 31, 2023 Page 22 of 48 Rev 1.21... -
Page 23: Nuwriter Tool
NuMaker-Server-NUC980 Select the USB mode(SW1) Plug in the USB to UART cable (CON2) Set power on setting(SW1) to ON/ON to Boot from USB. Description (Status and Function) GPIO pin of NUC980 Power on setting ON/ON = Boot from USB. SW1.2/ SW1.1 GPG1/GPG0 ON/OFF = Boot from SD/eMMC. -
Page 24: Figure 4-8 Program U-Boot-Spl
NuMaker-Server-NUC980 After “Program” the image, click the “Verify” button to read back the image data to make sure the burning status. Note: Confirm NUC980DK63YC.ini (V2.0) or NUC980DK61Y.ini (V1.2/1.0) Figure 4-8 Program u-boot-spl 5. According to Figure 4-9, following the steps to program u-boot.bin: a. -
Page 25: Figure 4-9 Program U-Boot
NuMaker-Server-NUC980 Note: Confirm NUC980DK63YC.ini (V2.0) or NUC980DK61Y.ini (V1.2/1.0) Figure 4-9 Program u-boot 6. According to Figure 4-10, following the steps below to program kernel image: Select the “SPI NAND” type. Fill in the image information: Image Name: nuc980-eth2uart.dtb ... -
Page 26: Figure 4-10 Program Dtb
NuMaker-Server-NUC980 Note: Confirm NUC980DK63YC.ini (V2.0) or NUC980DK61Y.ini (V1.2/1.0) Figure 4-10 Program dtb 7. According to Figure 4-11, following the steps below to program kernel image: Select the “SPI NAND” type. Fill in the image information: Image Name: uimage.bin ... -
Page 27: Executing Sample Code
Figure 4-12 Program environment You can create a TXT file extension and add contents. NuWriter will transform env.txt to an environment image and download the image to SPI NAND. Here is an example for NuMaker-server-NUC980 environment variables: baudrate=115200 bootdelay=1 stderr=serial... -
Page 28: Figure 4-9 Numaker-Server Board Setup
NuMaker-Server-NUC980 Virtual COM UART1 UART3 UART2 (CON5, U6) (CON15) (CON19) (CON17) UART4 RS232 (CON9) Ethernet0_PE (CON7, U10) UART5 RS232 (CON12) UART8 UART7 UART6 (CON20) (CON18) (CON16) USB0 Device/Host Figure 4-13 NuMaker-Server Board Setup Then, use Terminal tool, such as PuTTY, Tera term, etc to open the serial COM port. The COM port configuration is baudrate 115200bps, 8-bit data length and no-parity. -
Page 29: Figure 4-10 Serial Com Port Setting
NuMaker-Server-NUC980 Figure 4-14 Serial COM Port Setting Power ON or push the Reset key and boot system. Freeing unused kernel memory: 5456K [Mount JFFS2]: /dev/mtdblock0 --> /mnt/mtdblock0 nuc980-emac0 nuc980-emac0: eth0 is OPENED nuc980-emac1 nuc980-emac1: eth1 is OPENED random: arm-linux-light: uninitialized urandom read (8 bytes read, 7 bits of entropy available) BusyBox v1.22.1 (2016-02-03 14:11:04 CST) built-in shell (ash) -
Page 30: Figure 4-11 Serial Com Port
NuMaker-Server-NUC980 Below is an example transmit data from Ethernet to UART. When type “123” in TCP/IP connection window which port number is 50001. The UART1 serial COM port window will show “123”. Figure 4-15 Serial COM Port And below is an example with other direction, transmit data from UART to Ethernet. When type “123”... -
Page 31: Make Your Own Embedded Linux
NuMaker-Server-NUC980 Figure 4-17 UART Setting Web Page Make your own Embedded Linux “NUC980/NUC970 Linux Environment on VMware User Manual” describes how to compile and modify your own Embedded Linux step by step. Please refer from here to get more details. -
Page 32: Block Diagram Schematic
NuMaker-Server-NUC980 BLOCK DIAGRAM SCHEMATIC GPIO List Schematic Figure 5-1 GPIO List Schematic Jul 31, 2023 Page 32 of 48 Rev 1.21... -
Page 33: Power Schematic
NuMaker-Server-NUC980 Power Schematic Figure 5-2 Power Schematic Jul 31, 2023 Page 33 of 48 Rev 1.21... -
Page 34: Nuc980Dk Schematic
NuMaker-Server-NUC980 NUC980DK Schematic Figure 5-3 NUC980DK Schematic Jul 31, 2023 Page 34 of 48 Rev 1.21... -
Page 35: Power Filter Schematic
NuMaker-Server-NUC980 Power Filter Schematic Figure 5-4 Power Filter Schematic Jul 31, 2023 Page 35 of 48 Rev 1.21... -
Page 36: Configure Schematic
NuMaker-Server-NUC980 Configure Schematic Figure 5-5 Configure Schematic Jul 31, 2023 Page 36 of 48 Rev 1.21... -
Page 37: Nuc123Zd4An0 Schematic
NuMaker-Server-NUC980 NUC123ZD4AN0 Schematic Figure 5-6 NUC123ZD4AN0 Schematic Jul 31, 2023 Page 37 of 48 Rev 1.21... -
Page 38: Memory Schematic
NuMaker-Server-NUC980 Memory Schematic Figure 5-7 Memory Schematic Jul 31, 2023 Page 38 of 48 Rev 1.21... -
Page 39: Rmii_Pe Schematic
NuMaker-Server-NUC980 RMII_PE Schematic Figure 5-8 RMII_PE Schematic Jul 31, 2023 Page 39 of 48 Rev 1.21... -
Page 40: Rmii_Pf Schematic
NuMaker-Server-NUC980 RMII_PF Schematic Figure 5-9 RMII_PF Schematic Jul 31, 2023 Page 40 of 48 Rev 1.21... -
Page 41: Uart_A Schematic
NuMaker-Server-NUC980 UART_A Schematic Figure 5-10 UART_A Schematic Jul 31, 2023 Page 41 of 48 Rev 1.21... -
Page 42: Uart_B Schematic
NuMaker-Server-NUC980 UART_B Schematic Figure 5-11 UART_B Schematic Jul 31, 2023 Page 42 of 48 Rev 1.21... -
Page 43: Usb Schematic
NuMaker-Server-NUC980 USB Schematic Figure 5-12 USB Schematic Jul 31, 2023 Page 43 of 48 Rev 1.21... -
Page 44: Expand Schematic
NuMaker-Server-NUC980 Expand Schematic Figure 5-13 Expand Schematic Jul 31, 2023 Page 44 of 48 Rev 1.21... -
Page 45: Pcb Placement
NuMaker-Server-NUC980 PCB Placement Figure 5-14 Front PCB Placement Jul 31, 2023 Page 45 of 48 Rev 1.21... -
Page 46: Figure 5-15 Back Pcb Placement
NuMaker-Server-NUC980 Figure 5-15 Back PCB Placement Jul 31, 2023 Page 46 of 48 Rev 1.21... -
Page 47: Revision History
NuMaker-Server-NUC980 REVISION HISTORY Date Revision Description 2020.05.22 1.00 Initial version 2020.07.22 1.20 For board versionV1.2 For board version V2.0 2023.07.31 1.21 SOC change NUC980DK61YC to NUC980DK63YC Modified chapter 4 Jul 31, 2023 Page 47 of 48 Rev 1.21... - Page 48 NuMaker-Server-NUC980 Important Notice Nuvoton Products are neither intended nor warranted for usage in systems or equipment, any malfunction or failure of which may cause loss of human life, bodily injury or severe property damage. Such applications are deemed, “Insecure Usage”.
Need help?
Do you have a question about the NuMaker-Server-NUC980 and is the answer not in the manual?
Questions and answers