Table of Contents
Advertisement
Quick Links
Advertisement
Table of Contents

Related Manuals for Esse-ti ST 800 S


Summary of Contents for Esse-ti ST 800 S
- Page 1 User’s manual...
- Page 2 The User shall be responsible for defects arising from the use of the product. Esse-ti shall only be responsible for defects according to and within the limitations set by the Presidential Decree dated 24/05/1988 no.
-
Page 3: Table Of Contents
TABLE OF CONTENTS TABLE OF CONTENTS......................3 EDITING CRITERIA......................6 General instructions for the installer..................7 General Notes........................7 Making the Installation.......................8 FUNCTIONAL DESCRIPTION ....................9 Visual references ........................9 Upper view............................9 Rear view ............................9 Lower view ............................10 Display ..........................10 Display of the “Events” section .......................11 Display of the telephone connections....................11 Display of menu items and services ....................12 Display of telephone operations ......................12... - Page 4 Extensions ............................32 Groups ..............................32 Extension services..........................32 Room status............................33 Alarms ..............................33 Messages ............................33 Buffer ...............................33 Password ..........................34 Installer password ..........................34 User password ..........................34 HOTEL SERVICES ......................35 Room status and rate display....................35 Room data display..........................35 Group data display ...........................35 Printing and resetting......................35 Call list .............................35 Printing switchboard information ....................36 Resetting............................37...
- Page 5 Parking a line ...........................51 Retrieving a parked line........................51 Calling a stored number ....................51 Dialling with the handset down ..................52 Line disengagement......................52 Quick dialling buttons ......................53 Door opening........................53 Day/night service......................54 ST800-S INFORMATIOn ....................55 Information window ......................55 Using a LPT printer......................56 Error signalling.........................57 PRINTBRIDGE SOFTWARE .....................58 Installation........................58 Operation..........................61...
-
Page 6: Editing Criteria
EDITING CRITERIA This paragraph describes the editing criteria followed in this manual, together with their meaning for easier user’s reference. The following table shows the printing styles on the left and their meaning on the right column. Example Meaning CHAPTER Style used for the title of chapters. -
Page 7: General Instructions For The Installer
• The product must be EXCLUSIVELY used for the purpose it was designed for. Esse-ti shall not be responsible for damages arising from improper use. • The product has been designed in compliance with the regulations in force and must be installed in system that comply with the provisions of law. -
Page 8: Making The Installation
AKING THE NSTALLATION Internal telephone installations must be carried out by specialised personnel. installation connection telephone terminals telecommunications network that do not comply with the regulations in force is not permitted. Page 8 General instructions for the installer... -
Page 9: Functional Description
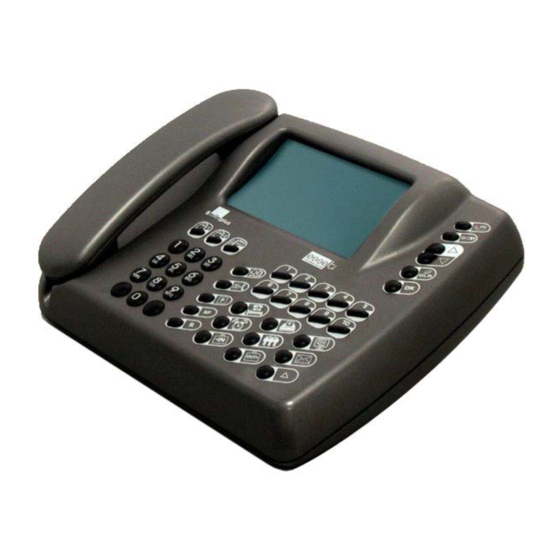
FUNCTIONAL DESCRIPTION This chapter describes the main operating principles of the ST800-S console phone. We recommend reading the instructions carefully. ISUAL REFERENCES Upper view A: LCD display B: Accessory telephone function buttons C: Telephone keypad D: Hotel function buttons E: Quick dialling buttons F: Menu management buttons Rear view A: Printer connector... -
Page 10: Lower View
Lower view A: Contrast adjustment screw B: Ringer intensity control ISPLAY Description of the information visualised on the display and of its division in various sections. A: Header or message ‘Buffer full’ B: Telephone connections/Menu services C: Telephone operations D: Events E: Date and time F: Operating mode D, N, T o A Page 10... -
Page 11: Display Of The "Events" Section
Display of the “Events” section In the “Events” section are listed the various operations that the ST800-S console phone is carrying out. SYMBOL TYPE OF EVENT The ST800-S console phone is transferring the data to the switchboard Printer not ready or not present Group function active Buffer almost full (less than 300 recordings) Print in progress... -
Page 12: Display Of Menu Items And Services
Display of menu items and services The ST800-S operator telephone is provided with a graphic interface that allows a user-friendly use of the various functions, thanks to particular symbols. Symbol description Cursor. Always indicates the active element Indicates a choice among several items, such as programming menus Indicates an option that is not active (option field) Indicates an active option (option field) -
Page 13: Keypad
EYPAD Describes the keypad and its use. Please refer also to the figure at page 9 that describes the logical division of the various function areas. Button group name Accessory functions Telephone functions Hotel functions Quick dialling Menu management Accessory functions Button description: Opening of door N. -
Page 14: Hotel Functions
Hotel functions Button description: Displays total amount due (or residual credit) and room status Printing and Resetting Telephone boxes Alarm Client groups Messages Check-in Check-out Services By pressing the button corresponding to the desired function (starting from the main screen), you can access the corresponding submenu. Follow the instructions shown on the display and use the navigation button to carry out the desired operations. -
Page 15: Menu Management
Menu management Button description Access to programming menu Back to previous screen image Move the cursor to the previous or subsequent value Modify the data of a screen image after “Confirm?” Deactivate the option fields Delete last character Modify the data of a screen image after “Confirm?” Activate the option fields Confirm Terminology... -
Page 16: Description Of The Menu Browsing Procedures
Description of the menu browsing procedures To... What to do... Press ESC on the main screen image (where the line status is displayed). Access programming menus (You will be required to enter a password) Enter the password and press OK. Return to the previous screen Press ESC. -
Page 17: Technical Data
TECHNICAL DATA Phonebook 50 numbers Buffer memory capacity 1100 calls Display graphic 240x128 pixels backlit Keypad 45 buttons Printer interface Parallel PC interface Type of line 3 pair TECHNICAL DATA Page 17... -
Page 18: Installation
INSTALLATION Perform the operations below to connect the ST800-S console phone to the SMILE Plus or FOX 90 switchboards. Make sure that the CPU data output configuration mini jumpers present Console phone port enabled on the CPU board are in “ ”... - Page 19 Console phone plug Console phone speech plug Predispose: • The RJ45 plug provided with the ST800-S near the console phone (D in the figure below). • The RJ45 plug provided with the switchboard near the switchboard (E in the figure below) INSTALLATION Page 19...
-
Page 20: St800-S - Printer Connection
A Switchboard CPU board B Operator telephone RJ45 connector C ST800-S Operator telephone RJ45 connector Connect the conductor between the two plugs (1:1). Connect connector C of the ST800-S console phone to plug D, using the cable provided. Connect plug E to the console phone connector of the switchboard CPU board (B) using the cable provided with the switchboard. -
Page 21: St800-S - Pc Connection
check-out reports. The operations to perform in order to connect ST800-S to a parallel printer are identical to those to connect the printer to a normal PC. Use the Parallel/Centronics cable provided and connect the parallel extremity (25 poles male) to ST800-S via the special plug located on the posterior side. -
Page 22: Programming
PROGRAMMING ROGRAMMING Programming screen images can be accessed through the main screen image (the one displaying the lines status). The access procedure is the following: Press Enter the (user o installer) password and press At this point the screen image (programming main screen image) will be displayed, which allows you to access the programming menus described below. -
Page 23: Programming The Console Phone
Prints n Room status n Phone book A – Z n Alarms n Phone book 1 – 60 n Messages n Extension prog. n Buffer n Groups n Extension services Password Installer password n User password The ST800-S console phone and the switchboard are configured by default with a basic programming. -
Page 24: Heading
Heading You can enter a text up to 25 characters long, visible on the top left of the display. To customise this text, proceed as follows: Select “Heading”. Enter text. Energy saving You can set the amount of minutes between pressing the last button and a reduced brightness of the display. -
Page 25: Quick Dial Keys
Quick dial keys You can programme up to 10 telephone numbers or services that can be recalled directly through quick dialling. Select “Quick dial keys”. Enter the number of the button to be programmed (1..9, 0=10). Enter the telephone number to be stored. Enter the name. - Page 26 The format of the sent data regarding a call is as follows: |..|..|..|..|..|..|..| 42 Usc. 1 123456XXX 04/03/98 10:52:22 00:02:12 114 The end of the string is given by LF and CR. Number of Description Start Format characters Extension Type of report External line used Dialling Date...
-
Page 27: Language Select
Language select Allows you to choose the language of the menus and of the printed texts. Select “Language select”. Select the desired language. Console Reset Allows you to restore the ST800-S console phone default values. WARNING!!! The activation of this procedure will delete all the telephone numbers stored in the phonebook, all the data regarding telephone traffic, as well as the ST800-S menu settings and the printing settings. -
Page 28: Programming The Switchboard
ROGRAMMING THE SWITCHBOARD Detailed description of the options regarding the “Switchboard” programming. To access this screen image starting from the main one: Select “Switchboard”. In the descriptions below, it is assumed that you are in the screen image regarding the switchboard programming. Date/Time Allows you to update date and time of the switchboard and of the ST800-S console phone. - Page 29 “OK = start”; “OK = stop”; “Hang up”; Once these operations have been carried out, you can enter the code corresponding to a new message to be recorded or played back. When the maximum duration time has elapsed, you will hear an “end of recording”...
-
Page 30: Expert
Once these operations have been carried out, you can enter the code corresponding to a new message. You can programme up to 20 messages, depending on the programming of the H210 board. Recording a new message involves the deletion of the pre-existing one. You can record messages for a total 4 minutes. -
Page 31: Programming The Hotel Services
ROGRAMMING THE HOTEL SERVICES Detailed description of the options regarding the “Hotel services” programming. To access this screen image starting from the main one: Select “Hotel services”. In the descriptions below, it is assumed that you are in the screen image regarding the “hotel services”... -
Page 32: Prints
Activate or deactivate access to outgoing groups (G01..G16). RINTS Detailed description of the options regarding the “Prints” programming. To access this screen image starting from the main one: Select “Prints”. In the descriptions below, it is assumed that you are in the screen image regarding printing. -
Page 33: Room Status
Select “Extension serv.”. You can access rapidly by pressing the combination (services) and (print) on the main screen image. Room status Prints the status of all the rooms. Select “Room status”. You can access rapidly by pressing the combination (room status) and (print) on the main screen image. -
Page 34: Password
You can access rapidly by pressing the combination (arrow down) and (print) on the main screen image. ASSWORD Detailed description of the options regarding the “Passwords” programming. To access this screen image starting from the main one: Select “Password”. In the descriptions below, it is assumed that you are in the screen image regarding the passwords. -
Page 35: Hotel Services
HOTEL SERVICES OOM STATUS AND RATE DISPLAY Displays the room status, the total amount due and the residual credit (if any). In group mode the display of the room status is deactivated and only the total costs charged on the group will be shown. Room data display Press Enter the number of the room of which to display the information. -
Page 36: Printing Switchboard Information
WARNING!!! It is important to clear the telephone box and the console phone recordings periodically, in order to prevent the calls from filling the Buffer. Printing room data Press Enter the number of the room of which to display the information. Printing group data Press Press... -
Page 37: Resetting
Press Print room status Press Press Print alarms Press Press Print messages Press Press Print services Press Press Resetting Once you have printed the data concerning the room, the group, the telephone boxes and the buffer, the “RESET” window will appear. There are two options available: •... -
Page 38: Telephone Boxes
ELEPHONE BOXES Display Displays the situation of the extensions used as telephone boxes. Press ( All the information regarding the telephone boxes will be displayed. TEL. BOX 1 TEL. BOX 2 TEL. BOX 3 TEL. BOX 4 Total day Free/Activated Free/Activated Free/Activated Free/Activated... -
Page 39: In Room Charge
In room charge Allows you to charge a call placed from a telephone box on a room. Enter the number of the telephone box extension. Enter the number of the room on which to charge the call. You can charge the call only after it has ended and if there are units. The telephone box unit counter is reset as soon as the call has been charged. -
Page 40: Failed Alarm" Signals
Enter the desired time. Select the type of alarm between “Single” and “Daily”. Select the box “Enabled”. Press to confirm. The alarm will ring for 2 minutes at the set time. If the telephone is engaged, you will hear a call waiting tone. If at the set time there is no answer, a “failed alarm”... -
Page 41: Client Groups
In case of simultaneous failed alarms, these will be queued and sent to the console phone according to the order of arrival. All the failed alarms will be shown printing the telephone traffic. LIENT GROUPS Formation of groups Allows you to group the clients in order to quicken the check-in, check-out, printing and alarm operations. -
Page 42: Console Phone Group
If you delete the group leader, you will delete the entire group. A member of a group is automatically deleted after he has checked- out. You cannot remove a member from a group if he has not checked-in. Console phone group Is the group of extensions connected to the console phone. -
Page 43: Messages
ESSAGES Allows you to leave or display messages to clients. Press Enter the desired room number. Activate or deactivate the option indicating the presence of messages. If you only want to check the status of the messages after accessing the screen image, press ESC to exit, instead of activating or deactivating the option. -
Page 44: Group Check-In
Group check-In Press Press Enter the room number of the group leader. Select the desired presetting (mode 0 ... mode 3) or select, one by one, all the options displayed. Displaying the room settings Press Enter the room number to be displayed. The information displayed on the screen image refers to the options that are active for that room. -
Page 45: Single Check-Out
You cannot perform the check-out procedure for the extension defined as group leader. The display will show “ERROR 24”. It is not possible to check out if the room extension is in use. Single check-out Press Enter the room number to be freed. Group check-Out Press Press... -
Page 46: Help Call
“Forwarding no answer” allows the extension to access the call forwarding service if there is no answer within a given amount of time. Press Enter the number of the desired extension. Press to confirm. Activate or deactivate the option for the amplifier activation. Activate or deactivate the option for the Hot-Line activation. -
Page 47: Alarm Block From The Room
The ST800-S console phone rings. In the event of a conversation in progress, you will hear an alarm tone. The display will show the message “SIGNALLING EXT.” followed by the extension number, the time, the type of alarm. Example: Type15 = is the alarm due to a help call. Pick up the handset to stop the ringing or, if a conversation is in progress, put the interlocutor on hold to stop the alarm tone. - Page 48 The “Alarm block” mode is determined during the installation phase. The default programming provides for the room reset, to guarantee the help intervention. In case of simultaneous help calls, these will be queued and sent according to the order of arrival at the end of each intervention.
-
Page 49: Telephone Services
TELEPHONE SERVICES NSWERING A CALL When the ST800-S console phone rings, to answer the call: Pick up the handset. The status of the handset is shown on the display. NTERNAL CALL If the ST800-S console phone is not ringing and the handset is down, in order to make an internal call: Pick up the handset. -
Page 50: Last Number Dialled
AST NUMBER DIALLED This feature allows you to automatically redial the last telephone number you dialled. The ST800-S console phone must be in idle status. Pick up the handset. Press If the first engagement was in manual mode, the same line will be used. -
Page 51: Park
Press Press Allows you to park an external conversation and retrieve it later on. Parking a line The user must be engaged in a conversation over the external line. Press The external line is put on hold and a call waiting tone will be sent. Retrieving a parked line An external line must be parked. -
Page 52: Dialling With The Handset Down
Dial the desired page number (0..9). The requested phonebook page will be displayed. If the desired number is not in the selected page, press and repeat the operation. Pick up the handset. Dial the number of the desired user (1..5). The name associated to that number will be shown on the display. -
Page 53: Quick Dialling Buttons
UICK DIALLING BUTTONS Allow you to dial ten telephone numbers or service numbers. Pick up the handset. Press the desired button. The name associated to that button will appear on the display. If you programme a number of a subscriber, you must dial 0 as a first digit. -
Page 54: Day/Night Service
NIGHT SERVICE Allows you to select the switchboard operation mode. There are four operation modes: MODE DISPLAY Night Weekend Automatic Symbol and A When in automatic mode, the switchboard will recall the DAY programmes during the day time bands, and the NIGHT programmes during the night time bands. -
Page 55: St800-S Information
ST800-S INFORMATION NFORMATION WINDOW Will display the number of placed calls and the maximum number of calls that can be placed. Press the arrow down button. Press to exit. If you press while the information window is displayed, the report of all the placed outgoing calls will be printed. Each call involves the addition of an entry. -
Page 56: Using Alpt Printer
SING A PRINTER Before printing, make sure that: • The printer is connected to the ST800-S console phone • The printer is on • The printer is ready (i.e. ON-LINE) • The paper is inserted • the ink cartridge is in good conditions If for any reason (e.g. -
Page 57: Error Signalling
RROR SIGNALLING Indications of possible errors that may occur for non-permitted operations, electric problems or full memory. Description Solution and indications Serial error OVERRUN serial error If these problems occur frequently, please contact the FRAME ERROR serial error installer. RXERR serial error CHECKSUM serial error Printer error Make sure the printer is connected correctly. -
Page 58: Printbridge Software
PRINTBRIDGE SOFTWARE The PrintBridge software automatically allows: saving in the PC printing (via the default system printer): information regarding outgoing calls (after every single outgoing call) general reports upon check out. NSTALLATION Insert the installation CD in the CD-ROM unit and wait for the next window to appear. - Page 59 Insert the required information and choose whether the programme can be used by only one or all the users of the computer. Click on Next to continue the installation. Click on Change to install the programme in a different position than that proposed;...
- Page 60 Select the desired type of installation and click on Next to continue the installation. Click on Back to change one of the settings displayed or click on Install to install the programme. Page 60 PRINTBRIDGE SOFTWARE...
-
Page 61: Operation
Click on Finish to end the installation. If the option “Launch the program” is selected, the programme will start automatically and the PrintBridge icon will appear in the toolbar notification area. PERATION PrintBridge will start automatically upon Windows start-up and it will keep running in background. -
Page 62: Settings
If the connection goes through, the message below will be displayed in the toolbar notification area. If the connection does not go through, the message below will be displayed. In that case, check the connection between the ST800-S console phone and the Settings To configure PrintBridge: Right-click on the programme icon in the toolbar notification area. - Page 63 Note: to know in which COM port to connect the ST800-S console phone, check the Ports (COM and LTP) menu in Control panel/ System/Hardware/Device manager while disconnecting and reconnecting the USB cable to the PC. Select Report chiamate (Call reports) to configure the reception of the room check-out reports.
-
Page 64: Displaying Information
Select Chiamate singole (Single calls) to configure the reception of the information that the ST800-S console phone sends at the end of each outgoing call. If you select Salva chiamate singole su file giornaliero (Save single calls in daily file), all the information regarding the single calls are saved every day in a file. -
Page 65: Ce Conformity Declaration
CONFORMITY DECLARATION Esse-ti s.r.l., with registered seat in Zona Ind. Squartabue, I-62019 Recanati (MC), Italy, hereby declares that this device complies with the following standards: • EN50082-1, EN55022 (Electromagnetic compatibility)) • EN41003, EN60950 (Electric safety)) and also with the requirements of the 1999/5/CE Directive issued by the... - Page 66 ST800-S SMILE 08/05/2009 edition...
Need help?
Do you have a question about the ST 800 S and is the answer not in the manual?
Questions and answers