Table of Contents
Advertisement
Available languages
Available languages
Quick Links
Advertisement
Chapters
Table of Contents

Subscribe to Our Youtube Channel
Related Manuals for arcelik 391640 EI


Summary of Contents for arcelik 391640 EI
- Page 1 Refrigerator User Manual 391640 EI...
- Page 2 Lütfen önce bu kılavuzu okuyun! Değerli Müşterimiz, Modern tesislerde üretilen ve titiz kalite kontrol işlemlerinden geçirilen üründen en iyi verimi almanızı istiyoruz. Kullanma kılavuzu ürünü hızlı ve güvenli bir şekilde kullanmanıza yardımcı olur. • Güvenlikle ilgili talimatlara mutlaka uyun. • Daha sonra ihtiyacınız olabileceği için kullanma kılavuzunu kolay ulaşabileceğiniz bir yerde saklayın. • Ürünle birlikte verilen diğer belgeleri de okuyun.
-
Page 3: Table Of Contents
İçindekiler 1 . Güvenlikle ve Çevreyle İlgili Önemli 4 Ön hazırlık Talimatlar 4.1. Enerji tasarrufu için yapılması gerekenler . . 17 1.1. Kullanım amacı ..... . 3 4.2. -
Page 4: Güvenlikle Ve Çevreyle İlgili Önemli Talimatlar
Güvenlikle ve Çevreyle İlgili Önemli Talimatlar Bu kısım, bedensel yaralanma ya da malın Cihazın bu kişilerce kullanımı ancak bu • hasar görmesi riskinden korunmanıza kişilerin güvenliğinden sorumlu birinin yardımcı olacak güvenlik talimatları gözetimi altında gerekli talimatların içermektedir. Bu talimatlara uyulmaması verilmesi durumunda uygundur. - Page 5 Önemli güvenlik ve çevre talimatları Yangın ya da patlama riski • Buzdolabınızı asla elektrik tasarruf • olabileceğinden, ürünün yakınında gazlı cihazlarına bağlamayın. Bu tür sistemler spreyler kullanmayın! ürün için zararlıdır. Yanıcı ve yanıcı gaz ihtiva eden • Kurulum, bakım, temizlik ve onarım •...
-
Page 6: Hidrokarbon (Hc) Uyarısı
Önemli güvenlik ve çevre talimatları Besin kirlenmesinin yaşanmaması için • Ürününüzdeki soğutma lütfen aşağıdaki uyarılara dikkat edin : sistemi R134a gazı Uzun süre kapıların açık kalması • içeriyorsa bu uyarıyı dikkate ürünün içindeki sıcaklığın yükselmesine almayın. sebep olabilir. Ürününüzün üretiminde Gıdayla temas eden ve ulaşılabilir •... -
Page 7: Çocukların Güvenliği
Önemli güvenlik ve çevre talimatları Ürün yalnızca gıda saklamak için bu Direktifte belirtilen zararlı ve yasak • kullanılmalıdır. malzemeleri içermez. Üretici, yanlış kullanımdan ya da • 1.6. Ambalaj Bilgileri nakliyeden kaynaklanan herhangi bir Ürünün ambalaj malzemeleri, • hasarın sorumluluğu üstlenmemektedir. Ulusal Çevre Mevzuatına uygun geri Ürünün satın alma tarihinden itibaren •... -
Page 8: Buzdolabınız
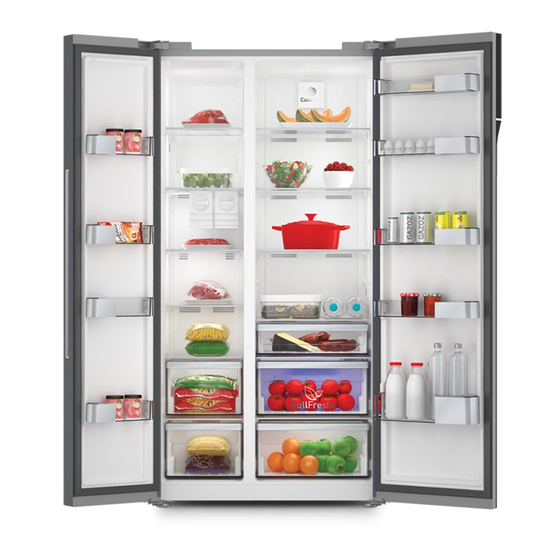
Buzdolabınız 1- Dondurucu bölme 10- Koku filtresi 2- Soğutucu bölme 11- Sıfır derece bölmesi 3- Fan 12- Sebzelikler 4- Tereyağ-peynir bölmesi 13- Ayarlı ayaklar 5- Cam raflar 14- Dondurulmuş yiyecek saklama bölmeleri 6- Soğutucu bölme kapı rafları 15- Dondurucu bölme kapı rafları 7- Minibar aksesuar 16- Buzmatikler 8- Su tankı... -
Page 9: Buzdolabınız
Buzdolabınız *Opsiyonel: Bu kullanım kılavuzunda şekiller şematik olup ürününüzle birebir uyum içinde olmayabilir. Satın almış olduğunuz üründe ilgili parçalar yoksa başka modeller için geçerlidir. Buzdolabı / Kullanma Kılavuzu 8 / 42 TR... -
Page 10: Kurulum
Kurulum 3.1. Kurulum için doğru yer 3.2. Plastik takozların takılması Ürünle duvar arasındaki hava dolaşımını Ürünün kurulumu için Yetkili Servisi arayın. Ürünü sağlayacak mesafe’yi korumak için ürün kullanıma hazır duruma getirmek için, kullanma içerisinden çıkan plastik takozlar kullanılmaktadır. kılavuzundaki bilgilere bakarak elektrik tesisatı ve 1. -
Page 11: Ayakların Ayarlanması
Kurulum 3.3. Ayakların ayarlanması 3.4. Elektrik bağlantısı Ürün, yerleştirdiğiniz yerde dengesiz duruyorsa öndeki ayar ayaklarını sağa veya sola döndürerek UYARI: Uzatma kabloları ya da çoklu ayarlayın. prizlerle bağlantı yapmayın. UYARI: Hasar görmüş elektrik kablosu Yetkili Servis tarafından değiştirilmelidir. İki soğutucu yan yana yerleştiriliyorsa aralarında en az 4 cm boşluk bırakılmalıdır. -
Page 12: Su Bağlantısı
Kurulum 3.5. Su bağlantısı (Bu özellik opsiyoneldir) UYARI: Bağlantı esnasında ürün ve varsa su pompasının fişi çekilmelidir. Ürününüzün, şebeke, filtre ve damacana bağlantıları yetkili servis tarafından yapılmalıdır. Ürününüzü, modeline bağlı olarak bir damacanaya veya doğrudan su şebekesine bağlayabilirsiniz. Bu bağlantıyı yapmak için önce su hortumunu ürüne bağlamanız gerekir. -
Page 13: Su Hortumunun Ürüne Bağlanması
Kurulum 3.6. Su hortumunun 3.7. Şebeke suyuna bağlama ürüne bağlanması (Bu özellik opsiyoneldir) Su hortumunu ürüne bağlamak için Ürünü soğuk su hattına bağlayarak aşağıdaki talimatları uygulayınız. kullanacaksanız, evinizdeki soğuk su şebekesine 1. Ürünün arkasında takılı gelen hortum standart bir 1/2” vana bağlantı elemanı takmanız uçlu adaptördeki rakoru çıkarın, rakoru su gerekir. -
Page 14: Damacana Kullanılacak Ürünler Için
Kurulum 4. Rakoru musluk adaptörüne geçirerek 2. Su hortumunun diğer ucunu pompanın su elle / aletle sıkın. hortumu girişinin içine iterek bağlantıyı yapın. 5. Su hortumunu, zarar görmesini, kaymasını 3. Pompa hortumunu damacananın içine veya yanlışlıkla yerinden çıkmasını önlemek yerleştirerek sabitleyin. için verilen klipslerle uygun yerlere sabitleyin. -
Page 15: Harici Filtrenin Duvara Monte Edilmesi (Bu Özellik Opsiyoneldir)
Kurulum 3.9.1.Harici filtrenin duvara monte 3. Filtreyi üzerindeki etikette belirttiği gibi filtre edilmesi bağlantı aparatına dik şekilde takın. ( 6 ). (Bu özellik opsiyoneldir) UYARI: Filtreyi ürünün üzerine monte etmeyin. Ürününüzün modeline bağlı olarak aşağıdaki parçaların ürünle birlikte gelip gelmediğini kontrol edin: 4. -
Page 16: Dahili Filtre
Kurulum 3.9.2.Dahili filtre 1. Filtre kurulumu için “Ice Off ” (Buz İptal) göstergesi etkin olmalıdır. Ekranda ON - OFF Ürün içinde gelen dahili filtre kurulu olarak göstergeleri arası geçiş “Ice”(Buz) düğmesine gelmediğinden hazırlanması için gerekli işlemler basarak yapılır. aşağıda belirtilmiştir : Su hattı... - Page 17 Kurulum 3. Su filtresi by-pass kapağını kendinize doğru çekerek çıkartın. Kapak çıkarıldıktan sonra birkaç damla suyun gelmesi normaldir. 4. Su filtresinin kapağını mekanizmanın içine oturtup ileri doğru iterek yerine kilitleyin. 5. Ekrandaki “Ice” (Buz ) düğmesine tekrar basarak “Ice Off ” (Buz İptal) modundan çıkın.
-
Page 18: Ön Hazırlık
Ön hazırlık 4.1. Enerji tasarrufu için • Yiyecekleri aşağıdaki şekilde belirtilen soğutucu yapılması gerekenler bölme sıcaklık sensörüne temas ettirmeyin. mehmet Ürünün elektronik enerji tasarruf sistemlerine bağlanması, ürüne zarar verebileceği için sakıncalıdır. • Buzdolabınızın kapılarını uzun süre açık tutmayın. • Buzdolabınıza sıcak yiyecek ya da içecek koymayın. -
Page 19: Ürünün Kullanımı
Ürünün kullanımı 5.1. Gösterge paneli Gösterge panelleri, ürününüzün modeline göre değişiklik gösterebilir. Gösterge panelindeki işitsel ve görsel fonksiyonlar buzdolabınızı kullanmanıza yardımcı olur. 1. Soğutucu bölme göstergesi 2. Hata durumu göstergesi 3. Sıcaklık göstergesi 4. Tatil fonksiyonu düğmesi 5. Sıcaklık ayar düğmesi 6. - Page 20 Ürünün kullanımı 1. Soğutucu bölme göstergesi 6. Soğutucu bölme Soğutucu bölme sıcaklığı ayarlanırken soğutucu Seçim düğmesi soğutucu ve dondurucu bölmeleri bölme ışığı yanar. arasında geçiş yapmak için buzdolabı bölme seçim düğmesine basın. 2. Hata durumu göstergesi 7. Dondurucu bölme göstergesi Buzdolabınız yeterli soğutma yapmıyorsa ya da bir sensör arızası...
- Page 21 Ürünün kullanımı Eco Mode interaction with product/ Display On after any interaction with buttons Yellow: Vacation *Opsiyonel: Bu kullanıcı kılavuzunda yer alan şekiller taslaktır ve ürünle birebir aynı olmayabilir. Satın almış olduğunuz üründe ilgili parçalar yoksa, bunlar başka modeller için geçerlidir. Buzdolabı...
- Page 22 Ürünün kullanımı 1- Elektrik kesintisi/Yüksek sıcaklık / hata uyarısı 3. Hızlı dondurma 2- Dondurucu bölme sıcaklık ayarı Hızlı dondurma işlemi için bu düğmeye basın, hızlı 3- Hızlı dondurma dondurma göstergesi ( )devreye girecektir. 4- Tuş kilidi Hızlı dondurma fonksiyonu açık olduğunda hızlı 5- Tatil fonksiyonu dondur göstergesi yanar ve dondurucu bölme 6- Hızlı...
- Page 23 Ürünün kullanımı 6. Hızlı soğutma Hızlı soğutma fonksiyonu açık olduğunda hızlı soğut ) ve soğutucu bölme sıcaklık gös- göstergesi yanar tergesi değeri 1 olarak görüntülenir. Bu fonksiyonu ip- tal etmek için tekrar Hızlı soğut düğmesine basın. Hızlı soğut göstergesi sönecek ve normal ayarlara geri dö- nülecektir.
- Page 24 Ürünün kullanımı 7.2 7.1 1- Ekonomik kullanım 2- Yüksek sıcaklık / hata uyarısı 3. Enerji tasarrufu (ekran kapalı) 4- Hızlı soğutma 5- Tatil fonksiyonu 6- Soğutucu bölme sıcaklık ayarı 7- Enerji tasarrufu (ekran kapalı)/Alarm off uyarısı 8- Tuş kilidi 9- Eko fuzzy 10- Dondurucu bölme sıcaklık ayarı...
- Page 25 Ürünün kullanımı 1. Ekonomik kullanım sıcaklık göstergesinde "- -" ibaresi görünür ve Bu simge, en ekonomik ayar değerleri olarak soğutucu bölmesinde hiçbir aktif soğutma işlemi dondurucu bölme -18°C'ye ayarlandığında yanar. gerçekleştirilmez. Bu fonksiyonda, yiyeceklerinizi ) Hızlı soğut veya hızlı dondur fonksiyonları soğutucu bölmesinde tutmanız uygun değildir.
- Page 26 Ürünün kullanımı ekonomik kullanım göstergesi yanacaktır.( Eko fuzzy fonksiyonunu devre dışı bırakmak için eko fuzzy fonksiyonu düğmesine 3 saniye boyunca basılı tutun. Bu gösterge eko fuzzy fonksiyonu aktifken 6 saat sonra yanar. 10. Dondurucu bölme sıcaklık ayarı Dondurucu bölme için sıcaklık ayarı yapılır.(9) numaralı...
- Page 27 Ürünün kullanımı 11.2 11.1 1. Dondurucu bölmesi sıcaklık ayarı 2. Ekonomi modu 3. Enerji tasarrufu (ekran kapalı) 4. Hata durumu 5. Soğutucu bölme sıcaklık ayarı 6. Hızlı soğutma 7. Tatil fonksiyonu 8. Tuş kilidi / filtre değişimi uyarısı iptal 9. Su, kırılmış buz, buz küpleri seçim 10.
- Page 28 Ürünün kullanımı 1. Dondurucu bölmesi sıcaklık ayarı 5. Soğutucu bölme sıcaklık ayarı (1) numaralı düğmeye basıldığında ( Düğmeye ( ) basıldığında soğutucu bölme dondurucu bölme sıcaklığı -18,-19,-20,-21,-22,- sıcaklığı sırayla 8,7,6,5,4,3,2... değerlerine 23,-24,-18... değerlerine ayarlanabilir. ayarlanabilir. 2. Ekonomi modu 6. Hızlı soğutma Buzdolabının, enerji tasarruf modunda çalıştığını...
-
Page 29: Nem Kontrollü Sebzelik
Ürünün kullanımı 5.2. Nem kontrollü sebzelik 10. Buz yapma açma/kapatma Düğmeye ( ) basarak , buz yapma iptal edilebilir (FreSHelf) ) veya aktifleştirebilir (Bu özellik opsiyoneldir) Nem kontrollü sebzelik özelliği ile sebze ve 11. 1 Ekran açma/kapatma meyvelerin nem oranları kontrol altında tutulmakta Düğmeye basarak , ekran açma/kapama iptal ve gıdaların daha uzun süre taze kalmaları... -
Page 30: Su Filtresi Değişim Uyarısının Aktiflenmesi
Ürünün kullanımı 5.3. Su filtresi değişim uyarısının aktiflenmesi (Şebeke suyu bağlantısı yapılan ve filtre kullanılan ürünler için) Su filtresi değişim uyarısı aşağıda verildiği gibi ayarlanır. Otomatik filtre süresi hesaplama fonksiyonu fabrika çıkışında etkin değildir. Filtre kullanılan ürünlerde etkinleştirilmesi gerekir. Buzdolabında kullandığımız S4 display kartı dokuzlu tuş sistemine sahiptir. Displayde set değerleri gösterilmektedir. - Page 31 Ürünün kullanımı 2 k ez b asılır 1 k ez b asılır PS 0 ekranı tekrar görüldükten sonra buzdolabının enerjisi kesilip tekrar verilir.Filtre sayacı aktiflenmiş olur.130 gün sonra PS 0 ekranı tekrar görüldükten sonra buzdolabının enerjisi kesilip tekrar verilir.Filtre sayacı aktiflenmiş olur.130 gün sonra displayde filtre uyarı...
-
Page 32: Su Pınarının Kullanılması
Ürünün kullanımı 5.4. Su pınarının kullanılması 5.5. Su pınarının su deposunun doldurulması (bazı modellerde) Şekilde gösterildiği gibi su deposunun kapağını açın. Saf ve temiz içme suyunu doldurun. Kapağı kapatın. Pınardan alınan ilk birkaç bardak suyun ılık olması normaldir. Su pınarı uzun süre kullanılmamışsa, temiz su elde etmek için ilk birkaç... -
Page 33: Su Deposunun Temizlenmesi
Ürünün kullanımı 5.6. Su deposunun temizlenmesi Kapı rafı içindeki su doldurma haznesini çıkarın. Su deposunu her iki tarafından tutarak 45 ∘ derece Kapı rafını her iki tarafından tutarak yerinden çıkarın. açı ile yerinden çıkarın. Su deposu kapağını çıkararak temizleyin. Su deposuna su dışında, meyve suyu, karbonatlı... -
Page 34: Buz / Su Alınması
Ürünün kullanımı 5.7. Buz / su alınması • Filtrenin ilk kez kulanıldığı durumlarda su bulanık gelebilir. İlk 10 bardak su (Bu özellik opsiyoneldir) tüketilmemelidir. Su ( ) / küp buz ( ) / kırık buz ( ) almak • Ürün ilk kurulduğunda, suyun soğuması için için ekranı... -
Page 35: Sıfır Derece Bölmesi
Ürünün kullanımı 5.9. Sıfır derece bölmesi 5.12. İyonizer (Bu özellik opsiyoneldir) (Bu özellik opsiyoneldir) Bu bölmeyi daha düşük sıcaklıkta saklanması Hava, soğutucu bölme hava kanalındaki iyonlaştırıcı gereken şarküteri ürünlerini veya hemen sistem sayesinde iyonlaşır. Bu şekilde kötü kokular tüketeceğiniz et ürünlerini saklamak için kullanın. ortadan kaldırılmış... -
Page 36: Buzmatik Ve Buz Saklama Kabı
Ürünün kullanımı 5.15. Buzmatik ve buz 5.16. Buzmakinası saklama kabı (Bu özellik opsiyoneldir) (Bu özellik opsiyoneldir) Buz makinası grubu dondurucu kapının üst Buzmatiği su ile doldurup yerine koyunuz. kısmında bulunur. Yaklaşık iki saat sonunda buzlarınız hazırdır. Buz stok haznesi grubunu yandaki tutamaklardan Buz almak için buzmatiği yerinden çıkarmayı- tutarak yukarı... - Page 37 Ürünün kullanımı Buzların hazneye düşerken çıkardıkları ses normal Buz makinesini ilk defa kullanırken veya uzun çalışma gereğidir. zaman kullanılmadıktan sonra kullanılırken Buzların tamamının alınamaması durumunda Buzlar su sisteminde kalan havadan dolayı küçük Buz küpleri uzun bir süre alınmadığında, birbirlerine gelebilir. İçerdeki hava bir süre kullanımdan sonra yapışarak büyük buz kütleleri oluşmasına neden olabilir.
-
Page 38: Taze Yiyeceklerin Dondurulması
Ürünün kullanımı 5.17. Taze yiyeceklerin dondurulması 5.18. Donmuş gıdaların saklanmasıyla ilgili tavsiyeler • Gıdaların kalitesinin korunabilmesi için dondurucu bölmeye konulduğunda mümkün Bölüm en az -18°C dereceye ayarlı olmalıdır. olduğunca hızlı dondurulmalıdır, bunun için hızlı 1. Ürünleri satın aldıktan sonra çözülmesine dondurma özelliğini kullanın. -
Page 39: Gıdaların Yerleştirilmesi
Ürünün kullanımı 5.21. Kapı açık uyarısı Sebzelerin dondurulmuş halde depolama sürelerini uzatmak için haşlayın ve suyunu süzün. Süzdükten (Bu özellik opsiyoneldir) sonra hava geçirmeyen ambalajlara koyun ve Ürününüzün kapısı 1 dakika süre açık kaldığında dondurucuya yerleştirin. Muz, domates, marul, uyarı sesi duyulur. Kapı kapatıldığında veya varsa, kereviz, haşlanmış... -
Page 40: Bakım Ve Temizlik
Bakım ve temizlik Ürünün düzenli temizlenmesi halinde kullanım 6.1. Kötü Kokuların Önlenmesi ömrü uzar. Ürününüzün üretiminde kokuya neden olacak hiçbir madde kullanılmamaktadır. Ancak uygun olmayan UYARI: Buzdolabınızı temizlemeden yiyecek saklamaya ve ürün iç yüzeyinin gerektiği önce elektrik bağlantısını kesin. şekilde temizlenmemesine bağlı olarak koku ortaya • Temizlik için keskin ve aşındırıcı... -
Page 41: Sorun Giderme
Sorun Giderme Servis çağırmadan önce, bu listeyi gözden geçirin. • Kapı çok sık açılıp kapanmıştır. >>> Ürünün Bunu yapmak sizi zaman ve para kaybından kurtarır. kapısını çok sık açıp kapamamaya dikkat edin. Bu liste sık rastlanabilecek, hatalı işçiliğe ya da • Ortam çok nemlidir. - Page 42 Sorun giderme • Soğutucu bölme sıcaklığı çok düşük bir değere • Yeni ürün, eskisinden daha geniş olabilir. Daha ayarlanmıştır. >>> Soğutucu bölme sıcaklığını büyük ürünler daha uzun süre çalışır. daha yüksek bir değere ayarlayıp kontrol edin. • Oda sıcaklığı yüksek olabilir. >>> Sıcak Soğutucu ya da dondurucudaki sıcaklık çok ortamlarda daha uzun süre çalışması...
- Page 43 Sorun giderme • Havanın sıcak ve nemli olması buzlanmayı • Ürününüz çalışırken, iki kapı arasında, yan ve yoğunlaşmayı artırır. Bu normaldir ve bir arıza panellerde ve arka ızgara bölgesinde yüksek değildir. sıcaklık görülebilir. Bu normal bir durumdur ve • Kapılar sık açılmış ya da uzun süre açık herhangi bir servis ihtiyacı...
-
Page 44: Müşteri Hizmetleri
* Faks Numaramız: 444 0 888 0216-423-2353 (Sabit telefonlardan veya cep * Web Adresimiz: telefonlarından www.arcelik.com.tr alan kodu çevirmeden arayın*) * e-posta Adresimiz: * Diğer Numaramız - musteri.hizmetleri@arcelik.com 0216 585 8 888 * Sosyal Medya Hesaplarımız: - Çağrı Merkezimiz haftanın 7 günü 24 https://www.instagram.com/arcelik/ saat hizmet vermektedir. https://twitter.com/arcelik - Çağrı Merkezimiz ile yaptığınız görüşmeler iletişim hizmeti aldığınız https://www.facebook.com/arcelik/ operatör firma tarafından sizin için https://www.youtube.com/user/tvarcelik... - Page 45 Hizmet talebinin değerlendirilmesi Müșteri Bașvurusu Web sitesi 444 0 888 Yetkili Servis musteri.hizmetleri Yetkili Satıcı Faks @arcelik.com Çağrı merkezi 0216 423 23 53 Bașvuru kaydı Bașvuru Konusu Müșteri Adı, Soyadı Müșteri Telefonu Müșteri Adresi Hizmet talebinin alınması - Hizmet talebi analizi - Hizmet hakkında müșterinin bilgilendirilmesi...
- Page 47 Please read this manual before using the product! Dear Customer, We'd like you to make the best use of our product, which has been manufactured in modern facilities with care and meticulous quality controls. Thus, we advice you to read the entire user manual before you use the product. In case the product changes hands, do not forget to hand the guide to its new owner along with the product.
- Page 48 Table of Contents 1. Safety and environment instructions 3 4 Preparation 1.1. General safety..... . . 3 4.1. What to do for energy saving ... 17 1.1.1 HC warning .
-
Page 49: Safety And Environment Instructions
Safety and environment instructions – staff kitchen areas in shops, This section provides the safety offices and other working instructions necessary to prevent environments; the risk of injury and material – farm houses and by clients damage. Failure to observe these in hotels, motels and other instructions will invalidate all residential type environments;... - Page 50 Safety and environment instructions the authorised service before Unplug the product during • doing anything. installation, maintenance, Plug the product into an cleaning and repair. • earthed socket. Earthing If the product will not be used • must be done by a qualified for a while, unplug the product electrician.
-
Page 51: Hc Warning
Safety and environment instructions 1.1.2 For models with The handle may come off. water dispenser Take care to avoid trapping any • part of your hands or body in Pressure for cold water inlet • any of the moving parts inside shall be maximum 90 psi (6.2 the product. -
Page 52: Child Safety
Safety and environment instructions Do not keep sensitive 1.5. Compliance with RoHS Directive • products requiring controlled • This product complies with EU WEEE Directive (2011/65/EU). It does temperatures (vaccines, not contain harmful and prohibited heat sensitive medication, materials specified in the Directive. medical supplies, etc.) in the 1.6. -
Page 53: Refrigerator
Refrigerator 1- Freezer compartment 10- Odour filter 2- Cooler compartment 11- Zero degree compartment 3- Fan 12- Vegetable bins 4- Butter-cheese compartment 13- Adjustable stands 5- Glass shelves 14- Frozen food storing compartments 6- Cooler compartment door shelves 15- Freezer compartment door shelves 7- Minibar accessory 16- Icematics 8- Water tank... -
Page 54: Refrigerator
Refrigerator *Optional: Figures in this user guide are schematic and may not be exactly match your product. If your product does not comprise the relevant parts, the information pertains to other models. Refrigerator / User Guide 8 / 42 EN... -
Page 55: Installation
Installation 3.1. Right place for installation 3.2. Attaching the plastic wedges Use the plastic wedges in the provided with Contact the Authorized Service for the product's the product to provide sufficient space for air installation. To ready the product for installation, circulation between the product and the wall. -
Page 56: Adjusting The Stands
Installation 3.3. Adjusting the stands In order to adjust the doors vertically, If the product is not in balanced position, adjust the •Loosen the fixing nut at the bottom front adjustable stands by rotating right or left. •Screw adjusting nut (CW/CCW) according to the position of the door •Tighten the fixing nut for the final position In order to adjust the doors horizontally, • Loosen the fixing bolt on the top • Screw the adjusting bolt (CW/CCW) on the side according to the position of the door... -
Page 57: Water Connection
Installation 3.5. Water connection (Optional) WARNING: Unplug the product and the water pump (if available) during connection. The product’s water mains, filter and carboy connections must be rendered by authorizer service. The product can be connected to a carboy or directly to the water mains, depending on the model. -
Page 58: Connecting Water Hose To The Product
Installation 3.6. Connecting water 3.7. Connecting to water mains hose to the product (Optional) To connect the water hose to the product, To use the product by connecting to the cold water follow the instructions below. mains, a standard 1/2” valve connector must be 1. -
Page 59: For Products Using Water Carboy
Installation 4. Attach the connector into the faucet adaptor 2. Connect the other end of the water hose to and tighten by hand / tool. the water pump by pushing the hose into the pump’s hose inlet. 5. To avoid damaging, shifting or accidentally 3. -
Page 60: Fixing External Filter On The Wall (Optional)
Installation 3.9.1.Fixing external filter on the wall (Optional) WARNING: Do not fix the filter on the product. Check to see the following parts are supplied with your product’s model: 4. Attach the water hose extending from the top of the filter to the product’s water connection adaptor, (see 3.6.) 1. -
Page 61: Internal Filter
Installation 3.9.2.Internal filter 1. “Ice Off” indicator must be active while installing the filter. Switch the ON-OFF The internal filter provided with the product is not indicator using the “Ice” button on the screen. installed upon delivery; please follow the instructions below to install the filter. - Page 62 Installation 3. Remove the water filter by-pass cover by pulling. A few drops of water may flow out after removing the cover; this is normal. 4. Place the water filter cover into the mechanism and push to lock in place. 5.
-
Page 63: Preparation
Preparation 4.1. What to do for energy saving 4.2. First Use mehmet Before using your refrigerator, make sure the Connecting the product to electronic necessary preparations are made in line with energy-saving systems is harmful, as it the instructions in “Safety and environment may damage the product. -
Page 64: Using The Product
Using the product 5.1. Indicator panel Indicator panels may vary depending on the model of your product. Audial and visual functions of the indicator panel will assist in using the refrigerator. 1. Cooler compartment indicator 2. Error status indicator 3. Temperature indicator 4. - Page 65 Using the product 1. Cooler compartment indicator Push the Vacation button ( ) again to cancel The cooler compartment light will turn on when this function. adjusting the cooler compartment temperature. 5. Temperature adjustment button 2. Error status indicator Respective compartment's temperature varies in This sensor will activate if the refrigerator is not -24°C..
- Page 66 Using the product Eco Mode interaction with product/ Display On after any interaction with buttons Yellow: Vacation *Optional: The figures in this user guide are intended as drafts and may not perfectly match your product. If your product does not comprise the relevant parts, the information pertains to other models. Refrigerator / User Guide 20 / 42 EN...
- Page 67 Using the product 1- Power failure/High temperature / error compartment to -18, -19, -20, -21, -22, -23 and warning -24. 2- Freezer compartment temperature setting 3. Quick freeze 3- Quick freeze Press this button for quick freeze operation, the 4- Key lock 5- Vacation function quick freeze indicator ( ) will be activated.
- Page 68 Using the product fridge function is cancelled automatically in 1 hour if you do not cancel it. If you want to cool large amounts of fresh food, press the Quick fridge button before putting the food into the fridge compartment. 7.
- Page 69 Using the product 7.2 7.1 1. Economic use 2- High temperature / fault alert 3. Energy saving function (display off) 4- Rapid cooling 5- Vacation function 6- Cooler compartment temperature setting 7. Energy saving (display off) /Alarm off 8- Keypad lock 9- Eco-fuzzy 10- Freezer compartment temperature setting 11- Rapid freezing...
- Page 70 Using the product 1. Economic use 5. Vacation function This sign will light up when the freezer To activate the Vacation function, , press the quick compartment is set to -18°C', the most fridge button for 3 seconds; this will activate the economical setting.
- Page 71 Using the product 9. Eco-fuzzy To activate the eco-fuzzy function, press and hold the eco-fuzzy button for 1 second. When this function is active, the freezer will switch to the economic mode after at least 6 hours and the economic use indicator will light up. To deactivate the ( ) eco-fuzzy function, press and hold the eco-fuzzy function button for 3 seconds.
- Page 72 Using the product 11.2 11.1 1. Freezer compartment temperature setting 2. Economy mode 3. Energy saving function (display off) 4. Power failure/High temperature / error warning indicator 5. Cooler compartment temperature setting 6. Rapid cooling 7. Vacation function 8. Keypad lock / filter replacing alert cancellation 9.
- Page 73 Using the product 1. Freezer compartment temperature setting Use this function when placing fresh foods into the cooler compartment or to rapidly cool the Pressing the button ( ) will enable the freezer food items. When this function is activated, the compartment temperature to be set at -18,-19,- refrigerator will be engaged for 1 hour.
-
Page 74: Humidity Controlled Crisper
Using the product 11.2 Alarm off warning 5.2. Humidity controlled crisper In case of power failure/high temperature alarm, (FreSHelf) after checking the food located in the freezer compartment press the alarm off button to clear (This feature is optional) the warning. Humidity rates of the vegetables and fruit are 12. -
Page 75: Activating Water Filter Change Warning
Using the product 5.3. Activating water filter change warning (For products connected to the mains water line and equipped with filter) Water filter change warning is activated as follows: Automatic filter usage time calculation is not enabled ex factory. It must be enabled in products equipped with a filter. The S4 display board we use in the refrigerator has a nine-key system. - Page 76 Using the product Press twice Press once “Upon seeing PS 0 screen, de-energise the refrigerator and energise it again. This way, the filter counter will be activated. The filter warning LED will be active on the display in 130 days. After replacing the filter with a new one, press the Key Lock button for 3 seconds to make the filter counter to count down from 130 days.
-
Page 77: Using The Water Fountain
Using the product 5.4. Using the water fountain 5.5. Filling the fountain water tank Open the water tank’s lid, as shown in the figure. (for certain models) Fill in pure and clean drinking water. Close the lid. The first few glasses of water taken from the fountain will normally be warm. -
Page 78: Cleaning The Water Tank
Using the product 5.6. Cleaning the water tank Remove the water filling reservoir inside the door shelf. Detach by holding both sides of the door shelf. Hold both sides of the water tank and remove at 45° angle. Remove and clean the water tank lid. Do not fill the water tank with fruit juice, fizzy beverages, alcoholic beverages or any other liquids incompatible for use in... -
Page 79: Taking Ice / Water
Using the product 5.7. Taking ice / water • The water may be cloudy during first use of the filter; do not consume the first 10 glasses (Optional) of water. To take water ( ) / ice cube ( ) / fragmented • You must wait approximately 12 hours to get ice ( ), use the display to select the respective... -
Page 80: Zero Degree Compartment
Using the product 5.9. Zero degree compartment 5.12. Ionizer (Optional) (Optional) Use this compartment to keep delicatessen The ionizer system in the cooler compartment's at lower temperatures or meat products for air duct serves to ionize the air. The negative immediate consumption. -
Page 81: Icematic And Ice Storage Box
Using the product 5.16. Ice-maker 5.15. Icematic and ice storage box (Optional) (Optional) Ice maker is located on the upper section of the Fill the icematic with water and put in place. freezer cover. The ice will be ready after approximately two hours. - Page 82 Using the product When the ice dispenser does not work properly If you do not remove ice cubes for a long time, they will cause formation of ice chunks. In this case, please remove the ice stock reservoir in accordance with the ...
- Page 83 Using the product While taking broken Ice, cubed ice may come first. There is a case of coming cubed ice while taking broken ice. Freezer door on front of the ice machine can create a light snow and film layer. This is normal, it is recommended to clean without waiting for a long time.
-
Page 84: Freezing Fresh Food
Using the product 5.17. Freezing fresh food 5.18. Recommendations for storing frozen foods • To preserve food quality, the food items placed in the freezer compartment must be frozen as The compartment must be set to at least -18°C. quickly as possible, use the rapid freezing for 1. -
Page 85: Placing The Food
Using the product The lamp(s) used in this appliance is not suitable 5.20. Placing the food for household room illumination. The intended Freezer Various frozen goods including purpose of this lamp is to assist the user to place compartment meat, fish, ice cream, foodstuffs in the refrigerator/freezer in a safe and shelves vegetables etc. -
Page 86: Maintenance And Cleaning
Maintenance and Cleaning Cleaning the product regularly will prolong its 6.1. Preventing Bad Odour service life. The product is manufactured free of any odorous materials. However, keeping the food in WARNING: Disconnect the power inappropriate sections and improper cleaning of before cleaning the refrigerator. -
Page 87: Troubleshooting
Troubleshooting Check this list before contacting the service. Doing so will save you time and money. This list includes frequent complaints that are not related to faulty workmanship or materials. Certain features mentioned herein may not apply to your product. The refrigerator is not working. - Page 88 Troubleshooting • The freezer compartment temperature is set to a very low degree. >>> Set the freezer compartment temperature to a higher degree and check again. The cooler temperature is very low, but the freezer temperature is adequate. • The cooler compartment temperature is set to a very low degree. >>> Set the freezer compartment temperature to a higher degree and check again.
- Page 89 Troubleshooting • The product is not cleaned regularly. >>> Clean the interior regularly using sponge, warm water and carbonated water. • Certain holders and packaging materials may cause odour. >>> Use holders and packaging materials without free of odour. • The foods were placed in unsealed holders. >>> Keep the foods in sealed holders. Micro-organisms may spread out of unsealed food items and cause malodour.
- Page 90 391640 EI 57 8135 0000/AH TR-EN...
Need help?
Do you have a question about the 391640 EI and is the answer not in the manual?
Questions and answers