Table of Contents
Advertisement
Quick Links
Advertisement
Table of Contents

Related Manuals for arcelik 5845 NFEY


Summary of Contents for arcelik 5845 NFEY
- Page 1 5845 NFEY 8541 NFEY 5850 NFY 5847 NFEY...
- Page 2 Please read this user manual first! Dear Customer, We hope that your product, which has been produced in modern plants and checked under the most meticulous quality control procedures, will provide you an effective service. Therefore, read this entire user manual carefully before using the product and keep it as a reference.
-
Page 3: Table Of Contents
CONTENTS 1 Your Refrigerator 4 Preparation 2 Important Safety 5 Using your refrigerator 15 Warnings Indicator Panel .........15 Temperature setting button ....24 Intended use ........4 Setting the temperature of your General safety ........4 refrigerator ........24 For products with a water dispenser; .8 Dual cooling system ......24 Child safety ........9 Recommendations for preservation of... -
Page 4: Your Refrigerator
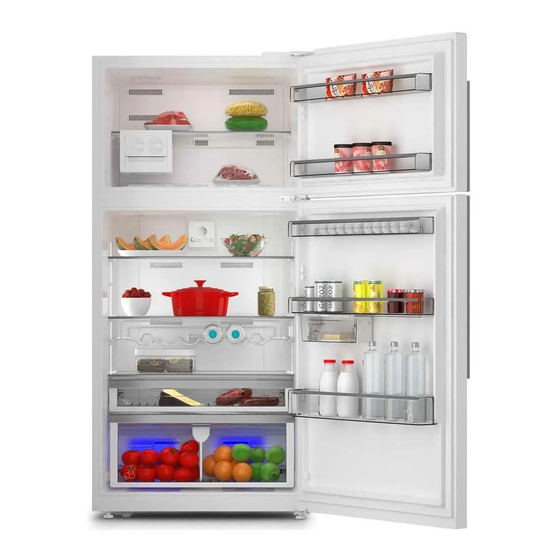
Your Refrigerator Door shelves of the freezer compartment Odor filter Temperature setting indicator Glass shelves of fridge compartment Egg section Illumination glass Water dispenser filling tank Impeller Water dispenser reservoir Automatic Icematic water tank Door shelves of fridge compartment Icebox Sliding and rotary storage containers Ice storage container Blue light... -
Page 5: Important Safety Warnings
Important Safety Warnings • When you want to Please review dispose/scrap the following information. product, we recommend Failure to observe this you to consult the information may cause authorized service injuries material in order to learn the damage. Otherwise, all required information and warranty reliability... - Page 6 • Do not touch frozen food and eye injuries. by hand; they may stick • Do not cover or block to your hand. the ventilation holes on • Unplug your refrigerator your refrigerator with any material. before cleaning or defrosting. • Electrical devices must be repaired by only • Vapor and vaporized...
- Page 7 other than those • Contact authorized recommended by the service when there is a manufacturer. power cable damage to avoid danger. • This product is not intended to be used by • Never plug the persons with physical, refrigerator into the wall sensory or mental outlet during installation.
- Page 8 • This operation manual to avoid fire and should be handed in to explosion risk. the new owner of the • Never place containers product when it is given filled with water on top to others. of the refrigerator; in the • Avoid causing damage event of spillages, this on power cable when...
-
Page 9: For Products With A Water Dispenser
• The plug's tip should be cleaned regularly with a dry cloth; otherwise, it may cause fire. • Refrigerator may move if adjustable legs are not properly secured on the floor. Properly securing adjustable legs on the floor can prevent the refrigerator to move. -
Page 10: Child Safety
seek a professional Package information support.Use drinking Packaging materials of the product water only. manufactured from recyclable materials in accordance with our National • Use only potable water. Environment Regulations. Do not dispose of the packaging materials together with Child safety the domestic or other wastes. -
Page 11: Recommendations For The Fresh Food Compartment
Recommendations for the • Do not install your refrigerator under direct sunlight or near heat emitting appliances fresh food compartment such as ovens, dishwashers or radiators. *optional Keep your refrigerator at least 30cm away from heat emitting sources and at least Do not allow the food to touch the 5cm from electrical ovens. -
Page 12: Installation
Installation In case the information which are given in the user manual are not taken into account, manufacturer will not assume any liability for this. Points to be paid attention to when the relocation of the refrigerator Your refrigerator should be unplugged.Before transportation of your refrigerator, it should be emptied and cleaned. -
Page 13: Disposing Of The Packaging
Placing and Installation • The voltage stated on the label located at left inner side of your product should be If the entrance door of the room where equal to your network voltage. the refrigerator will be installed is not wide Extension cables and multi plugs •... -
Page 14: Adjusting The Legs
Adjusting the legs Changing the illumination lamp If your refrigerator is unbalanced; You can balance your refrigerator by To change the Bulb/LED used for turning its front legs as illustrated in the illumination of your refrigerator, call your figure. The corner where the leg exists is Authorized Service. -
Page 15: Preparation
Preparation • Your cooler/freezer should be installed at • This product has been designed to least 30 cm away from heat sources such function at ambient temperatures up to as hobs, ovens, central heater and stoves 43 °C (90 SDgrF). Even if the ambient and at least 5 cm away from electrical temperature falls to -15 °C, frozen food ovens and should not be located under... -
Page 16: Using Your Refrigerator
Using your refrigerator Indicator Panel Indicator panels may vary depending on your product's model. The Indicator panel aids in using your refrigerator with its audio and visual functions. (in some models) Freezer Compartment Temperature Setting Indicator Freezer Compartment Temperature Setting Button Fridge Compartment Temperature Setting Indicator Fridge Compartment Temperature... - Page 17 1. Freezer Compartment Temperature Setting Indicator Indicates the temperature set for freezer compartment. 2. Freezer Compartment Temperature Setting Button Press this button to set the temperature of the freezer compartment to -18, -20, -22, -24, -18... respectively. Press this button to set the desired temperature for the freezer compartment.
- Page 18 Freezer Compartment Temperature Economic Usage Indicator Setting Button Quick Fridge Function Indicator Fridge Compartment Temperature Setting Quick Fridge Function Button Button Fridge Compartment Temperature Setting Error Status Indicator Indicator Key Lock indicator Quick Freeze Function Button Icematic Eco Extra Function Indicator On-Off Button (3") Eco Extra / Vacation Button Freezer Compartment Temperature...
- Page 19 1. Freezer Compartment Temperature Press the relevant button again to Setting Button deactivate this function. This function allows you to set the 6. Eco Extra/Vacation Button temperature of freezer compartment. Press Press this button briefly to activate the Eco this button to set the temperature of the Extra function.
- Page 20 15. Quick Freeze Function Indicator If you do not cancel it, Quick Fridge will This symbol flashes in an animated style cancel itself automatically after 4 hours or when the Fast Freeze function is active. when the fridge compartment reaches to the required temperature.
- Page 21 Eco-Fuzzy (Special Economic Usage) Freezer Compartment Temperature Indicator Setting Indicator Vacation Function Freezer Compartment Temperature Vacation Function Indicator Setting Function Energy Efficiency Function Quick Freeze Function Button Icematic On-Off Button (3”) Energy Efficiency Indicator Key Lock Function Quick Freeze Function Indicator Fridge Compartment Temperature Setting Key Lock indicator Indicator...
- Page 22 1. Freezer Compartment Temperature 6. Fridge Compartment Temperature Indicator Setting Function Indicates the temperature set for Freezer function allows you to set the fridge Compartment. compartment’s temperature. Press this button to set the temperature of the fridge 2.Freezer Compartment Temperature compartment to 8, 7, 6, 5, 4, 3, 2 degrees, Setting Function respectively.
- Page 23 10. Eco-Fuzzy (Special Economic 14. Energy Saving Indicator Usage) Indicator This indicator illuminates when Energy This symbol illuminates when the Eco- Efficiency Function is selected. Fuzzy Function is active. 15. Key Lock Function 11. Vacation Function When you press and hold Key Lock Press and hold Eco Fuzzy button for 3 button for 3 seconds, Key Lock Function seconds to activate Vacation Function and...
- Page 24 When the Ice Cream process is completed, the symbols start to flash and an audio warning is given. All Ice Cream symbols will turn off after this 5-minute warning. Just press the Ice Cream button briefly to terminate the audio warning; Ice Cream buttons will turn off too.
-
Page 25: Temperature Setting Button
Dual cooling system *Optional Your refrigerator is equipped with two separate cooling systems to cool the fresh food compartment freezer compartment. Thus, air in the fresh food compartment and freezer compartment do not get mixed. Thanks to these two separate cooling systems, cooling speed is much higher than other refrigerators. -
Page 26: Recommendations For Preservation Of Frozen Food
• Frozen food must be used immediately 2. Do not freeze too large quantities of after they are thawed and they should food at one time. The quality of the food never be re-frozen. is best preserved when it is frozen right through to the core as quickly as possible. • Please observe the following instructions to obtain the best results. -
Page 27: Deep-Freeze Information
Materials to be used for packaging the Fridge Food in pans, foodstuff must be tear-proof and resistant compartment covered plates and to cold, humidity, dour, oils and acids. shelves closed containers Foodstuff to be frozen should not be allowed to come in contact with the previously frozen items to prevent their Small and packaged Door shelves... -
Page 28: Description And Cleaning Of Odor Filter
Description and cleaning of Breakfast Compartment odor filter Because products such as fish, red meat, chicken mean, and dairy products *optional such as cheese, yoghurt and milk need Odor filter prevents unpleasant odor build- to be kept in an ambient a few degrees up in your refrigerator. -
Page 29: Water Dispenser
Water Dispenser Filling the water dispenser's tank Water tank filling reservoir is located inside *optional the door rack. You can open the reservoir Water dispenser is a very useful feature cover and fill it with potable water. And then, based on reaching cold water without close the lid. -
Page 30: Cleaning The Water Tank
• Use clean drinking water only. • Capacity of the water tank is 3 liters; do not overfill. • Push the arm of the water dispenser with a rigid glass. If you are using disposable plastic glasses, push the arm with your fingers from behind the glass. Cleaning the water tank • Remove the water filling reservoir inside the door rack. • Remove the door rack by holding from both sides. • Grab the water tank from both sides and remove it with an angle of 45°C. -
Page 31: Blue Light
Blue light Water tray Water that dripped while using the water *optional dispenser accumulates in the spillage tray. Take out the plastic strainer as shown in Foodstuff stored in the crispers that are the figure. enlightened with a blue light continue their With a clean and dry cloth, remove the photosynthesis by means of the wavelength water that has accumulated. -
Page 32: Rotary Storage Container
Rotary storage container (in some models) Sliding body shelf can be moved to left or right in order to allow you place the tall bottles, jars or boxes to the lower shelf (Fig. You can reach the food that you have placed into the shelf by grabbing and turning it from its right edge (Fig.2). -
Page 33: Auto Icematic
Auto Icematic *optional The Auto Icematic allows you to make ice in the fridge easily. Remove the water tank in the fridge compartment, fill it wilt water and install it back to obtain ice from the Icematic. First ice cubes will be ready in approximately 2 hours in the Icematic drawer located in the freezer compartment. -
Page 34: Icematic And Ice Storage Container
Icematic and ice storage container *optional Using the Icematic Fill the Icematic with water and place it into its seat. Your ice will be ready approximately in two hours. Do not remove the Icematic from its seating to take ice. Turn the knobs on the ice reservoirs clockwise by 90 degrees. -
Page 35: Making Ice
Making ice Humidity-controlled crisper (Ever Fresh) *optional Fill the ice container with water and place *optional it into the freezer compartment. Your ice will Humidity rates of the vegetables and fruit be ready approximately in two hours. are kept under control with the feature of You can remove the ice in the ice container humidity-controlled crisper and the food is by removing it from the freezer and twisting... - Page 36 Never block the air vents which are located Do not place together the pear, apricot, in front of the slide flaps on the front side of peach, etc. and apple in particular which the crisper cover. have a high level of generation of ethylene gas in the same crisper with the other To prevent condensation, vegetables vegetables and fruit.
-
Page 37: Ice-Cream Machine
Ice-cream machine *optional • Open the freezer compartment of the refrigerator, • Push and release open the cover of the ice-cream making compartment in the freezer compartment, • The ice-cream mix which will be placed in the ice cream boxes must not exceed the amount stated in the ice cream recipes. If more ice cream mix is placed in the boxes than indicated in the recipe, it will overflow. - Page 38 • Close the cover of the ice-making compartment, push and release to lock it. • Close the door of the freezer compartment. You can determine the ice cream mode from the ice cream recipe book. Set the ice cream mode depending on the ice cream type from the display on the door. Do not wash the ice cream making container in the dishwasher.
-
Page 39: Maintenance And Cleaning
Maintenance and cleaning Protection of plastic Never use gasoline, benzene or similar surfaces substances for cleaning purposes. We recommend that you unplug the Do not put the liquid oils or oil-cooked appliance before cleaning. meals in your refrigerator in unsealed containers as they damage the plastic Never use any sharp abrasive instrument, surfaces of your refrigerator. -
Page 40: Troubleshooting
Troubleshooting Please review this list before calling the service. It will save your time and money. This list includes frequent complaints that are not arising from defective workmanship or material usage. Some of the features described here may not exist in your product. The refrigerator does not operate. - Page 41 • New product may be wider than the previous one. Larger refrigerators operate for a longer period of time. • The room temperature may be high. >>>It is normal that the product operates for longer periods in hot ambient. • The refrigerator might be plugged in recently or might be loaded with food. >>>When the refrigerator is plugged in or loaded with food recently, it will take longer for it to attain the set temperature.
- Page 42 • The fridge temperature is adjusted to a very high value. >>>Fridge compartment temperature setting has an effect on the temperature of the freezer. Change the temperatures of the fridge or freezer and wait until the relevant compartments attain a sufficient temperature.
- Page 43 • No regular cleaning is performed. >>>Clean the inside of the refrigerator regularly with a sponge, lukewarm water or carbonate dissolved in water. • Some containers or package materials may cause the smell. >>>Use a different container or different brand packaging material. • Food is put into the refrigerator in uncovered containers.
- Page 44 57 5129 0000/AB...
Need help?
Do you have a question about the 5845 NFEY and is the answer not in the manual?
Questions and answers