Table of Contents
Advertisement
Quick Links
HEATIT
Z-TRM6
Installers manual
White RAL 9003
54 305 66
TABLE OF CONTENTS
1. Introduction
2. Statement regarding
products from multiple
manufacturers
3. Behavior within the
Z-Wave network
4. Quick Start
5. Installation
6. Connections
7. Add/Remove
8. Factory reset
9. Startup
10. Principles of regulation
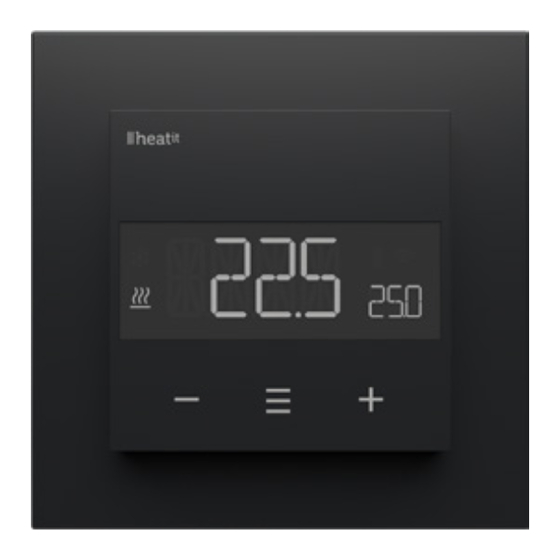
11. Local settings menu
12. Display Menu structure
13. Temperature shown in
display
14. Standby and main screen
15. KWh value in menu
16. Size of load
17. Choice of sensor
18. Selecting sensor value
19. Calibration
TO PRODUCT
DOCUMENTS
Firmware version
Document version
FW 1.0
2023-A
Article no.
Document date
54 305 66
01.06.2023
54 305 68
Org. doc. date 01.06.2023
Black matt
54 305 68
20. Brightness
21. Display on/off
22. Display icons
23. Child lock
24. Open window detection
25. Error codes
26. Safety features
27. QR-Code placement (DSK)
28. Security
29. Node Information Frame
30. Associations
31. Association Groups
32. Configuration Parameters
33. Command Classes
34. Supported Command
Classes
35. Controlled Command
Classes
36. Thermostat dimensions
37. Menu structure display
Product info
1. INTRODUCTION
Heatit Z-TRM6 is an electronic thermostat for electrical
underfloor heating. The thermostat can be controlled through
your Z-Wave™ network or via the buttons on the front. The
thermostat has a user friendly interface.
Heatit Z-TRM6 has 3 modes; Heat - Cool and Eco.
The thermostat fits in standard European junction boxes and
may be used with most System 55 frames. It has a sturdy metal
frame for secure fastening on the junction box. The thermostat
has one built-in room temperature sensor. Two additional
external temperature sensors may also be connected.
Heatit Z-TRM6 has active power metering and it gives you
real time information about your power consumption. It also
allows you to set the power metering value manually in case
of connection with a contactor.
The thermostat can be set up with multiple associations
and can be used as a master thermostat. It can also control
external relays and wall plugs.
Designed for electrical heating.
The thermostat can withstand a load of max 16A/3600W at
230VAC. We recommend a contactor for loads above 13A.
2. STATEMENT REGARDING PRODUCTS FROM MULTIPLE
MANUFACTURERS
Please read this before installation
This device may be used with all devices certified with the
Z-Wave Plus™ certificate and should be compatible with
such devices produced by any manufacturer. Every primary
controller is different depending on the manufacturer, their
target audience and intended use/application. Please review
the functionalities implemented by the primary controller you
intend to use with our Z-Wave Plus certified device to ensure
that it provides the necessary controls to take full advantage of
our product's capabilities.
3. BEHAVIOR WITHIN THE Z-WAVE NETWORK
This device may be operated within any Z-Wave™ network
with Z-Wave-certified devices from other manufacturers. All
non-battery-operated nodes within the network will act as
repeaters regardless of manufacturer to increase the reliability
of the network. On delivery, the device does not belong to any
Z-Wave network. The device needs to be added to an existing
network to communicate with the other devices within it.
Devices may also be removed from a network. The add/
remove processes are initiated by the primary controller of the
Z-Wave network.
4. QUICK START
1. Switch off the mains voltage (disable the fuse).
2. Open the junction box.
3. Connect the wires according to the description in Chapter
6; "Connections". Optional: Connect external wired sensors.
4. After verifying the connections, switch on the mains voltage.
Advertisement
Table of Contents

Subscribe to Our Youtube Channel
Related Manuals for Heatit Z-TRM6


Summary of Contents for Heatit Z-TRM6
- Page 1 54 305 66 01.06.2023 54 305 68 Heatit Z-TRM6 has 3 modes; Heat - Cool and Eco. Org. doc. date 01.06.2023 The thermostat fits in standard European junction boxes and may be used with most System 55 frames. It has a sturdy metal frame for secure fastening on the junction box.
-
Page 2: Installation
5. Set the primary controller in add mode (security/non- When the device is removed from the network, it will NOT security). revert to factory settings. 6. Hold the Center button until “OFF” is shown in the display (approx. 5 seconds). An always listening node must be powered continuously 7. - Page 3 9. STARTUP 14. STANDBY AND MAIN SCREEN When the thermostat remains untouched for a while, it will After powering up the device for the first time, all parameters will have default settings and the thermostat will start by asking automatically go to the standby screen. The standby will by default show the setpoint temperature.
- Page 4 19. CALIBRATION 25. ERROR CODES If the temperature sensor readout is not correct, you can make Adding fail. See Chapter 7 “Add/remove”. minor changes to the temperature readout. The temperature Err1 Internal error. Most probably a faulty unit. Replace unit. readings can be calibrated by ±6°C using Parameter 10, 11 Err2 Z-Wave error.
-
Page 5: Association Groups
30.2 Multi Channel support Group 4 -Thermostat Mode Set Heatit Z-TRM6 has support for the Multi Channel Command Max. nodes in group: 10 Class. This allows the thermostat to be perceived as multiple 2: MULTILEVEL SENSOR DEVICE INTERNAL SENSOR devices by the primary controller, which enables the reporting Lifeline. -
Page 6: Command Classes
SHORT DESCRIPTION SHORT DESCRIPTION NAME DESCRIPTION / COMMENT OF VALUE NAME DESCRIPTION / COMMENT OF VALUE Enabled, buttons on the 0, device will turn off Disable buttons, must be en- front of the device work. and show an error in the abled through the parameter, Decide how the device should (Default) -
Page 7: Thermostat Dimensions
33.4 Thermostat Mode Command Class INSECURE ON SECURE ON ASSOCIATION VERSION SECURE INCLUSION SECURE INCLUSION It is possible to change the operating mode of the thermostat Association by sending a Thermostat Mode set command. The accessible Association Group Information operating modes are: Device Reset Locally Notification 0x00: OFF (Thermostat regulation and display are... -
Page 8: Menu Structure Display
37. MENU STRUCTURE DISPLAY Hold the middle button for 10 seconds to enter menu. Success Fail TDS: Temperature displayed in standby mode Hold button for 2 seconds SETT: Setpoint temperature RELT: Real time temperature... - Page 9 Only shows available options Only shows available options...
- Page 10 Only shows available options Hold the middle button to set HYST value, from 0.3-3.0 Default Short hold to change the mode Default Load value from 100-9900W, by increments of 100. Hold to reset the Kwh.
-
Page 11: Product Info
Any wrongful installation, misuse or damage to the product is not covered under warranty. Heatit Controls AB · Läkarvägen 4, 454 31 BRASTAD, SWEDEN Heatit Controls AB can not be held liable for any type of errors or omittances in our product information. Phone: +47 61 18 77 77 · post@heatit.com · heatit.com...
Need help?
Do you have a question about the Z-TRM6 and is the answer not in the manual?
Questions and answers