
Related Manuals for Horizon Fitness TORUS 5


Summary of Contents for Horizon Fitness TORUS 5
- Page 1 Инструкция Мультистанция Horizon Home Gym Torus 5 Полезные ссылки: Мультистанция Horizon Home Gym Torus 5 - смотреть на сайте Мультистанция Horizon Home Gym Torus 5 - читать отзывы...
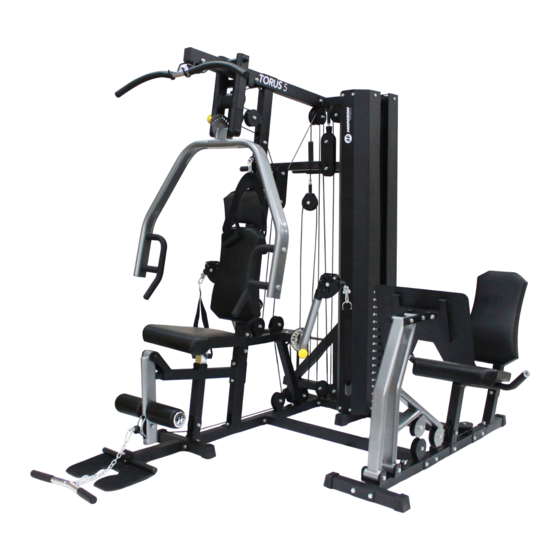
- Page 2 TORUS HOME GYM OWNER’S MANUAL...
- Page 3 INTRODUCTION CONGRATULATIONS and THANK YOU for your purchase of this Horizon home gym! Whether your goal is to tone your muscles, increase your strength or simply enjoy a fuller, healthier ifestyle, a Horizon home gym can help you attain it – adding club-quality performance to your at-home workouts, with the ergonomics and innovative features you need to get stronger and healthier, faster.
- Page 4 IMPORTANT SAFETY PRECAUTIONS FOR HOUSEHOLD USE ONLY SAVE THESE INSTRUCTIONS Read all instructions before using this home gym. Basic precautions should always be followed, including the following: Read all instructions before using this home gym. It is the responsibility of the owner to ensure that all users of this home gym are adequately informed of all warnings and precautions.
- Page 6 ASSEMBLY IMPORTANT: READ THESE SAFETY INSTRUCTIONS BEFORE USE! WARNING During the assembly process there are several areas that special attention must be paid. It is very important to follow the assembly instructions correctly and to make sure all parts are firmly tightened. If the assembly instructions are not followed correctly, the home gym could have frame parts that are not tightened and will seem loose and may cause irritating noises.
- Page 8 TOOLS INCLUDED: PRE ASSEMBLY Screwdriver 19 mm Flat Wrench UNPACKING 13 mm/17 mm Flat Wrench 3 mm Allen Wrench Unpack the product where you will be using it. Place the bench on a level flat surface. 5 mm Allen Wrench It is recommended that you place a protective covering on your floor.
- Page 9 PACKING DETAILS BOX NO. DESCRIPTION PART NO. VIEW CHECK BOX NO. DESCRIPTION PART NO. VIEW CHECK CALBE 1 IRON SHELL (LEFT) CALBE 2 IRON SHELL (RIGHT) CALBE 3 FRONT UPRIGHT BOX 1 FRAME CALBE 4 GUIDE ROD FOAM ROLLER WITH 1 PC PULLEY - Ø100 REAR UPRIGHT PULLEY...
- Page 10 BOX NO. DESCRIPTION PART NO. VIEW CHECK BOX NO. DESCRIPTION PART NO. VIEW CHECK CROSS CONNECTOR TOP BRACKET FOOT PLATE CENTRAL CONNECTOR ADJUSTABLE PULLEY BLOCK SINGLE PULLEY BOX 3 BLOCK PULLEY BLOCK FREE MOTION ARM BRACKET DOUBLE THREAD SCREW FREE MOTION ARM PIVOT AXLE SEAT BRACKET PRESS ARM...
- Page 11 BOX NO. DESCRIPTION PART NO. VIEW CHECK BOX NO. DESCRIPTION PART NO. VIEW CHECK FOOT EXTENSION WEIGHT PLATE SUPPORT BOX 5 BACK SUPPORT WEIGHT PLATE BOX 6 ROTATE BUSHING WEIGHT PLATE BOX 7 JOINT PLATE TOP PLATE BOX 8 CABLE 5 CONNECTING TUBE (LONG) SQUARE END CAP...
- Page 12 BOX NO. DESCRIPTION PART NO. VIEW CHECK UPRIGHT HANDLE LEFT SUPPORT HANDLE RIGHT SUPPORT HANDLE VKR FOOT SUPPORT BOX 10 ARMREST PAD BACK PAD SQUARE END CAP HARDWARE PACKAGE B9 LOW ROW BAR ABDOMINAL STRAP ACCESSORIES HOOK BOX 11 ANKLE STRAP WATER BOTTLE HOLDER HARDWARE...
- Page 13 HARDWARE PACKAGE...
- Page 15 ASSEMBLY STEP 1 2 PCS TOOLS Qty:6 M10X60 Qty:6 Qty:6 Qty:2 M10X60 M10X75 Qty:2 Qty:4 Qty:2 COMPONENTS Qty:1 Qty:1 Qty:1 Qty:1 Qty:1 Qty:1 Qty:5...
- Page 16 Attach FRONT UPRIGHT FRAME (8) to BASE FRAME (1) with BLOT ASSEMBLY (95) x 2. Attach REAR UPRIGHT FRAME (5) to BASE FRAME (1) with BLOT ASSEMBLY (95) x 2. Attach CENTRAL CONNECTOR (11) to BASE FRAME (1) with BLOT ASSEMBLY (95) x 2. Attach SQUARE END CAP (79) to BASE FRAME (1), SIDE CONNECTOR (7) and CROSS CONNECTOR (6).
- Page 17 ASSEMBLY STEP 2 2 PCS TOOLS Qty:2 M10X75 Qty:4 Qty:2 Qty:2 M10X90 Qty:4 Qty:2 COMPONENTS Qty:1 Qty:1 Attach TOP FRAME (9) to REAR UPRIGHT FRAME (5) with BLOT ASSEMBLY (96) x 2. Attach JOINT PLATE (42) and TOP FRAME (9) to FRONT UPRIGHT FRAME (8) with BLOT ASSEMBLY (99) x 2.
- Page 18 ASSEMBLY STEP 3 TOOLS Qty:1 Qty:1 COMPONENTS 5,6,7 Qty:2 Qty:1 Qty:15 Qty:1 Qty:1 Qty:4 Screw GUIDE ROD (28) x 2 to the bolts on CROSS CONNECTOR (6). Put BUFFER (82) x1 through each GUIDE ROD (28). Put WEIGHT PLATE (50) through GUIDE ROD (28). Attach STABILIZER (83) to WEIGHT ROD (29) then put WEIGHT ROD (29) through the center of WEIGHT PLATE (50).
- Page 19 ASSEMBLY STEP 4 2 PCS TOOLS M10X75 Qty:2 Qty:4 Qty:2 M10X65 Qty:1 Qty:2 M10x20 Qty:2 Qty:2 COMPONENTS Qty:1 Qty:1 Qty:1...
- Page 20 Attach TOP BRACKET (10) to GUIDE ROD (28) with BOLT ASSEMBLY (101) x 2. Attach JOINT PLATE (42) and TOP BRACKET (10 ) to TOP FRAME (9) by secure with BOLT ASSEMBLY (96) x 2. Attach BUFFER (84) to TOP BRACKET (10) with BOLT ASSEMBLY (100).
- Page 21 ASSEMBLY STEP 5 2 PCS TOOLS M10X75 Qty:4 Qty:8 Qty:4 M6X10 Qty:1 M10x65 Qty:2 Qty:2 Qty:2 Qty:2 COMPONENTS Qty:1 Qty:1 Qty:1 Qty:1 Qty:1 Qty:2...
- Page 22 Attach FREE MOTION ARM BRACKET (13) to CENTRAL CONNECTOR (11) with BOLT ASSEMBLY (103) x 2, attach FREE MOTION ARM BRACKET (13) to FRONT UPRIGHT FRAME (8) with BOLT ASSEMBLY (96) x 2. Attach SQUARE END CAP (79) to BASE FRAME CONNECTOR (2). Attach LOW ROW CONNECTOR (3) and BASE FRAME CONNECTOR (2) to BASE FRAME (1) with BOLT ASSEMBLY (96) x 2.
- Page 23 ASSEMBLY STEP 6 2 PCS 3 washers TOOLS M10X75 Qty:1 Qty:2 Qty:1 M10X90 Qty:2 Qty:4 Qty:2 M10x40 Qty:1 M10X80 Qty:1 Qty:2 Qty:1 Qty:2 24 13 M6X6 Qty:4 Qty:1 Qty:1 104 84 96...
- Page 24 COMPONENTS Qty:2 Qty:1 Qty:2 Qty:1 Qty:1 Qty:1 Qty:1 Qty:2 Qty:1 Qty:2 Qty:1 Attach SEAT BRACKET CONNECTOR (20) to BASE FRAME (1) with BOLT ASSEMBLY (96). Attach SEAT BRACKET (22) to SEAT BRACKET CONNECTOR (20) and secure by KNOB (86). Attach SEAT BRACKET CONNECTOR (20) and JOINT PLATE (42) to FRONT UPRIGHT FRAME (8) with BOLT ASSEMBLY (99) x 2. Attach BUFFER (84) to SEAT BRACKET CONNECTOR (20) with PHILLIPS SCREW (104).
- Page 25 ASSEMBLY STEP 7 2 PCS TOOLS M12X20 COMPONENTS Qty:1 Qty:1 Qty:1 Qty:1 Qty:2 Qty:2...
- Page 26 Attach PRESS ARM CONNECTOR (17) to TOP FRAME (9) and put PIVOT AXLE (31) through, then put DOUBLE THREAD SCREW (36) through PIVOT AXLE (31) and secure by NUT ASSEMBLY (108). Attach PRESS ARM (16) to PRESS ARM CONNECTOR (17) and put PIVOT AXLE (31) through, then put DOUBLE THREAD SCREW (36) through PIVOT AXLE (31) and secure by NUT ASSEMBLY (108).
- Page 27 ASSEMBLY STEP 8 119 27...
- Page 28 2 PCS TOOLS M10X70 Qty:3 Qty:6 Qty:3 M10X45 Qty:7 Qty:14 Qty:7 M10X85 Qty:1 Qty:2 Qty:1 Qty:6 Qty:1 COMPONENTS Qty:2 Qty:12 Qty:1...
- Page 29 FIGURE A: Attach PLASTIC BUSHING (90) to TOP FRAME (9), attach CABLE 1 (119) onto PULLEY P1 (91) then fix them to TOP FRAME (9) by BOLT ASSEMBLY (98). FIGURE B: Attach PLASTIC BUSHING (90) to TOP FRAME (9), attach CABLE 1 (119) onto PULLEY P2 (91) then fix them to TOP FRAME (9) by BOLT ASSEMBLY (98).
- Page 30 ASSEMBLY STEP 9...
- Page 31 2 PCS TOOLS M10X70 Qty:2 Qty:4 Qty:2 M10X45 Qty:4 Qty:8 Qty:4 M10X55 Qty:1 Qty:2 Qty:1 Qty:4 Qty:2 COMPONENTS Qty:6 Qty:1 Qty:1...
- Page 32 FIGURE A: Attach PLASTIC BUSHING (90S) x 2 to LEG EXTENSION (21), then put CABLE 2 (120) (use the end without ball)through the bottom of PULLEY P12 (92) and fix to LEG EXTENSION (21) with BOLT ASSEMBLY (112). FIGURE B: Attach PLASTIC BUSHING (90) x 2 to SEAT BRACKET CONNECTOR (20), attach PULLEY P13 (91) to SEAT BRACKET CONNECTOR (20) by BOLT ASSEMBLY (98) and put CABLE 2 (120) through the bottom of PULLEY P13 (92).
- Page 33 ASSEMBLY STEP 10...
- Page 34 2 PCS TOOLS M10X50 Qty:6 Qty:12 Qty:6 Qty:1 M10X125 Qty:2 Qty:1 Qty:2 M6X45 Qty:4 Qty:2 Qty:1 M10X45 Qty:2 Qty:1 COMPONENTS Qty:1 Qty:2 Qty:2 Qty:4 Qty:9 Qty:1...
- Page 35 FIGURE A: Attach CABLE 3 (121) and PULLEY P19 (91) to ROTATIONAL PULLEY BLOCK (23) with BOLT ASSEMBLY (110). Attach GYRO WHEEL (33) to ROTATIONAL PULLEY BLOCK (23) with BUSHING (34), secure them with BOLT ASSEMBLY (114). FIGURE B: Attach CABLE 3 (121) to the PULLEY P20 (91) then attach PULLEY P20 (91) to FREE MOTION ARM (14) with BOLT ASSEMBLY (110).
- Page 36 ASSEMBLY STEP 11 2 PCS TOOLS Qty:3 M10X45 Qty:6 Qty:3 COMPONENTS Qty:2 Qty:1...
- Page 37 Note: If you purchase TORUS5, please use CABLE5 instead of CABLE4 and DO NOT fix the cable to CROSS CONNECTOR (6) at this step, there is more detailed description to connect LEG PRESS STATION on step 21. FIGURE A: Attach SINGLE PULLEY BLOCK (12) to CABLE 4 (122). FIGURE B: The PULLEY P28 (91) has been assembled to TOP FRAME (9) by STEP 8, put CABLE 4 (122) around the PULLEY P28 (91).
- Page 38 ASSEMBLY STEP 12 2 PCS TOOLS Qty:16 M8X16 Qty:16 COMPONENTS Qty:1 Qty:1 Attach IRON SHEEL(LEFT) (25) to CROSS CONNECTOR (6) and TOP BRACKET (10) with BOLT ASSEMBLY (115). Attach IRON SHEEL(RIGHT) (26) to CROSS CONNECTOR (6) and TOP BRACKET (10) with BOLT ASSEMBLY (115).
- Page 39 ASSEMBLY STEP 13 2 PCS TOOLS M8X16 Qty:2 Qty:2 Qty:2 M8X85 Qty:2 Qty:4 M6X20 Qty:4 Qty:4 Qty:1 COMPONENTS Qty:1 Qty:2 Qty:1 Qty:1 Qty:1...
- Page 40 Attach SEAT PAD (48) to SEAT BRACKET (22) with BOLT ASSEMBLY (117) x 4. Attach HEAD PAD (49) to FRONT UPRIGHT FRAME (8) with BOLT ASSEMBLY (116) x 2. Attach BACK PAD (47) to FRONT UPRIGHT FRAME (8) with BOLT ASSEMBLY (115) x 2. Attach FREE MOTION ARM STRAP (46) x2 to CABLE 3 (121) with HOIST HOOK (93) x 2.
- Page 41 ASSEMBLY STEP 14 COMPONENTS Qty:27 Attach HOLE PLUG (94) to holes on BASE FRAME (1), REAR UPRIGHT FRAME (5) and CROSS CONNECTOR (6) as shown on the drawing.
- Page 42 ASSEMBLY STEP 15 TORUS3 ASSEMBLY COMPLETE!
- Page 43 ASSEMBLY STEP 16 (FOR LEG PRESS) 2 PCS WASHER 6 TOOLS Qty:2 M10X60 Qty:2 Qty:2 Qty:6 M10X75 Qty:12 Qty:6 Qty:1 M10X70 Qty:2 Qty:1 Qty:2 M10X115 Qty:4 Qty:2 Qty:1 M10X20 COMPONENTS Qty:1 Qty:1 Qty:3 Qty:1 Qty:1 Qty:1 Qty:1 Qty:1 Qty:1 Qty:3 Qty:1...
- Page 44 Attach SQUARE END CAP (79) to BASE FRAME CONNECTOR (2) and LEG EXTENSION BASE FRAME (56). Attach CONNECTING TUBE (LONG) (52) and JOINT PLATE (42) to LEG EXTENSION BASE FRAME (56) with BOLT ASSEMBLY (96) x2. Attach CONNECTING TUBE (SHORT) (53) and JOINT PLATE (42) to LEG EXTENSION BASE FRAME (56) with BOLT ASSEMBLY (96) x2.
- Page 45 ASSEMBLY STEP 17 (FOR LEG PRESS) TOOLS 2 PCS WASHER 6 Qty:4 M10X75 Qty:8 Qty:4 Qty:1 M10X70 Qty:2 Qty:1 Qty:4 M6X20 Qty:4 M10X135 Qty:2 Qty:4 Qty:2 M10X40 Qty:2 Qty:2 Qty:2 COMPONENTS Qty:1 Qty:1 Qty:1 Qty:1 Qty:2 Qty:1 Qty:1 Qty:1...
- Page 46 Attach SEAT SUPPORT (59) to UPRIGHT SUPPORT (58) with BOLT ASSEMBLY (98). Attach SEAT SUPPORT (59) and JOINT PLATE (42) to REAR SUPPORT (57) with BOLT ASSEMBLY (96) x2. Attach RIGHT ARMREST (54) and LEFT ARMREST (55) to SEAT SUPPORT (59) with BOLT ASSEMBLY (96) x2. Attach LEG PRESS SEAT PAD (67) to SEAT SUPPORT (59) with BOLT ASSEMBLY (117) x4.
- Page 47 ASSEMBLY STEP 18 (FOR LEG PRESS) TOOLS WASHER 5 M8X16 Qty:2 Qty:2 COMPONENTS Qty:1 Qty:1 Qty:1 Attach BACK SUPPORT (60) to REAR SUPPORT (57) by KNOB (86). Attach BACK PAD (47) to BACK SUPPORT (60) with BOLT ASSEMBLY (115).
- Page 48 ASSEMBLY STEP 19 (FOR LEG PRESS) 2 PCS TOOLS M10X45 Qty:3 Qty:6 Qty:3 M10X45 Qty:1 Qty:1 COMPONENTS Qty:4 Attach PULLEY P32 (91) to FOOT EXTENSION POLE (REAR) (62) with BOLT ASSEMBLY (153). Attach PULLEY P33 (91), PULLEY P35 (91) and PULLEY P36 to LEG EXTENSION BASE FRAME (56) with BOLT ASSEMBLY (152).
- Page 49 ASSEMBLY STEP 20 (FOR LEG PRESS) 2 PCS TOOLS M10X75 Qty:2 Qty:4 Qty:2 M10x20 Qty:1 Qty:1 COMPONENTS Qty:1 Qty:1 Attach CONNECTING TUBE (SHORT) (53) to CROSS CONNECTOR (6) with BOLT ASSEMBLY (101). Attach CONNECTING TUBE (LONG) (52) and JOINT PLATE (42) to BASE FRAME (1) with BOLT ASSEMBLY (96)x2.
- Page 50 ASSEMBLY STEP 21 (FOR LEG PRESS) If you had TORUS3 already then purchase upgrade kits for LEG PRESS, please use CABLE5 instead of CABLE 4 and follow the assembly instruction below. Attach PULLEY P31(91) to CROSS CONNECTOR (6) with BOLT ASSEMBLY (152). Attach CABLE5 (109) to SINGLE PULLEY BLOCK (12), then put CABLE5 (109) around PULLEY P28, go down to PULLEY P29, from PULLEY P29 to PULLEY P30, then...
- Page 51 ASSEMBLY STEP 22 (FOR LEG PRESS) 2 PCS TOOLS M10X50 Qty:1 Qty:2 Qty:1 M8X30 Qty:1 Qty:1 COMPONENTS Qty:1 Qty:1 L=7040 Attach CABLE5 (109) around PULLEY P32, then go to the bottom of PULLEY P33. Put CABLE 5 (109) to the top of PULLEY P34 (91) then attach to FOOT EXTENSION POLE (REAR) (62) with BOLT ASSEMBLY (110).
- Page 52 ASSEMBLY STEP 23 (FOR LEG PRESS) TOURS3 ADD LEG PRESS STATION COMPLETE!
- Page 53 ASSEMBLY STEP 24 (FOR VKR) 2 PCS TOOLS M10X70 Qty:2 Qty:4 Qty:2 M10x115 Qty:2 Qty:4 Qty:2 Qty:6 M8x65 Qty:6 M12x25 Qty:2 Qty:2 COMPONENTS Qty:2 Qty:1 Qty:1 Qty:1 Qty:1 Qty:2 Qty:1...
- Page 54 Attach SQUARE END CAP (79) to VKR FOOT SUPPORT (71), then attach VKR FOOT SUPPORT (71) to REAR UPRIGHT (5) with BOLT ASSEMBLY (144). Attach LEFT SUPPORT POLE SET (69) and RIGHT SUPPORT POLE SET (70) to REAR UPRIGHT (5) by BOLT ASSEMBLY (98) x 2.
- Page 55 ASSEMBLY STEP 25 (FOR VKR) VKR ASSEMBLY COMPLETE!
- Page 56 ASSEMBLY STEP 26 TOOLS Qty:3 Qty:1 COMPONENTS Qty:1 Qty:1 Qty:1 Qty:1 Attach LOW ROW BAR (73) or ANKLE STRAP (76) to CABLE2 (120) with CHAIN (118) and HOIST HOOK (93). Attach LOW ROW BAR (73) to CABLE2 (120) with CHAIN (118) and HOIST HOOK (93). Attach ABDOMINAL STRAP (74) to CABLE2 (120) with HOIST HOOK (93).
- Page 57 ASSEMBLY STEP 27 COMPONENTS Qty:3 Attach ACCESSORIES HOOK (75) x3 to REAR UPRIGHT FRAME (5).
- Page 58 ASSEMBLY STEP 28 We provide some foot pads for TORUS, if the floor is uneven, you can insert these pads beneath the machine to enhance the stability.
- Page 59 ASSEMBLY STEP 29 TORUS5 ASSEMBLY COMPLETE!
- Page 60 BEFORE YOU BEGIN CONGRATULATIONS! on choosing your home gym. You’ve taken an important step in developing and sustaining an exercise program! Your home gym is a tremendously effective tool for achieving your personal fitness goals. Regular use of your home gym can improve the quality of your life in so many ways.
- Page 61 CONDITIONING GUIDELINES ALWAYS CONSULT YOUR PHYSICIAN BEFORE BEGINNING AN EXERCISE PROGRAM. HOW OFTEN? (Frequency of Workouts) The American Heart Association recommends that you exercise at least 3 to 4 days per week to maintain fitness. If you have other goals such as weight or fat loss, you will achieve your goal faster with more frequent exercise. Whether it’s 3 days or 6 days, remember that your ultimate goal should be to make exercise a lifetime habit.
- Page 62 GENERAL STRENGTH TRAINING GUIDELINES • It is recommended that you perform at least 5-10 minutes of cardiovascular exercise before beginning your strength routine in order to warm the muscles, increase the heart rate, and prepare your body for strength training. •...
- Page 63 STRETCHING T I PS STRETCH FIRST Before using your product, it is best to take a few minutes doing a few gentle stretching exercises. Stretching prior to exercise will improve flexibility and reduce chances of exercise related injury. Ease into each of these stretches with a slow gentle motion. Do not stretch to the point of pain.
- Page 64 THE IMPORTANCE OF WARM UP & COOL DOWN T I PS WARM UP Always perform 10-15 minutes of aerobic activity before begining your strength training session. This warm-up will limber your muscles and prepare them for more strenuous exercise. Make sure that you warm-up on your product at a slow pace. The warm up should gradually increase your heart rate into your heart rate training zone and increase core body temperature.
- Page 65 TRAINING INSTRUCTION CABLE FLY LAT PULL DOWN 1. Turn the free motion arm upright. 1. Sit on the machine, reach up, and grab the lat bar with a wide grip. 2. Hold the free motion straps by your both hands and extend your arms as wide as possible.
- Page 66 SEATED ABDOMINAL CRUNCH SEATED LEG EXTENSION 1. Attach ab strap or free motion arm straps on the machine. 1. Adjust the seat height to place your knees as close as possible to the leg lever pivot. 2. Sit upright with your back supported by the back pad. 2.
- Page 67 STANDARD CHEST PRESS SEATED CABLE ROW 1. Adjust the seat height so either the upper or lower grips align 1. Attach the short handle to the lower pulley. vertically with the center of your chest. 2. Sit facing the machine with your legs slightly bent and keep them bent during the exercise.
- Page 68 TRICEPS DIPS LEG PRESS 1. Sit on the leg press station and adjust the back pad to a 1. Face the machine and grip the dip station handles firmly. comfortable position. 2. Use the step to assist in getting into the upright position with all your weight supported by your arms and hands.
- Page 69 Answering these and other questions will give the technicians IF NO: the ability to send proper replacement parts and the service necessary to get you and your Horizon Fitness home gym • Adjust threaded bolt on top plate so that the holes in the functioning again! bayonette align with the weight plate.
- Page 70 • Lubricate guide rods with a spray or gel silicone lubricant.• Inspect cable ends and cable insulation for damage. EVERY MONTH - IMPORTANT! • Inspect all frame bolts and tighton as needed. Please contact Horizon Fitness with questions about applying lubricant to your home gym.
- Page 71 TORUS3 EXPLODED VIEW...
- Page 72 LEG PRESS EXPLODED VIEW VKR EXPLODED VIEW 66 139 cable...
- Page 73 TORUS PARTS LIST DESCRIPTION DESCRIPTION BASE FRAME IRON SHELL (RIGHT) FRONT BASE TUBE ADJUSTABLE PULLEY BLOCK LOW ROW CONNECTOR GUIDE ROD FOOT PLATE WEIGHT ROD REAR UPRIGHT LAT BAR BOTTOM CROSS CONNECTOR PIVOT AXLE SIDE ROW CONNECTOR PULL PIN FRONT UPRIGHT GYRO WHEEL TOP FRAME BUSHING...
- Page 74 DESCRIPTION DESCRIPTION TOP PLATE BOLT M10×70 SQUARE END CAP WASHERS BUFFER (A) LOCK NUT WEIGHT PIN BOLT M10×90 BUFFER (B) WASHERS STABILIZER LOCK NUT BUFFER (C) PHILLIPS SCREW M10×65 YELLOW HANDLE KNOB BOLT M10×20 + WASHER SQUARE BUSHING-45 FLAT HEAD SCREW M6×10 FOAM ROLLER BOLT M10×65 FOAM CAP...
- Page 75 DESCRIPTION DESCRIPTION ROUND PLUG-Φ25 WASHERS ROUND BUSHING-Φ50 LOCK NUT BOLT M10×85 OVAL PLUG - 8040 ROUND PLUG-Φ30 WASHERS LOCK NUT RECTANGLE PLUG - 7050 BOLT M10×55 SQUARE PLUG - 38 WASHER SQUARE PLUG - 25 LOCK NUT SPRING BOLT M10×125 FOAM TUBE LAT BAR WASHERS CIRCLIPS FOR SHAFT...
- Page 76 DESCRIPTION CROSS RECESSED COUNTERSUNK HEAD SCREW M10×65 HEXAGON NUT M10 BOLT M10×20 CROSS PAD HEAD SCREW M6×10 BIG WASHER 10 CROSS RECESSED COUNTERSUNK HEAD SCREWS M10×40 BOLT M10×80 NELON CAP 10 SET SCREW M6×6 BOLT M12×20 WASHER 12 LOCK NUT M12 BOLT M10×50 BOLT M10×85 BOLT M10×55...
- Page 77 LEG EXTENSION PART LIST DESCRIPTION DESCRIPTION CONNECTING TUBE (LONG) WASHERS CONNECTING TUBE (SHORT) LOCK NUT BASE FRAME CONNECTOR BOLT M10×70 RIGHT ARMREST WASHERS LEFT ARMREST LOCK NUT LEG EXTENSION BASE FRAME BOLT M10×115 REAR SUPPORT WASHER UPRIGHT SUPPORT LOCK NUT SEAT SUPPORT SQUARE BLOCK BACK SUPPORT...
- Page 78 DESCRIPTION DESCRIPTION LOCK NUT BOLT M6×20 BOLT M10×20 BOLT M10×115 WASHER CROSS SOCKET HEAD SCREWS M10×20 HEX SOCKET HEAD SCREWS M8×20 BOLT M10×135 FOAM TUBE - Ø32*125 HEX SOCKET HEAD SCREWS M10×40 SQUARE PLUG - 50 BOLT M8×30 ROUND BUSHING - Ø50 HEX SOCKET HEAD SCREWS M8×20 RECTANGLE PLUG - 3020 BOLT M10×45...
- Page 79 VKR PART LIST DESCRIPTION DESCRIPTION UPRIGHT HANDLE WASHER 8 LEFT SUPPORT HANDLE BOLT M10×115 RIGHT SUPPORT HANDLE BOLT M8×65 VKR FOOT SUPPORT BOLT M12×25 FOAM CHECK RING ARMREST PAD BACK PAD BOLT M10×70 WASHER LOCK NUT HEX SOCKET HEAD SCREWS M8×20 BOLT M10×115 WASHER LOCK NUT...
- Page 80 ACCESSORIES PART LIST DESCRIPTION LOW ROW BAR ABDOMINAL STRAP ACCESSORIES HOOK ANKLE STRAP WATER BOTTLE HOLDER HOIST HOOK PHILLIP SCREW M6×16 CHAIN OVAL PLUG - 8040 ROUND PLUG-Φ30 FOAM TUBE-Φ32*125 CROSS PAD HEAD SCREW M6×16...
- Page 81 TRAINING LOG SHEET MUSCLE GROUP=UPPER BODY, TORSO, LOWER BODY EXERCISE MUSCLE GROUP WEIGHT USED FREQUENCY TIME...
- Page 82 EXERCISE MUSCLE GROUP WEIGHT USED FREQUENCY TIME...
- Page 85 HOME GYM OWNER’S MANUAL Torus 5 Owner’s Manual 080913 Rev.2.2 © 2013 Horizon Fitness...
Need help?
Do you have a question about the TORUS 5 and is the answer not in the manual?
Questions and answers