Table of Contents
Advertisement
Quick Links
Grandview Crystal Screen Guangzhou Co.,Ltd.
GuangzhouJudelntelligent Audiovisual EquipmentCo.,Ltd.
No.43S,GuomaoAve.Hualong,Panyu,Guangzhou,Guangdong,PR.C
http://www.grandviewscreen.com
After-salesservice Tel020-84899499
ISO9001:2000
International certification
Grandview Projector Lift Instruction Manual
Model:GPAD42 Series
c
GPAC42 Series
Advertisement
Table of Contents

Subscribe to Our Youtube Channel
Related Manuals for Grandview GPAD42 Series


Summary of Contents for Grandview GPAD42 Series
- Page 1 Grandview Projector Lift Instruction Manual Model:GPAD42 Series GPAC42 Series Grandview Crystal Screen Guangzhou Co.,Ltd. GuangzhouJudelntelligent Audiovisual EquipmentCo.,Ltd. ISO9001:2000 International certification No.43S,GuomaoAve.Hualong,Panyu,Guangzhou,Guangdong,PR.C http://www.grandviewscreen.com After-salesservice Tel020-84899499...
- Page 3 Troubleshoot This product is designed to be used for many years without failure, and many problems are caused by simple little things. If you find a problem, please check the simple fix list below. If the problem persists, please contact an authorized dealer. Caution 1.Please ensure the installation ceiling be secure enough to avoid falls,.The loading capacitymust Problem...
- Page 4 Remote control Notes Components 1.Working temperature:-20℃ to +70℃ 2.Battery:2 pcs of RC2032 button battery 3.Requires replacement battery when Traction wire electronic Electric Projector Lift(GPAD42/GPAC42) Positionging setting button givensignal weak Battery Battery installation: ① Electric ceiling door(Exclusively Battery When remote control signal weak,please for GPAD)...
- Page 5 Rs485 Port Setting: Specification Bit Rate:2400; USB Serial Port (COM3) Properties Data bit:8 bit; General Port Settings Driver Details Events 常规 端口设置 驱动程序 详细信息 事件 Odd check:N/A; 580mm 580mm Stopping position:1 Bits per second: 2400 2400 Baud Rate: 位/秒(B): Baud Rate: 620mm 数据位(D): Data bits:...
- Page 6 Remote Localizer Installation Need to set the lower limit,opened the door of electric double mask,when finished surface layer board to smalpox,press the pause button,will the remote control on the back of the puncture needle inserted to blue light,the hanger into the default state,meet customer customer desired location,press the stop button,once again,use a needle to insert the holes at the back of the remote controlights,see the hanger slightly moving Installation instructions up and down once,is set to complete.
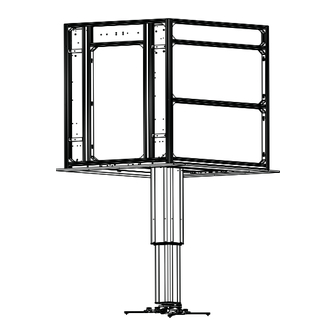
- Page 7 adjustment Installation steps Angle 1.determine the direction of the projector and the installation position,according to the size ° Rotate left and right ±3 of the opening in the ceiling layer. 1.Rotate left and right Use a hex wrench to loosen the two screws on the front end. As shown by the arrow in Figure 1,the universal joint can be adjusted to the left and right by ±3°.
- Page 8 3.After checking that the tapping screw is fixed, install the screw rod and fix it.(In order to 5.install the decorative frame so that the decorative frame fits on the ceiling layer and the make the screw rod easier to pass through the lifter,we recommend that the end of the installation is complet ed.In order to prevent the lift falling down,We suggest add 4pcs steel rods screw rod be tapered,and the length between each two lead rods can differ by 10-20mm.
Need help?
Do you have a question about the GPAD42 Series and is the answer not in the manual?
Questions and answers