Table of Contents
Advertisement
Quick Links
Advertisement
Table of Contents

Related Manuals for JUNO JB084C1


Summary of Contents for JUNO JB084C1
- Page 1 User Manual Oven JB084C1...
-
Page 2: Table Of Contents
VISIT OUR WEBSITE TO: Get usage advice, brochures, trouble shooter, service and repair information: www.juno.de/support CONTENTS 1. SAFETY INFORMATION...................2 2. SAFETY INSTRUCTIONS.................4 3. INSTALLATION....................7 4. PRODUCT DESCRIPTION................8 5. CONTROL PANEL.................... 8 6. BEFORE FIRST USE..................9 7. DAILY USE...................... 10 8. - Page 3 be kept away from the appliance unless continuously supervised. Children should be supervised to ensure that they do not • play with the appliance. Keep all packaging away from children and dispose of it • appropriately. WARNING: The appliance and its accessible parts become •...
-
Page 4: Safety Instructions
Always use oven gloves to remove or insert accessories or • ovenware. To remove the shelf supports first pull the front of the shelf • support and then the rear end away from the side walls. Install the shelf supports in the opposite sequence. Do not use a steam cleaner to clean the appliance. - Page 5 electrical ratings of the mains power supply. Total power (W) Section of the ca‐ • Always use a correctly installed ble (mm²) shockproof socket. maximum 3680 3x1.5 • Do not use multi-plug adapters and extension cables. The earth cord (green / yellow cable) must be •...
- Page 6 2.5 Internal lighting – be careful when you remove or install the accessories. • Discoloration of the enamel or stainless WARNING! steel has no effect on the performance of Risk of electric shock. the appliance. • Use a deep pan for moist cakes. Fruit •...
-
Page 7: Installation
3. INSTALLATION 3.1 Building in WARNING! Refer to Safety chapters. (*mm) min. 550 min. 560 (*mm) min. 550 min. 560 ENGLISH... -
Page 8: Product Description
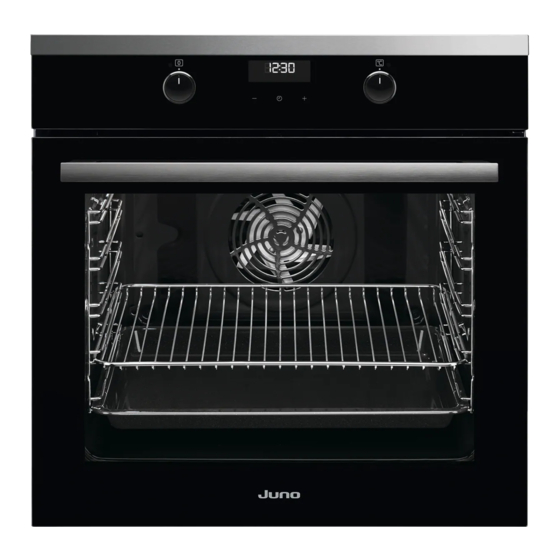
3.2 Securing the oven to the cabinet 4. PRODUCT DESCRIPTION 4.1 General overview Control panel Knob for the heating functions Power lamp / symbol Display Control knob (for the temperature) Temperature indicator / symbol Heating element Lamp Cavity embossment - Aqua cleaning container Shelf support, removable Shelf positions... -
Page 9: Before First Use
5.2 Sensor fields / Buttons To set the time. To set a clock function. To set the time. 5.3 Display A. Clock functions B. Timer 6. BEFORE FIRST USE WARNING! Refer to Safety chapters. 6.1 Before first use The oven can emit an odour and smoke during preheating. Make sure that the room is ventilated. -
Page 10: Daily Use
7. DAILY USE WARNING! Step 2 Turn the control knob to select the temperature . Refer to Safety chapters. Step 3 When the cooking ends, turn the 7.1 How to set: Heating function knobs to the off position to turn off the oven. - Page 11 7.3 Heating functions Heating Application function Heating Application function To roast large meat joints or The oven is off. poultry with bones on one shelf position. To make gra‐ Turbo Grilling tins and to brown. Off position To grill thin pieces of food in To turn on the lamp.
-
Page 12: Clock Functions
8. CLOCK FUNCTIONS 8.1 Clock functions Clock function Application To set, change or check the time of day. Time of Day To set how long the oven works. Duration To set a countdown. This function has no effect on the operation of the oven. -
Page 13: Using The Accessories
How to set: Minute Minder Step 1 - press repeatedly. - starts to flash. Step 2 - press to set the time. The function starts automatically after 5 sec. When the set time ends, the signal sounds. Step 3 Press any button to stop the signal. Step 4 Turn the knobs to the off position. -
Page 14: Additional Functions
Deep pan: Push the tray between the guide bars of the shelf support. 10. ADDITIONAL FUNCTIONS 10.1 Cooling fan 10.2 Safety thermostat When the appliance operates, the cooling fan Incorrect operation of the oven or defective turns on automatically to keep the surfaces of components can cause dangerous the appliance cool. - Page 15 Ramekins Pizza pan Baking dish Flan base tin Ceramic Dark, non-reflective Dark, non-reflective Dark, non-reflective 8 cm diameter, 28 cm diameter 26 cm diameter 28 cm diameter 5 cm height 11.3 Moist Fan Baking For the best results follow suggestions listed in the table below.
- Page 16 (°C) (min) Macaroons, 20 baking tray or dripping pan 45 - 55 pieces Muffins, 12 pieces baking tray or dripping pan 30 - 40 Savory pastry, 16 baking tray or dripping pan 35 - 45 pieces Short crust bis‐ baking tray or dripping pan 40 - 50 cuits, 20 pieces Tartlets, 8 pieces...
- Page 17 ( °C) (min) Apple True Fan Wire shelf 70 - 90 pie, 2 Cooking tins Ø20 Fatless Conven‐ Wire shelf 40 - 50 Preheat the oven sponge tional Cook‐ for 10 min. cake, cake mould Ø26 cm Fatless True Fan Wire shelf 40 - 50 Preheat the oven...
-
Page 18: Care And Cleaning
12. CARE AND CLEANING WARNING! Refer to Safety chapters. 12.1 Notes on cleaning Clean the front of the appliance only with a microfibre cloth with warm water and a mild detergent. Clean and check the door gasket around the frame of the cavity. Use a cleaning solution to clean metal surfaces. - Page 19 Step 1 Turn off the oven and wait until it is cold. Step 2 Pull the front of the shelf support away from the side wall. Step 3 Pull the rear end of the shelf sup‐ port away from the side wall and remove it.
- Page 20 Step 2 Lift and pull the latches until they click. Step 3 Close the oven door halfway to the first opening position. Then lift and pull to re‐ move the door from its seat. Step 4 Put the door on a soft cloth on a stable surface.
-
Page 21: Troubleshooting
12.6 How to replace: Lamp Always hold the halogen lamp with a cloth to prevent grease residue from burning on the lamp. WARNING! Risk of electric shock. The lamp can be hot. Before you replace the lamp: Step 1 Step 2 Step 3 Turn off the oven. -
Page 22: Energy Efficiency
14. ENERGY EFFICIENCY 14.1 Product Information and Product Information Sheet according to EU Ecodesign and Energy Labelling Regulations Supplier's name Juno Model identification JB084C1 949499348 Energy Efficiency Index 95.3 Energy efficiency class Energy consumption with a standard load, conventional mode 0.93 kWh/cycle Energy consumption with a standard load, fan-forced mode 0.81 kWh/cycle... -
Page 23: Environmental Concerns
Keep food warm Moist Fan Baking Choose the lowest possible temperature Function designed to save energy during setting to use residual heat and keep a meal cooking. warm. 15. ENVIRONMENTAL CONCERNS appliances marked with the symbol with Recycle materials with the symbol . - Page 24 867359841-D-232023...
Need help?
Do you have a question about the JB084C1 and is the answer not in the manual?
Questions and answers