Table of Contents
Advertisement
Quick Links
This guide was created for common use for multiple products and may contain images or contents that are different from the product purchased. /
_ _CRS-FWK0640_ENG.indb 1
_ _CRS-FWK0640_ENG.indb 1
ELECTRIC PRESSURE
RICE COOKER
Prior to using your Cuchen Electric pressure rice cooker,
please read this User's Guide to ensure proper use of this product.
After reading it, keep it in a place where users of the product can always see it.
This guide is subject to change according to the company's circumstances.
[US] CRS-FWK0640 Series
This User's Guide includes a product warranty. /
US-CRS-FWK0640-V1
2023-05-17
2023-05-17
9:55:52
9:55:52
Advertisement
Chapters
Table of Contents

Related Manuals for Cuchen CRS-FWK0640 Series


Summary of Contents for Cuchen CRS-FWK0640 Series
- Page 1 RICE COOKER [US] CRS-FWK0640 Series Prior to using your Cuchen Electric pressure rice cooker, please read this User's Guide to ensure proper use of this product. After reading it, keep it in a place where users of the product can always see it.
- Page 2 IMPORTANT SAFETY PRECAUTIONS IMPORTANT SAFEGUARDS ※ When using electrical appliances, basic safety precautions should always be followed including the following: • Read all instructions. • Do not touch hot surfaces. Use handles or knobs. • To protect against electrical shock do not immerse cord, plugs, or appliance in water or other liquid. • Close supervision is necessary when any appliance is used by or near children. • Unplug from outlet when not in use and before cleaning. Allow to cool before putting on or taking off parts. • Do not operate any appliance with a damaged cord or plug or after the appliance malfunctions or has been damaged in any manner. Return appliance to the nearest authorized service facility for examination, repair, or adjustment. • The use of accessory attachments not recommended by the appliance manufacturer may cause injuries.
- Page 3 Before Use • Any other servicing should be performed by an authorized service representative. A short power supply cord is provided to reduce the risk resulting from becoming entangled in or tripping over a longer cord. • This appliance cooks under pressure. Improper use may result in scalding injury. Makecertain unit is properly closed before operating. • Do not open the pressure cooker until the unit has cooled and all internal pressurehas been released. If the handles are difficult to push apart, this indicatesthat the cooker is still pressurized – do not force it open. Any pressure inthe cooker can be hazardous. • Always check the pressure release devices forclogging before use. • Beaware that certain foods, such as applesauce, cranberries, pearl barley,oatmeal or other cereals, split peas, noodles, macaroni, rhubarb, or spaghettican foam, froth, and sputter, and clog the pressure release device (steamvent). These foods should not be cooked in a pressure cooker. • When the normaloperating pressure is reached, turn the heat down so all the liquid, whichcreates the steam, does not evaporate. ※ WARNING: Intended for countertop use only. ※ WARNING: Spilled food can cause serious burns. Keep appliance and cord away from children.
- Page 4 In the hot plate method, the heat from the inner plate is transferred to the inner pot to cook rice. (cauldron method) Product Specification Product Electric pressure rice cooker CRS-FWK0640 Series Rated Voltage and Frequency 120 V~, 60 Hz Rated power consumption...
-
Page 5: Table Of Contents
Table of Contents Before Getting Important Safety Precautions …………… 6 Started Part Names and Functions … ……………… 10 Taking Care of the Product ……………… 12 Operating How to Cook Tasty Rice …………………… 18 Instructions How to Cook Rice … ………………………… 20 How to Adjust Soaking and Simmer …… 22 How to Fine-tune the Taste ……………… 23 How to Use Preset Cooking ……………… 24 Grain on Salad Cooking Instructions …… 26 Steam Dish Cooking Instructions ………… 27 Slow Cook/Congee Instructions ………… 28 Sous Vide Recipe ……………………………... -
Page 6: Before Getting Important Safety Precautions
IMPORTANT SAFETY PRECAUTIONS ※ The purposes of these precautions are to protect your safety and prevent property damages. ※ Carefully read the cautions to use the product correctly. Danger If the instructions are not followed, severe injury or even death may occur. Warning If the instructions are not followed, serious injury or property damage may occur. Caution If the instructions are not followed, minor injury or property damage may occur. Power Supply This product is only for 120V. - Page 7 Before Use Installation Do not use the product near a heat source such as direct sunlight, gas Do not install or clean the product in a sink, bathroom or other stove, lighter, heating appliance, and furnace. places where water can enter. Danger There is a danger of electric leak, electric shock, Electric leak, electric shock or fire may occur. discoloration or deformation. If water enters the product, discontinue the use, Do not place the power cord near a heat source. If the unplug the device, and contact Customer Center.
- Page 8 IMPORTANT SAFETY PRECAUTIONS During Use Never use the product without the inner pot. Do not touch the inside of the inner pot, Do not use a deformed inner pot. pressure weight, clean cover, etc. during or after Only use a genuine, dedicated inner pot. There is a danger of electric shock or fire. cooking rice or other food since they are hot. Warning If you have added rice and There is a danger of burn due There is a danger of fire, water into the product to the high temperature.
- Page 9 Before Use During Use To wash the inner pot, soak it in water sufficiently before cleaning, and do Scrubbers for Cleaning Inner Pot not use a coarse scrubber, metallic scrubber, brush or abrasive as it may May Be Used May Not Be Used peel off the coating on the inside and outside of the pot. Caution Microfiber scrubber Iron scrubber In particular, do not use an abrasive, toothpaste, or other polishing agents to wash the surface of the inner pot. Sponge scrubber Green scrubber Discoloration may occur, or the coating may peel off. Mesh scrubber Scrubber for burnt pots Do not lift the product by...
-
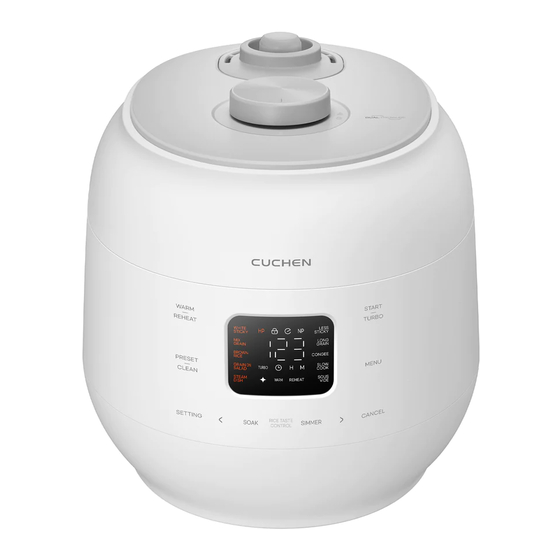
Page 10: Started Part Names And Functions
PART NAMES AND FUNCTIONS Front/Internal Parts Pressure weight Automatic steam exhaust unit Adjusts the inner pressure of the (steam outlet) inner pot to keep it consistent. The built-in automatic steam exhaust unit automatically discharges steam from the inner pot. Lid handle Cooking will not start if the handle is not in the "locked (●)" position. Steam cover You can open the lid when the handle is in the "open ( )" position. Pressure packing Forms a tight seal to prevent steam from escaping. It is recommended to replace Safety sensor the pressure packing periodically since its Detects the temperature inside the life span is about 1-3 years depending on inner pot. - Page 11 Before Use Control/Display Do not clean the control/display panel with a liquid containing volatile ingredients (e.g. alcohol, acetone). Doing so may discolor the panel or erase the printed text and symbols on the panel. Caution Number Name Function [WARM/REHEAT] • Used to select the Warm and Reheat functions. • Used to preset cooking and do automatic cleaning. If you press the button once, you can preset the cooking, and if you press the [PRESET/CLEAN] button twice, you can use automatic cleaning. • Used to control the warming temperature, warming heat level, and taste fine- [SETTING] tuning.
-
Page 12: Taking Care Of The Product
TAKING CARE OF THE PRODUCT How to Clean the Clean Cover After cleaning the clean cover, be sure to dry it before attaching it to the lid. • If you do not clean the clean cover, it will cause an odor during warming. (Unplug the product and let the main body cool down before cleaning it.) • Wipe the main body and lid with a dry cloth. Do not use benzene, thinner, etc. • While using the product, rice water on the clean cover, lid or inside of the inner pot may create starch films, and this is not an unsanitary phenomenon. • If you do not clean the clean cover, evaporation of internal moisture during cooking may cause small amounts of vapor to come out through the sides of the lid. Hold the clean cover handle and pull it in the direction of the arrow to easily remove it from the lid for cleaning. When cleaning the clean cover, push the corner of the clean cover handle at the front as shown in the figure and separate the outer packing as well. - Page 13 Before Use On the back of the clean cover, press the center of the clean cover handle in the direction of the arrow to fix it in place. Rear To mount the outer packing on the clean cover, position the packing so that the letters on it are upright, fix the groove on the packing into the clean cover starting at ① and secure it in place by pressing it in a circle in the direction of ②. (The front side of the packing is marked with the word 'Front' on the top and bottom.) To attach the clean cover on the pressure lid, hold the clean cover handle, align it with the holder at the center of the pressure lid, and push it in with force in the direction of the arrow. Precautions When Attaching Clean Cover • Be sure to check the front and back of the clean cover. • Do not insert screws or other foreign matters into the holes on the clean cover. • Be sure to install the clean cover before use. _ _CRS-FWK0640_ENG.indb 13 _ _CRS-FWK0640_ENG.indb 13 2023-05-17 2023-05-17 9:56:01 9:56:01...
- Page 14 TAKING CARE OF THE PRODUCT How to Replace Pressure Packing • The packing is difficult to be pulled out because it is designed to prevent leakage of steam, but you can pull it out with force when cleaning is needed. • The packing is a consumable item. If there is a steam leak, remove the packing and clean it. After cleaning, fix it back in as shown below and check the condition. If steam is still leaking, purchase a new packing at the dealer shop or the service center and replace the old one. • It is recommended to replace the pressure packing periodically since its life span is about 1-3 years depending on the number of uses. (The pressure packing is made of silicone.) Pull out the pressure packing by hand as shown in the figure to remove it. Align the attachment marks on the pressure packing and pressure lid as shown in the figure and push in the spot. External fixing bump Internal fixing bump • Pressure packing Insertion order 1 2 The four spots of attachment marks have been inserted. Insert the spots in the numerical order.
- Page 15 Before Use Using the pen with the lid, rub the pressing part (A→B) of the pressure packing in the direction of the arrow in the figure to complete the insertion. This is when it is properly inserted. Properly Assembled Improperly Assembled The packing maintains a circular shape. • If the packing is attached incorrectly, steam may leak out during use, posing a risk of burn and causing the rice to be undercooked. Please confirm that it is attached correctly before use. Caution: After cleaning the packing, be sure to follow the above instructions in order to prevent steam leakage. _ _CRS-FWK0640_ENG.indb 15 _ _CRS-FWK0640_ENG.indb 15 2023-05-17 2023-05-17 9:56:02...
- Page 16 TAKING CARE OF THE PRODUCT Cleaning the Product • Unplug the product before cleaning it. Do not sprinkle water on it or wipe it with benzene, thinner, etc. • If you do not thoroughly clean the product, there may be odors during warming. Caution Inner pot Pressure lid, pressure packing Do not use a coarse scrubbier, metallic scrubber, brush, Soak a dish towel in hot water, wring it out, and wipe abrasive, etc. As the inner pot may be damaged or off foreign matters. Cleanliness of the pressure packing deformed, use a kitchen detergent with a soft cloth or a maintains performance of the product and suppresses sponge to clean it. odors. Especially, do not wipe the inner pot using abrasives or Do not remove the pressure packing after use, and be other brighteners to brighten its surface. It may cause sure to clean it with a clean cloth. discoloration. Water collector Separate the water tray and clean it thoroughly. Clean the separated water tray with a mild dish detergent and a sponge. Inside of main body Remove the inner pot and remove any foreign matters on the bottom before use. If foreign matters are caught on the automatic temperature sensor or the bottom, the product will not be able to detect temperatures, causing undercooking, abnormal operation, or fire. Do not clean the outer rubber material of the sensor with sharp objects, rough scrubbers, or rough dishcloths, and clean softly with smooth dishcloths. Be careful not to damage (break) the metal plate or outer rubber packing of the Accessories sensor. This may result in product degradation.
- Page 17 Before Use How to Clean a Clogged Pressure Nozzle Caution: Do not touch these parts immediately after cooking because they are hot. It may cause burns. If the packing of the pressure Pressure weight/Pressure control nozzle control nozzle is out of place If there is water collected, as shown in the figure, secure wipe it off with a well wrung-...
-
Page 18: Operating How To Cook Tasty Rice
HOW TO COOK TASTY RICE Delicious rice starts with good water level control! - Based on 4 servings of plain rice - ● When cooking old rice or When cooking new Rice Type Water Adjustment making soft-boiled rice rice or soaked rice or When cooking old rice Higher than the mark making hard-boiled rice When cooking new rice Lower than the mark When cooking soaked rice... - Page 19 White Sticky Water mark Produces sticky and plump rice. (4 servings) Less Sticky Produces soft and less sticky rice. Rinse 4 cups of rice and put it in the inner pot, and put water into the inner pot up to level 4 of the Plain scale. Melanoising Phenomenon (Rice Browning) The Cuchen electric pressure cooker may produce slightly burnt rice with a pale brown color on the bottom. This Notes phenomenon is called "melanoising," which gives rice savory fragrance and flavor. Glutinous Rice Cooking / Warming When cooking or warming, glutinous rice produces a murky (brownish) color and a peculiar smell because it contains more amylose than non-glutinous rice. _ _CRS-FWK0640_ENG.indb 19 _ _CRS-FWK0640_ENG.indb 19 2023-05-17 2023-05-17 9:56:04 9:56:04...
-
Page 20: Instructions How To Cook Rice
HOW TO COOK RICE Basic Cooking Instructions Plug in the cooker and close the lid. • Remove moisture or foreign substances from the auto temperature sensor’s surface. (Maintain the auto temperature sensor clean to always cook savory and tasty rice.) • Make sure that the outer surface of the inner pot is completely dry and clean before placing it inside the cooker. • Check if the pressure packing and the clean cover handle are properly installed on the clean cover, and install the clean cover. Turn the lid lock to the locked ( ) position. ● • Always make sure that the pressure weight is level. • Pressing the [START/TURBO] button when the lid lock is not in the locked ( ● position will not start cooking. Caution: When cooking, steam leakage is prevented and the cooker works properly only when the pressure packing and clean cover handle are properly installed on the clean cover. Use the [Menu] button to select the desired menu item. Flashes Flashes • Each time you press the [Menu] button in the standby mode, the menu is selected in the following order: White Sticky → Mix Grain → Brown Rice → Grain on Salad →... - Page 21 Using the Product Cooking Times by Menu Item Classification Classification No. of Servings Cooking Time Dishes Menu Item Menu Item White Sticky 1 to 6 servings Approx. 25 to 40 mins. Plain rice, nutritious rice in hot pot, black rice White Sticky Turbo 1 to 4 servings Approx. 17 to 25 mins. Plain Rice Plain rice, rice with stir-fried octopus, seasoned vegetables bibimbap, curry Less Sticky 1 to 4 servings Approx. 35 to 45 mins. and rice, bulgogi with rice, fried tofu rice balls, kimbap, kimchi fried rice Multi-grain rice, five-grain rice, assorted mushroom rice, rice with nuts, Mix Grain 1 to 4 servings Approx. 35 to 45 mins. mushroom and bamboo shoot rice Brown rice, mushroom tian, brown rice with seasoned vegetables, green Brown Rice...
-
Page 22: How To Adjust Soaking And Simmer
HOW TO ADJUST SOAKING AND SIMMER Soaking and Simmer Control You can fine-tune the taste of rice according to your taste by selecting the level of texture (stickiness, softness) and flavor (savoriness). The soaking and simmer control function can be used in White Sticky, Less Sticky, Mix Grain, and Brown Rice menus. If you use the soaking or simmer function, it takes extra time to finish cooking depending on the selected menu and level (from level 1 to 3). The extra time may differ from the time shown on the rice cooker depending on the type and condition of the grain and the use conditions. The graph of rice taste for each level of soaking and simmer <Soaking> Level 1: Produces soft rice. Level 2: Produces sticky rice. Level 3: Produces Soaking Control sticky and well-cooked soft rice. Level ① Level ② Level ③ <Simmer> Level 1: Produces rice with soft scorched rice crust. Level 2 : Produces rice Simmer Control with scorched rice crust and savory fragrance. Level 3 : Produces rice with hardened scorched rice crust like nurungji and savory smell. Level ① Level ② Level ③... -
Page 23: How To Fine-Tune The Taste
HOW TO FINE-TUNE THE TASTE Fine-tuning Taste You can fine-tune the taste of rice according to your taste by adjusting the soaking time or heating temperature. The Fine-tuning Taste function can be used in White Sticky, Less Sticky, Mix Grain, Long Grain, Brown Rice menus. Press the [SET] button twice in the standby mode. Use the [MENU] button to select the desired menu item and press the Flashes Flashes [START/TURBO] button. • Each time you press the [Menu] button, the menu is repeatedly selected in the following order: White Sticky → Mix Grain → Brown Rice → Less Sticky → Long Grain → White Sticky. Use the [<] and [>] buttons to select the soaking time and press the [START/ TURBO] button. Flashes Flashes • Each time you push [<] or [>] button, 0 ↔ 2 mins ↔ 4 mins ↔ 6 mins ↔ 8 mins ↔ 10 mins ↔... -
Page 24: How To Use Preset Cooking
HOW TO USE PRESET COOKING In case of preset cooking (when presetting cooking to 8 hours later for Mix Grain menu) Press the [PRESET/CLEAN] button once in the standby mode. If you do not place the lid handle in the Lock position and press the [PRESET] button, preset cooking will not operate. Before closing the lid, make sure that the clean cover is attached. Use the [<] and [>] buttons to select the preset cooking time. Flashes Flashes Flashes Flashes • If you press the [<] button, the number decreases by 1 hour, and if you press the [>] button, the number increases by 1 hour. • Press the [<] or [>] buttons for 1 second or longer to keep increasing or decreasing the number. • You cannot preset the time in minutes. • The preset time is the time when you want the cooking to be finished. • You can preset the time to up to 13 hours later. •... - Page 25 Using the Product Available timer ranges for each menu item • Preset cooking is not supported for White Sticky Turbo, Mix Grain Turbo, Grain on Salad, Steam Dish, Sous Vide and Slow Cook menus. • Once preset cooking started, the default settings for each menu will apply. (Recall or control of the soaking/simmer settings is not supported.) Menu Item Available for Preset Cooking Available Preset Time White Sticky, Mix Grain, Brown Rice, Less Sticky, Long Grain, 1 hour to 13 hours Congee Cautions for Preset Cooking • Because rice can go bad more easily in summer, make sure that the preset time does not exceed 10 hours. • If the rice package has been open for a long time, or if the rice is excessively dry, the resulting rice may be layered or half- crushed. • If rice is half-cooked, add about 50% more water to the indicated water level. • If you run preset cooking when the inner pot is hot immediately after cooking rice, the rice may go bad, so allow the inner pot to cool down enough before starting preset cooking. • Avoid setting a long preset time because the ingredients may go bad depending on the ingredient types and temperature. •...
-
Page 26: Grain On Salad Cooking Instructions
GRAIN ON SALAD COOKING INSTRUCTIONS Grain on Salad This menu produces the rice with the savory taste of grains and the less sticky texture suitable for salad. Also, you can easily cook and enjoy the rice without soaking it. You can eat the rice put on top of a salad as a substitute for a meal, which gives you a feeling of fullness, or use it for a dish other than rice. Brown Grain Lentils Quinoa Millet Barley Kamut Chickpea Adlay Rice Ingredient : Water 1C : 1C 1C : 1C 1C : 1C 1C : 1C 1C : 1C 1C : 1C 1C : 1C 1C : 2C 1C : 1C Time 25 minutes 20 minutes 25 minutes 30 minutes 50 minutes 40 minutes 40 minutes 60 minutes 60 minutes Ingredient : Water 2C : 1.5C 2C : 1.5C... -
Page 27: Steam Dish Cooking Instructions
STEAM DISH COOKING INSTRUCTIONS Cooking Instructions (Steam Dish 20 minutes) Select Steam Dish with the [Menu] button once in the standby mode. Flashes Flashes Flashes Flashes Use the [<] and [>] buttons to select the cooking time. Flashes Flashes • Time settings available for Steam Dish: 15-90 minutes • Press the [<] or [>] button to change the time. • Steam Dish: 20 ↔ 25 ↔ 30 ↔ 35…. 80 ↔ 85 ↔ 90 ↔ 15 ↔ 20 Flashes Flashes •... -
Page 28: Slow Cook/Congee Instructions
SLOW COOK/CONGEE INSTRUCTIONS Cooking Instructions (Slow Cook 60 minutes) Select [Slow cook] with the [Menu] button once in the standby mode. Flashes Flashes Flashes Flashes Use the [<] and [>] buttons to select the cooking time. Flashes Flashes • Time settings available for Slow Cook: 60-770 minutes • Press the [<] or [>] button to change the time. Flashes Flashes • Slow Cook: 60 ↔ 70 ↔ 80 ↔ 90…. 740 ↔ 750 ↔ 760 ↔ 770 ↔ 60 •... - Page 29 Using the Product Cooking Instructions (Congee 60 minutes) Select [Congee] with the [Menu] button once in the standby mode. Flashes Flashes Flashes Flashes Use the [<] and [>] buttons to select the cooking time. Flashes Flashes • Time settings available for Congee: 60-120 minutes Flashes Flashes • Press the [<] or [>] button to change the time. • Congee: in 5 minute increments • Press and hold the [<] or [>] button for 1 second or longer to keep increasing or decreasing the number. Press the [START/TURBO] button. • Once Congee starts, the cooker displays the remaining cooking time. _ _CRS-FWK0640_ENG.indb 29 _ _CRS-FWK0640_ENG.indb 29 2023-05-17 2023-05-17 9:56:06 9:56:06...
-
Page 30: Sous Vide Recipe
SOUS VIDE RECIPE Time (hr) Ingredient Thickness (cm) Temperature (℃) Sous Vide-Chicken breast 2.5 - 3 63 - 69 4 - 6 Sous Vide-Beef (tenderloin, rib eye, T-bone, 2.5 - 3 56.5 - 62 chop, cutlet) • Sous Vide is a recipe that preserves taste, flavor, moisture, texture and nutrients by vacuum-packing ingredients and additional seasoning in a sanitary plastic bag that can be completely sealed and heated, and then cooking them at a relatively lower temperature (near 60℃) than normal cooking temperature for a long time. • The temperature setting for Sous Vide is based on the average water temperature maintained after reaching the set temperature, and a deviation of around ±5℃ may occur (based on 1.5L of water). • Cooking time and temperature are only for recommendation and you can cook with the recipe that suits your taste. • If there is no vacuum packaging machine, you can use a zipper bag to remove as much air as possible for packaging. • Ingredients cooked with the Sous Vide menu should be eaten immediately or frozen. Sous Vide Cooking Instructions Select [Sous Vide] with the [Menu] button once in the standby mode. Flashes Flashes Flashes Flashes Use the [<] and [>] buttons to select the cooking temperature and press the [SET] button. -
Page 31: Switching Warming/Reheat
SWITCHING WARMING/REHEAT Switching to Warming after Cooking Once cooking is finished, the cooker automatically enters the warming mode. Or you can press the [WARM/REHEAT] button in the standby mode. • Once switched to the warming mode, the cooker displays the elapsed warming time instead of the current time. Time is displayed in minutes up to 59 minutes, and from then on, it is displayed in hours up to 199 hours. -
Page 32: How To Adjust Warming Temperature
HOW TO ADJUST WARMING TEMPERATURE How to Adjust Warming Temperature Press the [SET] button once in the standby mode. Use the [<] and [>] buttons to select the warming temperature. • Each time you press the [<] or [>] button, 69℃ ↔ 70℃ ↔ 71℃ ↔ 72 ℃ ↔ 73℃ ↔ 74℃ ↔ 75℃ ↔ 76℃ ↔ 77℃ ↔ 78℃ ↔ 79℃ ↔ 80℃ ↔ 69℃ are repeatedly selected in the specified order. -
Page 33: Auto Clean
AUTO CLEAN Auto Clean Function You can use the Clean mode to keep the steam vent inside the lid clean. This feature removes foreign substances, thus eliminating odor and preventing germs from spreading. Using the Auto Clean Function • Be careful as high-temperature, high-pressure steam may be discharged through the steam outlet. • Do not use detergent, soap, or any other chemical products for cleaning. Use water only. Caution Use the measuring cup and the Auto Clean water scale of the inner pot to pour in water. Insert the inner pot into the rice cooker. Close the lid, and turn the lid lock to the locked ( ) position. ● Before closing the lid, make sure that the clean cover is attached. In the standby mode, press the [PRESET/CLEAN] button twice to select the Clean mode and then press the [START/TURBO] button. • Auto Clean is carried out for 20 minutes. • When Auto Clean is finished, the cooker enters the standby mode. Flashes Flashes _ _CRS-FWK0640_ENG.indb 33 _ _CRS-FWK0640_ENG.indb 33 2023-05-17 2023-05-17 9:56:07 9:56:07... -
Page 34: Food Recipes
FOOD RECIPES White Sticky Less Sticky White Sticky Turbo Ingredients: rice, water Ingredients: rice, water Ingredients: rice, water ● ● ● How to Cook How to Cook How to Cook ● ● ● 1. Measure the rice with the measuring cup 1. Measure the rice with the measuring cup according 1. Measure the rice with the measuring cup according according to the number of servings you need. to the number of servings you need. to the number of servings you need. 2. Rinse the rice thoroughly until the rice water 2. Rinse the rice thoroughly until the rice water 2. Rinse the rice thoroughly until the rice water becomes clear. becomes clear. becomes clear. 3. Put the washed rice into the inner pot and pour 3. Put the washed rice into the inner pot and pour 3. Put the washed rice into the inner pot and pour the the right amount of water for the number of... - Page 35 Using the Product Mix Grain Turbo Brown Rice Sprouts Rice Ingredients (2 servings): 1 ⅓ cups of rice, ½ cup of Ingredients: brown rice, water Ingredients: 2 cups of brown rice, a small amount of ● ● ● various mixed grains, water How to Cook vegetable sprouts, water ● How to Cook Seasoned red pepper paste: ½ cups of red pepper ● ● 1. Measure the brown rice with the measuring cup paste, 40g of minced beef, 1 tablespoon of sesame oil, 1 1. Measure the rice and mixed grains with the according to the number of servings you need. tablespoon of honey, 1 tablespoon of sugar, and ⅓ cups measuring cup according to the number of 2. Wash the brown rice and rinse it until the water of water servings you need.
- Page 36 FOOD RECIPES Mushroom & Bamboo Green Tea Rice with Brown Rice with Shoot Rice Chicken Breast Seasoned Vegetables Ingredients: 4 cups of rice, 200g of oyster mushrooms, Ingredients: 2 cups of brown rice, 3g of green tea Ingredients: 2 cups of brown rice, 2 ½ cups of kelp stock, ● ● ● 100g of bamboo shoots, 10 ginkgo nuts, 1 tablespoon of leaf, 10g of green tea powder, 4 pieces of chicken 50g of chamnamul, 100g of boiled bracken, 100g of bean refined rice wine, and water breasts, 5g of celery, a little olive oil, salt, pepper sprouts, 3 shiitake mushrooms, ⅓ carrot, 1 tablespoon Seasoning sauce: 4 tablespoons of soy sauce, ½ powder, lime, rosemary, and water of sesame oil, 1 teaspoon of minced garlic, a small ● teaspoon of red pepper powder, 2 teaspoons of ground How to Cook amount of ground sesame mixed with salt ●...
- Page 37 Using the Product Samgyetang Stir-fried Shrimp with Boiled Pork Ketchup Ingredients: 600g of chicken, 4 cloves of garlic, ¾ Ingredients: 15 prawns, ⅓ of green onion, 30g of Ingredients: 600g of pork, 1 green onion, 1 ginger root, ● ● ● cups of glutinous rice, 1-2 roots of fresh ginseng, 2 onions, and 30g of carrots 5 cloves of garlic, 3 cups of water jujubes, 3 cups of water, a little salt and pepper Ketchup sauce: 4 tablespoons of ketchup, 1 ½ tablespoons of How to Cook ● ● How to Cook sugar, 1 ½ tablespoons of starch powder, 1 ½ tablespoons of water, ● 1. Remove fat from the pork and put it in the inner and a small amount of salt, soy sauce, and pepper 1. Cut both sides of the chicken 's stomach and pot with chopped green onion, ginger, and garlic, How to Cook ●...
- Page 38 FOOD RECIPES Steamed Potato Japchae Braised Short Ribs Ingredients: 3 potatoes (up to 200g), 2 cups of water Ingredients: 150g of glass noodles, ½ green bell pepper, ½ Ingredients: 600g of beef rib, 1 carrot, ½ onion, ¼ pear, ● ● ● How to Cook red bell pepper, 70g of carrots, 70g of onions, a little spinach, 10 chestnuts, 10 ginkgo nuts, 2 tablespoons of sugar, 2 ● 70g of enoki mushrooms, 70g of fish cakes, 1 ½ tablespoons tablespoons of liquor 1. Pour 2 cups of water into the inner pot. of cooking oil, ½ cup of water Seasoning sauce: 7 tablespoons of aged soy sauce, ● 2. Place the steam plate in the inner pot and put Seasoning sauce: sugar, soy sauce, sesame oil, sesame, 1 tablespoon of ground sesame mixed with salt, 1 ●...
- Page 39 Using the Product Steamed Egg Steamed Eggplant Steamed Sweet Potato Ingredients: 3 eggs, 300ml of water or anchovy Ingredients: 1 eggplant, 2 cups of water Ingredients: 3 sweet potatoes (up to 150g), 2 cups of ● ● ● and kelp stock, ½ teaspoon of salted shrimp, small Seasoning sauce: 2 tablespoons of aged soy sauce, water ● amount of salt, 15g of carrots, 15g of the green 1 red pepper, 1 green pepper, ½ tablespoon of red How to Cook ● onion (green parts) pepper powder, 1 tablespoon of vinegar, a small 1. Pour 2 cups of water into the inner pot. How to Cook amount of ground sesame mixed with salt, ½ stalk ● 2. Place the steam plate in the inner pot and put the of green onion, 4 cloves of garlic, and 2 teaspoons of 1. Put the eggs and water or anchovy and kelp cleaned sweet potatoes on the plate.
- Page 40 FOOD RECIPES Steamed Clam Boiled Egg Baked Egg Ingredients: 2 clams, 15g of beef, ½ egg white, Ingredients: 5 eggs, 2 cups of water, and 1 to 2 drops Ingredients: 5 eggs, ½ cup of water, and 1 to 2 drops ● ● ● ½ hard-boiled egg, 1 teaspoon of minced green of vinegar of vinegar onion, ½ teaspoon of minced garlic, a little salt and How to Cook How to Cook ● ● pepper, and 2 cups of water 1. Put the eggs, water, and vinegar in the inner pot. 1. Put the eggs, water, and vinegar in the inner pot. How to Cook ● 2. Place the inner pot inside the rice cooker and 2. Place the inner pot inside the rice cooker and 1. Mince the beef finely.
- Page 41 Using the Product Mushroom Tian Steamed Egg with Steamed Zucchini Tomatoes Ingredients: 2 cups of brown rice, 20g of brown Ingredients: ½ of tomato, 2 eggs, 100g of milk, 3 Ingredients: ½ of zucchini, 2 cups of water ● ● ● gravy sauce, a little salt, 2 sesame leaves, ⅓ teaspoons of water, and a small amount of chopped Seasoning sauce: 2 tablespoons of aged soy sauce, 1 ● zucchini, 1 pack of shimeji mushrooms green onions and salt tablespoon of minced green onions, ½ tablespoon How to Cook How to Cook of sesame oil, ½ tablespoon of red pepper powder, ● ● a small amount of shredded red pepper, 1 teaspoon 1. Thoroughly wash the brown rice and pour it in 1. Wash the tomato thoroughly and drain the water. of sugar, 1 tablespoon of minced garlic, and ½...
- Page 42 FOOD RECIPES Rice Cake Gratin Rice Pizza Plain Porridge Ingredients: 100g of sliced rice cake, 2 boiled eggs, Dough ingredients: 200g of rice Ingredients: 1 cup of rice, and 6 cups of water ● ● ● 1 sweet potato, 80g of pizza cheese, 2 slices of Topping ingredients: 4 ham slices, 4 champignon How to Cook ● ● cheese, a little olive oil, 1 cup of white sauce, and a mushrooms, 4 tablespoons of canned corn, 2 crab 1. Thoroughly wash the rice. Then, soak it in water little parsley powder sticks, 80g of pizza cheese, and 5 tablespoons of for 30 minutes. White sauce: 20g of flour, 20g of butter, 200g of pizza sauce ● 2. Put soaked rice in the inner pot and pour 6 cups milk, and a little salt and white pepper (Sauté melted How to Cook ● of water. butter with flour and boil it with milk until the texture 1. Peel the champignon mushrooms and cut them 3. Place the inner pot inside the rice cooker and gets thick. Then, add some salt and white pepper.) keeping their shape, then tear the crab sticks close the lid.
- Page 43 Using the Product Adlay Porridge Pine Nut Porridge Abalone Porridge Ingredients: 1 cup of adlay, 5 cups of water, ½ Ingredients: 1 cup of rice, 6 ½ cups of water, ½ cup of Ingredients: 1 cup of rice, 6 cups of water, 1 ● ● ● shiitake mushroom, ½ teaspoon of sesame oil, and pine nut, and a small amount of salt tablespoon of sesame oil, 1 abalone, and a small a small amount of salt How to Cook amount of salt ● How to Cook How to Cook ● ● 1. Thoroughly wash the rice. Then, soak it in water 1. Thoroughly wash the adlay and soak it in water for 30 minutes. 1. Thoroughly wash the rice. Then, soak it in water for at least 12 hours. 2. Wash the pine nuts and grind them in a blender.
- Page 44 FOOD RECIPES Sweet Pumpkin Soup Broccoli Porridge Sweet Potato & Apple Porridge Ingredients: 150g of sweet pumpkin, 1 ½ Ingredients: ⅔ cup of rice, 30g of broccoli, 1 ½ cups Ingredients: 100g of sweet potatoes, 100g of apples, ● ● ● tablespoons of bread crumbs, 100ml of water, a of water, and a small amount of salt and 50ml of water small amount of salt, and 1 teaspoon of milk How to Cook How to Cook ● ● How to Cook ● 1. Wash the rice and soak it in water for 30 minutes. 1. Peel the sweet potatoes and apples and slice 1. Select a ripe sweet pumpkin, peel it, and remove Put the rice, water, and broccoli into a blender them thin.
-
Page 45: Service
READ THIS BEFORE CONTACTING CUSTOMER SERVICE. Please check the following table before contacting Customer Service. A fully functional cooker may appear to malfunction if you are not familiar with how to use the rice cooker or due to easily correctable causes. If this is the case, check the following and you may be able to solve simple issues without having to contact Customer Service. If the problem persists, contact Customer Service. Symptom Please check How to Troubleshoot Unable to cook occasionally. Is the power cord plugged in? Plug in the power cord securely. Takes too long to cook. Has the power gone out while cooking? If the power has gone out for an extended duration of time, start over again. Did you press the [CANCEL] button or do any Do not press any buttons while cooking is in other operation while cooking? progress. - Page 46 READ THIS BEFORE CONTACTING CUSTOMER SERVICE. Symptom Please check How to Troubleshoot The cooker makes a noise Is it not a relay sound (cooking sound) when Cooking relay sound ‘crackle’ is a normal while cooking or keeping rice cooking? operation sound. warm. Is there any water between the inner pot and Wipe the water between the inner pot and the the hot plate? hot plate. Rice develops a smell or Did you keep the rice warm for more than 12 Do not warm the rice for more than 12 hours. discolors while being kept hours? Did you warm the rice that was cooked (Refer to page 31.) warm.
- Page 47 CUCHEN 压力电饭煲 [US] CRS-FWK0640 Series 请务必详细阅读本使用说明书,正确使用"CUCHEN"压力电饭煲。 阅读后,请将其保管在用户随手可及处。 本使用说明书内含质量保证书。/ 本说明书为通用版,因此其中包含的图片及内容可能会与您购买的产品有所不同。 / 本说明书可能会因公司情况变化发生变更。 US-CRS-FWK0640-V1 _ _CRS-FWK0640_CHS.indb 1 _ _CRS-FWK0640_CHS.indb 1 2023-05-17 2023-05-17 9:57:05 9:57:05...
- Page 48 等。 有火灾或变形的危险。 可能导致爆炸、火灾或产品 故障。 可能导致火灾或产品故障。 托盘 请勿将本产品用于烹饪指定菜单以外的食物(豆类、红豆、番茄、粉状食品等)。 蒸气排放口可能堵塞,造成爆炸或燃烧的危险。 注意 加热方式(电热板) 在热板法中,内板的热量传递到内锅来煮饭。 (大锅法) 产品规格 产品名称 压力电饭煲 CRS-FWK0640 Series 额定电压及频率 120 V~, 60 Hz 额定功率 1 040 W 最大烹饪容量 1.08 L (6人份) 调节装置压力/安全装置压力 68.6kPa / 205.9 kPa 产品尺寸(长×宽×高) 358×263×273 mm 重量 5.4kg 为了改善产品的性能,产品规格有可能有所变动。...
- Page 49 目 录 使用前 安全注意事项 ………………………………… 4 各部分名称及功能 …………………………… 8 产品清洁方法 ………………………………… 10 使用 如何煮出美味的饭 …………………………… 16 煮饭方法 ……………………………………… 18 浸泡、焖调节方法 …………………………… 20 细微调节饭味方法 …………………………… 21 预约煮饭方法 ………………………………… 22 沙拉杂粮煮饭方法 …………………………… 24 万能美味蒸使用方法………………………… 25 慢炖/粥使用方法 …………………………… 26 低温慢煮烹饪指南 …………………………… 28 保湿保温 / 再加热 ………………………… 29 保温温度调节方法...
-
Page 50: 安全注意事项
安全注意事项 ※ 为保证用户的安全,防止财产损失。 ※ 请详阅注意事项,正确使用产品。 危险 不遵守指示内容可能导致重伤甚至死亡 警告 不遵守指示内容可能导致严重受伤和物质损失 注意 不遵守指示内容可能导致轻微受伤和物质损失 关于电源 请不要使用交流 120V以外的电源。 将电源插头插入或拔出插座时,请保持手部 本产品是 120V~ 专用产品。 没有沾水。 请务必将其插入额定电流为 15A 以上的 使用变压器可能导致触电、火灾。 危险 120V 专用插座。 不使用额定专用插座, 用湿手触碰电源插头和 有可能发生触电或火灾 120 V~ 插座时,有触电危险。 危险。 请使用 15A 以上的电 源延长线。 请勿拉拽电源线,务必抓住电源插头拔下。 请勿任意连接或加工电源插头。 请勿反复插拔电源插头。 冲击可能导致触电和火... - Page 51 使用前 关于安装 请勿将本产品放在有光线直射的地方或燃气灶、打火机、电热器 请不要将产品安装在洗手池、浴室等容易进水之处。 具、炉子等靠近热源的地方使用。 危险 有漏电、触电、变色、变形的危险。 有漏电、触电、火灾的危险。 请勿将电源线放在靠近热源的地方。 产品进水时,请停止使用, 因热源造成电源线损伤时, 拔出电源插头后,联系 A/S 客服中心。 有可能发生触电或火灾危险。 使用时,请与音响、电视等家电保持 2米以上的距离。 请不要在产品附近使用或保管 请不要将产品安装在灰尘多, 请勿将本产品放置在米桶或多功能搁板上。 可燃性气体和易燃物。 或有化学物质之处。 夹在缝隙中的电源线可能导致火灾和触电。 蒸汽排出时,多功能米桶和多 有火灾的危 可能导致触电、火灾、产品性 功能搁板可能造成机身损伤或 险。 能下降。 诱发火灾、触电。 请不要将产品安装在倾斜处,并 请注意防止手脚及其他物体绊 请防止产品、内锅掉落,或对 请将产品安装在距上方物体有 对其过度施加压力,或冲击。 到电源线,导致产品掉落。 其加以冲击。 1.5m 以上空间的场所。 注意 可能导致受...
- Page 52 安全注意事项 使用中 禁止在没有内锅的情况下使用。 煮饭和烹饪过程中或完成后,因内锅内部和 请勿使用已变形的内锅或专用内锅以外的其 压力阀、清洁盖等处温度过热,请勿用手触 他产品。 可能导致触电和火灾。 警告 碰。 已放入米和水时,请务 可能因高温造成烫伤的 可能会导致火灾及故 必与 A/S 服务中心联 危险。 障,同时存在爆炸的危 系,确认有无异常后再 压力阀掀开,蒸汽排 险。 使用。 出,能造成烫伤。 内锅变形或掉落时,请 使用专用内锅 使用专用内锅 联系 A/S 客服中心。 请勿将装饰罩、抹布或其他物品放在锅盖上 没有内锅的状态下,请勿放入清洁盖、金属 请勿在煮饭中拔下电源插头或按下其他按 使用。 性物质等进行使用。 钮。 产品火灾、变形或受压 可能导致触电和火灾。 可能导致故障。 可能造成爆炸危险。 (特别,注意儿童) 请勿在煮饭状态下或煮饭刚结束后,将脸或...
- Page 53 使用前 使用中 洗刷内锅时,经水充分泡后,内锅内外侧的镀膜可能会脱落,因此 内锅清洗用洗碗刷分类 请勿使用粗糙的洗碗布、金属性洗碗布、毛刷和抛光剂等擦拭。 注意 可以使用 不可使用 超细纤维洗碗刷 钢丝球 尤其,请勿为了内锅表面的光泽而使用研磨 剂、牙膏、其他抛光剂等进行擦拭。 海绵洗碗刷 绿色洗碗刷 可能导致变色或涂层脱落。 网眼洗碗刷 洗碗刷专用烧焦的锅 请勿握住内锅手柄提起产品。 清洁产品表面(尤其是金属部 烹饪(使用营养蒸、万能粥功 产品置于米桶或多功能架板上 握住内锅手柄提起产品会有锅 分)及清洁盖时,请勿使用粗 能)后,请务必清洁本产品。 时,请在煮饭时抽出架板。 盖弹起的危险。 糙的洗碗刷、金属洗碗刷、刷 烹饪后立即煮饭或保温会有异味 排放的蒸气可能损坏米桶和架 子、研磨剂等。 可能导致产品故障,破损和伤 混入饭内。请将内锅、清洁盖和 板。 害。 可能导致产品损坏和变形。 压力圈等擦拭干净后使用。 请勿向产品内喷放杀虫剂或化学物质等。 请将内锅手柄对准机体上的嵌 请勿将外部表面上粘有饭粒、异 入槽,然后将内锅放入机体。 物的内锅放入机体。...
-
Page 54: 各部分名称及功能
各部分名称及功能 正面/内部名称 压力阀 自动蒸汽调节装置(蒸气排放 调整内锅内部压力。 口) 带有自动蒸汽排放装置,可以自 动排放内锅蒸汽。 锅盖连接手柄 煮饭时,手柄标示在“锁定(●)” 蒸汽盖 位置才能操作。 手柄标示在“开启( )”位置时开 盖。 压力圈 保持密封,防止内锅内部的蒸气漏出。 压力圈的使用寿命根据使用次数约为 安心传感器 1~3 年,建议定期更换后使用。 感应内锅内部温度。 压力圈为消耗品,请通过 A/S 客服 中心或大型超市购买进行更换。 清洁盖 可拆卸清洗。 防止开盖装置 煮饭过程中产生一定压力时,运行安全 清洁盖压力圈 装置防止开盖。 清洁盖手柄 内锅手柄 内锅 特殊镀层,不易脱落、不易粘 锅。 接水槽 请在煮饭结束后把水倒掉,并拆下 操作屏/显示屏 接水槽进行清洁。... - Page 55 使用前 操作屏/显示屏 请勿使用内含挥发成分(酒精、丙酮等)的产品来清理操作屏/显示屏。 可能导致变色或印刷物脱落。 注意 编号 名称 功能 • 用于选择保温和再加热功能。 [保湿保温 / 再加热] • 用于预约煮饭及自动清洗。 [预约/清洗] - 按一次按钮可预约煮饭,按两次按钮,可使用自动清洗。 • 用于设置调节保温温度、调节保温加热量、细微饭味调节。 [设置] • 用于选择时间、温度等设定值。 [<]、[>] • 用于在偏软白米、不软不硬白米、混合杂粮、糙米 100 菜单中,利用各档位选择喜欢 [浸泡] 的耐嚼度与杂粮熟度的饭味。 • 用于在偏软白米、不软不硬白米、混合杂粮、糙米 100 菜单中,利用各档位选择香喷喷的饭味。 [焖] • 用于取消所有功能。 [取消] • 用于选择菜单。 [菜单] •...
-
Page 56: 产品清洁方法
产品清洁方法 清洁盖清洗方法 清洁盖清洗后,必须晾干后才能安装到锅盖上。 • 如不清洗,保温过程中可能会出现异味。(请务必拔下电源插头,待产品冷却后进行清洗。) • 请用干布擦拭机体和锅盖。请勿使用苯、辛那水等。 • 使用过程中,米汤可能会粘附在清洁盖、锅盖和内锅内部产生淀粉膜,但并不影响清洁卫生。 • 若不清洗清洁盖,煮饭中,因内部水分的蒸发,锅盖侧面可能会漏出微蒸汽。 握住清洁盖手柄,并沿箭头方向拉动即可方便地取下进行清 洗。 清洗清洁盖时,如图所示按下正面的清洁盖手柄环部取下, 再取下外侧密封圈。 请经常用厨房专用中性洗涤剂和海绵清洗,并用干布擦干。 _ _CRS-FWK0640_CHS.indb 10 _ _CRS-FWK0640_CHS.indb 10 2023-05-17 2023-05-17 9:57:10 9:57:10... - Page 57 使用前 请在清洁盖背面,沿箭头方向按下清洁盖手柄的中央部位嵌 入。 背面 安装清洁盖外侧密封圈时,保持清洁盖上的字朝向正面,将 密封圈槽从外侧某一部分 (①) 嵌入清洁盖,再沿 ② 号方 向旋转一圈安装密封圈。(密封圈正面部位(前面)的‘正 面’字样自下而上地显示。) 在压力锅盖上安装清洁盖时,握住清洁盖手柄,沿箭头方向 对准压力锅盖中央的支架后用力按压 组装清洁盖时的注意事项 • 必须确认清洁盖的正面和背面。 • 请不要将螺丝和其他物品,放入清洁盖的孔内。 • 请务必安装清洁盖后使用。 _ _CRS-FWK0640_CHS.indb 11 _ _CRS-FWK0640_CHS.indb 11 2023-05-17 2023-05-17 9:57:11 9:57:11...
- Page 58 产品清洁方法 压力圈更换方法 • 为防止漏气,密封圈被固定而不易脱落。但用手握住密封圈用力拉拽可将其取下,必要时可取下进行清洗。 • 密封圈属消耗品。漏气时,请取下密封圈进行清洗,按下列方法装上密封圈后进行确认。之后若仍出现漏气现 象,请在代理店或服务中心购买密封圈后进行更换。 • 压力圈的使用寿命根据使用次数约为 1~3 年,建议定期更换后使用。(压力圈由硅胶构成。) 如图,请用手按住并拖拽来取下压力圈。 将压力圈的对准部和压力锅盖的对准部如图所示对齐 插入。 外侧嵌入凸起 内侧嵌入凸起 • 压力圈插入顺 序 1 2 4 处对准部均已插入的状态。请按号码顺序进行对 齐。 压力圈 4 个 对准部 压力锅盖 4 个对准部 _ _CRS-FWK0640_CHS.indb 12 _ _CRS-FWK0640_CHS.indb 12 2023-05-17 2023-05-17 9:57:11 9:57:11...
- Page 59 使用前 请用带帽的笔,按照图中箭头方向按揉压力圈的按压部 (A→B 顺序),以完成插入。 正常完成附着的状态。 组装正确时 组装错误时 压力圈保持圆形状态 • 若未正常附着,使用中的蒸 汽泄漏会使米饭夹生或造成 烫伤。使用前请检查是否正 常附着。 注意:清洗密封圈后,必须遵守以上内容才可以防止蒸汽泄漏。 _ _CRS-FWK0640_CHS.indb 13 _ _CRS-FWK0640_CHS.indb 13 2023-05-17 2023-05-17 9:57:11 9:57:11...
- Page 60 产品清洁方法 产品清洗方法 • 请拔下电源插头后清洗,而且不要直接喷水或用苯、辛那水等擦拭产品。 • 未清洁产品时,会在保温时产生异味。 注意 内锅 压力锅盖、压力圈 禁止使用粗糙的洗碗布、金属性洗碗布、毛刷和抛光剂 请将软布用温水沾湿,拧干后擦拭异物。清洁压力圈能 等擦拭。内锅可能损坏及变形,请使用厨房专用中性洗 有效保持产品性能,并抑制异味的产生。 涤剂和软布或海绵进行清洗。 使用后无需取下压力圈,但请使用干净的布擦拭。 尤其,请勿为了内锅表面的光泽而使用研磨剂、其 他抛光剂等进行擦拭。可能出现变色。 接水槽 请分离接水槽后,进行清洗。用厨房专用的中性洗涤剂 和海绵,彻底清洗拆下的接水槽。 主机内部 请取出内锅,并将底部沾有的异物清除后,再使 用。自动温度传感器或底部有异物时,无法感应温 度,从而导致米饭夹生、异常操作和火灾。传感器 外侧的橡胶材质部分,请勿用尖锐物品、粗糙的洗 碗刷、粗糙的抹布等用力清洗,请用柔软的抹布 轻柔清洗。请勿使传感器的金属板和外侧橡胶垫受 损。导致质量下降。 请不要在煮饭或保温刚结束后触摸(清洁)。 配件 有烫伤的危险。 请将配件清洗干净,并晾干后,再进行保管。 为保证卫生及安全使用,请务必使用清洗后的饭勺。 ※ 若饭勺使用后未清洗而反复使用,保温中的饭可能 容易发生变质(异味、变色)。尤其是在高温多湿 的夏季,饭勺上的细菌繁殖可能更加活跃,因此请 多加注意。 _ _CRS-FWK0640_CHS.indb 14 _ _CRS-FWK0640_CHS.indb 14 2023-05-17 2023-05-17...
- Page 61 使用前 压力喷嘴阻塞时的清洁方法 注意:煮饭刚结束后会烫,请不要触摸。会导致烫伤。 如图所示,压力调节喷嘴的压力 压力阀/压力调节喷嘴 有积水时,请用拧干的软布擦拭。 圈脱落时,会出现蒸气泄漏,请 将压力圈安装在喷嘴上。 蒸汽盖 蒸气排放口 ● 可用清洗模式清除蒸气排放装置的异物,并同时进行清洗。(请参考第31页。) 蒸气排放帽的清洁方法 注意:煮饭刚结束后蒸气排放帽较烫,请不要触摸。会导致烫伤。 如图所示,取下蒸气排放 请按位于正面的手柄,向 帽。 ① 的方向取下,经常清 洗。 组装蒸汽排放帽时,请对 将蒸气排放帽安装于产品 准①的孔,然后沿箭头方 时,先将蒸气排放帽安装 向按压并套紧。 至锅盖,然后按下箭头部 分将其牢牢固定。 _ _CRS-FWK0640_CHS.indb 15 _ _CRS-FWK0640_CHS.indb 15 2023-05-17 2023-05-17 9:57:13 9:57:13...
-
Page 62: 如何煮出美味的饭
如何煮出美味的饭 ● 美味的饭从调节水量开始! - 白米 4 人份量标准 - 用陈米煮饭或做软 用新米、泡好的米 米的种类 调水 饭时 煮饭或做硬饭时 用陈米煮饭时 比刻度多 用新米煮饭时 比刻度少 用泡好的米煮饭时 比刻度少 做硬饭时 比刻度少 做软饭时 比刻度多 比刻度多 比刻度少 用免洗米煮饭时,请按人数份量对准刻度标准。(免洗米:洗好的米) ● 保温时,如果有异味 - 请经常进行清洗。尤其,盖部清洁状态不佳,可能会导致细菌繁殖,保温时 可能会出现异味。 - 未经清洗直接使用内锅及配件容易导致饭粒变质和细菌繁殖,进而产生异 粘到饭粒或异物时, 请用拧去水的抹布擦 味。此时,请在内锅中加入水和醋的混合物,选择自动清洗功能,最后洗 蒸气排放口特别 干净。 净。(配合比率:自动清洗刻度的水、1 大匙食醋) 需要经常清洗。... - Page 63 请根据人数使用计量杯取米后洗净。 一杯为 1 人份。 请按照人数加水至相应的刻度线。 例)做 4 人份白米饭时 加水刻度 (4人份) 偏软白米 制作稠软饱满的饭。 不软不硬白米 将 4 杯米洗净并放入内锅,然后添 制作软糯的不软不硬的饭。 水至白米刻度 4 即可。 黑化现象(焦饭) 用 CUCHEN 压力电饭煲煮出的饭底层略焦,呈浅褐色。即为“黑化 (Melanoizing) 现象”,做出的饭喷香美味,味香 参考 纯正。 糯米煮饭/保温 糯米相较于粳米直链淀粉含量低,煮饭及保温时,出现浑浊的颜色(黄色)以及特有的香气。 _ _CRS-FWK0640_CHS.indb 17 _ _CRS-FWK0640_CHS.indb 17 2023-05-17 2023-05-17 9:57:14 9:57:14...
-
Page 64: 煮饭方法
煮饭方法 基本煮饭方法 插好电源插头后,盖好锅盖。 • 如果自动温度传感器沾有水分及异物,一定要清除。 (如果能保持自动温度传感器的清洁,那么随时可以做出独具风味的 美味的饭。) • 请在清除内锅周围的水分及异物后,将内锅放入锅体中。 • 安装清洁盖时,请确认压力圈、清洁盖手柄正确安装在清洁盖上。 请将锅盖的结合手柄旋转至锁定 ( ) 位置。 ● • 请时刻确认压力阀是否水平。 • 如果没有对准锁定 ( ),即使按下 [开始/快速] 按钮,也不会工作。 ● 注意:煮饭时,压力圈、清洁盖手柄必须正确安装在清洁盖上,才可防止蒸 汽泄露,并保证运行正确的功能。 请使用 [菜单] 按钮选择所需菜单。 闪烁 闪烁 • 待机状态下,每按一次 [菜单] 按钮,依次选择偏软白米 → 混合杂粮 → 糙米 100 → 沙拉杂粮 → 万能美味蒸 → 不软不硬白米 → 长粒 →... - Page 65 使用 各菜单煮饭时间 分类 煮饭量 煮饭时间 烹饪种类 菜单名 偏软白米 1 人份 ~ 6 人份 约 25 分钟 ~ 40 分钟 米饭、营养石锅饭、黑米饭 白米快速 1 人份 ~ 4 人份 约 17 分钟 ~ 25 分钟 米饭 米饭、章鱼盖饭、山菜拌饭、咖喱饭、烤肉盖饭、油豆腐寿司、紫 不软不硬白米 1 人份 ~ 4 人份 约...
-
Page 66: 浸泡、焖调节方法
浸泡、焖调节方法 浸泡、焖调节功能 浸泡、焖调节功能可分档调节口感(劲道、软糯)、香气(香喷喷),按喜好调节饭味。 浸泡、焖调节功能只能在偏软白米、不软不硬白米、混合杂粮、糙米 100 菜单使用。 若设定浸泡、焖功能,按选择的菜单与档(1~3 档),会延长时间。 根据使用的谷类种类及状态、使用环境条件延长时间,可能 和电饭煲上显示的时间有所不同。 浸泡、焖调节各档饭味图表 <浸泡> 浸泡调节 1 档:制作软糯的饭。 2 档:制作劲道的饭。 ①档 ②档 ③档 3 档:制作劲道、谷类口感软糯的饭。 <焖> 焖调节 1 档:制作软糯有焦糊的饭。 2 档:制作香喷喷的有焦糊的饭。 ①档 ②档 ③档 3 档:香喷喷的香和有如锅巴一样焦糊的饭。 浸泡 3 浸泡 2 浸泡 1 浸泡 0 口感... -
Page 67: 细微调节饭味方法
细微调节饭味方法 细微饭味调节功能 可以通过调节默认设定的浸泡时间或加热温度,调节出适合个人口味的饭味。 细微饭味调节功能只能在偏软白米、混合杂粮、糙米 100、不软不硬白米、长粒菜单使用。 请在待机状态下,按 2 次[设置]按钮。 利用 [菜单] 按钮选择菜单,然后按下 [开始/快速] 按钮。 闪烁 闪烁 • 每按一次 [菜单] 按钮,以 偏软白米 → 混合杂粮 → 糙米 100 → 不软不硬白米 → 长粒 → 偏软白米 的顺序循环选择。 请利用 [<]、[>] 按钮选择浸泡时间,然后按 [开始/快速] 按钮。 闪烁 闪烁 • 每按一次 [<]、[>] 按钮,以0 ↔... -
Page 68: 预约煮饭方法
预约煮饭方法 预约煮饭时(混合杂粮,8 小时后预约煮饭时) 请在待机状态下按 [预约/清洗] 按钮 1 次。 将锅盖手柄未对准锁定位置时,按下 [预约] 按钮将无法执行预约。 盖上锅盖之前,请确认是否已安装清洁盖。 请利用 [<]、[>] 按钮设定预约煮饭时间。 闪烁 闪烁 闪烁 闪烁 • 按 [<] 按钮,数字以 1 小时为单位减少,按 [>] 按钮,以 1 小时为单位增 加。 • 按 [<]、[>] 按钮 1 秒以上,数字连续增加或减少。 • 无法以分钟为单位进行设置。 • 预约时间是煮饭结束的时间。 •... - Page 69 使用 各菜单可预约的时间 • 白米快速、杂粮快速、沙拉杂粮、万能美味蒸、低温慢煮、慢炖菜单无法进行预约煮饭。 • 进入预约煮饭时,按各菜单默认设置煮饭。(浸泡、焖功能不可记忆及调节) 可预约的菜单 可预约的时间 偏软白米、混合杂粮、糙米 100、不软不硬白米、长粒、粥 1小时 ~ 13小时为止 预约煮饭时注意事项 • 夏季米容易发馊,请勿将预约时间设为 10 小时以上。 • 使用开封已久或过于干燥的米煮饭,会做出夹生饭或碎米饭。 • 饭夹生时,请比原本的水量刻度多加半个刻度的水。 • 在煮饭结束后,锅内较烫的状态下预约煮饭时,米可能发馊,请待锅内完全冷却后再预约。 • 随气温和食材的种类及状态不同,可能发生变质,因此,请尽量避免长时间预约。 • 米粒长时间沉淀时内锅底部沉淀了细微的淀粉和普通煮饭相比黑化现象(焦饭)可能会更加严重。 _ _CRS-FWK0640_CHS.indb 23 _ _CRS-FWK0640_CHS.indb 23 2023-05-17 2023-05-17 9:57:15 9:57:15...
-
Page 70: 沙拉杂粮煮饭方法
沙拉杂粮煮饭方法 沙拉杂粮 保留谷物的喷香和适合用于沙拉的不软不硬的口感,即使不浸泡也容易做熟食用。 代餐,具有饱腹感,请加入沙拉中食用,或加入菜肴中食用。 杂粮 小扁豆 藜麦 黍米 大麦 燕麦 东方小麦 糙米 鹰嘴豆 薏米 材料:水 1C : 1C 1C : 1C 1C : 1C 1C : 1C 1C : 1C 1C : 1C 1C : 1C 1C : 2C 1C : 1C 时间... -
Page 71: 万能美味蒸使用方法
万能美味蒸使用方法 使用方法(万能美味蒸 20 分钟时) 请在待机状态下,利用 [菜单] 按钮选择 [万能美味蒸]。 闪烁 闪烁 闪烁 闪烁 请利用 [<]、[>] 按钮设定煮饭时间。 闪烁 闪烁 • 万能美味蒸可以设置的时间:15 分钟 ~ 90 分钟 • 每按一次 [<]、[>] 按钮更改时间。 • 万能美味蒸:20 ↔ ↔ ↔ 35…. 80 ↔ ↔ ↔ ↔ 闪烁 闪烁 •... -
Page 72: 慢炖/粥使用方法
慢炖/粥使用方法 使用方法(慢炖 60 分钟时) 请在待机状态下,利用 [菜单] 按钮选择 [慢炖]。 闪烁 闪烁 闪烁 闪烁 请利用 [<]、[>] 按钮设定煮饭时间。 闪烁 闪烁 • 慢炖可以设置的时间:60 分钟 ~ 770 分钟 • 每按一次 [<]、[>] 按钮更改时间。 闪烁 闪烁 • 慢炖:60 ↔ ↔ ↔ 90….740 ↔ ↔ ↔ ↔ • 长按 [<]、[>] 按钮 1 秒以上,数字连续增加或减少。 请按... - Page 73 使用 使用方法(粥 60 分钟时) 请在待机状态下,利用 [菜单] 按钮选择 [慢炖]。 闪烁 闪烁 闪烁 闪烁 请利用 [<]、[>] 按钮设定煮饭时间。 闪烁 闪烁 • 粥可以设置的时间:60 分钟 ~ 120 分钟 闪烁 闪烁 • 每按一次 [<]、[>] 按钮更改时间。 • 粥:90 ↔ 95 ↔ 100 ↔ 105 …. 120 ↔ 60 •...
-
Page 74: 低温慢煮烹饪指南
低温慢煮烹饪指南 时间 (hr) 材料 厚度 (cm) 温度 (℃) 低温慢煮-鸡胸肉 2.5 ~ 3 63 ~ 69 4 - 6 低温慢煮-牛肉(胸肉、肋眼、T 骨、肉饼、肉片) 2.5 ~ 3 56.5 ~ 62 • 低温慢煮指,将材料和调料等放入可完全密封及加热处理的卫生的塑料袋中,真空 (vacuum) 包装后,以相较于一般 烹饪温度更低的温度(60℃ 左右)长时间烹饪,是保留香味、水分、质感、营养元素的烹饪方法。 • 低温慢煮设置温度以到达设置温度后维持的平均水温为准,可能出现约 ±5℃ 的偏差。(以水 1.5L 为准) • 烹饪时间与温度为推荐事项,请按个人喜好烹饪。 •... -
Page 75: 保湿保温 / 再加热
保湿保温 / 再加热 煮饭后保温 煮饭结束后,自动转换为保温模式。或请在待机状态下按 [保湿保温 / 再加热] 按钮。 • 转换为保温后,将不再显示当前时间,而显示保温经过时间。 - 59 分前以分钟为单位表示,此后以 1 小时为单位表示,最长 199 小时。 - 超过 199 小时后将停止在 199 小时。 再加热 再加热功能是加热正在保温的饭的功能。 请使用微波炉等再加热冷藏/冷冻饭。 在保温状态下,按 [保湿保温/再加热] 按钮。 • 再加热时间为 10 分钟。 • 再加热时按 [保湿保温/再加热] 转换为保温。 • 再加热结束后,转换为保温状态。 •... -
Page 76: 保温温度调节方法
保温温度调节方法 保温温度调节方法 请在待机状态下,按 1 次[设置]按钮。 请按 [<]、[>] 按钮选择保温温度。 • 每按一次 [<]、[>] 按钮,以 69℃ ↔ 70℃ ↔ 71℃ ↔ 72 ℃ ↔ 73℃ ↔ 74℃ ↔ 75℃ ↔ 76℃ ↔ 77℃ ↔ 78℃ ↔ 79℃ ↔ 80℃ ↔ 69℃ 的顺序循环选择。 • 基本设置值为 74 度。 •... -
Page 77: 自动清洗方法
自动清洗方法 自动清洗功能 使用清洗模式,可以将锅盖内部的蒸气排出通路清洗干净。 消除异物并消除因异物产生的异味,防止细菌滋生的功能。 自动清洗功能使用 • 蒸气排出口会排出高温、高压蒸气,敬请注意。 • 切勿加入水以外的洗涤剂、肥皂、其他药品等。 参考 请使用计量杯加水至内锅自动清洗的水位刻度。 将内锅放入电饭煲后,盖上锅盖,并将手柄对准锁定 ( ) 位置。 ● 盖上锅盖之前,请确认是否已安装清洁盖。 请在待机状态下按 [预约/清洗] 按钮 2 次选择清洗模式后,按 [开始/快 速] 按钮。 • 自动清洗将持续 20 分钟。 • 自动清洗结束后,转换为待机状态。 闪烁 闪烁 _ _CRS-FWK0640_CHS.indb 31 _ _CRS-FWK0640_CHS.indb 31 2023-05-17 2023-05-17 9:57:16 9:57:16... -
Page 78: 烹饪指南
烹饪指南 偏软白米 不软不硬白米 白米快速菜单 ● 材料:大米、水 ● 材料:大米、水 ● 材料:大米、水 ● 烹饪方法 ● 烹饪方法 ● 烹饪方法 请用计量杯量取所需人数份量的米。 请用计量杯量取所需人数份量的米。 请用计量杯量取所需人数份量的米。 请将量取的米淘洗干净。 请将量取的米淘洗干净。 请将量取的米淘洗干净。 请将洗净的米放入内锅,然后加水至人数份 请将洗净的米放入内锅,然后加水至人数份 请将洗净的米放入内锅,然后加水至人数份量对应的高压白 量对应的高压白米水量刻度位置。 量对应的无压白米水量刻度位置。 米水量刻度位置。 请将内锅放入电饭煲内,并盖好锅盖。 请将内锅放入电饭煲内,并盖好锅盖。 请将内锅放入电饭煲内,并盖好锅盖。 请在菜单中选择偏软白米后,按下 [开始/快 请在菜单中选择不软不硬白米后,按下 [开 请在菜单中选择偏软白米后,连续按两次按下 [开始/快速] 速] 按钮煮饭。 始/快速] 按钮煮饭。 按钮煮饭。... - Page 79 使用 杂粮快速菜单 糙米 100 嫩芽饭 ● 材料(以 2 人为准):大米 1 ⅓ 杯、各种杂粮 ½ ● 材料:糙米、水 ● 材料:糙米 2 杯、嫩芽蔬菜各少许、水 杯、水 ● 烹饪方法 ● 调味辣椒酱:辣椒酱 ½ 杯、牛肉(末状)40g、香油 ● 烹饪方法 1 大匙、蜂蜜 1 大匙、糖 1 大匙、水 ⅓ 杯 请用计量杯量取所需人数份量的糙米。 请用计量杯量取所需人数份量的大米和杂 请将量取的糙米淘洗干净。 ● 烹饪方法...
- Page 80 烹饪指南 蘑菇竹笋饭 鸡脯肉配绿茶饭 糙米蔬菜饭 ● 材料:大米 4 杯、平菇 200g、竹笋 100g、银杏 ● 材料:糙米 2 杯、绿茶叶 3g、绿茶粉 10g、鸡 ● 材料:糙米 2 杯、海带汤水 2 ½ 杯、山芹 50g、 10 个、清酒 1 大匙、水 脯肉 4 块、芹菜 5g、橄榄油·食盐·胡椒· 煮蕨菜 100g、豆芽 100g、香菇 3 个、胡萝卜 ⅓ 酸橙·迷迭香少许、水 个、香油 1 大匙、蒜泥 1 小匙、芝麻盐少许 ●...
- Page 81 使用 参鸡汤 番茄酱炒虾 白切肉 ● 材料:鸡肉 600g、蒜 4 瓣、糯米 ¾ 杯、水 ● 材料:中虾 15 只、大葱 ⅓ 个、洋葱 30g,胡萝 ● 材料:猪肉 600g、大葱 1 根、姜 1 块、蒜 5 瓣、水 参 1~2 根、大枣 2 个、水 3 杯、食盐·胡椒 卜 30g 3 杯 粉少许 ● 番茄酱:番茄酱4大匙、糖1 ½...
- Page 82 烹饪指南 韩式杂烩 炖牛排骨 蒸土豆 ● 材料:土豆(200g 以下)3 个、水 2 杯 ● 材料:粉条 150g、青椒 ½ 个、红椒 ½ 个、胡 ● 材料:牛排骨 600g、胡萝卜 1 个、洋葱 ½ 个、梨 ¼ 萝卜 70g、洋葱 70g、菠菜少许、金针蘑 70g、 个、板栗 10 个、银杏 10 个、糖 2 大匙、酒 2 大匙 ● 烹饪方法 鱼糕...
- Page 83 使用 鸡蛋糕 蒸茄子 蒸红薯 ● 材料:鸡蛋 3 个、水或¼鱼海带汤水 300ml、虾酱 ● 材料:茄子 1 个、水 2 杯 ● 材料:红薯(150g 以下)3 个、水 2 杯 ½ 小匙、食盐少许、胡萝卜 15g、葱绿色部分 15g ● 调味酱:浓汁酱油 2 大匙、青辣椒 1 个、红 ● 烹饪方法 ● 烹饪方法 辣椒 1 个、辣椒粉 ½ 大匙、醋 1 大匙、芝麻 请在内锅中倒入...
- Page 84 烹饪指南 蒸文蛤 煮鸡蛋 烤鸡蛋 ● 材料:文蛤 2 只、牛肉 15g、鸡蛋清 ½ 个、熟鸡蛋 ● 材料:鸡蛋 5 个、水 2 杯、醋 1~2 滴 ● 材料:鸡蛋 5 个、水 ½ 杯、醋 1~2 滴 ½ 个、葱末 1 小匙、蒜末 ½ 小匙、食盐·胡椒粉少 ● 烹饪方法 ● 烹饪方法 许、水 2 杯 请在内锅中放入鸡蛋、水和醋。...
- Page 85 使用 蘑菇盖饭 蒸番茄鸡蛋 蒸西葫芦 ● 材料 :糙米 2 杯、褐色酱汁 20g、食盐少 ● 材料:番茄 ½ 个、鸡蛋 2 个、牛奶 100g、水 3 ● 材料:西葫芦 ½ 个、水 2 杯 许、苏子叶 2 片、南瓜 ⅓ 个、真姬菇 1 袋 小匙、葱花·食盐少许 ● 调味酱:浓汁酱油 2 大匙、葱末 1 大匙、香油 ● 烹饪方法 ●...
- Page 86 烹饪指南 年糕烤 米饭披萨 白米粥 ● 材料:年糕 100g、煮鸡蛋 2 个、红薯 1 个、披 ● 面饼材料:米饭 200g ● 材料:大米 1 杯、水 6 杯 萨饼用奶酪 80g、薄片奶酪 2 张、橄榄油少许、 ● 馅料材料:火腿片 4 片、洋菇 4 个、玉米罐头 4 ● 烹饪方法 白酱 1 杯、荷兰芹粉少许 大匙、蟹肉条 2 个、披萨饼用奶酪 80g、披萨饼酱 请将洗净的米放入水中浸泡...
- Page 87 使用 薏米粥 松子粥 鲍鱼粥 ● 材料:薏米 1 杯、水 5 杯、香菇 ½ 个、香油 ½ ● 材料:大米 1 杯、水 6 ½ 杯、松子 ½ 杯、食盐少 ● 材料:大米 1 杯、水 6 杯、香油 1 大匙、鲍鱼 1 小匙、食盐少许 许 个、食盐少许 ● 烹饪方法 ● 烹饪方法 ● 烹饪方法 请将洗净的薏米放入水中浸泡...
- Page 88 烹饪指南 南瓜汤 西兰花粥 红薯苹果粥 ● 材料:南瓜 150g,面包粉 1 ½ 大匙、水 100ml,食 ● 材料:大米 ⅔ 杯、西兰花 30g、水 1 ½ 杯、食盐 ● 材料:红薯 100g、苹果 100g、水 50ml 盐少许,牛奶 1 小匙 少许 ● 烹饪方法 ● 烹饪方法 ● 烹饪方法 请将苹果和红薯去皮切成细条。 挑选熟透的金黄色南瓜去皮去籽后切成细条并用 将大米洗净后泡 30 分钟左右,将泡好的大米、 请将步骤 1 和 50ml 水放入内锅。 水清洗。...
-
Page 89: 申请故障前的确认事项
申请故障前的确认事项 故障申报前,请先确认以下事项。 除产品故障以外,不熟悉使用方法,或其他很小的原因也会造成压力电饭煲无法正常运行。此时,请检查下列事项,无需 A/S 服务中心 帮助即可简单解决问题。检查下列事项后仍无法解决时,请向 A/S 服务中心咨询。 现象 请确认。 应对措施 偶尔不能煮饭。 煮饭时间 电源插头是否被拔掉? 请插紧电源插头。 较长。 煮饭时是否停电? 长时间停电时,请重新按下煮饭按钮。 煮饭过程中是否按下【取消】按钮或进行其 请不要在煮饭状态下进行其他操作。 他操作? 煮饭过程中饭水溢出来。 压力阀是否倾斜? 请直立压力阀。(可能较热,请注意。) 是否使用计量杯? 请参考使用说明书,正确使用 是否正确调节水量? 是否准确选择菜单? 饭太硬或未熟或太熟时 是否正确调节水量? 请根据米量对准测定刻度调整水位。 请清除自动温度传感器的异物。 内锅底部是否粘有异物? 锅盖旁边漏蒸气。 压力圈部位是否粘有饭粒等? 请清洁内锅上方侧面与压力圈外侧。(与压 力圈接触的部位) 是否及时更换压力圈? 蒸汽外漏时,弄湿压力阀,排出蒸汽、拔掉 电源插头后联系客服中心。(密封圈属消耗 品。)... - Page 90 申请故障前的确认事项 现象 请确认。 应对措施 11. 保温时饭产生异味或变色时 是否持续保温 12 小时以上?是否长时间对 请不要保温 12 小时以上。 预约煮饭的饭进行保温? (参考第29页) 是否使用烹饪功能?是否经常清洗压力圈? 请不要对长时间预约煮饭做出的饭进行保 温。 请必须确认清洁盖的结合状态。 是否对除白米以外的杂粮/糙米等菜单保 请勿对除白米以外的菜单保温,或放入冷饭 温,或与饭勺、冷饭或其他种类的饭一起保 及饭勺等异物一起保温。 温? 除白米以外的菜单,由于谷物的特性,相较 于白米菜单,保温时可能出现异味。 并且,冷饭及饭勺等异物可能导致细菌繁殖 及产生异味,因此不建议一起保温。 是否使用充分洗净的内锅、清洁盖、饭勺 饭勺请务必每次使用时充分洗净,请勿在未 等? 清洗的状态下存放或使用。 购买产品时附带的新饭勺或暴露于唾液(口 水)的饭勺,请务必清洗干净后使用。 12. 按下按钮时出现 标示 产品中是否装入内锅? 本产品在未装内锅的状态下不执行煮饭、预 约煮饭和保温。请放入内锅后使用。 是否在 110V(电源)电压下使用? 本产品为...
Need help?
Do you have a question about the CRS-FWK0640 Series and is the answer not in the manual?
Questions and answers