Advertisement
Quick Links
Advertisement

Related Manuals for Lippert Cosmo 2 Euro


Summary of Contents for Lippert Cosmo 2 Euro
- Page 1 Cosmo 2 Euro Collapsible table leg OEM INSTALLATION MANUAL...
-
Page 2: Table Of Contents
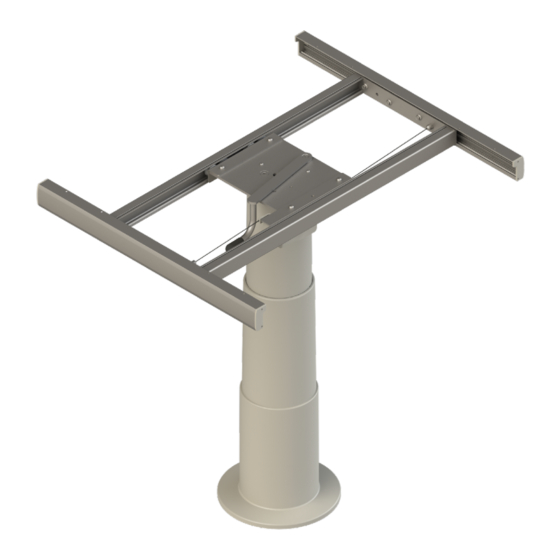
Post-installation Check Introduction Lippert's COSMO 2 Euro Collapsible Table Leg (Fig. 1) has telescoping cylinders powered by gas struts for easy height adjustment and the table can slide as needed to fully optimize interior space. For information on the assembly or individual components of this product, please visit: https://support.lci1.com/lci-interiors. -
Page 3: Safety
Safety Read and understand all instructions before installing or operating this product. Adhere to all safety labels. This manual provides general instructions. Many variables can change the circumstances of the instructions, i.e., the degree of difficulty, operation and ability of the individual performing the instructions. This manual cannot begin to plot out instructions for every possibility, but provides the general instructions, as necessary, for effectively interfacing with the device, product or system. -
Page 4: Installation
Installation Find a location for the COSMO 2 Euro Collapsible Table Leg (Fig. 2), making sure there is enough clearance for the pedestal with a table top installed to fully extend. Pull the height adjustment handle (Fig. 2A) and lift the leg's slide support mounting plate (Fig. 3A) to fully extend the leg. - Page 5 Fig. 4 Slide Support Table Slide Handle Height Adjustment Handle Install a flat washer (Fig. 5A) onto a hex socket head button screw (Fig. 5B). Repeat to assemble four screws. Insert each assembled screw into a mounting hole on the slide support (Fig. 5C). Secure the slide support to the pedestal's top plate by installing a hex nylon lock nut (Fig.
- Page 6 Pull the table slide handle outward (Fig. 6A) to release tension on the cable (Fig. 6B). 10. Use a wrench to turn the cable tensioner (Fig. 6C) counterclockwise to loosen the cable. Fig. 6 11. Route the cable so that it goes between the slide table bracket (Fig. 7A) and the threaded stud (Fig. 7B) for the stopper nut.
- Page 7 12. Hold or clamp the cable against the slide table bracket (Fig. 8A) while installing the stopper nut (Fig. 8B) onto the threaded stud. Use a hex wrench to tighten the stopper nut in-place. NOTE: Pedestal not shown for clarity. Fig. 8 13.
- Page 8 15. If necessary, adjust the table slide until it is centered with the pedestal. 16. Use a wrench to turn the cable tensioner (Fig. 10A) clockwise to restore full tension on the cable. 17. The table is now in its default, locked position. Fig.
- Page 9 20. Secure the table top to the slide support's outside rails with OEM-supplied hardware (Fig. 12A) appropriate for the material and thickness of the table top. 21. Place the pedestal on the floor where it will be mounted. Fig. 12 22.
- Page 10 For flathead machine screws with washers and hex nylon lock nuts: Make sure designated drilling area is clear of service lines. Use a pencil to mark the locations of the six mounting holes (Fig. 14A) in the base plate. III. Set the table leg aside. Fig.
-
Page 11: Post-Installation Check
24. Release the leg covering (Fig. 15A) so it extends down to the base. Fig. 15 Floor Post-installation Check Pull the height adjustment handle (Fig. 16A) and lift to extend the table (Fig. 17). Move the height adjustment handle back into its locked position. Press downward on the table to make sure the collapsible leg is locked in-place and the table does NOT travel downward. - Page 12 Pull the table slide handle outward (Fig. 18A) to release the table. Fig. 18 Slide the table right (Fig. 19), left (Fig. 20), backward (Fig. 21) then forward (Fig. 22); locking it in-place at each direction by pushing the table slide handle (Fig. 23A) inward. Fig.
- Page 13 Using the table slide handle (Fig. 23A), center the table then pull the height adjustment handle (Fig. 24A) and lower the table. Move the height adjustment handle back into its locked position. Fig. 23 Fig. 24 Page 13 Rev: 08.31.23 CCD-0007174...
- Page 14 Lippert representative has been provided. Any unauthorized use shall void any applicable warranty. The information contained in this manual is subject to change without notice and at the sole discretion of Lippert. Revised editions are available for free download from lippert.com.
Need help?
Do you have a question about the Cosmo 2 Euro and is the answer not in the manual?
Questions and answers