Table of Contents

Subscribe to Our Youtube Channel
Related Manuals for StarTech.com 2NS-CPU-WALL-MOUNT


Summary of Contents for StarTech.com 2NS-CPU-WALL-MOUNT
- Page 1 Maximize work space by wall-mounting a CPU *Actual product may vary from photos User Manual SKU: 2NS-CPU-WALL-MOUNT For the latest information and specifications visit www.StarTech.com/2NS-CPU-WALL-MOUNT Manual Revision: 04/28/2023...
- Page 2 This manual may make reference to trademarks, registered trademarks, and other protected names and/or symbols of third-party companies not related in any way to StarTech.com. Where they occur these references are for illustrative purposes only and do not represent an endorsement of a product or service by StarTech.com, or an endorsement of the product(s) to which this manual...
-
Page 3: Safety Statements
Sicherheitsmaßnahmen • Die Installation und/oder Montage des Produkts sollte von einem zertifizierten Fachmann gemäß den örtlichen Sicherheits- und Bauvorschriften durchgeführt werden. To view manuals, videos, drivers, downloads, technical drawings, and more visit www.startech.com/support... -
Page 4: Warning Statements
• Do not allow children to climb on this product or to use this product without proper supervision. • Improper use or handling of the product may cause the product or mounted To view manuals, videos, drivers, downloads, technical drawings, and more visit www.startech.com/support... - Page 5 à l’aide du matériel et des techniques de montage appropriés. Si l’équipement n’est pas correctement fixé, il risque de tomber du mur et de provoquer des blessures ou des dommages. Veuillez vous référer au manuel To view manuals, videos, drivers, downloads, technical drawings, and more visit www.startech.com/support...
- Page 6 • Innan du borrar hål i någon yta ska du se till att strömmen har stängts av och fastställa var alla potentiella mekaniska/elektriska installationer och/eller rördragningar finns. To view manuals, videos, drivers, downloads, technical drawings, and more visit www.startech.com/support...
- Page 7 • Voor uw veiligheid en om letsel te voorkomen is het sterk aanbevolen dat er twee personen aanwezig zijn tijdens het installatieproces. Pogingen om het product alleen te installeren kunnen leiden tot persoonlijk letsel of schade To view manuals, videos, drivers, downloads, technical drawings, and more visit www.startech.com/support...
- Page 8 • StarTech.com K.K.は、 この技術文書に記載されているインストール手順に 起因するいかなる物的損害および/または人身事故に対して責任を負うも のではありません。 • 本製品は、 木製間柱、 純コンクリート、 またはコンクリートブロック壁に設置 することを前提としています。 壁の構造は、 取り付けらる機器の少なく とも 4倍の重量を支えることができるものでなければなりません。 壁の構造はさ まざまであり、 使用する壁構造の種類と取り付け用金具が、 取り付けられた 機器を適切に支えられるかどうかの確認が重要です。 設置方法について疑 問や不明な点がある場合は、 専門の設置業者にご相談ください。 もし適切 な設置ができなければ、 人身事故および物的損害の原因となる恐れがあり ます。 • 本製品に同梱されている取付説明書や金具は、 使用する壁面の構造によっ To view manuals, videos, drivers, downloads, technical drawings, and more visit www.startech.com/support...
- Page 9 • 本製品は屋内での使用のみを想定しているため、 屋外では使用しないで ください。 Dichiarazioni di avvertenza • StarTech.com Ltd. non è responsabile per eventuali danni a cose e/o persone derivanti dalle procedure di installazione descritte in questo documento tecnico • Questo prodotto è progettato per essere installato su una parete in legno, cemento o blocchi di cemento.
- Page 10 Advertencias de uso • StarTech.com Ltd. no se responsabiliza de los daños materiales y/o personales derivados de los procedimientos de instalación descritos en este documento técnico. To view manuals, videos, drivers, downloads, technical drawings, and more visit www.startech.com/support...
- Page 11 • El uso o manejo inadecuado del producto puede hacer que el producto o el equipo montado se caiga, provocando lesiones personales o daños materiales. • Este producto está destinado únicamente para uso en interiores y no debe To view manuals, videos, drivers, downloads, technical drawings, and more visit www.startech.com/support...
- Page 12 Tragkraft der Wandmontage-Halterung beträgt 18 kg. • Um die Sicherheit des Geräts zu gewährleisten und Personen- oder Sachschäden zu vermeiden, muss das Produkt unbedingt mit geeigneten Befestigungsteilen und Montagetechniken ordnungsgemäß befestigt To view manuals, videos, drivers, downloads, technical drawings, and more visit www.startech.com/support...
-
Page 13: Table Of Contents
Fasten the Wall Mount Bracket to a Concrete Wall ..............10 Install the Rubber Self-Adhesive Strips .................... 13 Install the Sliding Bracket ........................14 Install the CPU ............................16 Warranty Information ................18 Limitation of Liability ................18 To view manuals, videos, drivers, downloads, technical drawings, and more visit www.startech.com/support... -
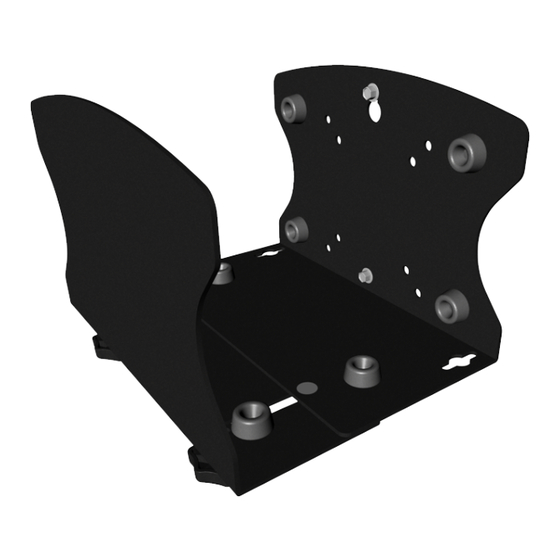
Page 14: Product Diagram
Product Diagram *Actual product may vary from photos Sliding Bracket Mounting Keyhole Wall Mounting Screws Sliding Slots Threaded Studs Wall Mounting Bracket Rubber Self-Adhesive Spacers To view manuals, videos, drivers, downloads, technical drawings, and more visit www.startech.com/support... -
Page 15: Product Dimensions
Product Dimensions Front View Side View To view manuals, videos, drivers, downloads, technical drawings, and more visit www.startech.com/support... -
Page 16: Plastic Spacers
Product Dimensions Plastic Spacers To view manuals, videos, drivers, downloads, technical drawings, and more visit www.startech.com/support... -
Page 17: Product Information
Maximum CPU size: Small form factor (SFF) • Minimum CPU width: 1.9 in (5 cm) • To view manuals, videos, drivers, downloads, technical drawings, and more visit www.startech.com/support To view manuals, videos, drivers, downloads, technical drawings, and more visit www.startech.com/support... -
Page 18: Package Contents
Package Contents Wall Mount Plastic Spacers Sliding Bracket Rubber Self- Bracket Adhesive Strips Qty: 1 Qty: 2 Qty: 1 Qty: 2 Rubber Self- Rubber Self- Wall Mounting Concrete Adhesive Spacers Adhesive Pads Screws Anchors Qty: 8 Qty: 4 Qty: 2 Qty: 2 Hand Knobs User Manual... -
Page 19: Installation
3/16 in (4.5 mm) wood drill bit. Minimum 2.1 in (55 mm) long • A 25/64 in (10 mm) concrete drill bit. Minimum 2.1 in (55 mm) • long To view manuals, videos, drivers, downloads, technical drawings, and more visit www.startech.com/support... -
Page 20: Fasten The Wall Mount Bracket To A Stud Wall
Figure 1 Ensure there is a 1/8 ~ 5/32 in ( 3 ~ 4 mm) gap between the head of the Screw and the Wall. Figure 2. Figure 2 To view manuals, videos, drivers, downloads, technical drawings, and more visit www.startech.com/support... - Page 21 Step 7. Hang the Wall Mount Bracket onto the Wall Mounting Screw from Step 4 using the Mounting Keyhole at the top of the Wall Mount Bracket. To view manuals, videos, drivers, downloads, technical drawings, and more visit www.startech.com/support...
- Page 22 Bottom Mounting Hole. Use the 11/32 in (8 mm) Wrench to Tighten all the Wall Mounting Screws (x 2) to secure the Wall Mount Bracket. Figure 4. Bottom Mounting Hole Wall Mounting Screw Figure 4 To view manuals, videos, drivers, downloads, technical drawings, and more visit www.startech.com/support...
-
Page 23: Fasten The Wall Mount Bracket To A Concrete Wall
Step 3 using the 11/32 in (8 mm) Wrench. Ensure there is a 1/8 ~ 5/32 in ( 3 ~ 4 mm) gap between the head of the Screw and the Wall. Figure 6. Figure 6 To view manuals, videos, drivers, downloads, technical drawings, and more visit www.startech.com/support... - Page 24 25/64 in (10 mm) Drill Bit. Insert a Concrete Anchor into the newly drilled hole with the help of a Hammer. Hang the Wall Mount Bracket onto the Wall Mounting To view manuals, videos, drivers, downloads, technical drawings, and more visit www.startech.com/support...
- Page 25 Bottom Mounting Hole. Use the 11/32 in (8 mm) Wrench to Tighten all the Wall Mounting Screws (x 2) to secure the Wall Mount Bracket. Figure 8. Bottom Mounting Hole Wall Mounting Screw Figure 8 To view manuals, videos, drivers, downloads, technical drawings, and more visit www.startech.com/support...
-
Page 26: Install The Rubber Self-Adhesive Strips
Strips on the top part of the Wall Mounting Bracket. Figure Repeat Step 2 with the remaining Rubber Self-Adhesive Strip and place it on the bottom part of the Wall Mounting Bracket. Figure 9. Figure 9 To view manuals, videos, drivers, downloads, technical drawings, and more visit www.startech.com/support... -
Page 27: Install The Sliding Bracket
Install the Hand Knobs (x 2) onto the Threaded Studs on the Wall Mount Bracket. Tighten the Hand Knobs against the Sliding Bracket. Figure 11. Threaded Studs Figure 11 To view manuals, videos, drivers, downloads, technical drawings, and more visit www.startech.com/support... - Page 28 Adhesive Pads (x 4). Carefully place the Rubber Self- Adhesive Pads on the horizontal surface of the Sliding Bracket and the Wall Mounting Bracket. Figure 12. Figure 12 To view manuals, videos, drivers, downloads, technical drawings, and more visit www.startech.com/support...
-
Page 29: Install The Cpu
Adjust the Slide Bracket along the Sliding Slots until the gap matches the measured Width or Length of the CPU. Note: Mounting the CPU is a two-person task. Do not attempt to perform this task without assistance. To view manuals, videos, drivers, downloads, technical drawings, and more visit www.startech.com/support... - Page 30 Figure 15 Before releasing the weight of the CPU, ensure the Sliding Bracket and Wall Mounting Bracket are securely clamping the CPU by fully Tightening the Hand Knobs. To view manuals, videos, drivers, downloads, technical drawings, and more visit www.startech.com/support...
-
Page 31: Warranty Information
Limitation of Liability In no event shall the liability of StarTech.com Ltd. and StarTech.com USA LLP (or their officers, directors, employees or agents) for any damages (whether direct or indirect, special, punitive, incidental, consequential, or otherwise), loss of profits, loss of business, or any pecuniary loss, arising out of or related to the use of the product exceed the actual price paid for the product. - Page 32 Hard-to-find made easy. At StarTech.com, that isn’t a slogan. It’s a promise. StarTech.com is your one-stop source for every connectivity part you need. From the latest technology to legacy products — and all the parts that bridge the old and new — we can help you find the parts that connect your solutions.
Need help?
Do you have a question about the 2NS-CPU-WALL-MOUNT and is the answer not in the manual?
Questions and answers