Advertisement
Overview
The SVSI NMX-ENC-N2612S Encoder is part of the N2600 Series and used in conjunction
with N2600 Series Decoders for transmission of video, audio, control, and USB 2.0
over Ethernet. All Encoders and Decoders of the N2600 Series feature balanced audio,
HDMI video connections, and Power-over-Ethernet (PoE+). The N2600 Series Decoders
support output scaling and limited output downscaling options.
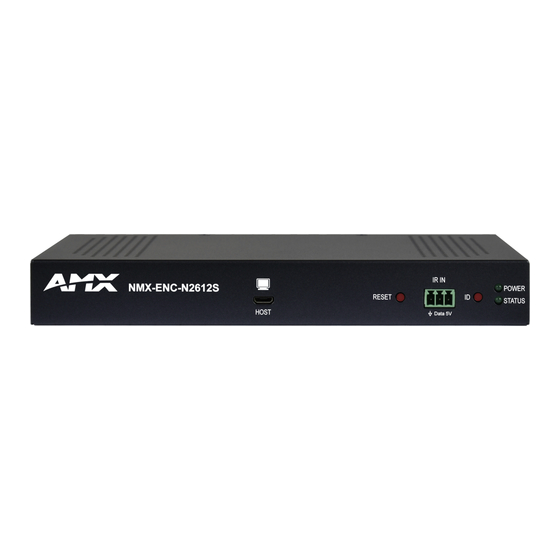
FIG. 1 N2612S STAND ALONE ENCODER
Attaching Signal and Control Cables
The following table explains how to attach cables to the front of the Encoder.
IMPORTANT: Encoders must be securely mounted and connected to the switch before
attaching the remaining cables.
NOTE: Any switch handling the N2612S Encoder video stream must be configured to
support jumbo frames. Disable the wireless adapter on your computer (it must be hard-
wired to the switch).
Basic Cabling Guidelines
Connector Description
External
External Power
Power
Connect a 12v regulated power supply (P/N N9312) to the unit's two-
pin terminal block plug connector labeled 12V 2A
P0 (PoE+)
PoE+
Connect the units P0 port to an active, PoE+ enabled network switch.
HDMI IN 1
Digital Video Connection
For video encoding of a digital source, connect from the source
to the Encoder's HDMI IN connector using a video cable with an
HDMI connector (or adapter).
HDMI IN 2
Digital Video Connection
For video encoding of a digital source, connect from the source to
the Encoder's HDMI IN 2connector using a video cable with an
HDMI connector (or adapter).
HDMI OUT
Digital Video Connection
For video decoding of a digital source, connect from the display to
the Decoder's HDMI OUT connector using a video cable with an
HDMI connector (or adapter).
AUDIO IN -
Audio Encoding
STEREO
Insert an analog audio cable from the source into the AUDIO IN
STEREO jack (optional) or use the embedded audio from the video
source.
IR OUT
IR Connection
Insert an IR cable blaster from the IR device being controlled into the
IR OUT jack (optional).
RS-232
Serial Control Connection
Insert a RS-232 cable from a RS-232 enabled device into the RS-232
jack (optional).
NMX-ENC-N2612S Encoder
The table shows LED states on initial power up. If not normal, check connections.
Normal
Indicator LEDs
power up
Front LEDs
POWER
Green
STATUS
Green
Rear LEDs
POWER
Green
STAT
Green
HDMI
Green
STREAM
Green
RESET and ID Buttons
RESET button - (Press and release)
Resets Encoder's CPU.
FIG. 3 BUTTONS LOCATED ON FRONT OF UNIT
Establishing Connection
N2612S Encoders are shipped with DHCP as their default IP mode. The IP address is
assigned automatically based on the network DHCP server. If no DHCP server is found,
the unit will use Auto IP mode instead (with a default IP address of 169.254.xxx.xxx).
Before using your N2612S Encoder unit, it must be configured using the free N-Able device
management software. However, you will not be able to configure units until they are in
the same subnet as the host computer. The sample steps below show how the required
changes (to the host computer's IP settings) are made in a Windows environment.
▪ Steps for IP address configuration:
1.
From the Control Panel > Network and Internet dialog box, select
Network and Sharing Center.
Select Change adapter settings.
2.
3.
Select the wired interface connected to your AV network.
4.
Click the Properties button.
5.
Scroll down in the list to the Internet Protocol Version 4 (TCP/IPv4)
option. Highlight it and click the Properties button.
6.
Enable the Use the following IP address option, and enter the static IP
address provided to you by your network administrator.
NOTE: If the computer does not need Internet access, you can simply enter a
unique 169.254.xxx.xxx IP address with a 255.255.0.0 Subnet mask. Please contact
your network administrator if you are unsure of how to configure the existing
interface. If the computer has a statically assigned IP address, click on the Advanced
button. Then click Add to enter a unique 169.254.xxx.xxx address with a subnet of
255.255.0.0.
▪ Steps for auto discovering devices on the network:
1.
Use the host computer to download and install the latest version of N-Able:
PC version -
http://www.amx.com/products/N-ABLE-C.asp
2.
Attach your N2612S Encoder unit(s) to the managed network switch.
3.
Connect the host computer to the same managed network switch.
4.
Open the N-Able application.
Note: If all devices do not appear automatically, click the Auto Discover button on
the Unit Management tab. This issues a broadcast command that will discover all units.
QUICK START GUIDE
Indicates
PoE+/External power is applied.
On flashing (green) when there is software activity.
PoE+/External power is applied.
On flashing (green) when there is software activity.
On when HDMI sync is detected
On when the unit is streaming to the network.
ID button - (Press and release)
Identifies the unit in N-Able.
(Press and hold 30 seconds)
set Encoder back to factory
defaults.
AV FOR AN IT WORLD
®
Advertisement
Table of Contents

Subscribe to Our Youtube Channel
Related Manuals for Harman AMX NMX-ENC-N2612S


Summary of Contents for Harman AMX NMX-ENC-N2612S
- Page 1 QUICK START GUIDE NMX-ENC-N2612S Encoder Overview The table shows LED states on initial power up. If not normal, check connections. Normal The SVSI NMX-ENC-N2612S Encoder is part of the N2600 Series and used in conjunction Indicator LEDs Indicates power up with N2600 Series Decoders for transmission of video, audio, control, and USB 2.0 over Ethernet.
- Page 2 REV: A © 2022 Harman. All rights reserved. SmartScale, NetLinx, Enova, AMX, AV FOR AN IT WORLD, and HARMAN, and their respective logos are registered trademarks of HARMAN. Oracle, Java and any other company or brand name referenced may be trademarks/registered trademarks of their respective companies.
Need help?
Do you have a question about the AMX NMX-ENC-N2612S and is the answer not in the manual?
Questions and answers
HOW CHEK ENCODER CONFIGURE
To configure the Harman AMX NMX-ENC-N2612S encoder:
1. Connect HDMI Source: Connect the video source to the encoder’s HDMI 2 input.
2. EDID Management:
- Use Pass-thru to view EDID from the connected display.
- Click Read EDID to load or refresh EDID data.
- Use Decode to translate EDID data into editable parameters.
- Modify settings on the right, then click Encode to apply.
- Click Set EDID to save a custom EDID.
- To reset, choose a standard EDID (source must be disconnected) and click Reset EDID.
3. Security Configuration:
- Access the Security page from the web interface.
- Enable options such as Force HTTPS, Command Secure Ports Only, and set passwords for Command and Stream Encryption.
- Click Save to apply changes.
4. Troubleshooting:
- Ensure HDMI signal is valid (HDMI LED on encoder should be on).
- If no video, try setting decoder to LocalPlay, then back to Live.
- Enable Jumbo Frame support on your network switch if screen sparkles appear.
- For audio problems, verify audio settings on the encoder and decoder.
5. Network Setup:
- Ensure the computer is in the same IP range as the encoder to access configuration pages.
This answer is automatically generated