Table of Contents
Advertisement
Advertisement
Table of Contents

Subscribe to Our Youtube Channel
Related Manuals for Craftsman 536.88644


Summary of Contents for Craftsman 536.88644
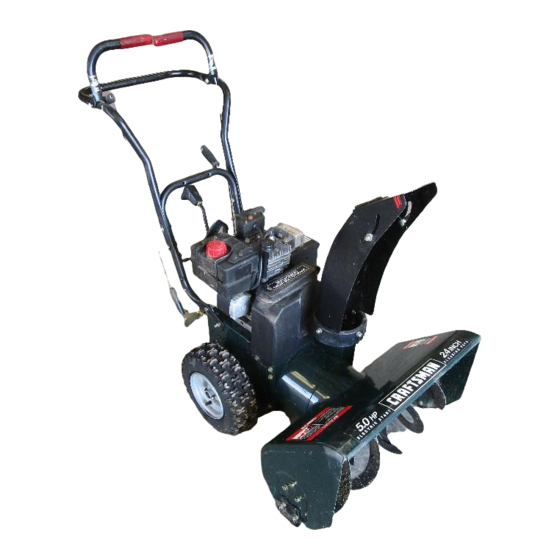
- Page 1 ICRRFTSMRN®I 5 Horsepower 24 Inch Dual Stage 120V. Electric Start SNOW THROWER MODEL NO. 536.886440 Caution: Read and follow all Safety Rules and Operating Instructions first use of this product. SEARS, ROEBUCK AND CO., Hoffman Estates, IL 60179 U.S.A. F-001087J before...
-
Page 2: Back Cover
SERVICE AND ADJUSTMENT LIMITED "13NO--YEAR WARRANTY For two years from the date of purchase, when this Craftsman Snow thrower is maintained, lubricated, and tuned up according to the operating owner's manual, Craftsman will repair, free of charge, any defect in material or workman- ship. -
Page 3: Operation
TRAINING Read the operating and service instruction manual carefully. Be thoroughly with the controls and the proper use of the equipment. Know how to stop the unit and disengage the controls quickly. Never allow children to operate the equip- ment. Never allow adults to operate the equipment without proper instruction. -
Page 4: Maintenance
Never operate the snow thrower near en- closures, automobiles, window drop--offs, and the like without proper ad- justment of the snow discharge Keep children and pets away. Do not overload the machine capacity by attempting to clear snow at too fast a rate. Never operate the machine at high trans- port speeds on slippery surfaces. - Page 5 Drive Clutch Forward Reverse Push To Engage Fuel Electric Starter Discharge DOWN Discharge UP Weight Transfer Weight Transfer Lift Handle To Depress Pedal Engage To Disengage SafetyWarningSymbols DANGER Thrown Objects. Keep Bystanders Away. IMPORTANT Read Owner's Manual Before Operating This Machine. WARNING Hot Surface F-OO1087J...
- Page 6 Contents of Parts Bag (actual 1 - Owner's Manual (not shown) 1 - Packet of Fuel Stabilizer (not shown) 1 - Warranty Card (not shown) 2 - Parts bags (not shown) *Non-Assembly Parts, found in toolbox located on belt cover 1- Screw, 5/16--18 x 2 in 1- Nut, 5/16-18 3- 5/16-18...
-
Page 7: Tools Required For Assembly
Parts packed separately in carton (not shown full size) 2- Ignition Keys (Attached to engine in plastic bag) IIIIIII satety glasses or eye shields ARNING: Always wear while assembling snow thrower. TOOLS REQUIRED ASSEMBLY 1 - Knife to cut carton 1 - 1/2 inch wrenches (or adjustable wrenches) - Page 8 2. Remove and discard the packing materialfrom around the snow thrower. 3. Cut down all four corners of the car- ton and lay the panels flat. 4. Roll snow thrower off the carton by pulling on the lower handle. CAU- TION: DO NOT back over cables.
- Page 9 7. Install the 3/8" flatwasher and the 3/8" nylon Iocknut loosely on the eye bolt. Carefully remove cotter pin, clevis pin and universal joint pin from yoke end of crank rod assembly. See Figure 6. Place universal joint into end of worm gear lining up large holes.
-
Page 10: Snow Chute Assembly
SNOW CHUTE ASSEMBLY 1. Turn crank assembly counterclock- wise until it stop. Position snow chute on inside of snow chute flange and align the three holes in the snow chute with holes on snow chute flange. Figure 9) Place three 5/16-18 carriage bolts from inside of chute as shown in Figure 9. -
Page 11: Snow Thrower Overview
KNOW YOUR SNOW THROWER READ THIS OWNER'S MANUAL AND SAFETY RULES BEFORE OPERATING YOUR SNOW THROWER. Compare the illustrations with your SNOW THROWER to familiarize yourself with the location of various controls and adjustments. Save this manual for future reference. Auger__ Electric Drive Lever... - Page 12 The operation of any snow thrower can result in foreign objects being thrown into the eyes, which can result in se- vere eye damage. Always wear safety glasses or eye shields while operating the snow thrower. We recommend standard safety glasses or a wide vision safety mask for over your glasses.
-
Page 13: Checking Oil
Klick Pin Unlocked Position Single Wheel Drive NOTE: Make sure that the klick pin is in the single wheel drive position of the axle only and not through the locked position. BEFORE STARTING THE ENGINE Before you service or start the en- gine, familiarize yourself with the snow thrower. -
Page 14: To Stop Engine
Never use engine or carburetor cleaner products in the fuel tank or permanent damage may occur. 1. Fill the fuel tank only with a fresh, clean, unleaded regular, unleaded premium, or reformulated tive gasoline. DO NOT use leaded gasoline. Make sure that the con- tainer you pour the gasoline from is clean and free from rust or other for- eign particles. -
Page 15: Warm Start
Push the primer button while cov- ering the vent hole as follows: move finger from primer button between primes. Do not prime if temperature 50 ° F (10 ° C). Push two time if temperature F (10 ° C) to 15°F (-10 ° C). Push four times if temperature below 15°... -
Page 16: Snow Throwing
Release the starter handle and let it snap back against the starter. if the engine still fails to start, repeat the two previous steps until the engine starts. Then continue with the direc- tions for cold start. To help prevent possible freeze-up recoil starter and engine controls, pro- ceed as follows after each snow remov- al job. -
Page 17: General Recommendations
CUSTOMER RESPONSIBILITIES SERVICERECORDS Fill in dates as you Before completeregular Each service, Check Engine Oil Level Change Engine Oil "nghten All Screws and Nuts Check Spark Plug Lubricate All Pivot Points I Lubricate Disc Drive Plate Zerk (See Maintenance) Check Fuel Drain Fuel Check Cable Adjustment... -
Page 18: Specifications
PRODUCT SPECIFICATIONS HORSEPOWER 11.0 HP DISPLACEMENT 21.82 cu. in. GASOLINE 4 quarts CAPACITY (unleaded) OIL CAPACITY 5W30 (20 oz capacity) SPARK PLUG: Champion RJ19LM (Gap .030 in.) or equivalent VALVE CLEARANCE: Intake: .010 In. Exhaust: .010 in. SNOW THROWER AS REQUIRED The following adjustment should be preformed more than once each sea-... -
Page 19: Change Engine Oil
drive plate or friction wheel come in contact with grease or oil, damage to the friction wheel will result. Should grease or oil come in contact with the disc drive plate or friction wheel, be sure to clean the plate and wheel thoroughly. -
Page 20: To Adjust Skid Height
nect the spark plug wire and ARNING: Always discon- place it where it cannot make contact with spark plug to pre- vent accidental starting when mak- ing any adjustments or repairs. TO ADJUST SKID HEIGHT This snow thrower is equipped with two height adjustment skids, located on the outside of the auger housing. -
Page 21: To Adjust Belts
HOW TO CHECK AND ADJUST THE CABLES The cables are adjusted at the factory and no adjustment should be neces- sary. If the cables have become stretched or are sagging adjustment be necessary. To check for correct adjustment,discon- nect the Z-fitting at the drive lever, move the drive lever to the full forward position, just contacting the plastic... -
Page 22: To Replace Belts
Guide be replaced with original equipment Drive belts available from your nearest Pulley Craftsman Store. A distributor's supplied in the parts manual. You will need the assistance ond person while replacing the belts. Loosen How To Remove The Auger Drive Belt... - Page 23 Remove the old auger drive belt. Replace the auger drive belt with an original factory replacement belt available from an authorized service center. Install the new auger drive belt onto the auger drive pulley and onto the drive pulley. 10. Adjust the auger drive belt. See "How To Adjust The Auger Drive Belt"...
-
Page 24: How To Adjust Or Replace The Friction Wheel
HOW TO ADJUST THE BELT GUIDE Disconnect spark plug wire, Remove the screw. Remove the belt cover. See Figure 22. Engage the auger drive lever. Measure the distance between the belt guide and auger drive belt. The correct distance is 1/8 inch (3.175 mm). - Page 25 position for the friction wheel. See Figure 30. Loosen Bolts Lev( Install the bottom panel. See Figure 28. Tighten the bolts on each side of the bottom panel. Install the bolts on each side of the bottom panel. How To Replace The Friction Wheel If the friction wheel is worn or damaged, the snow thrower will not move forward.
-
Page 26: To Adjust The Carburetor
_-" P! spalcer TO ADJUST THE CARBURETOR If you think your carburetor needs ad- justing, see your nearest Craftsman Store. Engine performance be affected at altitudes up to 7,000 feet. For operation at higher elevations, con- tact your nearest Craftsman Store. - Page 27 2. Be sure spark plug is clean and free of foreign material. Check elec- trodes gap with a wire feeler gauge and reset gap to 0.030" if neces- sary. See Figure 34. To Replace: 1. If you need a new spark plug, use only the proper replacement plug.
- Page 28 If you do not remove the gasoline, use fuel stabilizer supplied with unit or purchase Craftsman Fuel Stabi- lizer No. 3550. Add fuel stabilizer to any gasoline left in the tank to mini- mize gum deposits and acids. If the...
- Page 29 Stop engine immediately and disconnect spark plug wire. Tighten all bolts and make all necessary repairs. vibration continues, have the unit serviced by a Craftsman service repairman. Replace drive belt. Adjust traction drive cable. Replace friction wheel. Adjust auger drive belt;...
-
Page 30: Frame Assembly
CRAFTSMAN 24" 5HP SNOW THROWER 536.886440 Key No. Model 143.015005 SCREW, 5/16-18 WASHER, SPTLK .31X.58X.08 GUIDE, ROD BELT PLASTIC WASHER WASHER, SPTLK .31X.58X.08 SCREW, 5/16-24X SPACER PULLEY, HALF WASHER, FLAT .752X.91X.02 BELT, V 3L 33.13LG FLATWASH ER .765X1.12X.06 SPACER, SLEEVE PULLEY, ENGINE BELT, V 4L35.6 LG... -
Page 31: Electric Start Assembly
CRAFTSMAN 24" 5HP SNOW THROWER 536.886440 ELECTRIC Key No. Description MOTOR, STARTER SCREW SCREW CORD, STARTER F-O01087J START ASSEMBLY Part No. 330783 762226 6217 6219 319051... - Page 32 CRAFTSMAN 24" 5HP SNOW THROWER 536.886440 FRAME ASSEMBLY Key No. FRAME ASSY SCREW, 5/16--18X .50 COVER, BOTTOM SCREW, 1/4-20X IDLER ASSEMBLY PIN, HAIR .38DIAX1.64LG PIN, KLIK 3/16" DIA ASSY., SPRING ATTACH BEARING, BOLT, 3/8-16Xl WASHER, FLAT LEVER, IDLER ARM TRACTION BOLT, .625X.135 HHSH 5/16-18...
-
Page 33: Gear Case Assembly
CRAFTSMAN 24" 5HP SNOW THROWER 536.886440 GEAR CASE ASSEMBLY -341 Key No. Description CASE, GEAR, RH CASE, GEAR, LH SCREW,1/4-20X.75 NUT, I/4-20 NUT, 1/4-20 HEXKEPS SCREW, 3/8-16X.50 SEAL, OIL BEARING, FL WASHER, FLAT SHAFT, AUGER OUTPUT GASKET, GEAR BOX WORM GEAR... -
Page 34: Drive Components
CRAFTSMAN 24" 5HP SNOW THROWER 536.886440 DRIVE COMPONENTS 191 \ °° 224 229 313995 REV P F-001087J... - Page 35 CRAFTSMAN 24" 5HP SNOW THROWER 536.886440 DRIVE COMPONENTS Key No. Description LEVER, ASSY TRACTION BEARING, FLANGE RING, RET E SPRING, RETURN LEVER, SPRING SCREW, 1/4-20X NUT, 1/4-20 REGHEXCTRLK DISC, ASSY ZERK, GREASE SHAFT, HEX TRACTION BEARING, TRUNION FLATWASHER, RING, RETEX...
-
Page 36: Auger Housing
CRAFTSMAN 24" 5HP SNOW THROWER 536.886440 AUGER HOUSING ASSEMBLY KEY# 500 IS A WELDMENT iNCLUDES TWO SIDE PANELS REF, 339972 F-OO1087J... -
Page 37: Housing, Assy
CRAFTSMAN 24" 5HP SNOW THROWER AUGER HOUSING Key No. PULLEY, 4L 6.12X .67 SCREW, 5/16-18X.63 KEY, SQUARE SPACER, SLEEVE .676Xl .00X.53 RETAINER, BALL BRNG BEARING, BALL SCREW, 5/1 6-18X .75 NUT, 5/16-18 HOUSING, ASSY "502 FASTENER, BLADE, SCRAPER BOLT, 1/4-20X.75... -
Page 38: Discharge Chute Assembly
CRAFTSMAN 24" 5HP SNOW THROWER 536.886440 DISCHARGE CHUTE ASSEMBLY 594 596 REF. KEY# 600 600 m 608- 337160 F-OO1087J... - Page 39 CRAFTSMAN 24" 5HP SNOW THROWER 536.886440 DISCHARGE Key No. BOLT, 5/16-18 WASHER, PLASTIC NUT, 5/16-18 WASHER, PLASTIC WASHER, PLASTIC WASHER, PLASTIC FLATWASHER WASHER, SPLITLOCK FLATWASHER KNOB, T 2/BLADE W/NUT NUT, 5/16-18 CARR. BOLT, 5/16-18X1.00 CHUTE 600-1 CHUTE, LOWER 600-2 CHUTE, UPPER...
-
Page 40: Handle Assembly
CRAFTSMAN 24" 5HP SNOW THROWER 536.886440 HANDLE ASSEMBLY ;733 755- 753- 339622 F-OO1087J... - Page 41 CRAFTSMAN 24" 5HP SNOW THROWER 536.886440 HANDLE ASSEMBLY Key No. Description HANDLE, UPPER SCR EW, 5/16-18X2.75 WASHER, FLAT .349X.69X.066 WASHER, SPTLK .31X.58X.08 NUT, 5/16-18 REGHEX STOP, RED PLASTIC SET OF CLUTCH SET OF CLUTCH PIN, CLUTCH HANDLE NUT, PUSH ON CAP BUMPER, RECTANGLE CABLE, CLUTCH 28.44L...
-
Page 42: Wheel Assembly
CRAFTSMAN 24" 5HP SNOW THROWER 536.886440 WHEEL ASSEMBLY Key No. SHAFT, AXLE SPRKT & HUB SCREW, 1/4-20X2.25 NUT, 1/4-20 HEX NYLOCK BRNG, FL CHAIN, ROLLER LINK, CHAIN MASTER FLA'I'WASH ER .765X1.12X.06 BUSHING, WHEEL TIRE & RIM SCREW, 1/4-20X1.75 NUT, 1/4-20 RING, RE-I- PIN, KLIK .25 X 1.38 DIA... - Page 43 CRAFTSMAN 24" 5HP SNOW THROWER SHIFT YOKE ASSEMBLY 790-- Key No. ROD, SHIFT SCREW, 1/4-20X.75 NUT, 1/4-20 REGHEXCTRLK NUT, 1/2-13 HEXJAM KNOB, SHIFT LEVER, SPRING SHIFT SCREW, 1/4-20X.75 NUT, 1/4--20 REGHEXCTRLK BEARING, FLANGED ROD, ASSY. YOKE NUT, 3/8-16 F-O01087J Description Part No.
-
Page 44: Rod Assembly
CRAFTSMAN 24" 5HP SNOW THROWER 536.886440 CHUTE CONTROL _855 Key No. CRANK, ASSY CHUTE HANDLE, CHUTE CRANK FLATWASHER .39X.70X.05 E RING EYE BOLT 3/8-16X6.00 GROMMET, BOOT NUT, 3/8-16 FLATWASHER ADAPTER, FLATWASH ER .406X.81X.066 NUT, 3/8-16 BRACKET, WORM MTG WORM, GEAR CHUTE ROTATION... - Page 45 24" 5HP SNOW -830 VIEW FROM AUGER FRAME REAR Key No. MODEL PLATE DECAL DANGER CHUTE HAND DECAL DANGER & FOOT DECAL 5/24 CRAFTSMAN DECAL DANGER STRIPE DECAL DRIVE CLUTCH (SYMBOL) DECAL AUGER CLUTCH (SYMBOL) DECAL GEAR SELECTOR DECAL TOOLBOX INFO F-001087J THROWER 536.886440...
-
Page 46: Engine Model
CRAFTSMAN 4-CYCLE ENGINE MODEL NUMBER 143.015005 "135 '" _342A .-101 370D. 287 390 370K 329' F-001087J... - Page 47 CRAFTSMAN 4-CYCLE PART DESCRIPTION RPM High 3550 to 3850 RPM Low 1850 to 2150 36469A Cylinder (Incl. 2, 20, 72 & 125) 26727 Dowel Pin Oil Drain Extension (Purchase Local) 30969 Extension Cap Washer 28277 31334 Governor Rod 31510 Governor Lever...
- Page 48 CRAFTSMAN 4-CYCLE 31672 Valve Spring 31673 Valve Spring Cap 27234A Valve Cover Gasket 27666 Breather Body 31410 Breather Element 34146 Valve Cover 35350 Breather Tube 650783 Screw, 10-24 x 3/4" 29752 Nut & Lock Washer 650870 Screw, 1/4-28 x 1-11/16"...
- Page 49 CRAFTSMAN 4-CYCLE PART 590742 590740 590616 590617 590645A 590647 590535 590574 590760 F-001087J ENGINE MODEL NUMBER 143.015005 lill Ill -7 DESCRIPTION Rewind Starter Retainer Starter Dog Dog Spring Pulley & Rewind Spring Ass'y Starter Housing Ass'y Starter Rope (Length 98" x 9/64" dia.)
- Page 50 CRAFTSMAN 4-CYCLE ENGINE MODEL NUMBER 143.015005 F--OO1087J...
- Page 51 CRAFTSMAN 4-CYCLE PART 33290E 31749 33522 33769 37332 35461 35450 35912 35452A 590500 33441 35453 35454 35911 35462 35456 650819 651032 32450B 650759 F-OOfO87J ENGINE MODEL NUMBER DESCRIPTION Electric Starter (110 Volt) Retainer Ring Spring Retainer Anti-drift Spring Nut & Gear (Incl. 2) Drive End Cap Ass'y.
- Page 52 CRAFTSMAN 4-CYCLE ENGINE MODEL NUMBER 143.015005 F-OO1087J...
-
Page 53: Engine Model Number
CRAFTSMAN 4-CYCLE PART 640084A 631615 631767 640070 650506 632108 631890 630735 631807 651025 630766 640027 640053 631951 631024 632019 631028 631021 631022 27136A 27554 632745 632547 640183 27110A 630748 631027 632760 F-OOlO87J ENGINE MODEL NUMBER DESCRIPTION Carburetor (Incl. 184 of Engine Parts List) Throttle Shaft &... - Page 54 For the repair or replacement parts you need delivered directly to your home Call 7am-7pm, 7days a week 1-800-366-PART (1-800--366-7278) Para ordenar piezas con entrega a domicilio - 1-800-659-7084 For in-house major brand repair service Call 24 hours a day, 7days a week 1-800-4-REPAIR (1-800-473-7247) Para pedir servicio de reparaci6n a...
Need help?
Do you have a question about the 536.88644 and is the answer not in the manual?
Questions and answers