Table of Contents
Advertisement
Owner's Manual
10 in. Stationary
TABLE SAW
Model No.
315.228310
Save this manual for
future reference
_, CAUTION:
Read and follow all
Safety Rules and Operating
Instructions before first use of this
product.
".I
Customer Help Line: 1-800-932-3188
Sears,
Roebuck
and Co., Hoffman
Estates,
IL 60179
USA
Visit the Craftsman
web page: www.sears.com/craftsman
972000-524
10-98
• Safety
• Features
• Assembly
• Operation
• Maintenance
• Parts List
NRTL/C
Advertisement
Table of Contents

Related Manuals for Craftsman TABLE SAW 315.22831


Summary of Contents for Craftsman TABLE SAW 315.22831
- Page 1 Read and follow all Safety Rules and Operating Instructions before first use of this product. Customer Help Line: 1-800-932-3188 Sears, Roebuck and Co., Hoffman Visit the Craftsman web page: www.sears.com/craftsman 972000-524 10-98 ".I • Safety • Features • Assembly • Operation •...
- Page 2 Your saw has many features for making cutting operations more pleasant and enjoyable. Safety, performance and dependability have been given top priority in the design of this saw making it easy to maintain and operate. CAUTION: Carefully read throughthis entire owner's manual before using your new saw. Pay close attention to the Rules For Safe Operation and all Safety Alert Symbols, including Danger, Wam ng and Caution.
- Page 3 Heeling (Paralleling) the Sawblade to Miter Gage Groove ... t... 29-30 Setting the Bevel Stops and Indicator... Adjustingthe Miter Gage ... Removing/ Replacing the Throat Plate ... • Basic Operation/bf the Table Saw ... Causes of Kickback... AvoidingKickback ... Making Cutting Aids ... Types of Cuts ...
- Page 4 Always use originalfactory replacement parts when servicing. READ ALL INSTRUCTIONS KNOW YOUR POWER TOOL. Read the owner's manual carefully. Learn the saw's applications and limitationsas well as the specificpotential hazards related to this tool. DO NOT USE IN DANGEROUS ENVIRON- MENT.
- Page 5 BEFORE MOUNTING, DISCONNECTING OR REMOUNTING THE MOTOR; unplug the saw and remove the switch key. WARNING: Craftsman replacement pads. Use of any other parts may create a hazard or cause product damage. NEVER USE THIS TOOL IN AN EXPLOSIVE ATMOSPHERE. Normal sparkingof the motor could ignite fumes.
-
Page 6: Rules For Safe Operation
USE A SUPPORT FOR THE SIDES AND BACK OF THE SAW TABLE when sawing wide or long workpieces. Use a sturdy"outrigger" support if a table extension is more than 24 inches long and is attached to the saw, to preventtipping. -
Page 7: Electrical
ELECTRICAL CONNECTION Your Sears Craftsman Table Saw is powered by a precision builtelectric motor. It should be connected to a power supply that Is 120 volts, 60 Hz, AC only (normal household current). Do not operate this tool on direct current (DC). - Page 8 The area directly in line with the blade -- over, under, behind, orin front of it. Also, the workpiece area which willbe or has been cut by the blade. The distancethat the tip of the saw blade tooth is bent (or set) outwardfrom the face of the blade. Throw-Back Saw throwingback a workpiece;similar to kickback,...
-
Page 9: Loose Parts List
Your new table saw has been designed to give you many years of high quality performance. To insure this goal, proper care and treatment is important. Careful treatment begins with removing all pads from the cartonand checking them against the list of loose parts.The long box contains the rails. - Page 10 The following items are included with your Table Saw. A. Table Saw Base ... 1 B. Belt ... 1 C. Belt Guard (2 Piece) ... 1 D. Blade Guard Assembly (Hardware Shown Separately) ... 1 E. Wrench ... 1 F. Handwheel (Hardware Shown Separately) ... 2 G.
- Page 11 Check allloose parts fromtheboxwiththelistontheprevious page, t hefigures below andonthefollowing page, S mall i tems suchasfasteners andendcapsareshown infigures 2 b and2 c. Follow theinstructions in theAssembly section toassemble yournewsaw. Hardware for Handwheel ... 2 screw (3/16-24 x 1/2 in.)... 2 flat washer (3/15 in.) ... 2 V.
- Page 12 (5/16 in.) ... 6 hex nut (5/16-18) ... 6 end cap for rear rail ... 2 screw (5/32-32 x 1/2 in.) ... 2 CRAFTSMAN" TABLESAW315.228310 Y. Hardware for Blade Guard Bracket and Blade Guard Assembly Blade Guard Bracket ... 1 hex cap screw (5/16-18 x 1/2 in.) ...
- Page 13 The followingtoolsare needed for assembly and alignment. Note: The five hex keys listedbelow have been providedwith your saw. The remaining tools are typicalshop toolsand are not included with your saw. SMALL I MEDIUM PHILUPS SCREWDRIVER COMBINA_ONSOUARE FRAMING SQUARE 8 mm,10 mm,and12 mrn...
-
Page 14: Labels
The followinglabels are found on your saw in the locationsshown. Read all warnings and this owner's manual before using saw, 10 inch Table Saw 36QOIh_M 120VOLTS WARNING: WHEN SERVICING, USE ONLY IDENTICAL CRAFTSMAN REPLACEMENT PARTS. MODEL 315.228310 S_R. N O. - Page 15 2 Inches or lees from blade. • When ripping, when fence Is set between blade. Oo nut make rip cuts narrower •Tum off tool and walt for saw blade to stop before any operation freehand. moving workplece • Disconnect for ripping.
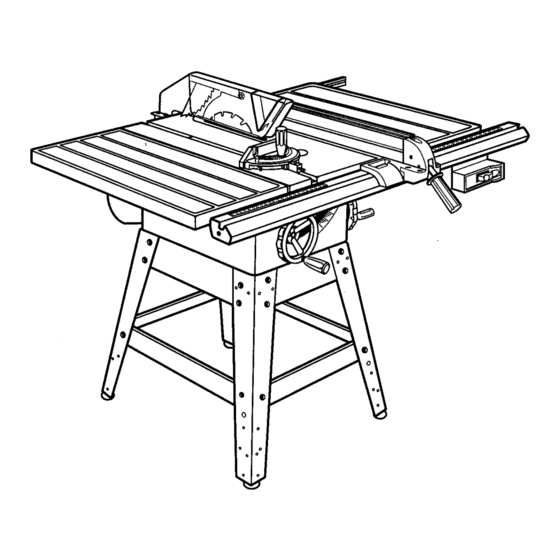
- Page 16 RIPFENCE BLADE RIVING KNIFE ORSPREADER ALIGN-A-CUT TABLE INSERT EXTENSION MITER GAGE GROOVE SCALE EXTENSION TABLE FRONT RAIL GAGE BEVEL SWITCH HANDWHEEL WITH KEY RIPFENCE SCALE HANDLE HANDWHEEL LEGSTAND BELTCOVER 'LEVELING FOOT BEVEL LOCKHANDLE MOTOR Fig. 5 CRAFTSMAN" TABLE SAW 315.228310...
-
Page 17: Features
BEVEL SCALE - The easy-to-road scale on the front of the work.standshows the exact blade angle. BLADE -This saw is providedwith a Craftsman 64 tooth, 10 in. steel blade. The blade is adjusted with bevel and height handwheels on the cabinet. Bevel angles are locked with a handle below the front rail. -
Page 18: Assembly
Assembly is best done in the area where the saw will be used. When you remove the table saw base, loose parts, and hardware from the packing matedals, check all items with the loose parts listand drawing. If you are unsure about the descriptionof any part, refer to the drawing. -
Page 19: Assembling Leg Stand
• Place the leg stand on the table saw base. Align the holes in the table with the holes in the end braces. Make sure the Craftsman label faces the front of the saw (same side as height handwheel). •... -
Page 20: Assembling Table Extensions
• With the saw upside down, align table extensionsto the saw table. Put a flat washer on each bolt, and attach the extensionsto the table by insertingbolts through holes from the direction of the table. -
Page 21: Installingthe Rear Rail
Put the end caps on the rail ends. Insert the screws and tighten with a phillipshead screwdriver. SLOT REARRAIL SQUARE HEADBOLTS WASHER SQUARE HEADBOLTS TABLE EXTENSION HEXNUT FLAT Fig. 12 FLAT WASHER TABLE REARRAIL Fig. 13 ENDCAP SCREW REAR OF SAW Fig. 14 CRRFTSNAN" TABLE SAW 315.228310... -
Page 22: Installing The Front Rail
(Bottom slot is for switch.) • Alignthe rail left to fight - Match the 7-1/8 in. mark on the dghtscale to the dghtedge of the table saw base (main table). See Figure 16. • Snug the rail against table. Finger-tighteneach nut on the table and extensions. -
Page 23: Mountingthe Motor
Thread the two hex bolts intothe cradle to clamp down on the rods. Do not securely tighten bolts yet. HEX BOLTS Fig. 17 RODS RIPFENCE MOTOR FRONT RAIL BRACKET 1 In.HEXBOLTS Fig. 18 MOTOR ASSEMBLY WASHER Fig. 19 CRRFTSNRN" TABLE SAW 315.228310... -
Page 24: Installing Thebeltandbeltguard
4 small hex nuts (3/16-24). • Lower the blade by turningthe height handwheel. • Slip the belt on the saw pulley (inside cabinet). Lift the motorforward and place the belt on the motor pulley. • Check that the belt is straightand both pulleysare aSgned. -
Page 25: Installingthe Blade Guard
Securelytighten with a 5 mm hex key. • Insertthe third socket head screw and flat washer into screw hole in saw table under throat plate. Securelytighten with a 5 mm hex key. • Replace the throat plate. -
Page 26: Aligning Therivingknifewiththe Blade
BLADE See Figures26 - 28. WARNING: Make sure the switch is off, the switch key is removed, and your saw is unplugged. Failure to do so could result in accidental starting, causing serious personal injury. The rivingknife must be aligned with end centered over the blade. -
Page 27: Checking Rip Fence And Blade Alignment
Secure it to the side of the cabinet with the cord clip and screw provided. Use care with the cord around sharp edges. Your saw is now set up to provide years of high quality performance. -
Page 28: Adjustments
• To install a standard blade, place the new blade on the arbor shaft, with teeth pointing down towardthe front of the saw, Wedge a piece of scrap woodat the back of the blade. See Figure 34. CAUTION: The teeth must point down toward the front of the saw to work properly.Otherwise,... - Page 29 WARNING: Make sure the switch is off, the switch key is removed, and your saw is un- plugged. Failure to do so could result in acciden- tal starting, resultingin serious personal injury. WARNING: The sawblade must be parallel to the miter gage groove so the wood does not bind, resulting in kickback.You could be hit or...
-
Page 30: Setting The Bevel Stops And Indicator
If the blade Is not parattel,adjust the front table bracket.Tilt the blade to 45" with the blade lock handle and bevel handwheel. • From the back of the saw, toosenthe bolts holding the front table bracket, as well as the rear table bracket. •... -
Page 31: Adjustingthe Miter Gage
Place the square against the blade (be sure the square is not against one of the saw teeth). Ifthe blade is not at 45", unscrewthe 45" stop screw (right of blade), turnthe handwheel untilthe blade is correct, and tighten the screw. - Page 32 • To remove the throat plate, first loosen the screw in the throat plate with a phillipsscrewdriverand lift the front end. Pull it out toward the frontof the saw. • To re-installthe throat plate, place It in the opening. Push it towardthe rear of saw base to engage the spdng clip.
-
Page 33: Causes Of Kickback
BASIC OPERATION OF THE TABLE SAW A table saw can be used for straight-linecutting operations such as cross cutting, ripping,mitering, beveling, and compound cutting. It can make dado or moldingcuts with optional accessories. The three-prong plug must be plugged into a match- ing outletthat is propeity installed and grounded according to all local codes and ordinances. -
Page 34: Types Of Cuts
TYPES OF CUTS See Figure 43. There are six basic cuts: t ) the cross cut, 2) the rip cut, 3) the miter cut, 4) the bevel cross cut, 5) the bevel rip cut, and 6) the compound (bevel) miter cut. All other cuts are combinations of these basic six. -
Page 35: Making A Cross Cut
MAKING A CROSS CUT See Figure 44. It is recommended that you make test cuts on scrap wood. Stand at the frontof the saw and push the wood to the blade with the miter gage. _1= WARNING: Make sure the blade guard is lowered over blade and is working properlyto prevent possible i njury. -
Page 36: Makinga Mitercut
• Make sure the wood is clear of the blade before turning on the saw. Insert the key and lift the switch to the ON position. Let the blade build up to full speed before feeding the wood into the blade with the miter gage. -
Page 37: Makinga Bevelripcut
• Make sure the wood is clear of the blade before turning on the saw. Insert the key and lift the switch to the ON position.Let the blade obtain full speed beforefeeding the workpiece intothe blade. -
Page 38: Makinga Compound (Bevel) Miter Cut
Retighten miter gage knob. • Place a supportthe same height as the top of the saw table behind the saw for the cut work. II Make sure the wood is not touchingthe blade. • Insert the kay and lift the switch to the ON position. -
Page 39: Making A Large Panel Cut
MAKING A LARGE PANEL CUT See Figure 51. Make sure the saw is properly secured to a work surface to avoid tipping from the weight of a large panel. WARNING: Make sure the blade guard is lowered over blade and is working properly to prevent possibleinjury. -
Page 40: Making A Dado Cut
Test the blade nut and blade washer tightness. • Installoptional dado thmat'plate. • Plug in the saw and follow dado instructions. Always use pushsticks with dado cuts. • When the work is completed, press the switch off and remove the key. -
Page 41: General Maintenance
GENERAL MAINTENANCE WARNING: When servicing, use only identical Craftsman replacement pads. Use of any other part may create a h_o.ardor cause product damage. WARNING: To prevent accidental starting that could cause possibleserious personal injury, turn off the saw, remove the switch key, and unplug the saw before working on the table saw. - Page 42 4. Circuit is overloaded with appliances, lights, or other motorS. 1. Motor is overloaded. 2. Du$$ blade. 3. Sawdust inside saw is blocking air flow. 1. Starter switch is defective. 2. Voltage from source is low. 3. Dull blade. 4. Fuses or circuit breakers are wrong size or defective.
- Page 43 Handwheels are hard to turn. Blade does not lower when turning height handwheel. Mitergage does not movesmoothly. Cut binds,bumsorstallsmotorwhen ripping. Saw bladedoes notcut true at 90"or 45" positions. CAUSE 1. Motor is overloaded. 2. Fuses or circuit breakers are wrong size or defective.
- Page 44 PROBLEM Rip fence does not move smoothly. Wood edges away from rip fence when ripping. CRIIFTSMlU4"TABLESAW3_G.22834,0 CAUSE 1. Rip fence is not mounted cor- rectly. 2. Rails are dirty or sticky. 1. Rip fence is misaligned. SOLUTION 1. Remove and repositionthe rip fence.
- Page 45 CRRFTSMAN" TABLE SAW 315.228310...
- Page 46 CRAFTSMAN TABLE SAW - MODEL NO. 315.228310 number in all correspondence regarding your TABLE SAW or when ordering repair pads. The model number will be found on a plate attached to the cabinet. Always mention the model FIGURE A CRIIFTSMRN"...
- Page 47 CRAFTSMAN number in all correspondence regardingyour TABLE SAW or when ordering repair parts. The model number will be found on a plate attached to the cabinet. Always mention the model PARTS LIST FOR FIGURE A PART NUMBER 977481-001 979974-001 ** STD551031 * Washer (5/16 in.) ...
- Page 48 SAW or when orderingrepair parts. The model number will be found on a plate attached to the cabinet. Always mentionthe model number in all correspondenceregardingyour TABLE FIGURE B CRAFTSMAN TABLE SAW - MODEL NO. 315.228310...
- Page 49 CRAFTSMANTABLE SAW - MODELNO.315.228310 SAW or when orderingrepair parts. he model numberwill be found on a plate attached to the cabinet. Always mention the model number in all correspondenceregardingyour TABLE PART NUMBER DESCRIPTION 979999-001 Leveling Foot... ** STD541031 * Hex Nut (5/16-18) ...
- Page 50 CRAFTSMAN TABLE SAW - MODEL NO. 315.228310 SAW or when orderingrepair parts. he model numberwillbe found on a plate attached to the cabinet.Always mentionthe model numberin all correspondenceregardingyour TABLE ¢,m FIGURE C...
- Page 51 SAW or when ordering repair parts. I The model number willbe found on a plate attached to the cabinet. Always mention the model number in all correspondence regarding your TABLE PART NUMBER DESCRIPTION 979973-001 Fence End Cap ... 1 979945-001 * Screw (5/32-32 x 1/2 in.) ...
- Page 52 SAW or when ordering repair parts. I The model numberwill be found on a plate attached to the cabinet. Always mentionthe modelnumber in all correspondence regardingyour TABLE FIGURE D CRAFTSMAN TABLE SAW - MODEL NO. 315.228310...
- Page 53 Pin ... 980955-001 Roll Pin ... 980400-001 Warning Label ... 980324-001 Blade Guard Label ... CRAFTSMAN TABLE SAW- MODEL NO. 315.228310 PARTS LIST FOR FIGURE D .*Standard Hardware Item-- May Be Pumhased Locally **Available From Div. 98 -- Source 980.00 QUAN.
- Page 54 CRAFTSMAN TABLE SAW - MODEL NO. 315.228310 SAW or when orderingrepair parts. The modelnumber will be found on a plate attachedto the cabinet.Always mentionthe modelnumber in all correspondence regardingyourTABLE FIGURE E...
- Page 55 CRAFTSMAN SAW or when orderingrepair parts. I The model number willbe found on a plate attached to the cabinet.Always mentionthe model number in all correspondenceregardingyour TABLE PART NUMBER DESCRIPTION 979945-001 * Screw (5/32-32 x 1/2 in.)... ** STD512503 * Screw (1/4-20 x 3/8 in.)...
- Page 56 CRAFTSMAN TABLE SAW - MODEL NO. 315.228310 SAW or when orderingrepair parts. I The model number willbe found on a plate attached to the cabinet. Always mention the model numberin all correspondence regarding your TABLE FIGURE F...
- Page 57 ** STD502502 * Setscrew (1/4-20 x 1/4 in.) ... Motor 979931-001 979988-001 Power Cord (Motor) ... CRAFTSMAN TABLE SAW- MODEL NO. 315.228310 °' ° ° e °0enum ° PARTS LIST FOR FIGURE F ,*Standard Hardware Item -- May Be Purchased Locally **Available From Div.
- Page 58 SAW or when ordering repair parts. The model number willbe found on a plate attached to the cabinet. Always mention the model number in all correspondence regarding your TABLE FIGURE G CRAFTSMAN TABLE SAW - MODEL NO. 315.228310...
- Page 59 CRAFTSMANTABLE SAW- MODELNO. 315.228310 SAW or when orderingrepair parts. The model number will be found on a plate attached to the cabinet.Always mentionthe model number in all correspondence regardingyourTABLE PART NUMBER DESCRIPTION 979992-001 Base ... ** STD523105 * Bolt (5/16-18 x 1/2 in. Hex Hd.) ...
- Page 60 CRAFTSMAN I Them_de_numberwi'_bef_und_nap_ateattachedt_thecabinet_A_waysmenti_nthem_de_numberina__c_rresp_ndencer_gardingy_urTABLE_sAw or when orderingrepair parts. ¢3 FIGURE H TABLE SAW- MODEL NO. 315.228310...
- Page 61 CRAFTSMAN TABLE SAW- SAW or when orderingrepair parts. The model number willbe found on a plate attached to the cabinet. Always mentionthe modelnumber in all correspondence regardingyour TABLE PART NUMBER DESCRIPTION 979945-001 * Screw (5/32-32 x 1/2 in.)... 979946-001 End Cap (Left Rear) ...
- Page 62 CRAFTSMAN SAW or when ordering repair parts. he model numberwill be found on a plate attached to the cabinet. Always mentionthe model number in all correspondenceregardingyour TABLE FIGURE I TABLE SAW - MODEL NO. 315.228310 15 16...
- Page 63 CRAFTSMAN TABLE SAW - MODEL NO. 315.228310 SAW or when ordedng repair pads. I The model number willbe foundon a plate attached to the cabinet. Always mentionthe modelnumber in all correspondenceregarding yourTABLE PART NUMBER DESCRIPTION ** STD551131 * Lock Washer (5/16 in.) ... 6 ** STD523105 * Bolt (5/16-18 x 1/2 in.
- Page 64 For in-home major brand repair service: Call 24 hours a day, 7 days a week 1-800-4-MY-Home s" (1-800-469-4663) Para pedir servicio de reparaci6n a domicilio - 1-800-676-5811 In Canada for all your service and parts needs call _ 1-800-665-4455 Au Canada pour tout le service ou les pi_ces For the repair or replacement parts you need: Call 7 am - 7 pro, 7 days a week...
Need help?
Do you have a question about the TABLE SAW 315.22831 and is the answer not in the manual?
Questions and answers