Table of Contents
Advertisement
Quick Links
Advertisement
Table of Contents

Subscribe to Our Youtube Channel
Related Manuals for Leica EZ4 E


Summary of Contents for Leica EZ4 E
- Page 1 Leica ES2 Leica EZ4 Leica EZ4 E Leica EZ4 W User Manual...
-
Page 2: Congratulations
Congratulations! You have just purchased a Leica E Series stereo In developing our stereo microscopes, we have microscope – an excellent choice! Viewing placed great emphasis on simple, self-explana- entire objects under magnification imparts tory operation. However, please take the time... -
Page 3: Table Of Contents
Safety and Use Leica ES2 Leica EZ4, Leica EZ4 E or Leica EZ4 W Eyepieces (Only for Leica EZ4) Photography Using the Leica EZ4 E or Leica EZ4 W Get Set! The Camera Remote Control (Optional) Care, Transport, Contact Persons... -
Page 4: Contents
Graticules: Preparation Using the LED Illuminator Inserting the Graticules Focusing Magnification Display Photography Using the Leica EZ4 E or Leica EZ4 W Adjusting the Resistance of the Focus Drive Introduction The Basics Leica EZ4, Leica EZ4 E or Leica EZ4 W... - Page 5 Ethernet Mode – Capturing and Adjusting Images Using a Network Dimensions Leica ES2 The Camera Remote Control (Optional) Leica EZ4 E or Leica EZ4 W Optional Remote Control Leica EZ4, 10× Eyepieces Viewing Images and Movies With the Optional Remote Control...
-
Page 6: Safety And Use
Safety and Use Leica E Series User Manual Safety and Use... -
Page 7: Symbols Used
Functional disturbances or damaged instruments Warning of hazardous electrical voltage This symbol indicates especially impor- tant information that, if not observed, can cause the following: Hazards to personnel Functional disturbances or damaged instruments Leica E Series User Manual Safety and Use... -
Page 8: Safety Instructions
The "Safety Concept" booklet contains addi- instrument. Technical safety tional safety information regarding service To connect the Leica E Series microscopes to work, requirements and the handling of the power, use a power cable that meets the power microscope, accessories as well as general cable specifications in your country. - Page 9 Radio interference suppression in compli- directive. ance with EN 55011 class B Noise immunity in compliance with DIN EN 61326-1. Intended for indoor use only in all EU member states, EFTA states and Switzerland. Leica E Series User Manual Safety and Use...
-
Page 10: Regulatory Compliance Information (Regarding Leica Ez4 W Only)
Regulatory Compliance Information (Regarding Leica EZ4 W Only) FCC Requirements for Operation in the United States FCC radio frequency interference warnings Connect the equipment into an outlet on FCC caution and instructions a circuit different from that to which the... - Page 11 Regulatory Compliance Information (Regarding Leica EZ4 W Only) (Continued) Canada (IC) Australia and New Zealand Notices Brasil This device complies with Industry Canada This device equipment complies with the licence-exempt RSS standard(s). Operation is Australian and New Zealand regulatory approv- subject to the following two conditions: als requirements.
-
Page 12: Instructions For Use
The power cable is provided Use in clean rooms as the power disconnect device. Leica E Series microscopes can be used in clean rooms without any problems. Leica E Series User Manual Safety and Use... - Page 13 – as this manual, repair and service work may mended). increases the risk class. Failure to observe this be carried out by authorized Leica technicians notice poses a risk of eye damage. only. Accessories...
-
Page 14: Leica Es2
Leica ES2 Leica E Series User Manual Leica ES2... -
Page 15: Overview: Leica Es2
10× fixed eyepieces for eyeglass wearers 2. Carrying handle 3. Two-level magnification changer 10× and 30× 4. Focusing drive 5. Integrated LED incident light illumination 6. Integrated LED transmitted illumination 7. Switch for incident and transmitted light Leica E Series User Manual Leica ES2... -
Page 16: Transport, Placement And Storage
Built-in carrying device Setting up the microscope Packing the device away All Leica E Series microscopes are 1. Place the microscope on a flat tabletop. 1. After use, wind up the cable as shown equipped with a carrying handle for in the illustration. -
Page 17: The Correct Interpupillary Distance
You may need a short time to become familiar with using the instrument. Not to worry – after a little while, it will become automatic. Leica E Series User Manual Leica ES2... -
Page 18: Using The Led Illuminator
Use transmitted light for transmitted light desired. specimens or transparent objects. Use the combination of both LED illumina- tors for partially transparent objects. After switching off, the LEDs remain lit for about another 4 seconds. Leica E Series User Manual Leica ES2... -
Page 19: Focusing
After you have adjusted the image or right-handed. sharpness at high magnification, it is maintained even if you switch to a lower magnification (parfocal). 2. Set the working distance to approx. 100 mm for coarse focusing. Focusing drive torque Leica E Series User Manual Leica ES2... -
Page 20: Magnification Display
Magnification Display You can read the configured magnifica- tion on the right-hand rotary knob of the Leica ES2. The additional magnification provided by the eyepieces is already incorpo- rated in the scale. Leica E Series User Manual Leica ES2... -
Page 21: Adjusting The Resistance Of The Focus Drive
No problem – the resistance can be adjusted individually depending on your personal preferences: 1. Grip the drive knobs with both hands and turn them towards each other until the desired resistance is reached during focusing. Leica E Series User Manual Leica ES2... -
Page 22: Leica Ez4, Leica Ez4 E Or Leica Ez4 W
Leica EZ4, Leica EZ4 E or Leica EZ4 W Leica E Series User Manual Leica EZ4, Leica EZ4 E or Leica EZ4 W... -
Page 23: Overview: Leica Ez4
1. 10× fixed eyepieces for eyeglass wearers 2. Carrying handle 3. Magnification changer 4. Focusing drive 5. Integrated LED incident light illumination 6. Illumination control 7. Integrated LED transmitted illumination Leica E Series User Manual Leica EZ4, Leica EZ4 E or Leica EZ4 W... -
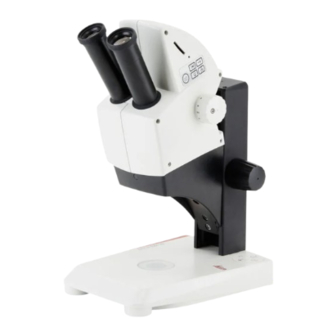
Page 24: Instrument Variant: Leica Ez4 E Or Leica Ez4 W
Instrument Variant: Leica EZ4 E or Leica EZ4 W 1. 10× fixed eyepieces for eyeglass wearers 2. Integrated digital camera with SD card slot 3. Mode selection panel (EZ4 E or EZ4 W) 4. Carrying handle 5. Magnification changer 6. IR receiver for optional remote control 7. -
Page 25: Transport, Placement And Storage
2. Connect the power supply to a grounded socket. 2. Store the instrument so that it is protected against dust. Leica E Series User Manual Leica EZ4, Leica EZ4 E or Leica EZ4 W... -
Page 26: The Correct Interpupillary Distance
You may need a short time to become familiar with using the instrument. Not to worry – after a little while, it will become automatic. Leica E Series User Manual Leica EZ4, Leica EZ4 E or Leica EZ4 W... -
Page 27: Switching On The Led Illuminator
Use incident light for plastic, opaque baseplate. objects Use transmitted light for transmitted light specimens or transparent objects. Use the combination of both LED illumina- tors for partially transparent objects. Leica E Series User Manual Leica EZ4, Leica EZ4 E or Leica EZ4 W... -
Page 28: Controlling The Automatic Shutoff
The LEDs flash twice slowly and then remain The LEDs flash three times slowly and then switched on. The automatic shutoff is now remain switched on. The automatic shutoff is disabled. now re-enabled. Leica E Series User Manual Leica EZ4, Leica EZ4 E or Leica EZ4 W... -
Page 29: Illumination Types
Leica E Series User Manual Leica EZ4, Leica EZ4 E or Leica EZ4 W... -
Page 30: Focusing
(parfocal). 2. Set the working distance to approx. 100 mm for coarse focusing. Focusing drive torque Leica E Series User Manual Leica EZ4, Leica EZ4 E or Leica EZ4 W... -
Page 31: Magnification Display
Leica EZ4. The magnification of the eyepieces is indicated on their outer surfaces, e.g. 10×/20, 16×/16 or 20×/12. Leica E Series User Manual Leica EZ4, Leica EZ4 E or Leica EZ4 W... -
Page 32: Adjusting The Resistance Of The Focus Drive
1. Grip the drive knobs with both hands and turn them towards each other until the desired resistance is reached during focus- ing. Leica E Series User Manual Leica EZ4, Leica EZ4 E or Leica EZ4 W... -
Page 33: Eyepieces (Only For Leica Ez4)
Eyepieces (Only for Leica EZ4) Leica E Series User Manual Eyepieces (Only for Leica EZ4) -
Page 34: Changing Eyepieces (Only For Leica Ez4, Open Version)
Changing Eyepieces (Only for Leica EZ4, Open Version) Changing eyepieces Various eyepieces are available for the Leica EZ4, allowing the stereo microscope to be adapted even better to the specific require- ments. The following eyepieces are available for selec- tion: Eyepieces replaceable, fixed or adjustable: 10×/20, 16×/16 or 20×/12... -
Page 35: Eyepieces And Eyecups (Only For Leica Ez4, Open Version)
Eyepieces and Eyecups (Only for Leica EZ4, Open Version) Eyecups The eyecups can be replaced. Risk of infection Direct contact with eyepieces is a poten- tial transmission method for bacterial and viral infections of the eye. The risk can be minimized by the use of individual eyecups. -
Page 36: Dioptric Correction (Only For Leica Ez4, Open Version)
Dioptric Correction (Only for Leica EZ4, Open Version) Dioptric correction Users with normal vision do not need adjust- Adjusting The adjustable eyepieces for the Leica able eyepieces. An adjustable eyepiece is suffi- 1. Set the dioptric correction for both EZ4 are also available with built-in diop- cient for mild shortsightedness. - Page 37 9. Select the highest magnification and refocus if necessary. Now, if you adjust the magnification from the highest to the lowest level, the specimen is always brought into sharp focus. If not, repeat the process. Leica E Series User Manual Eyepieces (Only for Leica EZ4)
-
Page 38: Graticules (Only For Leica Ez4, Open Version)
Graticules (Only for Leica EZ4, Open Version) Graticules Available eyepiece inserts The transparent graticules can be Graticules 10 mm/ 0.1 mm inserted in the adjustable eyepieces of 5 mm/ 0.1 mm the Leica EZ4. They enable easy measurements 5 mm/ 0.05 mm at the specimen. -
Page 39: Graticules: Preparation
Always hold the graticule by the edges! 1. Gently press the two small tabs on the snap 1. Screw the insert out counterclockwise. mount together and pull out the insert. Leica E Series User Manual Eyepieces (Only for Leica EZ4) -
Page 40: Inserting The Graticules
3. Carefully take hold of the edge of the grati- cule and push it sideways into the holder in the insert. Make sure that both plastic holders snap into place. 5. Insert the eyepiece into the tube. Leica E Series User Manual Eyepieces (Only for Leica EZ4) -
Page 41: Photography Using The Leica Ez4 E Or Leica Ez4 W
Photography Using the Leica EZ4 E or Leica EZ4 W Leica E Series User Manual Photography Using the Leica EZ4 E or Leica EZ4 W... -
Page 42: Introduction
Thank you for purchasing the Leica EZ4 E or Leica EZ4 W by Leica Microsystems. The special design of the Leica EZ4 E or EZ4 W makes it a universal, highly versatile tool for viewing microscopic specimens and capturing still images or video. -
Page 43: The Basics
Aspect ratio is 16:9 except in USB mode where the aspect ratio 5. Capture button is 4:3. Captures image onto the SD card Leica E Series User Manual Photography Using the Leica EZ4 E or Leica EZ4 W... -
Page 44: Leica Ez4 E Or Leica Ez4 W: Overview
1. LED status indicator Blinking red means starting up Green means ready 2. Capture button for SD card capture 3. Mode selection panel 4. SD card slot Leica E Series User Manual Photography Using the Leica EZ4 E or Leica EZ4 W... - Page 45 2. Ethernet socket for connecting an ethernet cable (cable not provided) 3. USB for connecting the provided USB cable Front Infrared window: Receives the signal from the optional remote control. Leica E Series User Manual Photography Using the Leica EZ4 E or Leica EZ4 W...
-
Page 46: Unpacking
The contents include CD with imaging software, If you ordered the handheld remote, you received HDMI cable, and USB cable. the remote with batteries. Leica E Series User Manual Photography Using the Leica EZ4 E or Leica EZ4 W... -
Page 47: Get Set
Get Set! Leica E Series User Manual Get Set! -
Page 48: Usb Mode - Capturing And Adjusting Images Using A Computer
USB port, and attach the other the status light is green and one of the The Leica EZ4 E or Leica EZ4 W ’s field of view, end of the cable to a USB 2.0 port of your mode button's is also green. This may take however, is rectangular with a diagonal of computer. - Page 49 4:3 using the controls of the projector or monitor. 6. You are ready to launch the Leica software. Follow the software instructions to adjust and capture an image.
-
Page 50: Sd Mode - Capturing Images Without A Computer Or Without A Wireless Device
3. If a mode button other than SD mode is lit have an SD card (not provided) with free 1. Switch on the power to the EZ4 E or EZ4 W green, then press the SD mode button and memory on it. If the SD memory card is full, the microscope. - Page 51 The capture button LED will turn green. The Leica You will hear a beep to acknowledge the 6. While in SD mode, you can connect the EZ4 E or Leica EZ4 W is now ready to capture button was pressed. provided HDMI cable from the camera to images onto the SD memory card.
-
Page 52: Adjusting Settings While In Sd Mode
Press and hold the capture button for 5 seconds. Wait for the beep. A new white balance is set. Leica E Series User Manual Get Set! -
Page 53: Wifi Mode - Capturing And Adjusting Images Using A Wireless Device (Only Available For Leica Ez4 W)
WiFi Mode – Capturing and Adjusting Images Using a Wireless Device (Only Available for Leica EZ4 W) 1. Switch on the power to the Leica EZ4 W 3. If a mode button other than WiFi mode is microscope. lit green, then press the WiFi button and wait until both the status LED and the WiFi 2. -
Page 54: Ethernet Mode - Capturing And Adjusting Images Using A Network
PC for viewing, capturing, and adjusting the camera image. 2. Switch on the power to the Leica EZ4 E or 4. If a mode button other than ethernet mode EZ4 W microscope. -
Page 55: The Camera Remote Control (Optional)
HD display. The only function which works in any mode is the "Info" function which shows details about the camera. Leica E Series User Manual The Camera Remote Control (Optional) -
Page 56: Optional Remote Control
7. Brightness adjustment up or down 8. Pairing button 9. Show/hide information box 10. White balance set button 11. Call up the camera menu 12. Arrow keys for navigation 13. OK to confirm Leica E Series User Manual The Camera Remote Control (Optional) -
Page 57: Viewing Images And Movies With The Optional Remote Control
Viewing Images and Movies With the Optional Remote Control If you have purchased the optional remote, the Leica HD camera shows images and movie clips directly on an HD moni- tor. 1. Thumbnail view (first press) up/down/left/right select thumbnail... -
Page 58: Calling Up The Camera Menu
3. Press the and buttons to select a menu item. 4. Press the button to confirm a menu item. EZ4 E 5. Press the button again to hide the camera menus. EZ4 W Leica E Series User Manual The Camera Remote Control (Optional) -
Page 59: Color (Automatic White Balance)
* SETUP WIFI only for EZ4 W The "COLOR" function makes it possible to adapt the camera chip to the ambient light so that color-neutral images can be acquired. Leica E Series User Manual The Camera Remote Control (Optional) -
Page 60: Color (Manual White Balance)
6. Press the button to exit the menu. The "COLOR" function makes it possible to adapt the camera chip to the ambient light so that color-neutral images can be acquired. Leica E Series User Manual The Camera Remote Control (Optional) -
Page 61: Exposure
SETUP USER GAMMA 0.60 4. Correct the values for "EXPOSURE", "GAIN" and "GAMMA" until you SETUP ETHERNET obtain the desired results for the image. * SETUP WIFI only for EZ4 W Leica E Series User Manual The Camera Remote Control (Optional) -
Page 62: Resolution
The "RESOLUTION" menu enables you to define the resolution for the live image, still image capture and network stream individually. This provides optimum results in every situation. Video capture on SD card will always be 1,920 × 1,080 resolution. Leica E Series User Manual The Camera Remote Control (Optional) -
Page 63: Setup Camera (Camera Settings)
This command resets the camera to the factory settings. All user informa- overlay. tion (such as white balance, resolution etc.) is reset. Leica E Series User Manual The Camera Remote Control (Optional) -
Page 64: Setup User
Here you can decide to have the menu remain on screen for 10 seconds or until you press the menu button again. COLOR SHOW MENU 10 SECONDS EXPOSURE RESOLUTION SETUP CAMERA SETUP USER SETUP ETHERNET SETUP WIFI* * SETUP WIFI only for EZ4 W Leica E Series User Manual The Camera Remote Control (Optional) -
Page 65: Setup Ethernet
(Dynamic) or by you using the onscreen keyboard (Static). If you selected "STATIC" for the IP address you can input the following using the onscreen keyboard: IP address IP subnet mask Gateway IP address Leica E Series User Manual The Camera Remote Control (Optional) -
Page 66: Setup Wifi (Only For Leica Ez4 W)
SETUP WiFi (Only for Leica EZ4 W) NAME (SSID) This is the camera name which will appear. You can change the name using the onscreen keyboard. COLOR NAME(SSID) Student8 EXPOSURE SECURITY OPTIONS WPA2PSK,AES SECURITY OPTIONS – NONE RESOLUTION PASSWORD(8 CHR) This means there is no password. -
Page 67: Pairing Cameras With Remotes
Pairing Cameras With Remotes Pairing 3. The microscope only responds to the The Leica EZ4 E or Leica EZ4 W and the remote control commands from this remote control can be paired and then remote control. only respond to each other. This can be helpful... -
Page 68: Care, Transport, Contact Persons
Care, Transport, Contact Persons Leica E Series User Manual Care, Transport, Contact Persons... -
Page 69: Care, Transport, Contact Persons
Leica representative. place. Protect the microscope from oil and grease. can find information on worldwide Leica Never grease or oil mechanical parts or representatives Leica website: If any optical surface becomes badly coated sliding surfaces. -
Page 70: Specifications
Specifications Due to the technology of the camera, the speci- fications are changing regularly. Please visit website www.leica-microsystems.com/ education for the latest brochure downloads to find the up to date specifications. Leica E Series User Manual Specifications... -
Page 71: Specifications
32 GB Integrated power 100 V – 240 V ~ 50 / 60 Hz supply Automatic adjustment to local voltage Power consumption max. 30 W (EZ4 E or EZ4 W), 15 W (ES2, EZ4) Leica E Series User Manual Specifications... -
Page 72: Specifications (Only For Leica Ez4 W)
Specifications (Only for Leica EZ4 W) Feature Specification Radio technology IEEE 802.11n (HT20) Operating frequency 2,412 – 2,472 MHz (20 MHz) Transmitted power 31.7 mW /15.0 dBm (20 MHz) e.i.r.p Leica E Series User Manual Specifications... -
Page 73: Certificates (Only For Leica Ez4 W)
Certificates (Only for Leica EZ4 W) Leica E Series User Manual Specifications... -
Page 74: Dimensions
Dimensions Leica E Series User Manual Dimensions... -
Page 75: Leica Es2
Leica ES2 Leica E Series User Manual Dimensions... - Page 76 Leica ES2 (Continued) Leica E Series User Manual Dimensions...
-
Page 77: Leica Ez4 E Or Leica Ez4 W
Leica EZ4 E or Leica EZ4 W Leica E Series User Manual Dimensions... - Page 78 Leica EZ4 E or Leica EZ4 W (Continued) Leica E Series User Manual Dimensions...
-
Page 79: Leica Ez4, 10× Eyepieces
Leica EZ4, 10× Eyepieces Leica E Series User Manual Dimensions... - Page 80 Leica EZ4, 10× Eyepieces (Continued) Leica E Series User Manual Dimensions...
-
Page 81: Leica Ez4 Without Eyepieces
Leica EZ4 Without Eyepieces Leica E Series User Manual Dimensions... - Page 82 Leica EZ4, Without Eyepieces (Continued) Leica E Series User Manual Dimensions...
- Page 83 CONNECT WITH US! Leica Microsystems (Schweiz) AG · Max-Schmidheiny-Strasse 201 · 9435 Heerbrugg, Switzerland T +41 71 726 34 34 · F +41 71 726 34 44 www.leica-microsystems.com...
Need help?
Do you have a question about the EZ4 E and is the answer not in the manual?
Questions and answers