
Related Manuals for Denver DFT-1912DVBT


Summary of Contents for Denver DFT-1912DVBT
- Page 1 DFT-1912DVBT ¼ò ½é ¼ò ½é 19" TFT LCD TV+DVBT Operating Instructions PAL/SECAM B/G,D/K,I AC 110-240V 50/60Hz TERMINALS INPUT: HDMI YPBPR SCART TELETEXT...
-
Page 3: Table Of Contents
Table Of Contents Table of Contents Specifications Installation Important Safety Instruction Warnings and Cautions Functional Parts(TV) Rear View Of TV Set Connecting External Equipment 10-12 Operation-Remote Control 13-15 Basic Operation 16-17 Advanced Functions 18-23 Troubleshooting Tips... -
Page 4: Specifications
Specifications Receiving System: B/G, D/K, I Colour System: PAL,SECAM 482.6mm(19 inch) diagonal LCD Panel: Ext.Antenna: 75 Ohm Coaxial Cable HDMI, AV, YPbPr, SCART, PC(VGA/AUDIO)IN, EARPHONE Ext. In/Out: Speaker: 8 OHM Audio Output: < 3W X 2 Power consumption: Standby power consumption: <3W Power Supply: AC 110-240V 50/60Hz... -
Page 5: Installation
Installation Thank you very much for your purchase of this product, the most natural Colour Television Receiver. To enjoy your set to the full from the very beginning, read this manual carefully and keep it handy for ready reference. INSTALLATION Locate the receiver in the room where direct light does not strike the screen. -
Page 6: Important Safety Instruction
Important Safety Instruction WARNING RISK OF ELECTRIC SHOCK DO NOT OPEN WARNING: TO REDUCE THE RISK OF ELECTRIC SHOCK DO NOT REMOVE COVER OR BACK. NO USER-SERVICEABLE PARTS INSIDE. REFER SERVICING TO QUALIFIED SERVICE PERSONNEL. The lighting flash with arrow head within a triangle is intended to tell the user that parts inside the product are a risk of electric shock to persons. -
Page 7: Warnings And Cautions
Warnings And Cautions Caution Do not drop or push objects into the television cabinet slots or openings. Never spill any kind of liquid on the television receiver. ¼ò ½é ¼ò ½é Caution Do not insert anything in the ventilation holes. If metal or something flammable enters, it may result in fire or electric shock. - Page 8 Warnings And Cautions Caution Never stand on, lean on, or suddenly push the television or its stand. You should pay special attention to children. Serious injury may result if it should fall. ¼ò ½é ¼ò ½é Caution Do not place your television on an unstable cart , stand , shelf or table.
- Page 9 Warnings And Cautions Warning Take care not to connect many appliances to the same mains socket as this could result in fire or electric shock. Warning High voltages are used in the operation of this television receiver. Do not remove the cabinet back from your set. Refer servicing to ¼ò...
-
Page 10: Functional Parts(Tv)
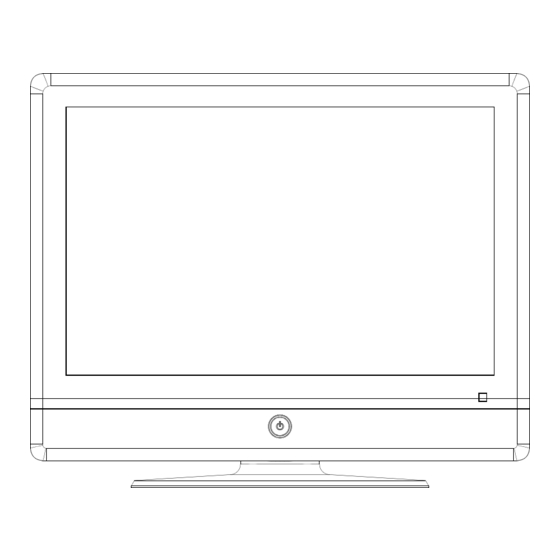
Functional Parts( TV ) Front View of LCD Set MENU SOURCE 1. LED indicator lamp 2. Remote Sensor 3. Standby Button Button Source 5. MENU Button 6. P+ Button 7. P- Button 8. V+Button 9. V- Button ¼ò ½é ¼ò ½é ¼ò... -
Page 11: Rear View Of Tv Set
Rear View Of TV Set DC IN 12V HDMI VIDEO YPbPr SCART TUNER UPDATE TUNER PC-A IN SCART HDMI DC-12V VIDEO NOTE: Precautions when connecting to other equipment When using external equipment with this TV set, please read the instruction manual of the external equipment. Switch off all power supplies to the equipment and TV set before connection. -
Page 12: Connecting External Equipment
Connecting External Equipment Connecting a PC When your PC is connected to the TV with D-SUB cable and audio cable. You can view and listen to the PC's video and audio output on the TV. Use the VASE 1440 X 900@60Hz format to obtain the best image quality for your TV. - Page 13 Connecting External Equipment Connecting a DVD Player or other device (E.G. VCR/Digital cable Box/Satellite Receiver) with Component Video Connectors . Use a component video cable to connect the DVD player's YPbPr jacks to the TV's YPbPr jacks. Use an audio cable to connect the DVD player's AUDIO OUT jacks to the TV's AUIDOIN jacks . Be sure to use the same row of input that you used for the video connection.
- Page 14 Connecting External Equipment Connecting a DVD with High-definition multimedia connectors Use HDMI cable connect the DVD HDMI jack to the TV's HDMI jack. BOTTOM LEFT LEFT U/Pb U/Pb VIDEO VIDEO HDMI HDMI V/Pr V/Pr RIGHT RIGHT COAXIAL COAXIAL S-VIDEO S-VIDEO DVD PIAYER HDMI cable Connecting a television system and earphone...
-
Page 15: Operation-Remote Control
Operation-Remote Control Insert Batteries into the Remote Control Insert two size AAA batteries by matching the and on the batteries to the diagram inside the battery compartment. Precaution on battery use Improper use of batteries can result in a leakage of chemicals and/or explosion. Be sure to follow the instructions below. - Page 16 ¼ò ½é ¼ò ½é ¼ò ½é ¼ò ½é Operation-Remote Control BUTTON DESCRIPTIONS 1. POWER POWER Turn the unit on or off GUIDE 2. GUIDE To access the Program Guide in DTV mode 3. 0-9 number buttons INFO Use these number button to select channel or input password SMODE 4.
- Page 17 Operation-Remote Control BUTTON DESCRIPTIONS POWER 16. SUB.PAGE To enter or exit the sub.page in the teletext mode GUIDE 17. MUTE To mute the sound INFO 18. SOURCE To select the signal input source SMODE 19. MENU:To access the Menu main page PROG+/PROG-:To select channels upward or REVEAL AUDIO...
-
Page 18: Basic Operation
Basic Operation Turning On/Off POWER Turning On First, connect correctly the power adapter and power cord. Press STANDBY on the TV or POWER button on the remote control Turing Off Press on the TV or POWER button on the remote control The TV enters standby mode and the image on the screen disappears. - Page 19 Basic Operation Adjusting Volume Using VOL+/VOL- on the remote control or V+/V- on the TV VOL- VOL+ Press the VOL+/VOL- or V+/V- to increase or decrease the volume. MUTE Using MUTE on the remote control Press the MUTE the button to mute the sound. Press it again to cancel the mute. Source Select SOURCE Press the SOURCE button on the remote control or on the TV, and select the input source with...
-
Page 20: Advanced Functions
Advanced Functions Depending on the signal tuned, you may see different MENU options on your screen. For example , Menus displayed below are based on ATV mode. Picture Control Accessing the Picture Menu PICTURE MENU 1.Press MENU ..Picture Mode Stan dard Contrast Brightness... - Page 21 Advanced Functions Sound Control Accessing the SOUND Menu MENU 1. Press MENU ..SOUND Sound Mode Stan dard 2. Highlight the AUDIO icon. Treble VOL- VOL+ Using VOL+ or VOL- button. Bass Balance 3. Press PROG- ..PROG- EXIT EXIT MENU RETURN ENTER To highlight an option and to change settings, press PROG+/- VOL+/-.
- Page 22 Advanced Functions System Setup Accessing the SETUP Menu MENU 1.Press MENU..SETUP Language English Audio Language English 2.Highlight the SETUP icon. VOL- VOL+ Subtitle Language Using VOL+ or VOL- button. Restore Setting 3.Press PROG- ..PROG- EXIT EXIT MENU RETURN ENTER To highlight an option and to change settings, press PROG+/- VOL+/-.
- Page 23 Advanced Functions Input the new password of the Lock system by the number key (0-9) on the remote control and confirm. Once you set your new password, please remember the password. 3.Block Program Press OK button to Enter the Block Program menu, press the PROG+ or PROG- button to select a channel, then press the GREEN button to Lock or Unlock the selected channel.
- Page 24 Advanced Functions Programme Edit Press OK or VOL+ buttons to enter Programme Edit menu , All ATV programs and DTV programs will listed in the Programme Edit menu. 1.ATV programs Options Delete Press red button to delete the program ,This operation will lost all information of the program. If you want to view the program, you must to manual tuning the program again.
- Page 25 Advanced Functions GUIDE Option Accessing Programme Guide PROGRAMME GUDE DTV 800 SZTVM01 GUIDE 16 Apr 2008 06:20 00:00-00:00 1. Press GUIDE button..16 Apr 06:00 07:00 800 SZTVM01 No Information PROG+ 2. Select a channel. 801 SZTVM02 No Information Use PROG+/- button. PROG- 802 SZTVM03 No Information...
-
Page 26: Troubleshooting Tips
Troubleshooting Tips Before calling for service, you can check the following items on symptoms and solutions. No picture: Check other channel, maybe station problem. Adjust the tuning control. Ensure that the input setting is at TV state. Ensure that the LCD is on. Ensure that the equipment is connected properly.
Need help?
Do you have a question about the DFT-1912DVBT and is the answer not in the manual?
Questions and answers