Table of Contents
Advertisement
Quick Links
Advertisement
Table of Contents
Troubleshooting

Related Manuals for SAINT-GOBAIN NORTON clipper CTC705


Summary of Contents for SAINT-GOBAIN NORTON clipper CTC705
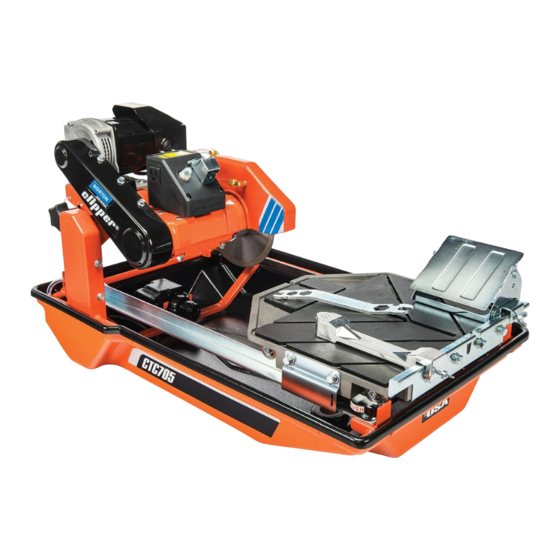
- Page 1 OWNER’S MANUAL WET TILE SAW 7” Model: CTC705 ...
-
Page 2: Table Of Contents
WARRANTY CTC705 saws manufactured by Norton Clipper are warrantied against defects in workmanship or materials for a period of one (1) year from the original purchase date from Norton Clipper when used in commercial, institutional, rental, or professional use. To activate your warranty for all Norton Clipper products visit the Product Registration page on the website and register your machine. -
Page 3: Table Of Contents
TABLE OF CONTENTS Table of Contents ....................1 Safety Precautions ....................3-7 Dust and Silica Warning ......................5 Machine Lifting Points ......................6 SPECIFCATIONS & Features ................. 8-9 CTC705 Specifications ......................8 Optional Accessories ......................9 Unpacking, Assembly, & Setup................10-12 Blade Guard Blade Assembly .................... -
Page 4: Safety Precautions
SAFETY PRECAUTIONS Important warnings and pieces of advice are indicated on the machine with icons. HAZARD ICONS Fuel (gasoline) is extremely flammable, and its vapors can explode if ignited. Store gasoline only in approved containers, in well-ventilated, unoccupied approved areas, and away from sparks or flames. Do not fill the fuel tank while the engine is hot or running. - Page 5 SAFETY PRECAUTIONS Important warnings and pieces of advice are indicated on the machine with icons. SAFETY ICONS Read OSHA and ANSI B7.1. Read operator’s instructions. Visit the industry safety page: www.safety.UAMA.org Eye protection must be worn. Ear protection must be worn. Hand protection must be worn.
-
Page 6: Dust And Silica Warning
SAFETY SAFETY PRECAUTIONS PRECAUTIONS DUST AND SILICA WARNING Grinding/cutting/drilling of masonry, concrete, metal, and other materials can generate dust, mists and fumes containing chemicals known to cause serious or fatal injury or illness, such as respiratory disease, cancer, birth defects or other reproductive harm. If you are unfamiliar with the risks associated with the particular process and/or material being cut or the composition of the tool being used, review the material safety data sheet and/or consult your employer, the material manufacturer/supplier, governmental agencies such as OSHA and NIOSH and other sources on... - Page 7 SAFETY PRECAUTIONS 1. Before mounting any blade on the saw, the blade should be inspected for any damage which might have occurred during shipment, handling, or previous use. 2. The blade collars and arbors should be cleaned and examined for damage before mounting the blade.
-
Page 8: Machine Lifting Points
SAFETY PRECAUTIONS Machine Lifting Points DO NOT Lift by Cutting Head or Blade Guard DO NOT Lift by Cutting Table Lift Here Lift Here CTC705 Lift Points The best lifting point is from the underside of the lip of the water pan which is highlighted with GREEN arrows on both sides of the machine or at the front and back. ... -
Page 9: Specifcations & Features
SPECIFICATIONS & FEATURES 1. A Powerful 1 HP brush motor makes cutting easier and quicker. 2. The Automatic Thermal Overload Protection system protects your saw from power surges and overheating. 3. The high fiber plastic water tray withstands even the toughest jobs, yet it is extremely easy to remove and install. -
Page 10: Optional Accessories
OPTIONAL ACCESSORIES Optional Accessories Description Type Image 70184682710 RIP GUIDE45/90 CTC/YTM7 70184680905 WRENCH UNIVERSAL YTM1015 Optional Accessories: 70184643045 STAND WITH WORKTABLE MITER BLOCK 70184680897 (For Miter Cutting Includes Mounting Hardware) GUIDE ADJUSTABLE ANGLE GUIDE 70184680907 (Includes Mounting Hardware) ... -
Page 11: Unpacking, Assembly, & Setup
UNPACKING, ASSEMBLY & SET-UP Open the container, carefully lift the saw by the saw frame handles and place it on a flat, level working area. Be certain that you have the following items before you discard the container. • Saw •... -
Page 12: Folding Stand Installation
UNPACKING, ASSEMBLY & SET-UP Blade Guard Assembly Folding Stand Assembly 1. The optional Folding Stand with Worktable ships ready to use with no assembly needed. 2. Table Remove the folding stand from its box. 3. Swing the working bench up-right. Open the two legs and place the work bench on top of the folding stand. -
Page 13: Blade Installation
UNPACKING, ASSEMBLY & SET-UP Blade Installation 1. Raise the blade guard to the highest position and tighten the blade guard adjustment knob. 2. Remove the blade shaft nut and outer flange. 3. Verify the direction of rotation of the Diamond Blade and match it to the CTC705. -
Page 14: Electrical
ELECTRICAL CTC70 Electrical Motor Specifications: Table 3. Extension Cord Chart Voltage: 115-volt Wire Gauge 115V Max Length Cycles: 60Hz 12 AWG 25' (7.6 m) 10 AWG 50' (15.2 m) Amperage: 15 Amp 8 AWG 75' (22.8 m) Horsepower: 1 HP Watts: 735 watts Motor RPM:... -
Page 15: General Electrical Trouble Shooting
GENERAL ELECTRICAL TROUBLE SHOOTING CTC705 Wiring Diagram Circuit Breaker During Start Up or Not Cutting: Verify that the power supply voltage matches the motor name plate voltage Failure to run the motor on the proper voltage will damage the motor and is not covered under warranty. - Page 16 GENERAL ELECTRICAL TROUBLE SHOOTING Verify the cutting method. Forcing the Blade into the material is a sign that either the Blade is NOT correct for the material being cut or an inexperienced operator. Let the Blade and Machine work for you do not work for the Blade and Machine.
- Page 17 GENERAL ELECTRICAL TROUBLE SHOOTING c) Overload Protector (Thermal) issues see Overload Protector (Thermal) Tips page 17. d) Low voltage at the machine see Power Supply page 18 Tripping of Circuit Breaker: a) If tripping while starting machine Circuit Breaker issue: weak, damage, to low amperage b) If tripping while cutting any material: Incorrect blade for the material being cut.
-
Page 18: Operation
OPERATION Operation The CTC705 tile saw is designed to cut tiles, stones, masonry products, bricks, and pavers up to 18” x 18” x 1-3/4”. The CTC705 should always be used wet if dry cutting use only blades designed for dry cutting and follow all OSHA requirements for dry cutting. 1. - Page 19 OPERATION Additional Cutting Features Cutting Table The Cutting Table features an adjustable ruler guide (1) enable easy aligning and measuring of cuts. The Ruler Gide can be removed for longer tiles and finetuned to ensure accurate measurements of any tile (loose the attachment screws and move left or right to align the center of the blade with the “0”...
- Page 20 OPERATION Miter Cuts 1. For miter cuts, place the lip of the miter block on the Ruler Guide, with the threaded knobs facing you. 2. Tighten the threaded knobs to secure the miter block in place. 3. Place material onto miter block and you are ready to cut. Cutting Depth The recommended cutting depth is to have the bottom of the diamond blade approximately ¼"...
- Page 21 MAINTANCE & TROUBLE SHOOTING Wet cutting Blades DO'S Inspect blades daily for cracks or uneven wear. Always use appropriate blade for material being cut. Inspect arbor shaft for uneven wear before mounting blade. Always use blades with the correct arbor shaft size. Ensure that blade is mounted in the correct direction.
-
Page 22: Saw Maintenance & Trouble Shooting
SAW MAINTENANCE & TROUBLE SHOOTING Saw Maintenance Maintenance Interval What to do for maintenance and care After every use of the machine Remove dirty water from container. Remove dirt and mud from the bottom of the container. Rinse the immersion pump with fresh water to prevent water pump clogging from residual dirt. After wet cleaning and before using the machine again Connect the machine to an electric power outlet equipped with a "GFCI" power breaker. If the safety power breaker cuts off the electrical power supply, do not try to operate the machine but have it checked by an authorized dealer first. Before not using the machine for a prolonged period of time Clean and lubricate all movable parts. After not using the machine for a prolonged period of time Check that the stand is safely fixed. Check that all screw joints and nuts are fixed. Check that the roller table is in its guides and that it easily moves to and from. With the saw blade removed, switch on the motor for an instant and switch it off again. If the motor does not run, have the machine inspected by a qualified electrician. Check that the immersion pump works properly. Turn on the cooling water tap and switch the machine on. If the pump does not give any water or only a little, switch the machine off at once. Clean the pump or replace if necessary. Ambient temperature below 32 F (operation in winter) To prevent the water in the pump and cooling system from freezing, remove the water after using the machine or when there will be a long break. Make sure that the cooling system is entirely drained so that there is no water left inside the pump, water hose and bearing housing! Trouble Shooting Problem Possible Cause... - Page 23 SAW MAINTENANCE & TROUBLE SHOOTING Trouble Shooting (continued) Problem Possible Cause Solution Use a Power cord extension cable of Poor machine performance little power Power cord/extension cable too long or the rated length, use a cable drum cable still wound up inside cable drum with cable fully extended. Power network is insufficient Observe the electrical ratings of the machine and connect it only to a ...
- Page 24 SAW MAINTENANCE & TROUBLE SHOOTING Belt Replacement 1. Turn off the saw before proceeding any further. 2. Loosen and remove the belt guard screws, then remove the belt guard. 3. Leave the blade tight in position and use your hand to hold the blade shaft tightly. Now loosen the pulley lock screw on the blade shaft pulley.
- Page 25 SAW MAINTENANCE & TROUBLE SHOOTING 4 1 1 2 3 Belt Tensioning 1. Unplug the saw from the power supply. 2. Verify that the Power Switch is in the OFF position 3. Remove the belt guard (see #1 in the Figure: Belt Tensioning) by removing all six (6) Belt Guard Retaining screws.
- Page 26 SAW MAINTENANCE & TROUBLE SHOOTING 9. Reinstall the Belt Guard and tighten all six (6) of the Belt Guard Retaining screws with lock washers and flat washers (see #1 in the Figure: Belt Tensioning). Belt Replacement Belt Replacement 1. Unplug the saw from the power supply. 2.
- Page 27 8. Place the new belt on the pulleys (see #2 in the Figure: Belt Tensioning) taking care to ensure that the micro-v of the belt is in the micro-v of both the motor and blade shaft pulleys. 9. Tension the belt by moving the motor away from the blade by turning the Belt Tensioner Screw Clockwise (see #4 in the Figure: Belt Tensioning) until 3/8”...
- Page 28 SAW MAINTENANCE & TROUBLE SHOOTING Main Causes of Belt Failures: Premature Belt failure can be attributed to the following issues: Tension (too much or too little), Pulley Misalignment, Damaged Pulleys, Improper Handling or Storage, Incorrect Blade Specification for Material Being Cut, and Cutting Too Deep. Symptom Possible Cause Corrective Action Too Much Tension Re‐tension Belts Belt Breakage Excessive Shock Load Reduce Load/ Check Blade Specification Pulley Out Of Round Replace Pulley Too Little Belt Tension Increase Belt Tension Excessive Load For Best Performance Only Cut only 1‐/2” to 2” Per Pass (Cutting Full Depth) Burning of Belt Containments On Belts Replace Belts and Find Source of Containments Incorrect Blade Specification Replace Blade with One Designed For Material Being Cut Symptom Possible Cause ...
- Page 29 SAW MAINTENANCE & TROUBLE SHOOTING Brush Cap and Carbon Brush Located On Back of Motor Brush Cap and Carbon Brush CTC705 Brush Locations c. Disconnect the power source from the CTC705 d. There are two (2) brushes in the CTC705 motor, one (1) on each side. Always replace both brushes. e. Use a coin or wide blade screwdriver to remove the Carbon Brush Cap. Use care not to damage the Carbon Brush Cap.
- Page 30 SAW MAINTENANCE & TROUBLE SHOOTING Bearing Housing installation 1. Remove the 4 screws on the belt guard (Attach to Belt Guard Bracket). 2. Remove the belt guard from Bracket. 3. Loosen the tighten screw from the end of blade's Pulley Shaft, remove the Belt from Pulley. 4.
- Page 31 SAW MAINTENANCE & TROUBLE SHOOTING Water Pump Maintenance When the machine has not been used for a long period of time, hard packed dirt may begin to build up inside the pump and block the pump wheel. If the machine is activated with the immersion pump blocked, the electric motor of the pump will be damaged within a few minutes! Please follow the steps listed below to clean the pump before and after operating the saw.
-
Page 32: Parts Break
3. Whenever alternate parts are shown due to product improvement, inspect the part you have and provide additional description as necessary. 4. Specify mode of shipping desired, for example, parcel post, truck, air freight, UPS., best way, etc. Contact Customer Service: Saint-Gobain Abrasives 2770 West Washington Stephenville, TX 76401 Phone: 800-554-8003 Fax: 254-918-2312 Web: www.nortonabrasives.com... -
Page 33: Ctc705 Exploded View
SAW EXPLODED VIEW CTC705 Exploded View OwnersManual-TileSaw-CTC705-Rev11-2023... -
Page 34: Ctc Service Parts Listing
SAW EXPLODED VIEW CTC705 Service Parts List Part # Description Type 70184600874 POWER CORD 7’ 233001 70184683352 1 HP BRUSH MOTOR 234002 70184682231 MOTOR SHAFT PULLEY 234003 70184600084 MOTOR ADJUSTMENT CLIP 234004 70184682551 MOUNTING PLATE 234005 70184600085 BELT GUARD BRACKET 234006 70184682230 TIMING T SHAPE NYLON BELT... - Page 35 NOTES This page is left intentionally blank OwnersManual-TileSaw-CTC705-Rev11-2023...
- Page 36 OwnersManual-TileSaw-CTC705-Rev11-2023...
Need help?
Do you have a question about the NORTON clipper CTC705 and is the answer not in the manual?
Questions and answers