Seagate LYVE - Mobile Padlock Quick Start Guide
- User manual (117 pages) ,
- Manual (25 pages) ,
- Quick start manual (17 pages)
Advertisement
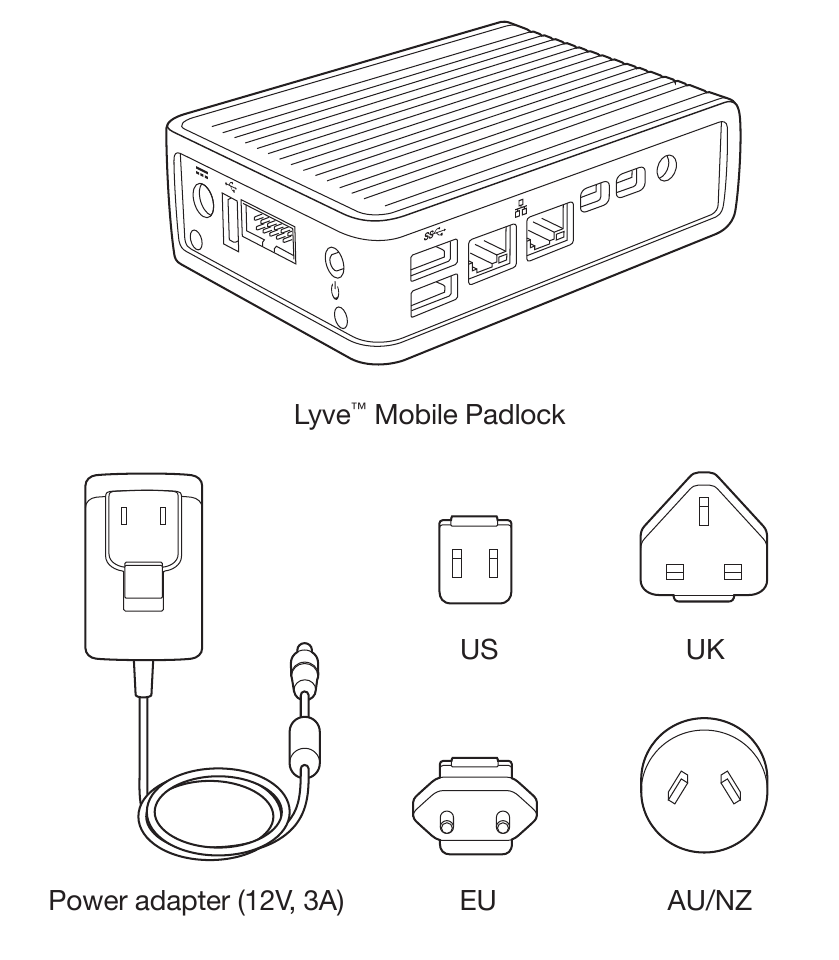
Parts list
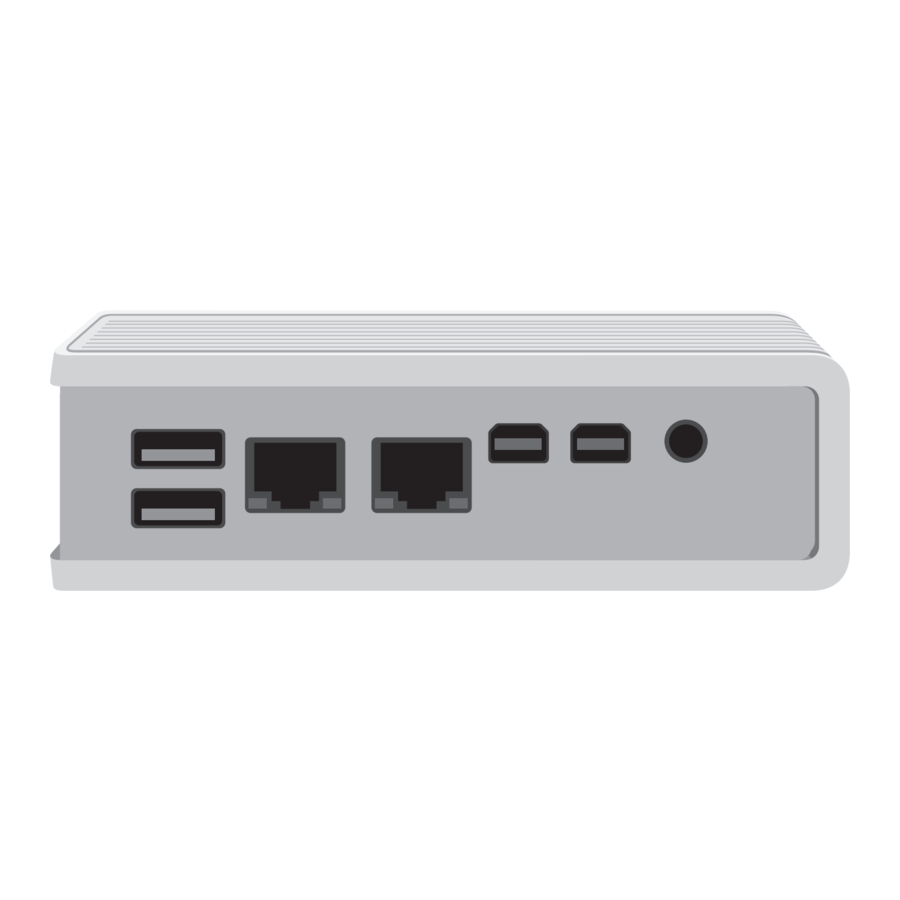
Views

 Unidentified ports are intentionally disabled.
Mounting installation
Mounting options include:
- DIN-mount
- VESA-mount
- Wall-mount
Visit www.onlogic.com for mounting accessories and instructions for safe use and installation.
Recommended clearance zones

Connection types
Lyve Mobile Padlock unlocks Lyve Mobile Arrays using the following interfaces:
- PCIe Adapter in Lyve Mobile Mount
- Fibre Channel or SAS via Lyve Mobile Rackmount Receiver Padlock does not support iSCSI connected devices.
Direct connection
Padlock's LAN2 (DHCP server) port can be directly connected to an Ethernet port on PCIe Adapter or Rackmount Receiver. Padlock can unlock only one device connected to the Ethernet port.
 Shown above: Padlock connected to Slot B's Ethernet port. If Lyve Mobile Array is in Slot A, connect the Ethernet cable to Slot A's Ethernet port.
Network connection
In network environments, PCIe Adapter and Rackmount Receiver Ethernet ports are connected to a network switch. Padlock's LAN1 (DHCP client) port can be connected to the same network switch to communicate with the devices.

The network must provide DHCP addressing.

Requirements
Connect Lyve Mobile Array
Before configuring Lyve Mobile Padlock to automatically unlock a Lyve Mobile Array, you must set up Lyve Mobile Array with your host device. Make certain to make all physical connections to the relevant ports.
USB external drive with Lyve token file
Lyve Mobile Padlock lets you unlock Lyve Mobile Arrays using an encrypted Lyve token file stored on a USB external drive. A product admin must provide you with a token file authorizing your Padlock to access Lyve Mobile devices.
Copy the Lyve token file to an external storage device capable of connecting via a USB Type A connector. The Lyve token file must be copied to the root level of the USB storage device to be detected by Lyve Mobile Padlock.

External storage device is not included with Lyve Mobile Padlock. Most drive formats are supported except APFS and ReFS.

For details on managing security for Lyve Mobile devices, go to www.seagate.com/lyve-security.
Connect power

![]() If Lyve Mobile Padlock does not turn on automatically upon connection to a live outlet, press the power button.
If Lyve Mobile Padlock does not turn on automatically upon connection to a live outlet, press the power button.
- Place the adapter plug for your location into the channel on the power supply. Slide it down to lock it in place.
- Connect the power adapter to a live power outlet.
- Connect the power cable to the power port on the side of Padlock.
Connect external USB drive to Padlock
Connect the external USB drive containing a Lyve token file to one of the USB 3.0 ports on the front of Padlock.

Connect Padlock
You can connect a single Lyve Mobile Array using Direct connection as well as multiple Lyve Mobile Arrays using Network connection. Padlock supports simultaneous Direct and Network connections.
Direct connection
- Connect an Ethernet cable to an Ethernet management port on PCIe Adapter or Rackmount Receiver. (Ethernet cable not included.)
Padlock can unlock only one device via Direct connection.
A direct connection only supports one Lyve Mobile Array. Make sure the Ethernet cable is connected to the correct Ethernet port on the back of Rackmount Receiver.

- Connect the other end of the Ethernet cable to the LAN2 port (DHCP server).
![warning]() The LED on Lyve Mobile Array changes from solid orange to solid green, indicating that Padlock has successfully unlocked the device.
The LED on Lyve Mobile Array changes from solid orange to solid green, indicating that Padlock has successfully unlocked the device.


Network connection
- Connect an Ethernet cable to an Ethernet switch for the network that includes PCIe Adapters and/or Rackmount Receivers. (Ethernet cable not included.)
![]()
The network must provide DHCP addressing.

- Connect the other end of the Ethernet cable to the LAN1 port (DHCP client).
![warning]() The LED on Lyve Mobile Array changes from solid orange to solid green, indicating that Padlock has successfully unlocked the device.
The LED on Lyve Mobile Array changes from solid orange to solid green, indicating that Padlock has successfully unlocked the device.


Ensure device detection
If a Lyve Mobile Array's storage is not detected by the host computer, you may need to scan for new hardware.
Windows®
- On the Windows host computer, open Device Manager.
- Right-click Disk drives and select Scan for hardware changes.
Linux®
- On the Linux station, open a terminal session.
- Enter the following: rescan-scsi-bus.sh
Padlock web interface
You can monitor Lyve Mobile Padlock or add a device manually from a Windows PC.
On your Windows PC, open a file browser and click on Network. Click on the Padlock icon under Other Devices. The Padlock interface will launch in your default web browser.
The web interface can be helpful if one or more authorized Lyve Mobile Arrays remain locked. You can:
- Confirm that Padlock has detected locked devices.
- Add a device manually using its IP address and serial number.


Documents / Resources
References
Download manual
Here you can download full pdf version of manual, it may contain additional safety instructions, warranty information, FCC rules, etc.
Advertisement


Need help?
Do you have a question about the LYVE and is the answer not in the manual?
Questions and answers