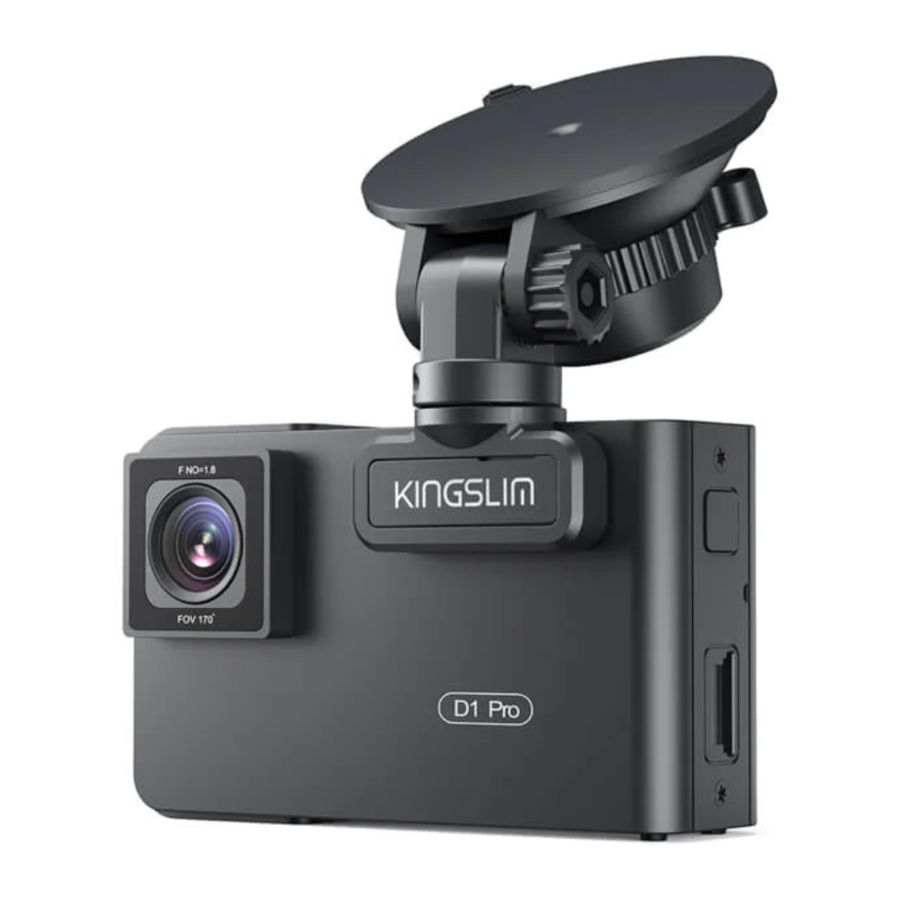
KingSlim D1 PRO - Dash Cam Manual
- User manual (170 pages) ,
- Quick start manual (8 pages) ,
- User manual (38 pages)
Advertisement
WHAT'S IN THE BOX

CAMERA OVERVIEW

- Mini USB Power Port
- Bracket Slot
- Front Camera
- Power Button
- Microphone
- Memory Card Slot
- IR LEDs & Indicator Light
- Screen
- Inside Camera
- Speaker
- Reset
- Set Buttons
- Wifi Button
 Note:
Note:
Power Button 
- Long press to turn on/off the camera.
- Short press to switch the view mode quickly from either the full-screen display of front/inside view or picture-in-picture display from both cameras.
ICONS INTRODUCTION
 Setup/Wifi
 Parking monitor
 Start to recording
 MIC
MIC
 Back
Back
 Forward
 Down
Down
 Playback
 Switch front and rear camera
 Lock video
 Stop recording
 Backward
 Up
Up
 Confirm or exit
HOW TO POWER ON
- Insert the car charger into the car's cigarette lighter socket.
- Connect the car charger to the dash cam's mini USB port.
(Charger input: DC 12-24V, Output DC 5V 2A)


Note:
- After powering on the dash cam through the car charger, the dash cam will automatically turn on and start recording (if the card has been inserted). To change settings, please firstly stop recording.
- Please charge for 30 minutes before using this dash cam powered by the built-in battery.
- When the dash cam is connected to the car's cigarette lighter socket through the car charger, the built-in battery will be charging at the same time. The indicator light glows solid red when charging, and goes off when fully charged.
- The built-in battery is only used to power the "parking monitor" function. In normal use, please plug the car charger into the cigarette lighter of the car to power the dash cam. The built-in battery is not recommended as a normal power supply for the dash cam. This is to avoid parking monitoring failure caused by running out of battery while the car is parked.
- The camera can also be powered by connecting it to a power source such as your DC 5V phone adapter via the USB cable.
When charging, please shut down the camera by long pressing the power button.
 Tips:
Tips:
- Blue flashing light means the camera is recording.
- Red light means the camera is charging.
- Blue light means the camera is working.
FORMAT MEMORY CARD
To record normally, please make sure that you have formatted the memory card with the camera. If the card has not been formatted in the camera, "Insert Memory Card" will be prompted on the screen.
Enter the setup setting, press  to choose "Format", press
  and then press
  again to confirm Memory card option, press
  or
or  to choose "Cancel" or "OK", press to confirm and exit.

Note:
- All data will be deleted. Before formatting your memory card, please remember to backup your important data on your other devices.
- When the memory card is inserted for the first time, please format it in the camera to ensure that the memory card is compatible with the camera.
RECORDING
Single Recording (Front Camera) 2K @30fps 1080P @60fps
- After turning on the camera, press
![]() button to stop recording.
button to stop recording.

- Press
![]() to enter the setting interface and choose "
to enter the setting interface and choose " ![]() ", press
", press ![]() to enter the Video interface. Press
to enter the Video interface. Press ![]() to choose "Resolution", press
to choose "Resolution", press ![]() and choose "2K30 or 1080P60", press
and choose "2K30 or 1080P60", press ![]() to save and exit.
to save and exit.

- Press
![]() two times to go back to th main interface, press
two times to go back to th main interface, press ![]() to record. The saved video is 2K30 or 1080P60.
to record. The saved video is 2K30 or 1080P60.

 button to stop recording.


Quick Set: Press  to switch the single recording (front camera) on main interface, press
 ![]() to record.
to record.
Dual Recording (Front and Cabin Camera) 1080P @30fps
- After turning on the camera, press
![]() button to stop recording.
button to stop recording.

- Press
![]() to enter the setting interface and choose "
to enter the setting interface and choose "![]() ", press
", press ![]() to enter the Video interface. Press
to enter the Video interface. Press ![]() to choos e "Resolution", press
to choos e "Resolution", press ![]() and choose "1080P DUAL 1080P", press
and choose "1080P DUAL 1080P", press ![]() to save and exit.
to save and exit.

- Press
![]() two times to go back to the main interface, press
two times to go back to the main interface, press ![]() to record. The saved video is 1080P DUAL 1080P.
to record. The saved video is 1080P DUAL 1080P.

 button to stop recording.
 to enter the setting interface and choose "
 ", press
  to enter the Video interface. Press
  to choos e "Resolution", press
  to save and exit.
 two times to go back to the main interface, press
  to record. The saved video is 1080P DUAL 1080P.
Quick Set: Press  to switch the single recording (front camera) on the main interface, press
  to record.
Note: The infrared lights of the cabin-facing camera will automatically detect the light levels inside the car and turn on if light is not sufficient. The recorded video footage is black and white when the infrared lights are on.
PLAYING BACK VIDEOS
Playing back Videos on Dash Camera
You can choose to play back unlocked videos, locked videos, and parking monitor videos. You can also choose the front camera and the inside camera.
After turning on the camera, press ![]() button to stop recording, press
button to stop recording, press ![]() to play back the videos which are stored on the card.
to play back the videos which are stored on the card.

Playing back Unlocked Videos
- After entering the playback interface, press
![]() /
/ ![]() to choose the folder of unlocked videos
to choose the folder of unlocked videos ![]() , then press
, then press ![]() .
.

- Press
![]() /
/ ![]() to choose the folder of the front camera
to choose the folder of the front camera ![]() or inside camera
or inside camera ![]() video, then press
video, then press ![]() .
.

- Press
![]() /
/![]() to choose the video you want to play, then short press
to choose the video you want to play, then short press ![]() to play.
to play.

- The video is over, press
![]() to exit.
to exit.
 /
/  to choose the folder of


 video, then press
  .
.


Note:
- When playing, press
![]() one time to end playing, press
one time to end playing, press ![]() twice to exit the current playing folder.
twice to exit the current playing folder. - When playing, press
![]() to pause playing, press
to pause playing, press ![]() to go on playing.
to go on playing. - When playing, press
![]() /
/![]() to rewind or fast forward, 2X/4X/8X for options.
to rewind or fast forward, 2X/4X/8X for options. - When pausing playing, press
![]() once to end playing, press
once to end playing, press ![]() twice to exit the current playing folder.
twice to exit the current playing folder. - Long press
![]() to delete videos.
to delete videos.
 to pause playing, press
  to go on playing.
 to delete videos.
Playing back Locked Videos
- After entering the playback interface, press
![]() /
/![]() to choose the folder of locked videos
to choose the folder of locked videos ![]() , then press
, then press ![]() .
.

- Press
![]() /
/![]() to choose the folder of the front camera
to choose the folder of the front camera ![]() or rear camera
or rear camera ![]() video, then press
video, then press ![]() .
.

- Press
![]() /
/![]() to choose the video you want to play, then short press
to choose the video you want to play, then short press ![]() to play.
to play.

- The video is over, press
![]() to exit.
to exit.
 /
/ to choose the folder of locked videos
  , then press
  .
.
 video, then press


Playing back Parking Monitor Videos
- After entering the playback interface, press
![]() /
/ ![]() to choose the folder of locked videos
to choose the folder of locked videos ![]() , then press
, then press ![]() .
.

- Press
![]() /
/ ![]() to choose the folder of the front camera
to choose the folder of the front camera ![]() or rear camera
or rear camera ![]() video, then press
video, then press ![]() .
.

- Press
![]() /
/![]() to choose the video you want to play, then short press
to choose the video you want to play, then short press ![]() to play.
to play.

- The video is over, press
![]() to exit.
to exit.


 or rear camera
  video, then press


Playing back Videos on Your Computer Downloading Videos from the memory Card
Option 1: Connect the dash cam to your computer's USB port via the USB cable. Choose "Memory Mode" on the screen of the dash cam, press  .
.
"Mass Storage" will display on the screen of the dash cam, then you can copy the videos from the memory card.

Note: When "Record Mode" is selected, the computer can be directly used as the power supply to the dash cam.
In this mode, the camera will automatically start recording.
You can preview, record, change settings, etc. in real-time.
Option 2: Take out the card from the dash cam, insert the card into a card reader, and then insert the card reader into a USB port of the computer. You can now access videos on the card.
Playing Videos on a Computer
Copy the following link to any browser to download the GPS player, and then you can play videos from the memory card.
https://www.kingslim.net/player
Note: Please close the anti-virus software on the computer before installing the player or click "allow" when prompted.
DOWNLOAD THE APP
Download the "RoadCam" app on the App Store or Google Play.


USE THE "ROADCAM" APP
CONNECT WITH THE APP
- Long press the Wifi button on the bottom of camera to enter the Wifi settings interface.


Or short press ![]() to enter setting interface, press
to enter setting interface, press  to
to  and press
  to enter Setup interface. Press
  to choose "Wifi", press and
 ![]() choose "On" to enable Wifi.
choose "On" to enable Wifi.

- Go to your smartphone's Wifi settings and connect to the Wifi name that's shown on the dash cam. Enter the password and confirm the Wifi network.
- Open the "RoadCam" app, tap "Add Recorder", wait a few seconds to enter the preview interface.
- Tap the video or photo icon to control the dash cam, either recording videos or shooting photos.


DOWNLOAD OR DELETE VIDEOS AND PHOTOS
- Tap the
![]() icon to stop the recording. Video
icon to stop the recording. Video - Tap the
![]() or
or ![]() icon to check the videos or photos.
icon to check the videos or photos. - Tap "Select" and choose videos or photos that you want.
- Tap the download or delete icon to download or delete.
 icon to stop the recording. Video
 or
or  icon to check the videos or photos.
 Note: To exit the Wifi feature, please press the power button on the dash cam.

CHANGE RECORDING SETTINGS
You can change recording settings in the app.
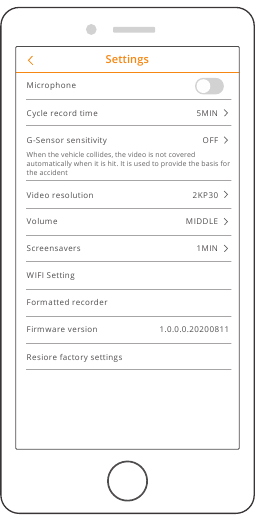
SETTINGS ON DASH CAM
After turning on the camera, press  button to stop recording.
Video Settings
Press  button to enter the system setting, choose"
  ", press
  to enter the setting.

Resolution: 2K30, 1080P60, 1080P DUAL 1080P
The default is 1080P DUAL 1080P.
Press  to choose "Resolution", press
  to enter the setting and choose "2K30 or 1080P60 or 1080P DUAL 1080P", press to save and exit.
Loop Recording: Off, 1 Minute, 3 Minutes, 5 Minutes
The default is 3 Minutes.
Press  to choose "Loop recording", press
  to enter the setting and choose "off/ 1 Minute/3 Minutes/5 Minutes", press to save and exit.
Dual Cam Display: Front, Rear, Front/Rear
The default is Front/Rear.
Press to choose "Dual Cam Display", press to enter the setting and choose "Front, Rear, Front/Rear", press to save and exit.
WDR (Wide Dynamic Range): Off, On
The default is on.
Press to choose "WDR", press  to enter the setting and choose "Off/On", press to save and exit.
Record Audio: Off, On
The default is on.
Press to choose "Record Audio", press to enter the setting and choose "Off/On", press to save and exit.
Date Stamp: Off, On
The default is on.
Press to choose "Date Stamp", press to enter the setting and choose "Off/On", press to save and exit.
G-Sensor: Off, Low, Medium, High
The default is Low.
Press to choose "G-Sensor", press to enter the setting and choose "Off or Low or Medium or High", press to save and exit.
System Settings
Press  button to enter the system setting, choose
  , press
  to enter the setting.

Screen Save: Off, 30 Sec, 1 Minute, 2 Minutes
The default is 1 Minute.
Press ![]() to choose "Screen Save", press
to choose "Screen Save", press  to enter the setting and choose "Off or 30 Sec or 1 Minute or 2 Minutes", press to save and exit.
Time Display: Off, On
The default is on.
Press  to choose "Time Display", press to enter the setting and choose "Off or On", press to save and exit.
Wifi: Off, On
The default is off.
Press ![]() to choose "Wifi", press to enter the setting and choose "Off or On", please refer to "Turn on Wifi Connection".
to choose "Wifi", press to enter the setting and choose "Off or On", please refer to "Turn on Wifi Connection".
Date/Time: Set the date and time of dash cam.
Press ![]() to choose "Date/Time", press and press
to choose "Date/Time", press and press  or
or  to adjust the date/time settings, press to confirm and turn to next, after finishing, press to exit.
Time System: 12H, 24H
The default is 12H.
Press ![]() to choose "Time System", press to enter the setting and choose "12-hour system or 24-hour system", press to save and exit.
to choose "Time System", press to enter the setting and choose "12-hour system or 24-hour system", press to save and exit.
Beep Sound: Off, On
The default is on.
Press  to choose "Beep Sound", press to enter the setting and choose "Off or On", press to save and exit.
Language: Set the language
The default is English.
Press ![]() to choose "Language", press to enter the setting and choose the language you need, press to save and exit.
to choose "Language", press to enter the setting and choose the language you need, press to save and exit.
Parking Monitor: Off, On
The default is off.
Press ![]() to choose "Parking Monitor", press to enter the setting and choose "Off or On", press to save and exit.
to choose "Parking Monitor", press to enter the setting and choose "Off or On", press to save and exit.
Frequency: 50Hz, 60Hz
The default is 60Hz.
Press ![]() to choose "Frequency", press to enter the setting and choose "50Hz or 60Hz", press to save and exit.
to choose "Frequency", press to enter the setting and choose "50Hz or 60Hz", press to save and exit.
GPS Speed: Off, On
The default is on.
Press  to choose "GPS Speed", press
  to enter the setting and choose "Off or On", press to save and exit.
Fatigue Driving Reminder: Off, 1hour, 2hours, 4hours
The default is off.
Press ![]() to choose "Fatigue Driving Reminder", press
to choose "Fatigue Driving Reminder", press  to enter the setting and choose "Off or 1hour or 2hours or 4hours", press
  to save and exit.
Format: Format the card on the dash cam.
Press ![]() to choose "Format", press to enter the setting and choose "SD Card", press and
to choose "Format", press to enter the setting and choose "SD Card", press and  to choose "Cancel or OK", press to save and exit.
Default Setting: Restore the original settings.
Press ![]() to choose "Default Setting", press to enter the setting and choose "Cancel or OK", press to save and exit.
to choose "Default Setting", press to enter the setting and choose "Cancel or OK", press to save and exit.
Version Info: Check the camera's version.
Press  to choose "Version Info.", press
  to view the camera's version information, then press
  to save and exit.
SPECIFICATIONS
| Name | KingSlim D1 Pro Dash Cam | Model | D1 Pro |
| Resolution | 2K30/1080P60/ 1080P DUAL 1080P | Lens Angle | 170° |
| GPS | External GPS Module | Wifi | Built-in Wifi |
| Screen | 2 inch IPS LCD Screen | Working Temperature | 4℉ - 140℉ |
| Memory Card | 8GB-128GB (built-in 32GB) | Battery | 300mAh |
PRECAUTIONS
- Please place it in a secure place and prevent the lens from scratches and dirt.
- Do not expose the device to rain, moisture, or water under any circumstance.
- Avoid leaving the device in direct sunlight for extended periods of time.
- Do not dismantle or expose the internal battery.
TROUBLESHOOTING
Q: The image is blurry.
A: The windshield will reflect the light, please adjust the camera's viewing angle.
Q: The camera suddenly turns off.
A: Make sure it is properly connected to the car charger.
Q: The camera unable to be turned on.
A: Please make sure that the charging indicator is on. If off, please re-insert the car charger and reset the camera.
Q: All buttons are not responding.
A: Please reset the camera to restart.
Q: The camera doesn't record automatically after turning on.
A:
- Check if the memory card is full.
- Reformat the memory card. If this does not work, insert a new class 10 or above memory card.
Q: No sound on the video.
A: Please ensure the voice icon is  when recording, if it is
  , please turn on it to .
Q: The computer does not recognize the camera.
A: Try connecting via a different USB cable.
Q: The menu button is not responding.
A: Because when the camera is recording, you can not operate the menu button, please press ![]() button to stop recording.
button to stop recording.
Q: The camera keeps turning on and off automatically.
A: Please charge the camera via the included car charger, do not charge via other power adapters.

Documents / Resources
References
Download manual
Here you can download full pdf version of manual, it may contain additional safety instructions, warranty information, FCC rules, etc.
Advertisement


Need help?
Do you have a question about the D1 PRO and is the answer not in the manual?
Questions and answers