Shark Detect Pro RV2820AE - Robot Vacuum Manual
- Owner's manual (18 pages)
- Also fits for
- Rv2820ae
Advertisement
- 1 GETTING TO KNOW YOUR DEVICE
- 2 LIVING WITH YOUR APPLIANCE
- 3 PREP YOUR HOME
- 4 SELF-EMPTY BASE SETUP
- 5 INSTALLING THE SIDE BRUSH
- 6 DEVICE INDICATOR LIGHTS
- 7 CHARGING
- 8 DOCK AND CLEAN BUTTONS
- 9 USING THE DEVICE
-
10
MAINTENANCE
- 10.1 MAINTAINING THE BASE DUST BIN
- 10.2 CLEANING AND REPLACING THE BASE FILTERS
- 10.3 EMPTYING THE UNIT DUST BIN
- 10.4 CLEANING THE UNIT FILTER
- 10.5 CLEANING SENSORS AND CHARGING CONTACTS
- 10.6 CLEANING SIDE BRUSH
- 10.7 BRUSHROLL
- 10.8 LIDAR MODULE
- 10.9 CLEANING THE WHEELS
- 10.10 CLEANING THE DIRTDETECT SENSORS
- 11 REPLACEMENT PARTS
- 12 WI-FI TROUBLESHOOTING
- 13 TROUBLESHOOTING
- 14 Questions or Problems?
- 15 Documents / Resources
GETTING TO KNOW YOUR DEVICE


LIVING WITH YOUR APPLIANCE
Questions? For how-to videos, FAQs, troubleshooting, and tips & tricks, call 1-888-228-5531 for robot support or visit: support.sharkclean.com

Your robot can easily climb over most thresholds, but if one is higher than 1 inch, set up a no-go zone in the app to block it off.

While your robot is cleaning, DO NOT pick it up and move it, or move the Self-Empty Base—this will impact the robot's ability to map your home. If the dock is moved, you will need to remap your home.

Restart your phone
- Turn off phone, wait a few minutes, then turn it back on and connect to Wi-Fi.
Reboot your robot
- Take robot off base and press and hold down the DOCK button on the robot for 12 seconds. Turn your robot back on by placing it on the base.
Reboot your router
- Unplug the router power cable for 30 seconds, then plug it back in. Allow several minutes for your router to reboot completely.
- Then follow the steps outlined in the SharkClean® app Wi-Fi setup instructions.
PREP YOUR HOME
Your robot uses an array of sensors to navigate around walls, furniture legs, and other obstacles while it cleans. To prevent the robot from entering areas you don't want it to, set up no-go zones in the app. For best results, prepare your home as indicated below, and schedule a daily cleaning to ensure all floor areas are regularly maintained.
NOTE: Scheduling is one of many features that can only be done in the app.
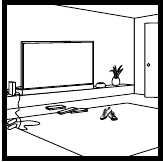
OBSTRUCTIONS
Your Detect Pro robot will avoid cords, but for the best coverage and cleaning, remove cords and objects smaller than 4.5" in height from floors. To ensure a complete map of your home, open interior doors.
STAIRS
Your robot's cliff sensors will prevent it from falling off ledges. For the cliff sensors to work properly in any mode, all runners, rugs, or carpets must be at least 8 inches from any stairs, or must extend over the edge of the stairs.
SCHEDULING
Schedule whole-home vacuuming runs with the app.
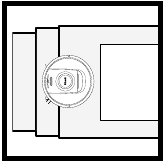
SELF-EMPTY BASE SETUP
- Place the base with its back against a wall. Select a level surface on a bare floor in a central area with a strong Wi-Fi signal. Do not place it against baseboard heaters or other heating elements.

- Select a permanent location for the Self-Empty Base because every time you relocate it, your robot will have to completely re-map your house. Remove protective film from robot and the base.
- Remove any objects that are closer than 3 feet from either side of the base or closer than 5 feet from the front of the base.

- Plug in the base. The indicator light will illuminate green when the base has power.


INSTALLING THE SIDE BRUSH

Attach the side brush to the post on the bottom of the robot.
NOTE: Side brush design may vary.
DEVICE INDICATOR LIGHTS

Battery level during cleaning is represented by number of LEDs illuminated during cleaning. For example, at full battery, it will reflect 5 green indicator lights, at 80% battery it will reflect 4 yellow indicator lights, and so on.

If your robot is low on battery power, the left LED light will pulse RED. Manually place the robot on the base to begin charging. When the robot is charging, the battery indicator light will pulse, based on the current battery charge level: RED for low, YELLOW for medium, GREEN for high.
DIRTDETECT
When your robot triggers DirtDetct behavior, the robot indicator lights will flash PURPLE and then begin to reflect the level of how much debris it is picking up by showing the indicator lights lighting from left to right to function as an indicator dial.
ACTIVELIFT
When your robot activates ActiveLift to better navigate your home, your indicator lights will flash ORANGE to indicate that it has activated.
SELF-EMPTY BASE INDICATOR LIGHTS
- Dock ON and Robot Charging – Solid Blue
- Dock ON but Robot Not Charging – Solid Green
- Robot Evacuating into Self-Empty Base – Pulsing Green
CHARGING

Be sure to charge the robot completely before its first cleaning so that it can explore, map, and clean as much of your home as possible. It may take up to 6 hours to fully charge your robot.

To TURN THE ROBOT ON: Place the robot on the Self-Empty Base or hold down DOCK button for 5 to 7 seconds, until the indicator lights turn on.

When the cleaning cycle is complete, or if the battery is running low, the robot will search for the Self- Empty Base. If the robot doesn't return to the base, its charge may have run out.
NOTE: When manually placing the robot on the Self-Empty Base, make sure the Charging Contacts on the bottom of the robot are touching the ones on the base.
NOTE: When picking up the robot, be careful not to place fingers between the bumper and the back of the robot.
DOCK AND CLEAN BUTTONS

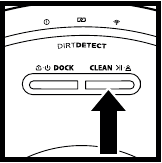
CLEAN BUTTON
If the robot is on the base, press the CLEAN button for a whole-home clean. Press again to pause the cleaning session.
For a 5x5 ft Matrix spot clean, press and hold the CLEAN button for 5-7 seconds
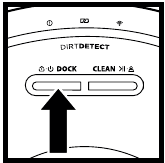
DOCK BUTTON
To turn on/off your robot, press the DOCK button for 5-7 seconds.
Press the DOCK button to allow the robot to go back to the Self-Empty Base.
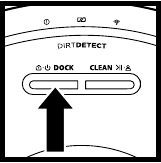
RECHARGE & RESUME
Press and hold the DOCK button for 15 seconds to turn Recharge & Resume ON or OFF.
The Recharge & Resume function is turned ON by default. The robot will run until it reaches low battery, and if its cleaning mission is not complete, it will return to the dock, recharge, and pick up where it left off.
USING THE DEVICE
Please visit support.sharkclean.com or call 1-888-228-5531 for answers to all your app questions.
USING THE SHARKCLEAN APP AND VOICE CONTROLS
Get the most out of your Shark robot vacuum with these app features:
- Recharge and Resume
The robot will return to the Self-Empty Base, recharge, and can pick up where it left off. - Matrix Clean:
Targeted precision grid deep cleaning for a specific room or single spot. - No-Go Zones
Use the no-go zones in the app to keep your robot out of the areas you would like it to avoid.
![]()
- Scheduling
Set up whole-home cleanings for any time, any day.
![]()
- Control From
Anywhere Wherever you are, you're in control of your robot. - Cleaning Reports
Each time your robot cleans, your app will generate a cleaning report.


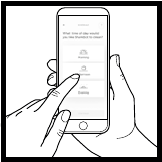
Search for SharkClean in the app store and download the app to your iPhone or Android.


SETTING UP VOICE CONTROL WITH THE GOOGLE ASSISTANT OR AMAZON ALEXA
Visit support.sharkclean.com for setup instructions, which include how to enable Shark Skill for Amazon Alexa and using with Google Assistant.
Google Assistant:
Hey Google, start vacuuming.
Hey Google, tell (robot name) to vacuum.
Hey Google, pause vacuuming.
Hey Google, tell (robot name) to go home.
Amazon Alexa:
Alexa, ask Shark to start vacuuming/cleaning the (room name).
Alexa, start/stop the vacuum.
Alexa, send the vacuum to Self-Empty Base.
3D SENSOR AND AI LASER NAVIGATION

After setup is complete, your robot will conduct an Explore Run to create an initial map of your home. The robot will travel from room to room to identify walls, furniture, and other obstacles as it cleans. This run will take less time than a full cleaning, as it doesn't cover the entire floor.

The robot's object detection technology helps it navigate around obstacles taller than 4.5" in height, as well as some common household objects like cords, cables, shoes, and clothes.
MANUAL CLEANING MODE
To manually start a cleaning cycle, press the CLEAN button on the robot or on the mobile app. To immediately send the robot back to the Self-Empty Base, press the DOCK button.
MATRIX CLEAN
Matrix Clean is targeted deep cleaning of a specific room or spot. A Matrix Clean can be activated with the SharkClean app, or manually without the app.
Matrix Clean with the SharkClean app: To set up a Matrix Clean with the app, select a specific room or spot to be cleaned on the map. Your robot will clean this targeted area on demand.
For a Matrix Spot Clean of a specific 5-foot-by-5-foot area, place the robot in the spot to be cleaned, then press and hold the CLEAN button for 5 to 7 seconds.'
NOTE: Be sure to charge the robot completely before its first cleaning so that it can explore, map, and clean as much of your home as possible. It may take up to 6 hours to fully charge your robot.
NOTE: Avoid moving the dock. If it is relocated, the robot may not be able to find its way back to the dock, and you will need to remap your home. If the robot is relocated while in use, it may not be able to follow its intelligent cleaning path, or find its way back to the dock.
MAINTENANCE
MAINTAINING THE BASE DUST BIN

Depending on the size of the base, empty the base dust bin every 30 to 60 days or as needed.
To detach the bin, press the Dust Bin Release button on the back right side of the base, then slide out the bin.

To empty the bin, hold it over the trash, then press the release button with the trash can icon on the side of the bin. The bin lid will open, releasing dust and debris. Lightly tap the dust bin against the inside of the trash receptacle to knock off any remaining debris. Reinstall the bin by sliding it into the slot in the base until it clicks into place.
CLEANING AND REPLACING THE BASE FILTERS
Regularly clean the filters to keep your vacuum's suction power optimal. Replace filters every 6-12 months or as needed.
DO NOT use soap when cleaning the filters.

CLEAN PRE-MOTOR FILTERS ONCE A MONTH
To open the filter housing lid, hold the top left edge of the base and pull up on the lid. With the lid open, remove the foam filter by the top handle, then lift out the felt filter underneath. Tap the filters clean over the trash, then rinse with cold water ONLY, as soap may damage them. Allow filters to air-dry completely before reinstalling them. The filters must be installed correctly for the base to work properly. Reinsert the felt filter first, then the foam filter.
CLEAN POST-MOTOR FILTER ONCE A MONTH
Press the button at the top of the Filter Door, then tilt the door and lift it off. Remove the Post-Motor Filter from the base by pulling the tab down. Tap the filters clean over the trash. Do not use water or soap to clean filters as this will cause damage.

Turn off power before performing any maintenance. To turn the robot power off, press the DOCK button on the robot for 5-7 seconds.
EMPTYING THE UNIT DUST BIN

Press the Dust Bin Release Button and slide out the dust bin.

To open the dust bin lid, pinch and lift up using the finger slots.

Empty debris and dust into trash. If desired, you may use a damp cloth to wipe the dust bin. Let dry for 24 hours before use.
NOTE: After emptying the dust bin make sure to insert the dust bin completely, until it clicks into place.
CLEANING THE UNIT FILTER
For optimal suction power, after each use, clean the filter inside the robot's dust bin.

Remove and empty the dust bin. Clean any hair or debris off the back of the dust bin.

Every time you empty the dust bin, lightly tap dust and dirt off the filter, then use a dry cloth or soft brush to remove any remaining debris.
CLEANING SENSORS AND CHARGING CONTACTS

CLEAN SENSORS AND CHARGING CONTACTS AS NEEDED. With a dry cloth, gently dust off the sensors and contacts located on the bottom of the robot and on the Self-Empty Base.
The robot uses cliff sensors to avoid stairs and other steep drops. Sensors may work less effectively when they are dirty. For best results, clean sensors regularly.
CLEANING SIDE BRUSH

CLEAN SIDE BRUSH AS NEEDED.
Carefully unwind and remove any string or hair wrapped around brush.
Gently wipe brush with a dry cloth. To reinstall, snap the brush over the peg. Spin the brush manually to make sure it is installed correctly.
NOTE: Remove and replace any side brush that is bent or damaged. To remove a brush, lift it off its peg.
BRUSHROLL

To access the brushroll, push up on the tabs on the brushroll door, then lift off the door.

Take out the brushroll and remove the cap on the end. Clean off any hair or debris then replace the cap. Reinstall the brushroll, inserting the flat end first. Close the brushroll access door and press down until both sides click into place.
LIDAR MODULE

Check the navigation module on top of the robot and gently remove any hair or debris. For a more complete clean, place the robot on a level surface and turn off the power. Use compressed air to blow away any dirt or debris from the gap around the rotating LiDAR module. Do not insert cotton swabs into the module.
NOTE: Replace brushroll every 6 to 12 months, or when visibly worn. See sharkaccessories.com for replacement parts.
CLEANING THE WHEELS
CLEAN FRONT WHEEL HOUSING PERIODICALLY.
See sharkaccessories.com for replacement parts.

Rotate the front wheel while lightly brushing away dirt and debris. Clean the wheel and the housing around it.

Periodically clean the drive wheels and the housing around them. To clean, rotate each drive wheel while dusting.
NOTE: Brush not included.
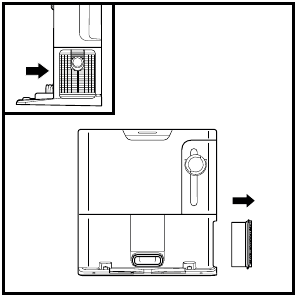
CLEANING THE DIRTDETECT SENSORS

Remove the robot dust bin. Using the included DirtDetect brush or a microfiber cloth, wipe off the area indicated to remove any dust or debris covering the sensor.
REPLACEMENT PARTS
NOTE: To order replacement parts visit sharkaccessories.com.

REPLACEMENT PARTS: ROBOT
*NOTE: Design may vary.
WI-FI TROUBLESHOOTING
- Typical home Wi-Fi networks support both 2.4 GHz and 5 GHz.
- Do not use a VPN or a proxy server. Hotspot available to connect only at 2.4GHz.
- Make sure Wi-Fi isolation is turned off on the router.
- If you cannot connect, call 1-888-228-5531.
How do I use my unit with Amazon Alexa
Open the Amazon Alexa app, go to the menu and select Skills. Or go to the Alexa Skills store on the Amazon website. Search for "Shark Skill". Select the Shark Skill to open the detail page, then select the Enable Skill option. Once enabled, you can ask Alexa to control your robot (i.e., "Alexa, tell Shark to start cleaning").
How do I set up my robot with the Google Assistant on an Apple device?
- Download, open, and sign into the Google Assistant app.
- Select the "Explore" icon. Search for "Shark" and select "Try it."
- To allow Google to link to your SharkClean® account, sign into your SharkClean account. This is the same account you used when setting up your Shark robot in the SharkClean app. Select "Authorize" to link your SharkClean account to the Google Assistant. Congratulations! The Google Assistant now works with your Shark robot. To send your robot into action, use the voice command, "Google, tell Shark to start cleaning."
How do I set up my robot with the Google Assistant on Android?
- Download open, and sign into the Google Assistant app.
- Select the "Explore" icon. Search for "Shark" and select "Link."
- Sign into your SharkClean account. This is the same account you used when setting up your Shark robot in the SharkClean app. Congratulations! The Google Assistant now works with your Shark robot. To send your robot into action, use the voice command, "Google, tell Shark to start cleaning."
What should I do if my Wi-Fi randomly disconnects
Turn OFF the robot, by pressing and holding the DOCK button for 5-7 seconds. Wait 10 seconds, then turn the robot power back on by pressing and holding the DOCK button for 5-7 seconds. Turn off your phone. Wait 30 seconds, then turn your phone back on. Open Wi-Fi settings on your phone, find the Shark network, and select Forget Network. Reopen SharkClean app and retry the connection process. It is normal for your robot to temporarily lose connectivity when it goes under furniture or moves far from your router. Your Shark robot will automatically reconnect to Wi-Fi. If the robot does not reconnect, power it off, wait 10 seconds, power the robot back on, and place it back on the base.
What should I do if I verified a wireless network password that is incorrect?
Close the app, then reopen it. Make sure that you entered the correct Wi-Fi network password this time. In your phone's network settings, choose your home 2.4 GHz network, and select Forget. Reconnect to your home network. Make sure to use the correct password. If you were able to connect to your home network, proceed to the app setup process. We recommend that you use the eye icon when entering your password to make sure it is correct. Turn off your router and wait 30 seconds. Turn your router back on. Check to make sure your 2.4 GHz network is visible in your phone settings. Turn off the robot, then wait 10 seconds. Turn the robot back on and wait for the voice prompt. Hard-close the app and restart the connection process on the robot. If you cannot locate your Wi-Fi password, please contact your Internet service provider.
What should I do if my username or password is invalid?
We recommend you select the eye icon next to the password entry to verify you are entering your password correctly. Select the 'Forgot Password' option on the sign-in page. The automated system will email you a link to reset your password. If you do not see an email, search your inbox and spam folder for emails from mysharkninja@sharkninja.com. You can use the "Resend code" option to send the email again.
What should I do if there is an issue resetting password (did not receive the email or token was invalid)?
Select the 'Forgot Password' option on the sign-in page. The automated system will email you a link to reset your password. If you do not see an email, search your inbox and spam folder for emails from mysharkninja@sharkninja.com. You can use the "Resend code" option to send the email again.
TROUBLESHOOTING
What should I do if my Shark® robot won't connect to Wi-Fi or loses Wi-Fi connectivity?
If you are an iOS user and recently upgraded to iOS 14, you need to enable local network access on your phone for the SharkClean app. Please take the following steps to enable. Go to your phone settings --> Select Privacy --> Select Local Network --> Toggle SharkClean on, then try connecting again. Make sure your phone is connected to your home Wi-Fi network before trying to connect your robot. Typical home Wi-Fi networks support both 2.4 GHz and 5 GHz. Make sure you are connected to a 2.4 GHz network when you enter your username and password. Ensure your robot is turned on and you hear an audio prompt. Do not use a VPN or a proxy server. Make sure Wi-Fi isolation is turned off on the router.
There may be instances where your Shark robot loses connectivity while operating, due to a weak Wi-Fi signal, or entering a zone that blocks Wi-Fi.
Turn off the robot. Wait 10 seconds, then turn the power back on and wait for the voice prompt. Power off your phone, wait 30 seconds, and power back on. Open Wi-Fi settings on your phone, find the Shark network, then select Forget Network. Reopen the SharkClean app and retry the connection process.
It is normal for your robot to temporarily lose connectivity when it goes under furniture, or moves far from your router. Your Shark robot will automatically reconnect to Wi-Fi. If the robot does not reconnect on its own, remove the unit from the Self-Empty Base. Power the robot off, wait 10 seconds, and place it back on the base.
STILL CAN'T CONNECT
Restart your phone
Turn off phone, wait a few minutes, then turn it back on and connect to Wi-Fi.
Reboot your robot
- Take robot off Self-Empty Base and press and hold the DOCK button on the robot for 5-7 seconds to turn off power. To turn power back on, place the robot back on the base.
Reboot your router
- Unplug the router power cable for 30 seconds, then plug it back in. Allow several minutes for your router to reboot completely.
ERROR CODES
If any error lights are illuminated or flashing on your robot, see the error code chart below:
| ERROR CODE | PROBLEM | |
| LEFT LED (YELLOW) flashing | Wrong password for Wi-Fi | |
| LEFT LED (YELLOW) + RIGHT LED (YELLOW) flashing | SSID cannot be found, try connecting again | |
| NOTIFICATION LED (RED) + WiFI LED (RED) flashing | Cannot connect to Wi-Fi | |
| ERROR CODE | ERROR NUMBER | SOLUTION |
| BATTERY LED (RED) + WIFI LED (RED) flashing | 2 | Side brush is stuck. Remove any debris from around the side brush so it moves freely. |
| NOTIFICATION LED (RED) + RIGHT LED (YELLOW) flashing | 4 | Blockage in brushroll. Remove any debris from around and inside the brushroll so that it can spin freely. |
| BATTERY LED (RED) + WIFI LED (RED) + RIGHT LED (YELLOW) flashing | 5 | A drive wheel is stuck. Clean the wheels and remove any debris wrapped around the axles so they can move freely |
| LEFT LED (YELLOW) + NOTIFICATION LED (RED) + BATTERY LED (RED) + WIFI LED (RED) + RIGHT LED (YELLOW) flashing | 18 | Wheel motor encoder failure. Please contact Shark Customer Service at 1-888-228-5531. |
| NOTIFICATION LED (RED) + WIFI LED (RED) + RIGHT LED (YELLOW) flashing | 3 | Suction motor failure. Remove and empty the dust bin, clean the filters, remove the brushroll and brushroll door, and remove blockages. |
| WIFI LED (RED) + RIGHT LED (YELLOW) flashing | 6 | Front bumper may be jammed. Clean the bumper and make sure it moves in and out freely. |
| NOTIFICATION LED (RED) + WIFI LED (RED) flashing | 7 | Cliff sensor error. Move your robot to a new location and clean its cliff sensors. |
| BATTERY LED (RED) + RIGHT LED (YELLOW) flashing | 9 | Robot dust bin needs to be reinstalled. Insert the dust bin until it clicks in place. |
| WIFI LED (RED) + RIGHT LED (YELLOW) flashing | 10 | Robot may be stuck on an obstacle. Move robot to a new location on a level surface. |
| WIFI LED (RED) + RIGHT LED (YELLOW) flashing | 16 | Robot is stuck. Move your robot to a new location and make sure the front bumper moves in and out freely. |
| NOTIFICATION LED (RED) + BATTERY LED (RED) + WIFI LED (RED) flashing | 23 | Robot cannot find the Self-Empty Base. Please make sure the Self-Empty Base is ON and is free of all obstacles. |
| LEFT LED (RED) flashing | 24 | Battery is critically low and needs recharging. Please pick up your robot and place it on the Self-Empty Base. Make sure the Self-Empty Base indicator light turns blue to confirm your robot is placed on the base correctly. |
| NOTIFICATION LED (RED) + BATTERY LED (RED) + WIFI LED (RED) + RIGHT LED (YELLOW) flashing | 26 | Blockage in dust bin. Check the Self-Empty Base and the robot dust bin for clogs. Clear any debris and reinstall the dust bin, ensuring that it clicks into place. |
| LEFT LED (YELLOW) + NOTIFICATION LED (RED) + BATTERY LED (RED) + WIFI LED (RED) | 30 | There may be a blockage with ActiveLift. Turn off the robot, and ensure that there is nothing blocking the wheel suspension from moving up and down. |
For all other issues, please call Customer Service at 1-888-228-5531
Questions or Problems?
CALL US: 1-888-228-5531
Toll-free customer support line
GET HELP RIGHT NOW!
DON'T RETURN TO THE STORE.
Other easy ways to get help RIGHT NOW:
ONLINE HELP AND FAQS:
support.sharkclean.com
CONTACT US:

@sharkcleaning

HOW-TO VIDEOS:
youtube.com/shark
APP DOWNLOAD:
Search "SharkClean" in the app store, or scan the QR code with your smartphone camera.

sharkclean.com

Documents / Resources
References
Download manual
Here you can download full pdf version of manual, it may contain additional safety instructions, warranty information, FCC rules, etc.
Advertisement


Need help?
Do you have a question about the Detect Pro RV2820AE and is the answer not in the manual?
Questions and answers