Sunbeam SecretChef HP8555 - All-in-One Sear and Slow Cooker 5.5L Manual
- Instruction/recipe booklet (28 pages)
Advertisement
Sunbeam's Safety Precautions
SAFETY PRECAUTIONS FOR YOUR SUNBEAM SLOW COOKER.
- Do not operate the unit on an inclined surface
- Do not move or cover the unit whilst in operation
- Do not immerse the base of the unit in water or any other liquid
- Use your unit well away from walls and curtains, and don't use in confined spaces.
- Do not touch any metal surface of the unit whilst in use as it will be hot.
- Use handles and oven mitts to move the unit, the pan and the lid when hot.
- Use only the supplied aluminium pan inside the unit, and the supplied lid.
- Do not plug in or switch on the unit without having the aluminium pan inside the slow cooker unit.
- Do not place food or liquid inside the unit. Only place inside the aluminium pan.
- Do not operate the unit without food or liquid in the pan.
- Do not use the pan on the stovetop, inside a microwave oven or inside an oven.
- Do not operate slow cooker when placed directly onto a bench top. Place a heat proof mat or chopping board underneath to protect the surface.
Sunbeam is very safety conscious when designing and manufacturing consumer products, but it is essential that the product user also exercise care when using an electrical appliance. Listed below are precautions which are essential for the safe use of an electrical appliance:
- Read carefully and save all the instructions provided with an appliance.
- Always turn the power off at the power outlet before you insert or remove a plug. Remove by grasping the plug - do not pull on the cord.
- Turn the power off and remove the plug when the appliance is not in use and before cleaning.
- Do not use your appliance with an extension cord unless this cord has been checked and tested by a qualified technician or service person.
- Always use your appliance from a power outlet of the voltage (A.C. only) marked on the appliance.
- This appliance is not intended for use by persons (including children) with reduced physical, sensory or mental capabilities, or lack of experience and knowledge, unless they have been given supervision or instruction concerning use of the appliance by a person responsible for their safety.
- Children should be supervised to ensure that they do not play with the appliance.
- The temperature of accessible surfaces may be high when the appliance is operating.
- Never leave an appliance unattended while in use.
- Do not use an appliance for any purpose other than its intended use.
- Do not place an appliance on or near a hot gas flame, electric element or on a heated oven.
- Do not place on top of any other appliance.
- Do not let the power cord of an appliance hang over the edge of a table or bench top or touch any hot surface.
- Do not operate any electrical appliance with a damaged cord or after the appliance has been damaged in any manner. If damage is suspected, return the appliance to the nearest Sunbeam Appointed Service Centre for examination, repair or adjustment.
- For additional protection, Sunbeam recommend the use of a residual current device (RCD) with a tripping current not exceeding 30mA in the electrical circuit supplying power to your appliances.
- Do not immerse the appliance in water or any other liquid unless recommended.
- Appliances are not intended to be operated by means of an external timer or separate remote control system.
- This appliance is intended to be used in household and similar applications such as: staff kitchen areas in shops, offices and other working environments; farm houses; by clients in hotels, motels and other residential type environments; bed and breakfast type environments.
If you have any concerns regarding the performance and use of your appliance, please visit www.sunbeam.com.au or contact the Sunbeam Consumer Service Line.
Ensure the above safety precautions are understood.
Features


Tempered Glass Lid
The glass lid allows you to view the food during slow cooking without lifting the lid, preventing the heat from escaping.
Non-slip feet
Keeps the unit secure on the bench top during use and prevents scratching of bench top surfaces.
Non-stick Aluminium Pan
The pan is to be used inside the unit for browning and slow cooker modes. There is no need to move the pan to the stovetop. The pan is non-stick and dishwasher safe.
Large 5.5 litre capacity
For cooking large family-sized meals.
Power Button
Press to turn the unit on and off.
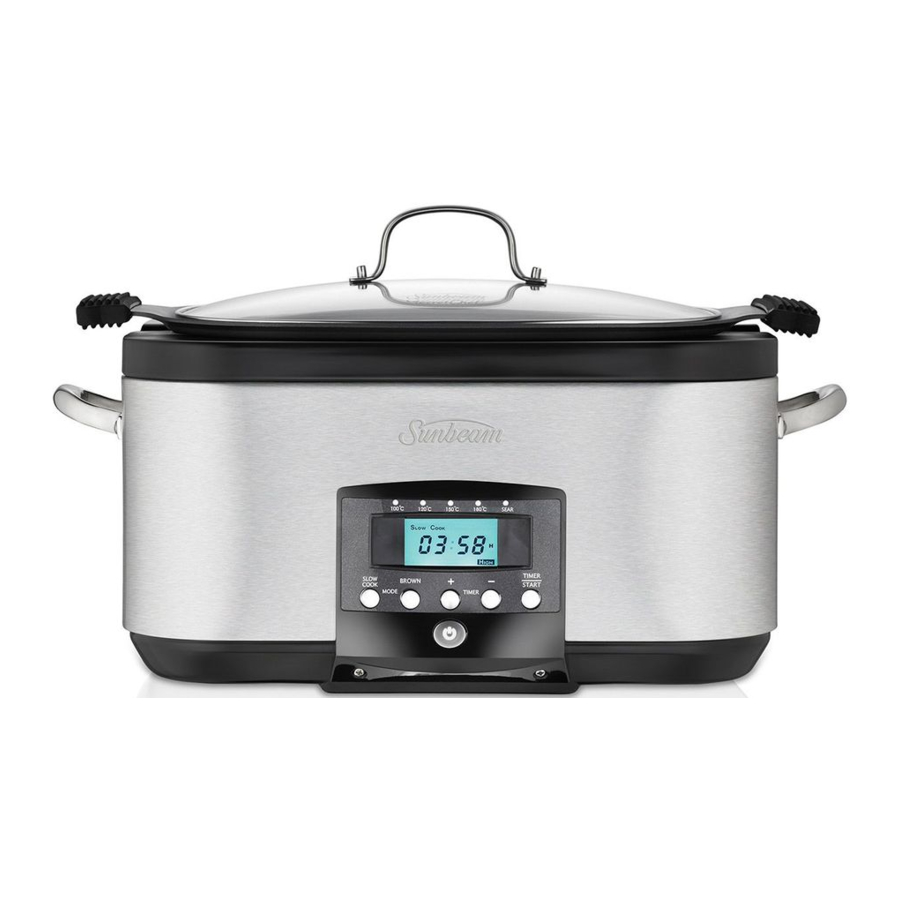
The Control Panel

The control panel on the SecretChef Sear and Slow Cooker is designed to ensure easy use and to make cooking a pleasure. Choose from the two cooking modes – Slow Cook or Browning. Adjust your temperature setting, adjust your timer setting and you're cooking.
- Browning mode cooking temperatures
The browning mode or frypan mode has five heat settings 100°C, 120°C, 150°C, 180°C and 'Sear'. A red light illuminates above the set temperature for the BROWN mode only. Scroll through the temperature settings available by pressing the BROWN button. - Slow Cook mode cooking temperatures
The Slow Cook mode has three convenient heat settings – LOW, HIGH and WARM. Scroll through the settings available by pressing the SLOW COOK button. - Slow Cook indicator
SLOW COOK will display in the LCD screen when the SLOW COOK mode is selected. - Brown indicator
BROWNING will display in the LCD screen when the BROWN mode is selected. - Ready indicator
In the BROWN mode, the pan needs to heat up to reach your desired selected temperature. When this temperature is reached READY will display in the LCD screen to show the pan is ready for use. - Timer display
Will show the remaining time in the cooking modes, or elapsed time in the KEEP WARM mode. - Mode buttons
Press either the SLOW COOK or the BROWN mode for your desired cooking style. - Timer buttons
Press + or – to change the cooking time. - Timer/ Start button
Press this button to START the selected cooking mode once all settings have been chosen. For the BROWN mode, once READY displays in the LCD screen to indicate your desired temperature has been reached, press START to start the countdown. - Power button
Press to turn your SecretChef ON or OFF. Always unplug your unit when cooking is finished.
Mode Settings
The SecretChef has two cooking modes, Slow Cook or Browning.
Slow Cooking
Slow Cooking achieves flavour filled meals, and tender moist meats cooked to perfection. As the name suggests, meals are cooked over a long period of time. Slow Cooking provides healthy, simple and economical cooking. It requires minimal supervision, short preparation times and quick clean up times. The Slow Cook mode has three convenient heat settings – LOW, HIGH and WARM. Scroll through the settings available by pressing the SLOW COOK button.
LOW Setting. This is suitable for simmering and slow cooking.
HIGH Setting. This is for faster cooking. Typically 1 hour on HIGH = approximately 2 - 2.5 hours on LOW.
KEEP WARM Setting. When cooking time is completed, the SecretChef automatically switches to the Keep Warm setting to prevent overcooking and to keep your cooked food warm until serving - perfect for busy families, those on the run and those who need flexible meal times. This setting is not hot enough to cook, and should only be used to keep hot, cooked food warm for serving.
Browning
The Browning or Frypan mode has five heat settings 100°C, 120°C, 150°C, 180°C and 'Sear', making the SecretChef an ideal everyday multifunctional cooker. On the browning mode you can change the heat setting depending on the food that you are cooking, and your style of cooking. Use it to boil, shallow fry, stir fry, sauté and of course even sear. Browning meat prior to slow cooking not only gives your food great colour, it also seals in the juices and flavours and keeps the meat tender.
Scroll through the heat settings available by pressing the BROWN button.
Using your SecretChef in the Slow Cook mode
- Before using your SecretChef for the first time, remove the aluminium pan and lid and wash them in warm soapy water.
- Place the SecretChef on a flat, level surface.
- Plug in the unit. The indicator lights and the LCD screen will illuminate for 3 seconds and then the unit will switch to stand-by mode. The display will show 00:00 and the LCD back light will turn off.
- Press the Power button to turn on the unit. The LCD will illuminate indicating that the unit is ready for you to enter your desired settings.
Note: If you do not press any buttons within 1 minute the unit will sound 5 short beeps 3 times and will enter the stand-by mode again. The display will show 00:00 and the LCD back light will turn off. - Select your desired slow cooking heat setting by pressing the SLOW COOK button according to the following chart.
| SLOW COOK BUTTON | HEAT | DEFAULT TIME | MIN TIME | MAX TIME |
| Press Once | HIGH | 04:00 | 02:00 | 08:00 |
| Press Twice | LOW | 08:00 | 04:00 | 20:00 |
| Press 3 Times | KEEP WARM | NO TIME SETTING - MAX 08:00 | ||
- Press the Timer + or – buttons to set your desired cooking time. Each button press will adjust the time by 30 minutes.
- Once you have selected the desired cooking HEAT setting and TIME, press the START button to activate the program. During the cooking process the SLOW COOK indicator will be shown on the LCD screen, along with the selected HEAT setting and remaining cooking TIME.
Note: If you do not press the START button within 1 minute the unit will sound 5 short beeps 3 times and will enter the stand-by mode again. The display will show 00:00 and the LCD back light will turn off. - It's a good idea to monitor your cooking results throughout the cooking cycle by viewing through the lid rather than removing the lid (causing heat loss). Different cuts and thickness of meats and vegetables can vary cooking times.
- After the set time has elapsed, the LCD screen will display 00:00 and the unit will sound 5 long beeps before automatically switching to the KEEP WARM mode.
Note: The unit will not switch to KEEP WARM mode if the maximum slow cooking time of 20 hours was selected. The maximum combined COOK/ KEEP WARM cooking time is 20 hours. For example, if the SLOW COOK time selected was 16 hours, the maximum KEEP WARM time would be 4 hours.
Using your SecretChef in the Browning mode
- Before using your SecretChef for the first time, remove the aluminium pan and lid and wash them in warm soapy water
- Place the SecretChef on a flat, level surface.
- Plug in the unit. The indicator lights and the LCD screen will illuminate for 3 seconds and then the unit will switch to stand-by mode. The display will show 00:00 and the LCD back light will turn off.
- Press the Power button to turn on the unit. The LCD will illuminate indicating that the unit is ready for you to enter your desired settings.
Note: If you do not press any buttons within 1 minute the unit will sound 5 short beeps 3 times and will enter the stand-by mode again. The display will show 00:00 and the LCD back light will turn off. - Press the BROWN button once and the LCD will display BROWNING in the upper right corner. The red light above 100°C will illuminate. Continue to press the BROWN button to cycle through all the temperature settings.
- The LCD timer will show the default time of 00:20 (20 minutes). Press the Timer + or – buttons to adjust your cooking time to your desired setting. Each button press will adjust the time by 1 minute. Holding the + or – buttons for greater than 1 second will adjust the time in 10 minute increments.
Note: the minimum cooking time is 10 minutes, and the maximum cooking time is 2 hours. - When the selected temperature is reached, the READY indicator will show in the LCD screen.
- Once READY appears press START to begin the countdown TIMER. The READY indicator will turn off and the TIMER will start.
Note: As a safety measure, if the START button is not pressed after the PREHEAT has completed and the READY indicator appears in the LCD screen the unit will keep the current set temperature for 1 hour and will then switch to stand-by mode. - After the set time has elapsed, the LCD will display 00:00 and the unit will sound 5 long beeps before automatically switching to KEEP WARM mode.
Note: For better browning results, do not use the lid on the browning mode.
Power Interruption Protection
Your SecretChef has a 1 minute Power Interruption Protection that protects the program memory in the advent of power surges, or short term power failure (blackout). If there is a power interruption of not greater than 1 minute during your cooking, the machine retains the settings programmed into the control panel and will continue cooking when the power supply returns.
Care and Cleaning
Do not immerse the SecretChef housing in water or any other liquid.
Turn the SecretChef off and unplug from the wall outlet. Allow the unit to completely cool before cleaning.
Do not use the aluminium pan on the stovetop, inside a microwave oven or inside an oven. Use the aluminium pan only inside the SecretChef unit.
Do not use metal knives or utensils on the pan surface.
Wash the aluminium pan and lid in hot soapy water. To remove food that is cooked onto the bottom, soak the pan in warm water before cleaning. Rinse well and dry. The aluminium cooking pan and the lid are dishwasher safe for added convenience.
Wipe the exterior of the SecretChef with a damp cloth and polish dry. DO NOT use harsh abrasives, scourers or chemicals to clean any part of the SecretChef as these will damage the surfaces.
Hints and Tips
- When in Browning mode, always remember to press START after the pan has pre-heated and displays "READY", even if you don't need the timer.
- The Browning mode assists you in your slow cooking by allowing you to sear meat and vegetables at the beginning, but also allows you to thicken sauces and make gravies at the end.
- To thicken a casserole at the end of cooking, set the Browning mode to SEAR and stir through a little cornflour combine with water. Allow to simmer, stirring until thickened.
- Your SecretChef is not only great for soups, casseroles, curries, stews and roasts, but also great for breakfasts, puddings, desserts and most of your other favourite recipes.
- To boil water, set your SecretChef to 120°C with the lid on.
- Slow Cooking is perfect for the cheaper, tough cuts of meats, as the lengthy cooking process tenderises these cuts.
- When in Slow Cooker mode, the SecretChef does not recover lost heat quickly. So only lift the lid if necessary or if instructed to do so in the recipe.
- It's a good idea to monitor your cooking results throughout the cooking cycle by viewing through the lid rather than removing the lid (causing heat loss). Different cuts and thickness of meats and vegetables can vary cooking times.
- It is not uncommon for meat to cook faster than root vegetables. It is for this reason that we recommend chopping all vegetables to a similar small size. Meat can be cut into larger chunks because if it is cut too small, it will break up once cooked and tenderised.
- Slow Cooking prevents evaporation, resulting in the flavours and juices being maintained. Keep this in mind when creating your own recipes, as you may not require as much liquid as you would when using other cooking methods.
- Don't be scared to experiment with your SecretChef. With your SecretChef, there are a myriad of possibilities.
Roasts
- With your SecretChef, you can roast a whole chicken as well as whole pieces of meat, such as lamb, beef, veal and pork.
- Roasts can be cooked without the addition of liquid as they will release juices while cooking. These juices are great to make sauces and gravies.
- To make a sauce or gravy with the roast juices, remove the meat and cover with foil to keep warm. Set the Browning mode to SEAR and stir through some cornflour mixed with a little water. Allow to simmer, stirring until thickened. You can also add some stock or wine to stretch the gravy a little further and add great flavour.
- Do not use oven bags in the SecretChef.
- Roasting in the Slow Cooker will not brown your meat or chicken, as roasting in an oven does. If you want your roast to be golden, we recommend using the browning mode to sear the meat first.
- Leftover roast makes great sandwiches the next day. Try the caramelised onion or tomato chutney recipe and make burgers with the leftovers!
Roasting Meat (such as beef, lamb and veal)
To get the best roasting results, we recommend sealing your meat first. Trim away any excess fat. Rub the meat with a little oil and season with salt and pepper (or any other flavourings or spices you wish to use). Set the Browning mode to SEAR, and when pre-heated, cook meat for a few minutes on each side. Set the Slow Cooker mode to LOW or HIGH and cook for the appropriate time.
Approximate cooking times for well done:
LOW 2 hours per 500g
HIGH 1 hour per 500g
Note: Unlike roasting in your oven, meat cooked to well done in the slow cooker will still be very tender.
Roasting Chicken
Wash the chicken in cold running water and pat dry with an absorbent paper towel. Rub with a little olive oil and season all over with salt and pepper (or any other spices you wish). Set the Browning mode to SEAR, and when pre-heated, cook the chicken for a few minutes on each side until golden. Set the Slow Cooker mode to LOW or HIGH and cook for the appropriate time. Approximate cooking times:
LOW 2 hours per 500g
HIGH 1 hour per 500g
Note: Ensure chicken is cooked all the way through by inserting a skewer or knife into the meatiest part of the chicken. The juices will be clear when the chicken is cooked through. If the juices are pink, a little more cooking is required.
Stocks
- Many slow cooker recipes use stock as part of the ingredients. A good stock is also the base of a great soup. Stocks can be bought at supermarkets; however, nothing beats the flavour of a homemade stock.
- Making your own stock is a great way to use up bones or carcasses that would normally be thrown away.
- There is no need to peel your vegetables when making a stock. Just ensure you wash them well before use.
- Fresh made stock will keep in the refrigerator for up to 4 days, but can be frozen for up to 3 months.
- Always label and date your stock before storing. It's a good idea to freeze stock in portioned sizes. So for example if you generally use stocks in stews, casseroles, curries etc, then freeze your stock in 1 cup portions. If you tend to use your stock more for gravies and sauces, then freeze it in smaller ¼ cup portions or even in ice cube trays, so that you don't need to defrost large quantities at a time.
- To remove the excess fat, place the stock in the fridge overnight, then skim the solidified fat from the surface.

Documents / ResourcesDownload manual
Here you can download full pdf version of manual, it may contain additional safety instructions, warranty information, FCC rules, etc.
Download Sunbeam SecretChef HP8555 - All-in-One Sear and Slow Cooker 5.5L Manual
Advertisement


Need help?
Do you have a question about the SecretChef HP8555 and is the answer not in the manual?
Questions and answers