Advertisement
Available languages
Available languages
Pico Line-Powered
Wireless Control
120 – 277 V~
50/60 Hz 0.5 W
Model
Numbers*:
PJL-2B
PJL-2BRL
PJL-3BRL
* Model numbers are TAA compliant
Note: Wallplates are sold separately
Important Notes
Please Read Before Installing
1. This install guide provides simple setup instructions for directly
connecting to individual wireless controls. When using your Pico
line-powered wireless control with a Lutron system, please refer to
the system setup guide. If you no longer have your system setup
guide, please download the latest version by following the links at
www.lutron.com
2. The Pico wireless control must be paired with wireless dimmer(s) /
switch(es) / control(s) or programmed to a Lutron system before it
can communicate.
3. Refer to product specification submittals at www.lutron.com for
system specifications on the maximum number of configurable Pico
wireless controls per device / system.
4. The range of the Pico wireless control is 30 ft (9 m) through walls
and 60 ft (18 m) line-of-sight. Performance is highly dependent on a
variety of complex factors, such as:
• Distance between system components
• Geometry of the building structure
• Construction of walls separating system components
• Electrical equipment located near system components
5. Product does not contain breakable fins. No additional work/
derating required when installed next to other wiring devices in a
multi-gang wallbox.
6. Clean Pico wireless control with a soft damp cloth only.
7. DO NOT paint the Pico wireless control.
8. Install in accordance with all national and local electrical codes.
FCC / IC Information
This device complies with part 15 of the FCC Rules and Industry Canada license-exempt RSS
standard(s). Operation is subject to the following two conditions:
(1) This device may not cause interference, and
(2) this device must accept any interference, including interference that may cause undesired
operation. Modifications not expressly approved by Lutron Electronics Co., Inc. could void the user's
authority to operate this equipment.
Note: This equipment has been tested and found to comply with the limits for a Class B digital device,
pursuant to part 15 of the FCC Rules. These limits are designed to provide reasonable protection
against harmful interference in a residential installation. This equipment generates, uses and can
radiate radio frequency energy and, if not installed and used in accordance with the instructions, may
cause harmful interference to radio communications. However, there is no guarantee that interference
will not occur in a particular installation. If this equipment does cause harmful interference to radio
or television reception, which can be determined by turning the equipment off and on, the user is
encouraged to try to correct the interference by one or more of the following measures:
— Reorient or relocate the receiving antenna
— Increase the separation between the equipment and receiver
—
Connect the equipment into an outlet on a circuit different from that to which the receiver is
connected
— Consult the dealer or an experienced radio / TV technician for help
Lutron Electronics Co., Inc.
7200 Suter Road
Coopersburg, PA 18036-1299
Installation
English
1. Turn power off at circuit breaker.
WARNING: SHOCK HAZARD
May result in serious injury or death. Turn off power at circuit breaker
or fuse before installing.
2. Connect the wireless control.
Line/Hot
Neutral
P/N 040475 Rev. A
Ground
05/2023
3. Mount the wireless control using the provided screws.
4. To attach the wallplate (sold separately), first attach the adapter to
the wireless control using the screws provided and then snap on
the wallplate.
NOTE: If you installed the dimmer next to other dimmers or
switches, you'll need to install a wallplate with the correct size/
number of openings to accommodate all the devices.
5. Turn power on at circuit breaker.
Basic Set-Up
(for controlling Lutron wireless controls only)
Please see Important Note #1.
1. Press and hold the dimmer / switch Tap button (Figure 1) or PowPak
Module On / Off button (Figure 2) for approximately 6 seconds. Once
the LED(s) start to blink slowly, release the Tap or On / Off button.
2. Press and hold the Off button on the Pico wireless control (Figure 3)
for approximately 6 seconds.
Figure 1
Figure 2
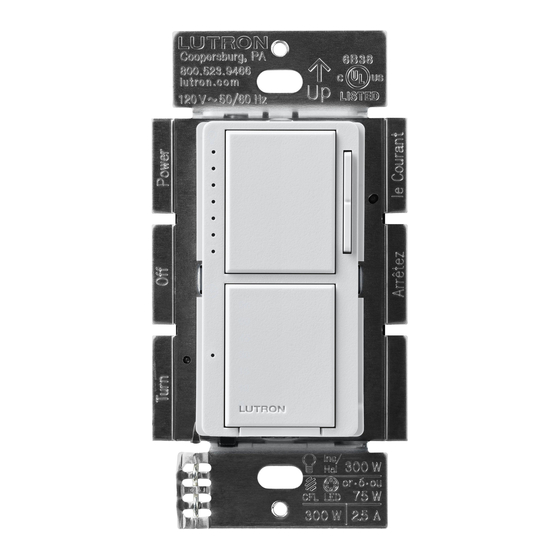
Maestro Wireless
PowPak Module
Dimmer / Switch
3. Once the dimmer / switch pairs with the Pico wireless control, the
LED(s) on the dimmer / switch / PowPak and the load will flash
3 times and they will exit Set-Up mode.
4. Repeat steps 1– 3 to pair multiple Pico wireless controls with a
single dimmer / switch / PowPak. Repeat steps 1– 3 to pair a single
Pico wireless control with multiple dimmers / switches.
5. Pressing the Preset button (-3BRL models only) on a Pico wireless
control will cause all paired dimmers to go to the favorite light
settings. Switches can be configured to turn On or Off. To save a
favorite light setting, adjust all the dimmers/switches controlled by
a Pico wireless control to the desired light setting. Then press and
hold the Preset button on the Pico wireless control for 6 seconds
until all LEDs on the dimmers/switches flash several times.
The Lutron logo, Lutron, Maestro Wireless, Pico and PowPak are trademarks or registered trademarks of Lutron Electronics Co., Inc. in the US and/or other countries.
©2023 Lutron Electronics Co., Inc.
Operation
Indicator LED
Flashes to indicate a button
press or when unit is in
programming mode.
Preset Button
(3BRL model only)
Tap once:
Devices go to
'snap'
preset levels.
Press and hold:
To save new preset level
or position, press and hold
for 6 seconds.
Un-pairing a Pico Wireless Control
To un-pair a previously paired Pico wireless control from your
system, perform the following steps:
1. Quickly tap the Off button on the Pico wireless control (Figure 3)
3 times and continue to hold it for 6 seconds after the third tap.
2. Once the indicator LED comes on solid, quickly tap the Off button
Figure 3
3 times. Do not continue to hold on the third tap.
3. To test that the Pico wireless control has been successfully
removed from the system, press the On button and verify that the
Pico wireless control no longer controls the load.
NOTE: This will remove all dimmers / switches with which it was
previously paired.
Pico Line-Powered
Troubleshooting
Wireless Control
Symptoms
Light does not respond to Pico
wireless control.
When in set-up mode, the LEDs on the
dimmer / switch flash when trying to set up
with the Pico wireless control.
Indicator LED does not respond to
button presses.
Top Button
Lights brighten to full intensity.
Raise Button (2BRL & 3BRL models only)
Lights increase in intensity.
Lower Button (2BRL & 3BRL models only)
Lights decrease in intensity.
Bottom Button
Lights dim to off.
Customer Assistance
U.S.A., Canada, Caribbean: 1.844.LUTRON1
Mexico: +1.888.235.2910
Others: +1.610.282.6701
For questions concerning the installation or operation of this product,
call Lutron Customer Assistance. Please provide exact model number
when calling.
World Headquarters
TEL: +1.610.282.3800
FAX: +1.610.282.1243
Possible Causes
• The dimmer / switch failed to pair with Pico wireless control; see Basic Set-Up.
• The dimmer / switch has already received and responded to a command or is already at the light
setting the Pico wireless control is sending.
• The Pico wireless control is outside the 30 ft (9 m) operating range.
• The maximum number of Pico wireless controls has been paired with the dimmer / switch. More
Pico wireless controls cannot be added. See Un-pairing a Pico Wireless Control.
• The Pico wireless control is not getting power; verify that the black and white wires are properly
connected to line-voltage, that power is turned on, and that the device is not wired in series with
another device (e.g., light fixture, light switch, dimmer).
Screen
www.lutron.com/support
®
Advertisement
Table of Contents

Related Manuals for Lutron Electronics Pico PJL-2B


Summary of Contents for Lutron Electronics Pico PJL-2B
- Page 1 LEDs on the dimmers/switches flash several times. Lutron Electronics Co., Inc. The Lutron logo, Lutron, Maestro Wireless, Pico and PowPak are trademarks or registered trademarks of Lutron Electronics Co., Inc. in the US and/or other countries. 7200 Suter Road ©2023 Lutron Electronics Co., Inc.
- Page 2 / commutateurs clignotent plusieurs fois. Lutron Electronics Co., Inc. Le logo Lutron, Lutron, Maestro Wireless, Pico et PowPak sont des marques commerciales ou déposées de Lutron Electronics Co., Inc. aux États-Unis et / ou dans d’autres pays. 7200 Suter Road ©2023 Lutron Electronics Co., Inc.
- Page 3 Lutron Electronics Co., Inc. El logotipo de Lutron, Lutron, Maestro Wireless, Pico y PowPak son marcas comerciales o marcas comerciales registradas de Lutron Electronics Co., Inc. en E.U.A. y / o en otros países. 7200 Suter Road ©2023 Lutron Electronics Co., Inc.
Need help?
Do you have a question about the Pico PJL-2B and is the answer not in the manual?
Questions and answers